有没有人内置购买后,恢复成功的代码(in-app purchases)已解决
我的解决方案:
免责申明(必读!):本博客提供的所有教程的翻译原稿均来自于互联网,仅供学习交流之用,切勿进行商业传播。同时,转载时不要移除本申明。如产生任何纠纷,均与本博客所有人、发表该翻译稿之人无任何关系。谢谢合作!
原文链接地址:http://www.raywenderlich.com/2797/introduction-to-in-app-purchases
源代码下载:http://download.csdn.net/download/x1135768777/4223213
教程截图:
成为ios开发者最大的好处就是,你编写的应用程序会有很多方式可以赚钱。比如,收费版,免费挂广告版,还有就是程序内置购买。
程序内置购买会让你爱不释手,主要有以下原因:
- 除了程序本身的下载收费以外,你还可以赚更多的钱。一些用户愿意为那些额外的功能花费大量的金钱。
- 你可以免费发布你的程序(这样的话,用户就可以任意下载了),如果他们喜欢这个程序的话,那么就会有人愿意购买额外功能。
- 在你做完一个程序的时候,你可以在以后的发布版中添加更多的功能,然后这些功能可以用内置购买,这样的话,你就不用再重新制作另一个程序了。
我最近正在制作的一个程序里面,我就决定先把程序免费(其中只包含一个故事),然后把更多的故事放在in-app purchase里面。
在这篇教程里面,你将会学到如何使用程序内置付费来解琐本地程序里面的内容,我将向你展示一些技巧,用来应付使用程序内置购买功能时的一些异步特性。请谨慎采纳这些建议,因为我的程序也还在开发之中,但是,随着我的知识的积累,我会逐步更新教程内容以确保不误人子弟。
这篇教程的前提条件你需要熟悉基本的ios编程概念,如果你还是一个ios开发新手,可以先参考这些教程。
In App Rage
那么,本教程将制作一个怎样的程序呢?好吧,在揭晓答案之前,我先介绍一些背景情况。。。
最近,我对 rage comics这玩意儿非常着迷。如果你以前从没听说过它,让我向你们介绍一下吧。它们实际上就是一些非常有趣的漫画,里面有些人非常搞笑和搞怪的人和事。
因此,这篇教程,我们想要做一个非常小巧的应用,叫做“In App Rage”,在这个程序里面,用户可以使用内置购买来获得一些漫画。但是,在我们开始编码之前,我们需要先用ios Developer Center和iTunes Connect来为本程序创建一个入口点。
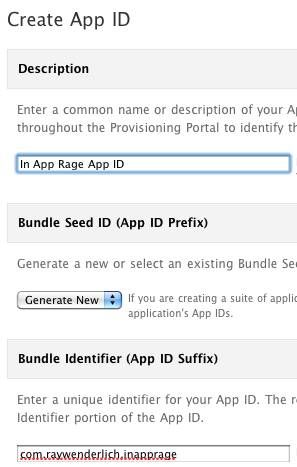
第一步,就是为这个程序创建一个App ID。所以,首先登录 iOS Developer Center,选择“App IDs”标签而,然后点击“New App ID”,如下图所示:
你可以按照下面的截图,根据提示 输入描述和bundle identifier:
注意,你不能直接使用上面这个bundle identifier,你需要定义你自己的独一无二的identifier,通常的做法是把你的域名反过来写就行了,然后你也可以基于其它规则来制作啦。
当你完成的时候,点击Submit。好,恭喜你,你现在有一个新的App ID了!现在,你将使用这个ID在iTunes Connect里面来创建一个新的应用了。
首先登录 iTunes Connect,点击“Manage Your Applications”,然后选择“Add New App”,并输入依次App Name,SKU number,同时选择你之前刚刚创建好的Bundle ID。
你可能不得不在你的应用程序名字上面下点功夫,因为,app名字必须是唯一的,而且我们之前为它添加了一个入口点(entry)。
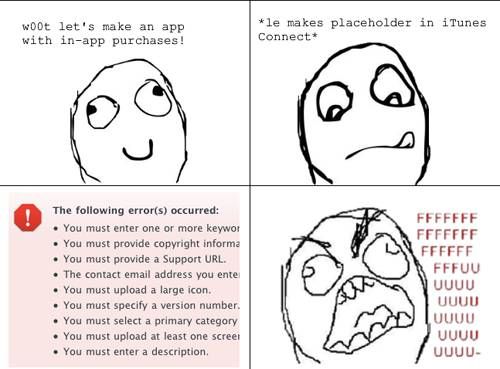
接下来的两页将要求你输入你的应用程序的一些信息。现在,可以随便填一些内容,因为后面还有机会再更改。但是,每个带×号的文本框你都必须要填好(包括程序截图,甚至你现在还没有截图,呵呵,造一个吧)
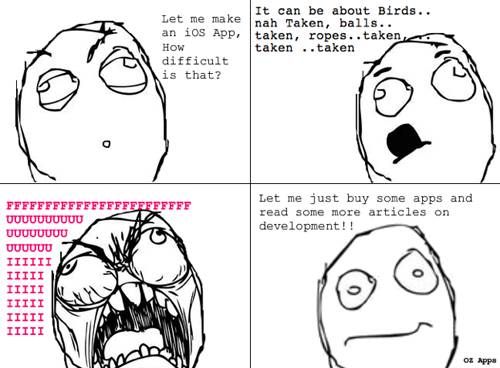
好吧,让你们看看我对于这个过程的感觉吧,请看下图:
如果你像上面一样出错了,只需要随便填写一些数据就可以了。你可以使用任何图标或者截屏,只要大小合适就行了。一旦你把所有的错误都解决完以后,你就大功告成啦,oh yeah!
管理 In App Purchases
在你开始编写in app purchase代码之前,你需要为此创建一个桩应用(placeholder app),同时,你必须在iTunes Connet里面设置好。所以,现在你拥有一个桩应用了,你现在只需要点击“Manage In App Purchases”按钮就行了,如下图所示:
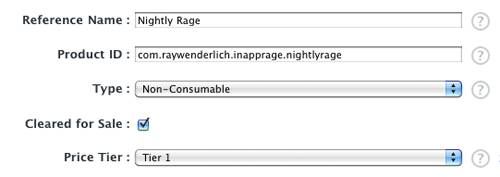
然后,点击左上角的“Create New”,然后按照下图所示,填写相应的信息:
让我们来解释下这几个文本域的含义吧:
- Reference Name: 这个名字就是在使用in-app purchase的时候会显示在iTunes Connect里面。这个名字你可以随便取,因为在你的程序里面是看不到它滴。
- Product ID: 在苹果的开发文档里面,这个也叫做“product identifier”,这是一个唯一的字符串,用来标识你的in-app purchase。通常的做法是,使用你的bundle id,然后在最后加一个唯一的字符串。
- Type: 你可以选择non-consumable(购买一次,永久使用),comsumable(购买一次,使用一次),或者subscription(自动续款)。本教程中,我们采用non-consumables。
- Cleared for Sale: 当应用程序上架的时候,程序内置购买功能购买记录清空。
- Price Tier: 设置程序内置购买的价钱。
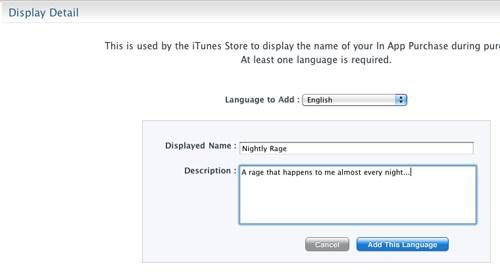
在你完成上面的设置以后,往下滚动鼠标,然后在Display Detail section部分添加一个English entry,如下图所示:
当你的程序的内置购买功能弄好之后,你查询App Store的时候会返回你刚刚设置的信息。
你可能会奇怪,为什么我们要设置刚刚这一步(毕竟,你还是可以直接硬编码在你的程序之中啊!)好吧,很明显Apple想知道你定的价钱嘛。同时,在App Store里面会根据你填写的这些东西来显示一些信息,比如,内置付费应用排行榜。最后,如果你这一步设置了,你之后会变得很轻松。因为,它让你不用硬编码这些信息在你的代码之中。而且可以让你动态改变是允许内置购买还是禁止内置购买。
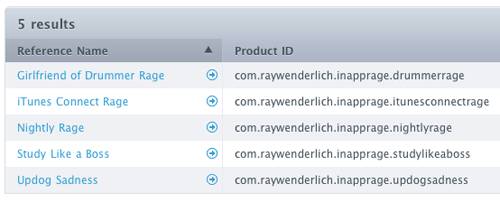
一旦你完成之后,保存entry,然后创建更多的实体(entry),和下面的截图效果类似。不要担心描述信息,我们并不会在本教程中使用它们。
你可能会注意到,这个过程要花费您不少时间,我能够相像,当你的程序有很多内置购买功能的时候,这个创建过程会有多么的烦人!幸运的是,本教程我们体会不到,但是,如果你的教程真的遇到了这种情况,呵呵,可以留言给我抱怨一下吧!:)
Retrieving Product List(提取产品列表)
在你能让用户从你的程序里面购买任何东西之前,你必须向iTunes Connect发送一个查询请求来从服务器上提取所有可用的产品列表。
我们可以直接在view controller里面添加代码来实现之,但是那样扩展性太不好了,不利于重用。所以,我们将创建一个辅助类来管理所有与in-app purchase相关的内容,然后你就可以在你的其它程序里面重用了。
在从服务器上获得产品列表的同时,这个辅助类还会记录哪些产品被购买了,哪些还没有。它会为每一个已经购买过的产品创建一个identifier,然后把它存到NSUserDefaults里面去。
好了,让我们动手实验一下吧!打开XCode,然后选择File\New Project,再选择 iOS\Application\Navigation-based Application,点击Choose。把工程命名为InAppRage,然后点击Save。
接下来,创建一个新的类来管理内置付费代码,命名为IAPHelper。首先,点击Classes分组,选择File\New File,然后是iOS\Cocoa Touch Class\Objective-C class,确保Subclass of NSObject被选中,然后点击Next。把这个文件命名为IAPHelper.m,通过确保“Also create IAPHelper.h” 被选中,然后点击Finish。
我们首先往IAPHelper.m里面添加一个方法来从iTunes Connect里面提取产品列表,代码如下:
- (void)requestProducts {

    self.request = [[[SKProductsRequest alloc] initWithProductIdentifiers:_productIdentifiers] autorelease];
    _request.delegate = self;
    [_request start];

}
这个方法假设我们已经定义了一个实例变量,叫做 _productIdentifiers ,它包含了一串产品标识符,之后用来从iTunes Connect里面查询产品滴。(比如com.raywenderlich.inapprage.drummerrage)
它然后创建了一个SKProductsRequest实例,那是苹果公司写的一个类,它里面包含从iTunes Connect里面提取信息的代码。使用此类灰常easy,你只需要给它一个delegate(它必须符合SKProductsRequestDelegate 协议),然后就可以调用start方法了。
我们设置IAPHelper类本身作为delegate,那就意味着此类会收到一个回调函数,此函数(productsRequest:didReceiveResponse)会返回产品列表。
Update: Jerry 在论坛里面指出,SKProductsRequestDelegate 协议是从SKRequestDelegate派生而来滴,而SKRequestDelegate协议有一个方法,叫做 request:didFailWithError:。此方法会在失败的时候调用,如果你喜欢的话,你可以使用此方法来代码后面的timeout方法。感谢Jerry!
好吧,接下来让我们来实现productsRequest:didReceiveResponse 方法吧,具体如下所示:
- (void)productsRequest:(SKProductsRequest *)request didReceiveResponse:(SKProductsResponse *)response {

    NSLog(@"Received products results...");
    self.products = response.products;
    self.request = nil;

    [[NSNotificationCenter defaultCenter] postNotificationName:kProductsLoadedNotification object:_products];
}
这个非常简单。它首先保存返回的产品列表(是一个SKProducts的数组),然后把request设置为nil(为了释放内存),然后发出一个通知,任何侦听这个通知的对象都会收到这个消息。
接下来添加初始化代码:
- (id)initWithProductIdentifiers:(NSSet *)productIdentifiers {
    if ((self = [super init])) {

        // Store product identifiers
        _productIdentifiers = [productIdentifiers retain];

        // Check for previously purchased products
        NSMutableSet * purchasedProducts = [NSMutableSet set];
        for (NSString * productIdentifier in _productIdentifiers) {
            BOOL productPurchased = [[NSUserDefaults standardUserDefaults] boolForKey:productIdentifier];
            if (productPurchased) {
                [purchasedProducts addObject:productIdentifier];
                NSLog(@"Previously purchased: %@", productIdentifier);
            }
            NSLog(@"Not purchased: %@", productIdentifier);
        }
        self.purchasedProducts = purchasedProducts;

    }
    return self;
}
这个初始化代码将检测哪些产品已经被购买,哪些还没有。通过查询NSUserDefaults可以知道,然后再建立一个适当的数据结构。
好了,现在,我们已经见过最重要的代码了。接下来,我们在头文件中添加一些声明。首先,打开 IAPHelper.h,并作如下修改:
#import <Foundation/Foundation.h>
#import "StoreKit/StoreKit.h"

#define kProductsLoadedNotification         @"ProductsLoaded"

@interface IAPHelper : NSObject <SKProductsRequestDelegate> {
    NSSet * _productIdentifiers;
    NSArray * _products;
    NSMutableSet * _purchasedProducts;
    SKProductsRequest * _request;
}

@property (retain) NSSet *productIdentifiers;
@property (retain) NSArray * products;
@property (retain) NSMutableSet *purchasedProducts;
@property (retain) SKProductsRequest *request;

- (void)requestProducts;
- (id)initWithProductIdentifiers:(NSSet *)productIdentifiers;

@end
这个简单地导入StoreKit 头文件,然后定义一些实例变量、函数和通知的名字。
接下来,在IAPHelper.m里面添加synthesize 代码,以后内存释放代码,如下所示:
// Under @implementation
@synthesize productIdentifiers = _productIdentifiers;
@synthesize products = _products;
@synthesize purchasedProducts = _purchasedProducts;
@synthesize request = _request;

// In dealloc
- (void)dealloc
{
    [_productIdentifiers release];
    _productIdentifiers = nil;
    [_products release];
    _products = nil;
    [_purchasedProducts release];
    _purchasedProducts = nil;
    [_request release];
    _request = nil;
    [super dealloc];
}
最后一步,你需要添加StoreKit框架。右键点击Frameworks文件夹,然后点Add\Existing Frameworks ,然后选择 StoreKit.framework。然后选择Build\Build 编译一下,编译完之后,你的代码应该是没有错误的。(此方法在Xcode4.0以上不适用。4.0需要点击工程文件名,然后右键target,然后在build phase里面添加框架)
Subclassing for Your App
这里将创建一个IAPHelper类,这样以后你在你的程序里面只需要继承一下它,然后指定你的产品标识符(product identifier)就可以啦。许多人给我提建议,说可以从WEB服务器上把产品标识符以及其它相关信息全部弄下来,然后,当你的应用程序需要更新的时候,你就可以动态添加新的in-app purchase了。
这个提议非常好,但是,为了保持本教程的简单性,我这里就采用了硬编码的方式。
右键选中Classes 分组,然后选择File\New File,再选择 iOS\Cocoa Touch Class\Objective-C class,确保Subclass of NSObject 被复选中,然后点击Next。把这个文件命名为InAppRageIAPHelper.M,同时确保 “Also create InAppRageIAPHelper.h” 被复选中,然后点击Finish。
然后,把InAppRageIAPHelper.h 替换成下列代码:
#import <Foundation/Foundation.h>
#import "IAPHelper.h"

@interface InAppRageIAPHelper : IAPHelper {

}

+ (InAppRageIAPHelper *) sharedHelper;

@end
这里把InAppRageIAPHelper类定义为IAPHelper类的子类,然后创建了一个静态方法用来创建些帮助类的单例。
接下来,把InAppRageIAPHelper.m替换成下面的代码:
#import "InAppRageIAPHelper.h"

@implementation InAppRageIAPHelper

static InAppRageIAPHelper * _sharedHelper;

+ (InAppRageIAPHelper *) sharedHelper {

    if (_sharedHelper != nil) {
        return _sharedHelper;
    }
    _sharedHelper = [[InAppRageIAPHelper alloc] init];
    return _sharedHelper;

}

- (id)init {

    NSSet *productIdentifiers = [NSSet setWithObjects:
        @"com.raywenderlich.inapprage.drummerrage",
        @"com.raywenderlich.inapprage.itunesconnectrage",
        @"com.raywenderlich.inapprage.nightlyrage",
        @"com.raywenderlich.inapprage.studylikeaboss",
        @"com.raywenderlich.inapprage.updogsadness",
        nil];

    if ((self = [super initWithProductIdentifiers:productIdentifiers])) {

    }
    return self;

}

@end
第一个sharedHelper方法是为了使InAppRageIAPHelper类变成一个单例类。注意,这种实现单例的方式并不是线程安全的,但是,对于本应用来说完全足够了,因为我们只有一个主线程。
接下来,我们硬编码了一组产品标识符的字符串数组,然后调用了基类的初始化方式。注意,我们在这里的字符串名字必须保持和之前在iTunes Connect里面定义的名称要一致。
然后选择Build\Build,保证没有错误再继续哦。
添加帮助类代码
我们差不多完成了我们的帮助类了,但是,在调用这个类的时候会有两个问题,我们接下来会讨论解决办法。
第一个问题就是,这段代码在没有网络连接的情况下是跑不起来滴。所以,我们在使用之前,需要检查是否有网络。
第二个问题,加载产品列表可以会耗费一定的时间,所以,我们需要让用户知道我们在加载产品列表,而不是神马都不显示,那样用户会以为程序出问题了。我们只需要简单的显示一个activity indicator就可以啦。
关于这两个问题,我们都可以自己动手来解决,但是,你为什么要重新发明轮子呢?(译者:工作中,遇到任何“问题”的时候,这里的“问题”,我指的是有点难度的问题,或者自己一时想不清楚的问题,不要急着动手编码,你还没想清楚呢!瞎编码什么呀!不妨google一下,你会有意想不到的收获。当然,这里我并不是鼓励大家不动脑筋,而是,有时候,我们程序员需要一种“懒”。)苹果已经为我们写好了一个检测网络是否可用的代码,叫做 Reachability class,而 Matej Bukovinski则为我们写了一个非常好用的指示器类 reusable progress indicator。你完全可以重用他们,而不要去重新发明轮子。
所以,尽管去下载这些源代码吧,当然,你也可以直接从本教程的源码中获得上面提到的源码。
一旦你下载完了这些文件,直接把MBProgressHUD.h/m 和 Reachability.h/m拖到你的项目的Classes分组下面就可以啦。同时确保 “Copy items into destination group’s folder”被复选中,然后点击Add。
最后一步----你需要添加SystemConfiguration 类库,因为Reachability这个类依赖此类库。右键点击Frameworks文件夹,然后选择Add\Existing Frameworks,然后再从列表中选择SystemConfiguration.framework就可以啦。然后,编译,确保没有错误后再继续。
好了,现在我们得到所有的产品列表和价格了,现在让我们把它们整合起来。
显示产品列表
打开RootViewController.h ,然后做如下修改:
// Before @interface
#import "MBProgressHUD.h"

// Inside @interface
MBProgressHUD *_hud;

// After @interface
@property (retain) MBProgressHUD *hud;
上面只是简单的声明一些实例变量和定义MBProgressHUD 属性。
然后,打开RootViewController.m,并做如下修改:
// At top of file
#import "InAppRageIAPHelper.h"
#import "Reachability.h"

// Under @implementation
@synthesize hud = _hud;

// Uncomment viewDidLoad and add the following
self.title = @"In App Rage";

// Uncomment viewWillAppear and add the following
self.tableView.hidden = TRUE;

[[NSNotificationCenter defaultCenter] addObserver:self selector:@selector(productsLoaded:) name:kProductsLoadedNotification object:nil];

Reachability *reach = [Reachability reachabilityForInternetConnection];
NetworkStatus netStatus = [reach currentReachabilityStatus];
if (netStatus == NotReachable) {
    NSLog(@"No internet connection!");
} else {
    if ([InAppRageIAPHelper sharedHelper].products == nil) {

        [[InAppRageIAPHelper sharedHelper] requestProducts];
        self.hud = [MBProgressHUD showHUDAddedTo:self.navigationController.view animated:YES];
        _hud.labelText = @"Loading comics...";
        [self performSelector:@selector(timeout:) withObject:nil afterDelay:30.0];

    }
}
这里比较重要的代码在viewWillAppear里面。它首先设置table view默认情况下隐藏(table view在产品列表加载完之后会再重新显示滴)。然后,设置了一个通告,因为此类需要知道什么时候产品列表加载完了。
然后再使用Reachability 来检测网络是否可用。如果可用的话,它就调用IAPHelper的requestProducts 方法来下载之前填好的产品列表。
当产品列表在加载过程中的时候,我们用MBProgressHUD 显示一个“loading”界面。同时,我们还设置一个超时检测函数,当30秒过后,如果还没有加载完产品列表的话,我们就提示用户错误。
所以,接下来,让我们添加一些代码来处理通告消息,和超时处理函数。
- (void)dismissHUD:(id)arg {

    [MBProgressHUD hideHUDForView:self.navigationController.view animated:YES];
    self.hud = nil;

}

- (void)productsLoaded:(NSNotification *)notification {

    [NSObject cancelPreviousPerformRequestsWithTarget:self];
    [MBProgressHUD hideHUDForView:self.navigationController.view animated:YES];
    self.tableView.hidden = FALSE;

    [self.tableView reloadData];

}

- (void)timeout:(id)arg {

    _hud.labelText = @"Timeout!";
    _hud.detailsLabelText = @"Please try again later.";
    _hud.customView = [[[UIImageView alloc] initWithImage:[UIImage imageNamed:@"37x-Checkmark.jpg"]] autorelease];
    _hud.mode = MBProgressHUDModeCustomView;
    [self performSelector:@selector(dismissHUD:) withObject:nil afterDelay:3.0];

}
第一个函数(dismissHUD)只是一个辅助函数,用来隐藏加载面板的。
第二个方法(productsLoaded)是在kProductsLoadedNotification 通告消息到达的时候被触发的。它隐藏了加载面板,同时重新加载table view里面的东西,用来显示down下来的产品列表滴。
最后一个方法(timeout),更新HUD并显示一个超时的消息,然后让这个HUD过一段时间再消失。
最后,我们需要在 RootViewController.m里面再添加一些代码来完成table view的动作,代码如下:
// Replare return 0 in numberOfRowsInSection with the following
return [[InAppRageIAPHelper sharedHelper].products count];

// In cellForRowAtIndexPath, change cell style to "subtitle":
cell = [[[UITableViewCell alloc] initWithStyle:UITableViewCellStyleSubtitle reuseIdentifier:CellIdentifier] autorelease];

// In cellForRowAtIndexPath, under "Configure the cell"
SKProduct *product = [[InAppRageIAPHelper sharedHelper].products objectAtIndex:indexPath.row];

NSNumberFormatter *numberFormatter = [[NSNumberFormatter alloc] init];
[numberFormatter setFormatterBehavior:NSNumberFormatterBehavior10_4];
[numberFormatter setNumberStyle:NSNumberFormatterCurrencyStyle];
[numberFormatter setLocale:product.priceLocale];
NSString *formattedString = [numberFormatter stringFromNumber:product.price];

cell.textLabel.text = product.localizedTitle;
cell.detailTextLabel.text = formattedString;

if ([[InAppRageIAPHelper sharedHelper].purchasedProducts containsObject:product.productIdentifier]) {
    cell.accessoryType = UITableViewCellAccessoryCheckmark;
    cell.accessoryView = nil;
} else {
    UIButton *buyButton = [UIButton buttonWithType:UIButtonTypeRoundedRect];
    buyButton.frame = CGRectMake(0, 0, 72, 37);
    [buyButton setTitle:@"Buy" forState:UIControlStateNormal];
    buyButton.tag = indexPath.row;
    [buyButton addTarget:self action:@selector(buyButtonTapped:) forControlEvents:UIControlEventTouchUpInside];
    cell.accessoryType = UITableViewCellAccessoryNone;
    cell.accessoryView = buyButton;
}

// In viewDidUnload
self.hud = nil;

// In dealloc
[_hud release];
_hud = nil;
在这里,table view只是简单的显示IAPHelper单例里面的产品列表---这个列表我们是通过SKProductsRequest来获取的。
products数组里面的对象都是SKProduct的实例。它们包含了你在iTunes Connect里面设置的信息,比如title,description,price,etc.本教程中,table view只是简单的显示价格和标题。同时,我们还添加了一个“购买”按钮,现在这个“购买”还不起作用,因为我们还没有为它编码任何代码。
你现在差不多可以测试一下了,但是,还有最后一件步(而且是非常重要的一步!)。你需要设置bundle identifier。点击你的InAppRage-Info.plist并修改Bundle identifier来匹配你的ios Developer Center里面的那个,如下图所示:
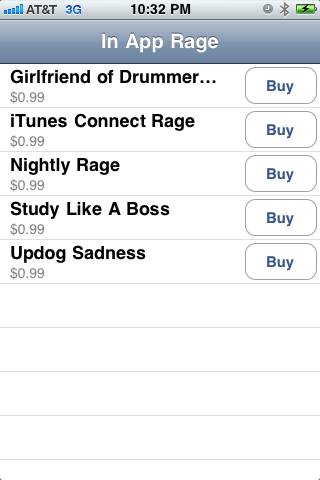
好了,差不多了!编译并运行你的程序(你需要编译到设备上面,模拟器上是不行的),然后你会看到一个loading indicator,之后,就会显示一系列产品列表,如下图所示:
给我钱看看
这是篇超级无敌又臭又长的教程,而且最重要的部分还是没有讲到---如何处理支付,如何赚钱,接下来,马上为您揭晓!
做支付基本的几个要领如下:
- 你创建一个SKPayment对象,然后指定用户想要购买的产品的标识符。然后把它加到支付队列(payment queue)里面去。
- StoreKit将会提醒用户“are you sure?”, 然后要求用户输入用户名和密码,然后支付,然后就会返回给你,支付成功还是失败。你也可以处理这种情况:用户已经为此付过费了,然后可以重新再下载,同时给出一个恰当的提示就可以了。
- 你设计一个特殊的对象来处理支付通告回调消息。这个对象需要处理支付内容下载(在我们这个教程没必要,因为我们是硬编码的),同时解琐程序里面的相关内容(我们可以通过使用NSUserDefaults类来处理,然后把值设置到purchasedProducts 里面就行啦)
不要担心---当你看到代码的时候,就会发现,其实这个过程是很easy滴。再强调一次,我们为了使IAPHelper尽可能可以重用,我们将在 IAPHelper.h里面做如下修改:
// Add two new notifications
#define kProductPurchasedNotification       @"ProductPurchased"
#define kProductPurchaseFailedNotification  @"ProductPurchaseFailed"

// Modify @interface to add the SKPaymentTransactionObserver protocol
@interface IAPHelper : NSObject <SKProductsRequestDelegate, SKPaymentTransactionObserver> {

// After @interface, add new method decl
- (void)buyProductIdentifier:(NSString *)productIdentifier;
然后打开IAPHelper.m 文件并作如下修改:
- (void)recordTransaction:(SKPaymentTransaction *)transaction {
    // Optional: Record the transaction on the server side...
}

- (void)provideContent:(NSString *)productIdentifier {

    NSLog(@"Toggling flag for: %@", productIdentifier);
    [[NSUserDefaults standardUserDefaults] setBool:TRUE forKey:productIdentifier];
    [[NSUserDefaults standardUserDefaults] synchronize];
    [_purchasedProducts addObject:productIdentifier];

    [[NSNotificationCenter defaultCenter] postNotificationName:kProductPurchasedNotification object:productIdentifier];

}

- (void)completeTransaction:(SKPaymentTransaction *)transaction {

    NSLog(@"completeTransaction...");

    [self recordTransaction: transaction];
    [self provideContent: transaction.payment.productIdentifier];
    [[SKPaymentQueue defaultQueue] finishTransaction: transaction];

}

- (void)restoreTransaction:(SKPaymentTransaction *)transaction {

    NSLog(@"restoreTransaction...");

    [self recordTransaction: transaction];
    [self provideContent: transaction.originalTransaction.payment.productIdentifier];
    [[SKPaymentQueue defaultQueue] finishTransaction: transaction];

}

- (void)failedTransaction:(SKPaymentTransaction *)transaction {

    if (transaction.error.code != SKErrorPaymentCancelled)
    {
        NSLog(@"Transaction error: %@", transaction.error.localizedDescription);
    }

    [[NSNotificationCenter defaultCenter] postNotificationName:kProductPurchaseFailedNotification object:transaction];

    [[SKPaymentQueue defaultQueue] finishTransaction: transaction];

}

- (void)paymentQueue:(SKPaymentQueue *)queue updatedTransactions:(NSArray *)transactions
{
    for (SKPaymentTransaction *transaction in transactions)
    {
        switch (transaction.transactionState)
        {
            case SKPaymentTransactionStatePurchased:
                [self completeTransaction:transaction];
                break;
            case SKPaymentTransactionStateFailed:
                [self failedTransaction:transaction];
                break;
            case SKPaymentTransactionStateRestored:
                [self restoreTransaction:transaction];
            default:
                break;
        }
    }
}

- (void)buyProductIdentifier:(NSString *)productIdentifier {

    NSLog(@"Buying %@...", productIdentifier);

    SKPayment *payment = [SKPayment paymentWithProductIdentifier:productIdentifier];
    [[SKPaymentQueue defaultQueue] addPayment:payment];

}
啊!好多代码啊,但是,其实都不难,我会一个个向大家解释清楚。
当table view里面的buy按照被按下去的时候,它将会调用buyProductIdentifier函数。然后会创建一个新的SKPayment 对象,并且把这个对象加载到队伍中去。我们将把此类当作delegate来接收支持事务的更新消息,所以,当支付完成 的时候或者失败的时候,paymentQueue:updatedTransactions 这个函数将会被调用。
如果支付成功了(或者取消了),那么provideContent 函数都会被调用。然后,重点来了---它会在NSUserDefaults里面设置一个标记,然后把这个事务加到队列中去。剩下的代码就是用来检测用户是否获得了相应的内容了。
假如支付失败了,也会相应的有一个失败的通告消息会到达的。
注意,这里recordTransaction 并没有任何实现。如果你可以的话,你可以去实现此方法,然后给WEB服务器发送一个消息,让服务器来做一些记录。个人来讲,我觉得实现这个方法没什么实际的用处。
同时,也请注意,这种方法保存支付信息是非常容易被黑的(你需要加密保存),但是,我并不是很关心这个东东,因为,任何想要破解我的程序的人,他们肯定是不愿意付钱的,in-app对他们来说没什么意义。
在我们使用这些代码之前,我们还需要在App Delegate里面添加一些东西,这样的话,当产品支付事务完成的时候,IAPHelper类就会得到相应的通千。所以,打开InAppRageAppDelegate.m并作如下修改:
// At top of file
#import "InAppRageIAPHelper.h"

// In application:didFinishLaunchingWithOptions
[[SKPaymentQueue defaultQueue] addTransactionObserver:[InAppRageIAPHelper sharedHelper]];
如果没有这句代码的话,那么 paymentQueue:updatedTransactions 这个函数将不会被调用,所以,造成记得要加上去!
最后一步,让我们回到table view上面来。打开RootViewController.m ,然后作如下修改:
// Add new method
- (IBAction)buyButtonTapped:(id)sender {

    UIButton *buyButton = (UIButton *)sender;
    SKProduct *product = [[InAppRageIAPHelper sharedHelper].products objectAtIndex:buyButton.tag];

    NSLog(@"Buying %@...", product.productIdentifier);
    [[InAppRageIAPHelper sharedHelper] buyProductIdentifier:product.productIdentifier];

    self.hud = [MBProgressHUD showHUDAddedTo:self.navigationController.view animated:YES];
    _hud.labelText = @"Buying fable...";
    [self performSelector:@selector(timeout:) withObject:nil afterDelay:60*5];

}

// Add inside viewWillAppear
[[NSNotificationCenter defaultCenter] addObserver:self selector:@selector(productPurchased:) name:kProductPurchasedNotification object:nil];
[[NSNotificationCenter defaultCenter] addObserver:self selector: @selector(productPurchaseFailed:) name:kProductPurchaseFailedNotification object: nil];

// Add new methods
- (void)productPurchased:(NSNotification *)notification {

    [NSObject cancelPreviousPerformRequestsWithTarget:self];
    [MBProgressHUD hideHUDForView:self.navigationController.view animated:YES];

    NSString *productIdentifier = (NSString *) notification.object;
    NSLog(@"Purchased: %@", productIdentifier);

    [self.tableView reloadData];

}

- (void)productPurchaseFailed:(NSNotification *)notification {

    [NSObject cancelPreviousPerformRequestsWithTarget:self];
    [MBProgressHUD hideHUDForView:self.navigationController.view animated:YES];

    SKPaymentTransaction * transaction = (SKPaymentTransaction *) notification.object;
    if (transaction.error.code != SKErrorPaymentCancelled) {
        UIAlertView *alert = [[[UIAlertView alloc] initWithTitle:@"Error!"
                                                         message:transaction.error.localizedDescription
                                                        delegate:nil
                                               cancelButtonTitle:nil
                                               otherButtonTitles:@"OK", nil] autorelease];

        [alert show];
    }

}
你就要成功啦,再坚持一小会儿!
In App Purchases, Accounts, and the Sandbox
当你在XCODE里面运行你的程序的时候,你并不是在运行真正的In-App Purchase服务器---你实际上是跑在沙盒服务器上面。
这意味着,你可以购买任何东西而不用担心会被扣钱。但是,你需要先创建一个测试帐号,同时确保你的设备登出了apple store,这样的话,你就可以看到这个处理过程了。
要创建测试帐号,你可以先登际 iTunes Connect ,然后点击“Manage Users”.点击“Test User”, 然后就可以创建一个测试帐号了。
然后,打开你的iphone,确保你退出当前的帐号了。你可以通过打开Settings程序,然后点击"Store",然后点"Sign out”。(大家千万注意啊!)
最后,运行你的程序吧。然后点击购买,输入测试帐号信息,如果一切顺利的话,你会得到如下截屏的输出!
但是,等一分钟---哪有里漫画啊!!!!你没值钱当然就没有啦。。。
好吧,这篇教程已经足够长了,用户购买以后可以得到漫画的任务就交由读者来完成吧。
这里有相应的漫画图片资源,你可以拿去用用。
何去何从?
本项目完整源代码:源代码下载:http://download.csdn.net/download/x1135768777/4223213
如果你想学习更多关于程序内置购买的内容,请参考苹果的文档 In-App Purchase Programming Guide。
同时,也请留意Noel Llopis 写的一些非常不错的文章。
