Zend Framework学习日记(2)--HelloWorld篇
Zend Framework学习日记(2)--HelloWorld篇
这一篇主要演示如何用zf命令行工具建立一个基于Zend Framework框架的工程,也是我初学Zend Framework的小练习。
(1)新建工程(Windows环境下)
打开CMD,将目录切换到你将要新建工程所在的目录下,输入“zf create project HelloWorld”,如下
D:/workphp/www>zf create project HelloWorld Creating project at D:/workphp/www/HelloWorld Note: This command created a web project, for more information setting up your V HOST, please see docs/README Testing Note: PHPUnit was not found in your include_path, therefore no testing a ctions will be created.
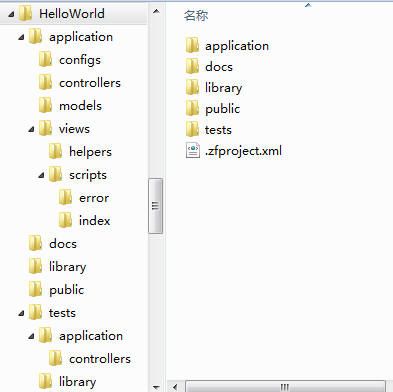
zf会自动建立一些目录和文件,目录结构如下
关于HelloWorld工程的目录结构:
1. application目录是源码放置的地方。由于Zend框架采用MVC模式,因此有controllers、models和views子目录,而congfigs子目录放置配置文件。
2. docs目录放置文档;library目录放Zend Framework(由于Zend Framework放置在别处,并加入了include_path,所以该目录为空);public目录比较重要,它就是站点发布的目录,该目录下的文件都可以通过浏览器访问;tests目录是单元测试的目录。
3. .zfproject.xml是zf工具的记录文件,有些zf命令会更新该文件。
注:关于Zend Framework的MVC模式,请参考http://framework.zend.com/manual/en/learning.quickstart.intro.html
(2)测试Zend Framework
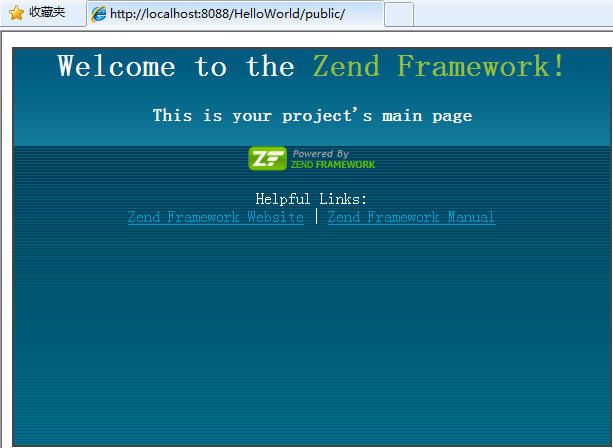
确保Apache服务器已开启,在浏览器中输入“http://localhost:8088/HelloWorld/public/”,我修改了Apache的默认端口(怎么修改,我的另一篇文章有提到,这里)。这时应该出现下面的界面,说明Zend Framework已经能正常工作了,gx!(如果没有,请参考“Zend Framework学习日记(1)--环境搭建篇”)
注:关于url的规则,简单点说就是,http://域名(IP)/public/controller/action,一个controller可以多个action,action就是处理view的,controller控制这些action,默认有IndexController和indexAction(见controllers目录下的IndexController.php),因此这里完整的url路径应该是http://localhost:8088/HelloWorld/public/index/index。具体参考Zend Framework manual。
(3)采用Two Step View设计模式
确保CMD在HelloWorld目录下面,输入“zf enable layout”,如下
D:/workphp/www/HelloWorld>zf enable layout Layouts have been enabled, and a default layout created at D:/workphp/www/HelloW orld/application/layouts/scripts/layout.phtml A layout entry has been added to the application config file.
会发现application目录多了一个layouts目录以及该目录下的子目录scripts和文件layout.phtml。如果你仔细找找,会发现“Welcome to the Zend Framework”界面的代码,是在views目录的scripts->index->index.phtml ,如下
安装了Zend Studio,可以直接打开,也可以用“记事本”或“写字板”打开。将index.phtml里面的内容全部删除,加入下面代码
<div id="welcome"> Hello World! </div>
再打开刚才自动产生的layout.phtml(HelloWorld->application->layouts->scripts),发现内容只有一行代码,如下
<?php echo $this->layout()->content; ?>
在此基础,我添加了一些代码,完善成一个简单的html文件,如下
<html> <head> <title>HelloWorld!</title> <meta http-equiv="Content-Type" content="text/html; charset=gbk" /> <mce:style type="text/css"><!-- #welcome { color: red; } --></mce:style><style type="text/css" mce_bogus="1"> #welcome { color: red; } </style> </head> <body> <?php echo $this->layout()->content; ?> </body> </html>
显然,可以看出index.phtml就是这里echo输出的内容,我只不过添加了一些html、head等标签。这就是Two Step设计模式,有2个视图,layout.phtml就是整体布局,index.phtml就是具体的内容(这是我个人理解)。记得保存上述修改,再次刷新浏览器,效果如下
可以看到,标题为“HelloWorld”,文字HelloWorld也变为红色。文章到此结束。
代码已上传到http://download.csdn.net/source/3200862,可供下载。欢迎交流!

