AndroidGUI01:TextView的常用技巧
转自:http://patmusing.blog.163.com/blog/static/13583496020114604941475/
1. 设定TextView显示的文本
方式1:
Step 1:
在Eclipse中,相应的项目下res/values的文件夹中,打开strings.xml文件,在该文件中添加如下类容:
<string name="sample_text">There is a kind of hush all over the world tonight.</string>
保存。保存这个动作会在R.java中为sample_text自动生成相应的id
Step 2:
在布局文件,比如main.xml中,增加
<TextView
android:id="@+id/TextView01"
android:layout_width="wrap_content"
android:layout_height="wrap_content"
android:text="@string/sample_text"
/>
Step 3:
在Activity对应的Java文件中,指定Layout:
setContentView(R.layout.main);
方式2:
这种方式不需再strings.xml中添加字符串,而是直接在Layout文件中,用raw text指定TextView的android:text属性,如下:
<TextView
android:id="@+id/TextView01"
android:layout_width="wrap_content"
android:layout_height="wrap_content"
android:text="Some sample text here"
/>
其他步骤如方式1
方式3:
在Activity对应的Java文件中,增加如下代码:
TextView tx1 = (TextView)findViewById(R.id.TextView01);
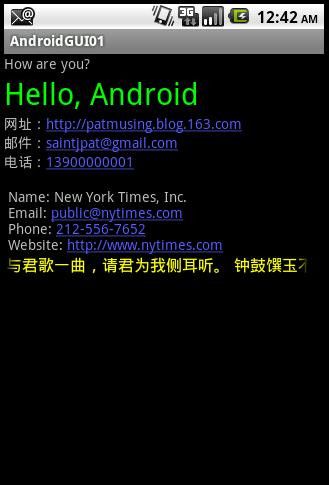
tx1.setText("How are you?");
2. 设定TextView中的文本大小和颜色
方式1:
在布局文件中,增加类似如下代码:
<TextView
android:id="@+id/TextView02"
android:layout_width="wrap_content"
android:layout_height="wrap_content"
android:text="Hello, Android"
android:textSize="30sp" <!-- 设定文字大小 -->
android:textColor="#FF7F7F" <!-- 设定文字颜色 -->
/>
方式2:
在Activity对应的Java文件中,增加如下代码:
TextView tx2 = (TextView)findViewById(R.id.TextView02);
tx2.setTextSize((float) 30.0); // 设定文字大小
tx2.setTextColor(Color. GREEN); // 设定文字颜色3. android:autoLink属性的使用
方式1:
在布局文件中,增加如下代码:
<TextView
android:id="@+id/TextView03"
android:layout_width="wrap_content"
android:layout_height="wrap_content"
android:text="网址:http://patmusing.blog.163.com"
android:autoLink="web"
/>
<TextView
android:id="@+id/TextView04"
android:layout_width="wrap_content"
android:layout_height="wrap_content"
android:text="邮件:[email protected]"
android:autoLink="email"
/>
<TextView
android:id="@+id/TextView05"
android:layout_width="wrap_content"
android:layout_height="wrap_content"
android:text="电话:13900000001"
android:autoLink="phone"
/>
方式2:
先在strings.xml文件中增加:
<string name="autolink_test">\n
Name: New York Times, Inc. \n
Email: [email protected] \n
Phone: 212-556-7652 \n
Website: http://www.nytimes.com
</string>
再在布局文件中增加:
<TextView
android:id="@+id/TextView06"
android:layout_width="wrap_content"
android:layout_height="wrap_content"
android:text="@string/autolink_test"
android:autoLink="all"
/>
方式3:
假定在布局文件中的TextView06,没有设定属性android:autoLink="all",即如下:
<TextView
android:id="@+id/TextView06"
android:layout_width="wrap_content"
android:layout_height="wrap_content"
android:text="@string/autolink_test"
/>
那么,在Activity对应的Java文件中,可以这样处理:
TextView tx = (TextView)this.findViewById(R.id.TextView06);
Linkify.addLinks(tx, Linkify.ALL);
也能达到方式2中同样的效果。4. android:ems、android:singleLine、android:ellipsize、android:marqueeRepeatLimit、android:focusable 以及
android:focusableInTouchMode等属性的组合使用,实现跑马灯效果。
假定在strings.xml中,存在:
<string name="autolink_test1">
君不见,黄河之水天上来,奔流到海不复回。
君不见,高堂明镜悲白发,朝如青丝暮成雪。
人生得意须尽欢,莫使金樽空对月。
天生我材必有用,千金散尽还复来。
烹羊宰牛且为乐,会须一饮三百杯。
岑夫子,丹丘生,将进酒,君莫停。
与君歌一曲,请君为我侧耳听。
钟鼓馔玉不足贵,但愿长醉不复醒。
古来圣贤皆寂寞,惟有饮者留其。
陈王昔时宴平乐,斗酒十千恣欢谑。
主人何为言少钱,径须沽取对君酌。
五花马,千金裘,呼儿将出换美酒,与尔同销万古愁。
</string>
在布局文件中,增加:
<TextView
android:id="@+id/TextView07"
android:layout_width="wrap_content"
android:layout_height="wrap_content"
android:ems="16"
android:text="@string/autolink_test1"
android:singleLine="true"
android:ellipsize="marquee"
android:marqueeRepeatLimit ="marquee_forever"
android:focusable="true"
android:focusableInTouchMode="true"
android:textColor="#FF0000"
android:textSize="16sp"
/>
即可达到跑马灯的效果。当然也可以使用TextView中的方法来做到这一点。