Linux模块编程机制之hello kernel
看了那么多理论知识,可能还是一头雾水,是啊,纯理论分析本来就不好理解。为了更好的理解Linux内核各种内部机制以及其运用,在接下来的学习中将采用理论+实验+源码注释的方式进行。包括算法、原理的实验,内核的局部扩展与修改等。Linux内核编程有很多方法,最方便的方式是使用内核提供的模块编程机制,另一种方式是以补丁的方式,这种方式只需要编译一次内核,当然也可以直接修改内核源码,但是每次修改后都需要重新编译、引导、重启,很麻烦,也很费时。首先,我们看看最方便快捷的一种方式——LINUX内核中模块编程机制。
还是从程序员的哪个起步程序hello world开始,但是我们这里比一般的hello world稍微复杂一点,用两个hello world程序。
文件hello.c
#include <linux/init.h>
#include <linux/module.h>
#include <linux/kernel.h>

MODULE_LICENSE("GPL");
extern int hello_data;

static int hello_init(void)
{
	printk(KERN_ERR "hello,kernel!,this is hello module\n");
	printk(KERN_ERR "hello_data:%d\n",++hello_data);
	return 0;
}

static void hello_exit(void)
{
	printk(KERN_ERR "hello_data:%d\n",--hello_data);
	printk(KERN_ERR "Leave hello module!\n");
}
module_init(hello_init);
module_exit(hello_exit);

MODULE_AUTHOR("Mike Feng");
MODULE_DESCRIPTION("This is hello module");
MODULE_ALIAS("A simple example");
对应的Makefile文件:
obj-m +=hello.o
CURRENT_DIR:=$(shell pwd)
KERNEL_DIR:=$(shell uname -r)
KERNEL_PATH:=/usr/src/kernels/$(KERNEL_DIR)

all:
	make -C $(KERNEL_PATH) M=$(CURRENT_DIR) modules
clean:
	make -C $(KERNEL_PATH) M=$(CURRENT_DIR) clean
文件hello_h.c:
#include <linux/init.h>
#include <linux/module.h>
#include <linux/kernel.h>

MODULE_LICENSE("GPL");
static unsigned int hello_data=100;
EXPORT_SYMBOL(hello_data);

static int hello_h_init(void)
{
	hello_data+=5;
	printk(KERN_ERR "hello_data:%d\nhello kernel,this is hello_h module\n",hello_data);

	return 0;
}

static void hello_h_exit(void)
{
	hello_data-=5;
	printk(KERN_ERR "hello_data:%d\nleave hello_h module\n",hello_data);
}

module_init(hello_h_init);
module_exit(hello_h_exit);
MODULE_AUTHOR("Mike Feng");
对应的Makefile
obj-m+=hello_h.o
CURRENT:=$(shell pwd)
KERNEL_PATH:=/usr/src/kernels/$(shell uname -r)

all:
	make -C $(KERNEL_PATH) M=$(CURRENT) modules
clean:
	make -C $(KERNEL_PATH) M=$(CURRENT) clean
可见,我们在hello_h.c中定义了一个静态变量hello_data,初始值为100,并把他导出了,在hello.c中使用了该变量。这样给出例子,后面我们会看到,是为了说明模块依赖。
模块信息分析初步
当我们make后,在当前目录下生成文件有:hello.mod.c、hello.o、hello.ko、hello.mod.o、Module.markers、modules.order、Module.symvers。上面的代码以及编译生成的文件后面会详细分析。
hello.ko文件是我们需要的,用file名命令看看。
![]()
file命令的输出表明模块文件是可重定位的,这是用户空间程序设计中一个熟悉的术语。可从定位文件的函数都不会引用绝对地址,而只是指向代码中的相对地址,因此可以在内存的任意偏移地址加载,当然,在映像加载到内存中时,映像个的地址要由动态链接器ld.so进行适当的修改。内核模块同样如此。其中的地址也是相对的,而不是绝对的。当重定位的工作由内核自身执行,而不是动态装载器。
我们再用nm命令查看一下该目标文件的外部函数列表。nm hello.ko:
00000000 r __mod_alias25
0000003c r __mod_author23
00000018 r __mod_description24
00000050 r __mod_license5
0000005c r __mod_srcversion23
0000008c r __mod_vermagic5
00000080 r __module_depends
00000000 D __this_module
00000000 T cleanup_module
U hello_data
00000000 t hello_exit
0000002d t hello_init
0000002d T init_module
U mcount
U printk
U代表未解决的引用,可见都为内核代码中的导出函数,D表示符号位于数据段,T表示符号位于代码段。内核提供了一个所有导出函数的列表。该列表给出了所有导出函数的内存地址和对应的函数名,可以通过proc文件系统访问,即文件/proc/kallsyms。
查询模块信息:
还有一些额外的信息来源,是直接存储在模块二进制文件中,并且指定了模块用途的文本描述。这些可以使用modutils中的modinfo工具查询。他们可以存储电子邮件地址、功能简短描述、配置参数描述、指定支持的设备、模块按何种许可证分发等,我们对上面的hello.ko文件查看一下:
这些额外的信息如何合并到二进制模块文件中呢?在所有使用ELF格式的二进制文件中,有各种各种单元将二进制数据组织到不同类别中,这些在技术上称之为段。为允许在模块中添加信息,内核引入了一个名为.modinfo的段。
自动加载:
通常,模块的装载发起于用户空间,由用户或自动化脚本启动。在处理模块时,呜呜i达到更大的灵活性并提高透明度,内核自身也能够请求加载模块。由于在用户空间完成这些比在内核空间容易的多,内核将该工作委托给一个辅助进程kmod。要注意,kmod并不是一个永久性的守护进程,内核会按需启动他。
当内核请求没有相关数据结构信息时,内核试图使用request_module函数加载对应的模块,该函数使用kmod机制启动modprobe工具,modprobe插入相应的模块。换句话说,内核依赖于用户空间中的一个应用程序使用内核函数来添加模块,如下图:

内核源代码中,很多不同地方调用了request_module。借助该函数,内核试图通过在没有用户介入的情况下自动加载代码,使得尽可能透明地访问那些委托给模块的功能。
可能出现这样的情况;无法唯一确定哪个模块能够提供所需的功能。为解决这个问题,附加到每个模块的一个小“数据库”。数据库的内容描述了该模块所支持的设备。数据库信息通过模块别别名提供。这些是模块的通用标识符,其中编码了所描述的信息。宏MODULE_ALIAS用于产生模块别名。MODULE_ALIAS这一类的宏都由MODULE_INFO定义,我们还是从源码中寻找出处:
/* Generic info of form tag = "info" */
#define MODULE_INFO(tag, info) __MODULE_INFO(tag, tag, info)

/* For userspace: you can also call me... */
#define MODULE_ALIAS(_alias) MODULE_INFO(alias, _alias)


#define __MODULE_INFO(tag, name, info)					  \
static const char __module_cat(name,__LINE__)[]				  \
  __used								  \
  __attribute__((section(".modinfo"),unused)) = __stringify(tag)
可见,MODULE_INFO内容保存在模块二进制文件的.modinfo段中。
模块行为
用户空间工具和内核的模块实现之间的结构,包括两个系统调用。
init_module:将一个新模块插入到内核中。用户空间工具只需提供二进制数据。所有其他工作(特别是重定位和解决引用)由内核自身完成。
delete_module:从内核溢出一个模块。当然,前提是该模块的代码不再使用,并且其他模块也不再使用该模块导出的函数。
还有一个request_module函数(不是系统调用),用于从内核端加载模块。他不经用于加载模块。还用于实现热插拔功能。
模块在内核中用下面数据结构表示:
struct module
{
	enum module_state state;

	/* Member of list of modules */
	/*链表的表头为一个module类型的全局变量
	modules*/
	struct list_head list;

	/* Unique handle for this module */
	char name[MODULE_NAME_LEN];

	/* Sysfs stuff. */
	struct module_kobject mkobj;
	struct module_attribute *modinfo_attrs;
	const char *version;
	const char *srcversion;
	struct kobject *holders_dir;

	/* Exported symbols */
	/*syms为一个数组,共有num_syms项,
	类型kernel_symbol负责将标识符(name字段)
	分配到内存地址(value字段)*/
	const struct kernel_symbol *syms;
	/*也是num_syms个项的数组,存放了到处富豪的校验和
	用于实现版本控制*/
	const unsigned long *crcs;
	unsigned int num_syms;

	/* Kernel parameters. */
	struct kernel_param *kp;
	unsigned int num_kp;

	/* GPL-only exported symbols. */
	unsigned int num_gpl_syms;
	const struct kernel_symbol *gpl_syms;
	const unsigned long *gpl_crcs;

#ifdef CONFIG_UNUSED_SYMBOLS
	/* unused exported symbols. */
	const struct kernel_symbol *unused_syms;
	const unsigned long *unused_crcs;
	unsigned int num_unused_syms;

	/* GPL-only, unused exported symbols. */
	unsigned int num_unused_gpl_syms;
	const struct kernel_symbol *unused_gpl_syms;
	const unsigned long *unused_gpl_crcs;
#endif

	/* symbols that will be GPL-only in the near future. */
	const struct kernel_symbol *gpl_future_syms;
	const unsigned long *gpl_future_crcs;
	unsigned int num_gpl_future_syms;

	/* Exception table */
	unsigned int num_exentries;
	struct exception_table_entry *extable;

	/* Startup function. */
	int (*init)(void);

	/* If this is non-NULL, vfree after init() returns */
	/*模块二进制数据分为两个部分:初始化部分和核心部分
	前者包含的东西在装载结束后都可以丢弃
	后者包含了正常运行期间需要的所有数据
	初始化部分的起始地址保存在module_init*/
	void *module_init;

	/* Here is the actual code + data, vfree'd on unload. */
	void *module_core;

	/* Here are the sizes of the init and core sections */
	unsigned int init_size, core_size;

	/* The size of the executable code in each section.  */
	unsigned int init_text_size, core_text_size;

	/* Arch-specific module values */
	struct mod_arch_specific arch;

	unsigned int taints;	/* same bits as kernel:tainted */

#ifdef CONFIG_GENERIC_BUG
	/* Support for BUG */
	unsigned num_bugs;
	struct list_head bug_list;
	struct bug_entry *bug_table;
#endif

#ifdef CONFIG_KALLSYMS
	/*
	 * We keep the symbol and string tables for kallsyms.
	 * The core_* fields below are temporary, loader-only (they
	 * could really be discarded after module init).
	 */
	Elf_Sym *symtab, *core_symtab;
	unsigned int num_symtab, core_num_syms;
	char *strtab, *core_strtab;

	/* Section attributes */
	struct module_sect_attrs *sect_attrs;

	/* Notes attributes */
	struct module_notes_attrs *notes_attrs;
#endif

	/* Per-cpu data. */
	void *percpu;

	/* The command line arguments (may be mangled).  People like
	   keeping pointers to this stuff */
	char *args;
#ifdef CONFIG_TRACEPOINTS
	struct tracepoint *tracepoints;
	unsigned int num_tracepoints;
#endif

#ifdef CONFIG_TRACING
	const char **trace_bprintk_fmt_start;
	unsigned int num_trace_bprintk_fmt;
#endif
#ifdef CONFIG_EVENT_TRACING
	struct ftrace_event_call *trace_events;
	unsigned int num_trace_events;
#endif
#ifdef CONFIG_FTRACE_MCOUNT_RECORD
	unsigned long *ftrace_callsites;
	unsigned int num_ftrace_callsites;
#endif

#ifdef CONFIG_MODULE_UNLOAD
	/* What modules depend on me? */
	/*将依赖本模块的模块用module_use数据结构链接
	起来*/
	struct list_head modules_which_use_me;

	/* Who is waiting for us to be unloaded */
	struct task_struct *waiter;

	/* Destruction function. */
	void (*exit)(void);

#ifdef CONFIG_SMP
	char *refptr;
#else
	local_t ref;
#endif
#endif

#ifdef CONFIG_CONSTRUCTORS
	/* Constructor functions. */
	ctor_fn_t *ctors;
	unsigned int num_ctors;
#endif
};
module_state状态:
enum module_state
{
	/*正常运行*/
	MODULE_STATE_LIVE,
	/*装载期间*/
	MODULE_STATE_COMING,
	/*正在移除*/
	MODULE_STATE_GOING,
};
struct kernel_symbol
{
	unsigned long value;
	const char *name;
};
依赖关系和引用:
如果模块B使用了模块A提供的函数,那么模块A和模块B之间就存在关系。为正确管理这些依赖关系,内核需要引入另一个数据结构:
/* modules using other modules */
struct module_use
{
	struct list_head list;
	struct module *module_which_uses;
};
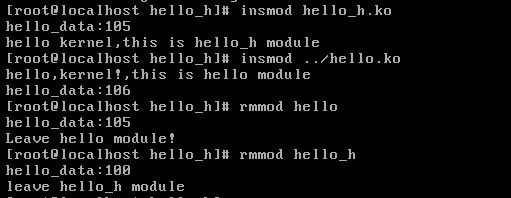
依赖关系的网络通过module_use和module数据结构的modules_which_use_me成员共同建立起来。对每个使用了模块A中函数的模块B,都会创建一个module_use的新实例。该实例将添加到模块A的modules_which_use_me链表中。Module_which_uses指向模块B的module实例。根据这些信息,内核很容易计算出使用特定模块的其他内核模块。我们回到前面的两个hello kernel代码,hello.c中用了一个外部变量hello_data,这个变量来自hello_h.c中,为hello_h.c的全局静态导出变量。所以hello模块依赖hello_h模块。我们正常操作:先插入模块hello_h然后插入hello模块,先移除hello模块,在移除hello_h:
很容易想到上面的操作顺序是不能改变的。
上面的依赖关系可以画出如下图:

当然,有数据结构必然有操作这些数据结构的函数,数据结构放这里了,对于他的操作就不看了。无非是从hello找到hello_h。
模块的二进制结构:
我们使用readelf –S hello.ko > readelf.txt命令来看看hello.ko模块文件的二进制结构,输出如下:
Section Headers:
[Nr] Name Type Addr Off Size ES Flg Lk Inf Al
[ 0] NULL 00000000 000000 000000 00 0 0 0
[ 1] .note.gnu.build-i NOTE 00000000 000034 000024 00 A 0 0 4
[ 2] .text PROGBITS 00000000 000058 00005c 00 AX 0 0 4
[ 3] .rel.text REL 00000000 01106c 000070 08 29 2 4
[ 4] .rodata.str1.1 PROGBITS 00000000 0000b4 000051 01 AMS 0 0 1
[ 5] .modinfo PROGBITS 00000000 000108 0000c4 00 A 0 0 4
[ 6] __mcount_loc PROGBITS 00000000 0001cc 000008 00 A 0 0 4
[ 7] .rel__mcount_loc REL 00000000 0110dc 000010 08 29 6 4
[ 8] .data PROGBITS 00000000 0001d4 000000 00 WA 0 0 4
[ 9] .gnu.linkonce.thi PROGBITS 00000000 0001d4 000164 00 WA 0 0 4
[10] .rel.gnu.linkonce REL 00000000 0110ec 000010 08 29 9 4
[11] .bss NOBITS 00000000 000338 000000 00 WA 0 0 4
[12] .note.GNU-stack PROGBITS 00000000 000338 000000 00 X 0 0 1
[13] .comment PROGBITS 00000000 000338 00005a 00 0 0 1
[14] .debug_aranges PROGBITS 00000000 000392 000020 00 0 0 1
[15] .rel.debug_arange REL 00000000 0110fc 000010 08 29 14 4
[16] .debug_pubnames PROGBITS 00000000 0003b2 00006a 00 0 0 1
[17] .rel.debug_pubnam REL 00000000 01110c 000010 08 29 16 4
[18] .debug_info PROGBITS 00000000 00041c 0090fe 00 0 0 1
[19] .rel.debug_info REL 00000000 01111c 0043d0 08 29 18 4
[20] .debug_abbrev PROGBITS 00000000 00951a 000550 00 0 0 1
[21] .debug_line PROGBITS 00000000 009a6a 000858 00 0 0 1
[22] .rel.debug_line REL 00000000 0154ec 000008 08 29 21 4
[23] .debug_frame PROGBITS 00000000 00a2c4 000084 00 0 0 4
[24] .rel.debug_frame REL 00000000 0154f4 000020 08 29 23 4
[25] .debug_str PROGBITS 00000000 00a348 005507 01 MS 0 0 1
[26] .debug_pubtypes PROGBITS 00000000 00f84f 00121c 00 0 0 1
[27] .rel.debug_pubtyp REL 00000000 015514 000010 08 29 26 4
[28] .shstrtab STRTAB 00000000 010a6b 000128 00 0 0 1
[29] .symtab SYMTAB 00000000 015524 000240 10 30 30 4
[30] .strtab STRTAB 00000000 015764 0000e1 00 0 0 1
Key to Flags:
W (write), A (alloc), X (execute), M (merge), S (strings)
I (info), L (link order), G (group), x (unknown)
O (extra OS processing required) o (OS specific), p (processor specific)
模块使用ELF二进制文件结构,模块中包含了几个额外的段,普通的程序或库中不会出现。
__ksymtab段包含一个符号表,包括了模块导出的所有符号,该段中导出的符号可以由内核的所遇部分使用(不考虑许可证)。另外还有__ksymtab_gpl、__ksymtab_gpl_future和其命名意思相同。
上面的.modinfo存储了在加载当前模块之前,内核中必须线性加载的所有其他模块名称,换句话说,该特定模块依赖的所有模块名称。
.gun.linkonce.this_module提供了sruct module的一个实例,其中存储了模块的名称和指向二进制文件中的初始化函数和清理函数的指针。根据本段,内核即可判断特定的二进制文件是否为模块。如果没有该段,则拒绝装载文件。
还有其他的段在上面的hello模块中没有出现,暂时不做分析了。
生成模块需要执行3个步骤:
1) 首先,模块源代码中的所有C文件都编译为普通话的.o目标文件。
2) 在为所有模块产生目标文件后,内核可以分析他们。找到的附加信息(例如,模块依赖关系)保存在一个独立的文件中,也编译为一个二进制文件。
3) 将前述两个步骤产生的二进制文件连接起来,生成最终的模块。
初始化和清理函数
模块的初始化函数和清理函数,保存在.gun.linkonce.module段中的module实例中,该实例位于上述为每个模块自动生成的附加文件中。对上面的hello.c文件编译生成的hello.mod.c中:
struct module __this_module
__attribute__((section(".gnu.linkonce.this_module"))) = {
 .name = KBUILD_MODNAME,
 .init = init_module,
#ifdef CONFIG_MODULE_UNLOAD
 .exit = cleanup_module,
#endif
 .arch = MODULE_ARCH_INIT,
};

static const char __module_depends[]
__used
__attribute__((section(".modinfo"))) =
"depends=";
KBUILD_MODNAME包含了模块的名称,只有将代码编译为模块时才定义
导出符号
内核为导出符号提供了两个宏:EXPORT_SYMBOL和EXPORT_SYMBOL_GPL。在我们的hello_h.c中用到了EXPORT_SYMBOL,我们看看内核是怎么定义的。在<module.h>中
/* Mark the CRC weak since genksyms apparently decides not to
 * generate a checksums for some symbols */
#define __CRC_SYMBOL(sym, sec)					\
	extern void *__crc_##sym __attribute__((weak));		\
	static const unsigned long __kcrctab_##sym		\
	__used							\
	__attribute__((section("__kcrctab" sec), unused))	\
	= (unsigned long) &__crc_##sym;
#else
#define __CRC_SYMBOL(sym, sec)
#endif

/* For every exported symbol, place a struct in the __ksymtab section */
#define __EXPORT_SYMBOL(sym, sec)				\
	extern typeof(sym) sym;					\
	__CRC_SYMBOL(sym, sec)					\
	static const char __kstrtab_##sym[]			\
	__attribute__((section("__ksymtab_strings"), aligned(1))) \
	= MODULE_SYMBOL_PREFIX #sym;                    	\
	static const struct kernel_symbol __ksymtab_##sym	\
	__used							\
	__attribute__((section("__ksymtab" sec), unused))	\
	= { (unsigned long)&sym, __kstrtab_##sym }

#define EXPORT_SYMBOL(sym)					\
	__EXPORT_SYMBOL(sym, "")

#define EXPORT_SYMBOL_GPL(sym)					\
	__EXPORT_SYMBOL(sym, "_gpl")

#define EXPORT_SYMBOL_GPL_FUTURE(sym)				\
	__EXPORT_SYMBOL(sym, "_gpl_future")
对每个导出的符号生成了两段代码。其用途:
.__kstrtab_function是一个静态变量,保存在__ksymtab_strings段中。他是一个字符串,其值对应于函数的名称。
.__ksymtab段中存储了一个kernel_symbol实例。它包括两个指针,一个指向导出的函数,另一个指向在字符串表中刚建立的项。
这些使得内核根据函数字符串名称,即可找到匹配的代码地址。
在对导出函数启用内核版本控制特性时,会使用__CRC_SYMBOL;
版本控制信息
.modinfo段中总是会存储某些必不可少的版本控制信息,无论内核的版本控制特性是否启用。这使得可以从各种内核配置中区分出特别印象整个内核源代码的那些配置,这些可能需要一个单独的模块集合。我们看上面hello模块生成的hello.mod.c文件中的
MODULE_INFO(vermagic, VERMAGIC_STRING);
VERMAGIC_STRING是一个字符串,表示内核配置的关键特性,在内核源码中定义为:
#define VERMAGIC_STRING 						\
	UTS_RELEASE " "							\
	MODULE_VERMAGIC_SMP MODULE_VERMAGIC_PREEMPT 			\
	MODULE_VERMAGIC_MODULE_UNLOAD MODULE_VERMAGIC_MODVERSIONS	\
	MODULE_ARCH_VERMAGIC
内核自身和每个模块中都会存储VERMAGIC_STRING的一份副本。只有内核与模块存储的两个字符串匹配时,模块才能加载。这意味模块和内核的相关配置必须是一致的。内核版本也会存储,但在比较时会忽略。内核版本不同的模块,只要剩余的版本字符串匹配,仍然可以装载。
模块的插入和卸载
模块的装载和卸载在内核中用两个系统调用实现:sys_init_module和sys_delete_module,定义在<kernel/module.c>中两个函数的实现比较复杂,有兴趣可以看看。