(2)搭建与测试 Spring 的开发环境
1,使用Spring所使用到的jar包
到http://www.springsource.org/download下载spring,然后进行解压缩,在解压目录中找到下面jar文件,拷贝到类路径下
dist\spring.jar
lib\jakarta-commons\commons-logging.jar
如果使用了切面编程(AOP),还需要下列jar文件
lib/aspectj/aspectjweaver.jar和aspectjrt.jar
lib/cglib/cglib-nodep-2.1_3.jar
如果使用了JSR-250中的注解,如@Resource/@PostConstruct/@PreDestroy,还需要下列jar文件
lib\j2ee\common-annotations.jar。
2,Spring的配置文件模版
<?xml version="1.0" encoding="UTF-8"?>
<beans xmlns="http://www.springframework.org/schema/beans"
       xmlns:xsi="http://www.w3.org/2001/XMLSchema-instance"
       xsi:schemaLocation="http://www.springframework.org/schema/beans
           http://www.springframework.org/schema/beans/spring-beans-2.5.xsd">
    .....
</beans>
该配置模版可以从spring的参考手册或spring的例子中得到。配置文件的取名可以任意,文件可以存放在任何目录下,但考虑到通用性,一般放在类路径下。
编写spring配置文件时,不能出现帮助信息:
由于spring的schema文件位于网络上,如果机器不能连接到网络,那么在编写配置信息时候就无法出现提示信息,解决方法有两种:
1。让机器上网,eclipse会自动从网络上下载schema文件并缓存在硬盘上。
2。手动添加schema文件,方法如下:
windwos->preferences->myeclipse->files and editors->xml->xmlcatalog
点"add",在出现的窗口中的Key Type中选择URI,在location中选"File system",然后在spring解压目录的dist/resources目录中选择spring-beans-2.5.xsd,回到设置窗口的时候不要急着关闭窗口,应把窗口中的Key Type改为Schema location,Key改为http://www.springframework.org/schema/beans/spring-beans-2.5.xsd
3,实例化Spring容器:
实例化Spring容器常用的两种方式:
方法一:
在类路径下寻找配置文件来实例化容器
ApplicationContext ctx = new ClassPathXmlApplicationContext(new String[]{"beans.xml"});
方法二:
在文件系统路径下寻找配置文件来实例化容器
ApplicationContext ctx = new FileSystemXmlApplicationContext(new String[]{“d:\\beans.xml“});
Spring的配置文件可以指定多个,可以通过String数组传入。
4,建立测试类,来验证Spring环境是否搭建好?
package junit.test;


import org.junit.BeforeClass;
import org.junit.Test;
import org.springframework.context.ApplicationContext;
import org.springframework.context.support.ClassPathXmlApplicationContext;

public class SpringTest {

	@BeforeClass
	public static void setUpBeforeClass() throws Exception {
	}

	// 专门用来实例化  Spring 容器的。
	@Test public void instanceSpring(){
		// 在类路径下,寻找配置文件来实例化容器。
		ApplicationContext ctx = new ClassPathXmlApplicationContext("beans.xml");
	}
}
5,开始使用Spring,编写业务逻辑方法,这里就写一个简单的方法。
package cn.itm.service.impl;

import cn.itm.service.PersonService;

public class PersonServiceBean implements PersonService{

	public void save(){
		System.out.println("我是 save() 方法");
	}
}
因为是面向接口编程的,所以要抽取接口:
package cn.itm.service;

public interface PersonService {

	public abstract void save();

}
6:
在Spring容器中 做相应的配置:要用谁就要配置谁,也就是让Spring容器来维护和管理,去找要用的业务方法:
<!-- 业务bean 交给 Spring容器 管理。 -->
<bean id="personService" class="cn.itm.service.impl.PersonServiceBean"></bean>
<!-- 配置好后,这个bean就会由Spring容器 帮我们创建和维护。。。当我们用到bean的时候 就直接从Spring中获取就可以了 -->
<?xml version="1.0" encoding="UTF-8"?>
<beans xmlns="http://www.springframework.org/schema/beans"
       xmlns:xsi="http://www.w3.org/2001/XMLSchema-instance"
       xsi:schemaLocation="http://www.springframework.org/schema/beans
           http://www.springframework.org/schema/beans/spring-beans-2.5.xsd">

           <!-- 业务bean 交给 Spring容器 管理。 -->
           <bean id="personService" class="cn.itm.service.impl.PersonServiceBean"></bean>
           <!-- 配置好后,这个bean就会由Spring容器 帮我们创建和维护。。。当我们用到bean的时候 就直接从Spring中获取就可以了 -->
</beans>
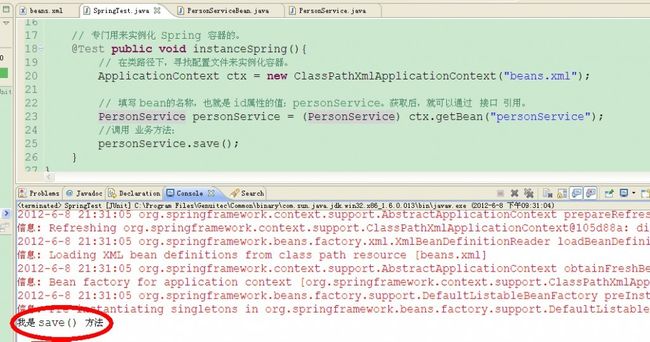
7,取得配置的业务逻辑,并调用 所要用的方法:
// 填写 bean的名称,也就是 id属性的值:personService。获取后,就可以通过   接口  引用。
		PersonService personService = (PersonService) ctx.getBean("personService");
		//调用  业务方法:
		personService.save();
package junit.test;


import org.junit.BeforeClass;
import org.junit.Test;
import org.springframework.context.ApplicationContext;
import org.springframework.context.support.ClassPathXmlApplicationContext;

import cn.itm.service.PersonService;

public class SpringTest {

	@BeforeClass
	public static void setUpBeforeClass() throws Exception {
	}

	// 专门用来实例化  Spring 容器的。
	@Test public void instanceSpring(){
		// 在类路径下,寻找配置文件来实例化容器。
		ApplicationContext ctx = new ClassPathXmlApplicationContext("beans.xml");

		// 填写 bean的名称,也就是 id属性的值:personService。获取后,就可以通过   接口  引用。
		PersonService personService = (PersonService) ctx.getBean("personService");
		//调用  业务方法:
		personService.save();
	}
}

本文:自学传智播客黎活明老师的视频,总结而至。