转: U-Boot启动引导内核分析
U-Boot 启动流程
大多数bootloader 都分为stage1 和stage2 两大部分,u-boot 也不例外。依赖于CPU 体系结构的代码( 如设备初始化代码等) 通常都放在stage1 ,且可以用汇编语言来实现,而stage2 则通常用C 语言来实现,这样可以实现复杂的功能,而且有更好的可读性和移植性。
u-boot 启动大致流程如图1 所示: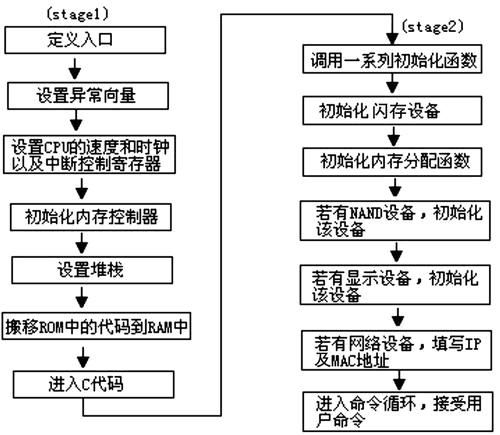
图 1
> Stage1
在flash中执行的引导代码,也就是bootloader中的stage1,负责初始化硬件环境,把u-boot从flash加载到RAM中去,然后跳到lib_arm/board.c中的start_armboot中去执行。
u-boot 的stage1 代码通常放在start.s 文件中,它用汇编语言写成,其主要代码部分如下:
1) 定义入口由于一个可执行的Image 必须有一个入口点,并且只能有一个全局入口,通常这个入口放在ROM(Flash) 的0x0 地址,因此,必须通知编译器以使其知道这个入口,该工作可通过修改连接器脚本来完成。
2) 设置异常向量(Exception Vector) 。
3) 设置CPU 的速度、时钟频率及中断控制寄存器。
4) 初始化内存控制器
5) 将ROM 中的程序复制到RAM 中。
6) 初始化堆栈
7) 转到RAM 中执行,该工作可使用指令ldr pc, _start_armboot 来完成。
> Stage2
lib_arm/board.c中的start_armboot是C语言开始的函数,也是整个启动代码中C语言的主函数,同时还是整个u-boot(armboot) 的主函数,该函数主要流程分析如下:
{
init_fnc_t ** init_fnc_ptr ;
char * s;
#if !defined(CFG_NO_FLASH) || defined (CONFIG_VFD) || defined(CONFIG_LCD)
ulong size ;
#endif
#if defined(CONFIG_VFD) || defined(CONFIG_LCD)
unsigned long addr ;
#endif
/* Pointer is writable since we allocated a register for it */
/* 给全局数据变量gd安排空间 */
gd = (gd_t * )(_armboot_start - CFG_MALLOC_LEN - sizeof (gd_t ));
/* compiler optimization barrier needed for GCC >= 3.4 */
__asm__ __volatile__ ("" : : : "memory" );
/* 给板子数据变量gd->bd安排空间 */
memset ((void * )gd , 0 , sizeof (gd_t ));
gd -> bd = (bd_t * )((char * )gd - sizeof (bd_t ));
memset (gd -> bd , 0 , sizeof (bd_t ));
monitor_flash_len = _bss_start - _armboot_start ;
/* 顺序执行init_sequence数组中的初始化函数 */
for (init_fnc_ptr = init_sequence ; * init_fnc_ptr ; ++ init_fnc_ptr ) {
if ((* init_fnc_ptr )() != 0 ) {
hang ();
}
}
/*初始化函数列表:
init_fnc_t *init_sequence[] = {
cpu_init, /* basic cpu dependent setup */
#if defined(CONFIG_SKIP_RELOCATE_UBOOT)
reloc_init , /* Set the relocation done flag, must
do this AFTER cpu_init(), but as soon
as possible */
#endif
board_init , /* basic board dependent setup */
interrupt_init , /* set up exceptions */
env_init , /* initialize environment */
init_baudrate , /* initialze baudrate settings */
serial_init , /* serial communications setup */
console_init_f , /* stage 1 init of console */
display_banner , /* say that we are here */
#if defined(CONFIG_HW_WATCHDOG)
hw_watchdog_init , /* watchdog setup */
#endif
#if defined(CONFIG_DISPLAY_CPUINFO)
print_cpuinfo , /* display cpu info (and speed) */
#endif
#if defined(CONFIG_DISPLAY_BOARDINFO)
checkboard , /* display board info */
#endif
#if defined(CONFIG_HARD_I2C) || defined(CONFIG_SOFT_I2C)
init_func_i2c ,
#endif
dram_init , /* configure available RAM banks */
display_dram_config ,
NULL ,
};
*/
/* armboot_start is defined in the board-specific linker script */
mem_malloc_init (_armboot_start - CFG_MALLOC_LEN );
#if defined(CONFIG_CMD_NAND)
puts ("NAND: " );
/* NAND FLASH初始化 */
nand_init (); /* go init the NAND */
#endif
/* 重新定位环境变量 */
env_relocate ();
#ifdef CONFIG_VFD
/* must do this after the framebuffer is allocated */
drv_vfd_init ();
#endif /* CONFIG_VFD */
#ifdef CONFIG_SERIAL_MULTI
/* 串口初始化 */
serial_initialize ();
#endif
/* 从环境变量中获取IP地址和MAC地址 */
gd -> bd -> bi_ip_addr = getenv_IPaddr ("ipaddr" );
/* MAC Address */
{
int i ;
ulong reg ;
char * s, * e ;
char tmp [ 64 ];
i = getenv_r ("ethaddr" , tmp , sizeof (tmp ));
s = (i > 0 ) ? tmp : NULL ;
for (reg = 0 ; reg < 6 ; ++ reg ) {
gd -> bd -> bi_enetaddr [ reg ] = s ? simple_strtoul (s, & e , 16 ) : 0 ;
if (s)
s = (* e ) ? e + 1 : e ;
}
#ifdef CONFIG_HAS_ETH1
i = getenv_r ("eth1addr" , tmp , sizeof (tmp ));
s = (i > 0 ) ? tmp : NULL ;
for (reg = 0 ; reg < 6 ; ++ reg ) {
gd -> bd -> bi_enet1addr [ reg ] = s ? simple_strtoul (s, & e , 16 ) : 0 ;
if (s)
s = (* e ) ? e + 1 : e ;
}
#endif
}
devices_init (); /* get the devices list going. */
#ifdef CONFIG_CMC_PU2
load_sernum_ethaddr ();
#endif /* CONFIG_CMC_PU2 */
/* 跳转表的初始化*/
jumptable_init ();
/* 控制台的初始化 */
console_init_r (); /* fully init console as a device */
/* IRQ中断使能 */
enable_interrupts ();
/* 各种型号网络设备的初始化 */
#ifdef CONFIG_DRIVER_TI_EMAC
extern void dm644x_eth_set_mac_addr (const u_int8_t * addr );
if (getenv ("ethaddr" )) {
dm644x_eth_set_mac_addr (gd -> bd -> bi_enetaddr );
}
#endif
#ifdef CONFIG_DRIVER_CS8900
cs8900_get_enetaddr (gd -> bd -> bi_enetaddr );
#endif
/* 通过环境变量初始化load_addr
默认定义ulong load_addr = CFG_LOAD_ADDR; */
if ((s = getenv ("loadaddr" )) != NULL ) {
load_addr = simple_strtoul (s, NULL , 16 );
}
/* */
#if defined(CONFIG_CMD_NET)
if ((s = getenv ("bootfile" )) != NULL ) {
copy_filename (BootFile , s, sizeof (BootFile ));
}
#endif
#ifdef BOARD_LATE_INIT
board_late_init ();
#endif
#if defined(CONFIG_CMD_NET)
#if defined(CONFIG_NET_MULTI)
puts ("Net: " );
#endif
eth_initialize (gd -> bd );
#if defined(CONFIG_RESET_PHY_R)
debug ("Reset Ethernet PHY /n " );
reset_phy ();
#endif
#endif
/* 循环不断地执行main_loop ()函数
main_loop ()主要处理用户命令 */
for (;;) {
main_loop ();
}
}
整个u-boot 的执行就进入等待用户输入命令,解析并执行命令的死循环中。
也许细心的你会问:我在用UBoot 的时候并没有直接进入用户命令界面呀,而是在倒计时结束后自动引导kernel 。这是怎么回事呢?
在 main_loop()函数当中有如下一段代码:
•
•
•
s = getenv ( "bootcmd" );
/*获取bootcmd 的内容*/
/*bootcmd=nand read 0x22000000 0xB0000 0x200000; bootm */
•
•
# ifndef CFG_HUSH_PARSER
run_command (s , 0 );
/*运行s包含的命令*/
/*运行nand read 0x22000000 0xB0000 0x200000表示将NANDFLASH
0xB0000处数据读取放于0x22000000处,读取长度为0x200000
*/
/*运行bootm命令,引导内核启动*/
# else
parse_string_outer (s , FLAG_PARSE_SEMICOLON |
FLAG_EXIT_FROM_LOOP );
# endif
•
•
•
#endif /* CONFIG_BOOTDELAY */
bootm 命令是什么?它是怎样引导内核的?
要知道想解决这个问题,就要分析common/cmd_bootm.c 中的函数do_bootm ,因为引导kernel 就是bootm 这条命令的工作,do_bootm 是命令bootm 的执行函数。
现在我们来分析一下common/cmd_bootm.c 中的函数do_bootm ,这是bootm 命令的处理函数。
{
ulong iflag ;
const char * type_name ;
uint unc_len = CFG_BOOTM_LEN ;
uint8_t comp , type , os ;
void * os_hdr ;
ulong os_data , os_len ;
ulong image_start , image_end ;
ulong load_start , load_end ;
ulong mem_start ;
phys_size_t mem_size ;
struct lmb lmb ;
memset (( void * ) & images , 0 , sizeof ( images ));
images . verify = getenv_yesno ( "verify" );
images . lmb = & lmb ;
lmb_init ( & lmb );
mem_start = getenv_bootm_low ();
mem_size = getenv_bootm_size ();
lmb_add ( & lmb , ( phys_addr_t ) mem_start , mem_size );
board_lmb_reserve ( & lmb );
/* get kernel image header, start address and length */
/* 获取内核镜像头信息 */
/* 打印 “## Booting kernel from Legacy Image at 22000000 ...
Image Name: Linux-2.6.30
Image Type: ARM Linux Kernel Image (uncompressed)
Data Size: 1507760 Bytes = 1.4 MB
Load Address: 20008000
Entry Point: 20008000
Verifying Checksum ... OK”*/
os_hdr = boot_get_kernel ( cmdtp , flag , argc , argv ,
& images , & os_data , & os_len );
if ( os_len == 0 ) {
puts ( "ERROR: can't get kernel image! /n " );
return 1 ;
}
/* get image parameters */
/* 获取内核镜像格式 */
switch ( genimg_get_format ( os_hdr )) {
case IMAGE_FORMAT_LEGACY:
/* 获取内核镜像参数 */
type = image_get_type ( os_hdr );
comp = image_get_comp ( os_hdr );
os = image_get_os ( os_hdr );
image_end = image_get_image_end ( os_hdr );
load_start = image_get_load ( os_hdr );
break ;
}
image_start = ( ulong ) os_hdr ;
load_end = 0 ;
type_name = genimg_get_type_name ( type );
/* 禁止所有中断 */
iflag = disable_interrupts ();
#ifdef CONFIG_AMIGAONEG3SE
/*
* We've possible left the caches enabled during
* bios emulation, so turn them off again
*/
icache_disable ();
invalidate_l1_instruction_cache ();
flush_data_cache ();
dcache_disable ();
#endif
switch ( comp ) {
case IH_COMP_NONE:
/* 加载内核镜像 */
/* 打印“Loading Kernel Image ... OK” */
if ( load_start == ( ulong ) os_hdr ) {
printf ( " XIP %s ... " , type_name );
} else {
printf ( " Loading %s ... " , type_name );
memmove_wd (( void * ) load_start ,
( void * ) os_data , os_len , CHUNKSZ );
}
load_end = load_start + os_len ;
puts ( "OK /n " );
break ;
}
puts ( "OK /n " );
debug ( " kernel loaded at 0x%08lx, end = 0x%08lx /n " , load_start , load_end );
show_boot_progress ( 7 );
/* 加载错误 */
if (( load_start < image_end ) && ( load_end > image_start )) {
debug ( "image_start = 0x%lX, image_end = 0x%lx /n " , image_start , image_end );
debug ( "load_start = 0x%lx, load_end = 0x%lx /n " , load_start , load_end );
if ( images . legacy_hdr_valid ) {
if ( image_get_type ( & images . legacy_hdr_os_copy ) == IH_TYPE_MULTI )
puts ( "WARNING: legacy format multi component "
"image overwritten /n " );
} else {
puts ( "ERROR: new format image overwritten - "
"must RESET the board to recover /n " );
show_boot_progress ( - 113 );
do_reset ( cmdtp , flag , argc , argv );
}
}
show_boot_progress ( 8 );
lmb_reserve ( & lmb , load_start , ( load_end - load_start ));
switch ( os ) {
default : /* handled by (original) Linux case */
case IH_OS_LINUX:
#ifdef CONFIG_SILENT_CONSOLE
fixup_silent_linux ();
#endif
/* 引导内核启动函数 */
do_bootm_linux ( cmdtp , flag , argc , argv , & images );
break ;
}
show_boot_progress ( - 9 );
#ifdef DEBUG
puts ( " /n ## Control returned to monitor - resetting... /n " );
do_reset ( cmdtp , flag , argc , argv );
#endif
if ( iflag )
enable_interrupts ();
return 1 ;
}
至此do_bootm 函数完成引导内核前的准备任务了。引导内核启动函数将由d o_bootm_linux() 函数执行。
do_bootm_linux()函数位于lib_arm/Bootm.c文件中,主要流程分析如下:
bootm_headers_t * images )
{
ulong initrd_start , initrd_end ;
ulong ep = 0 ;
bd_t * bd = gd -> bd ;
char * s;
int machid = bd -> bi_arch_number ;
void ( * theKernel )( int zero , int arch , uint params );
int ret ;
#ifdef CONFIG_CMDLINE_TAG
char * commandline = getenv ( "bootargs" );
#endif
/* find kernel entry point */
if ( images -> legacy_hdr_valid ) {
ep = image_get_ep ( & images -> legacy_hdr_os_copy );
#if defined(CONFIG_FIT)
} else if ( images -> fit_uname_os ) {
ret = fit_image_get_entry ( images -> fit_hdr_os ,
images -> fit_noffset_os , & ep );
if ( ret ) {
puts ( "Can't get entry point property! /n " );
goto error ;
}
#endif
} else {
puts ( "Could not find kernel entry point! /n " );
goto error ;
}
theKernel = ( void ( * )( int , int , uint )) ep ;
s = getenv ( "machid" );
if (s) {
machid = simple_strtoul (s , NULL , 16 );
printf ( "Using machid 0x%x from environment /n " , machid );
}
ret = boot_get_ramdisk ( argc , argv , images , IH_ARCH_ARM ,
& initrd_start , & initrd_end );
if ( ret )
goto error ;
show_boot_progress ( 15 );
debug ( "## Transferring control to Linux (at address %08lx) ... /n " ,
( ulong ) theKernel );
#if defined (CONFIG_SETUP_MEMORY_TAGS) || /
defined (CONFIG_CMDLINE_TAG) || /
defined (CONFIG_INITRD_TAG) || /
defined (CONFIG_SERIAL_TAG) || /
defined (CONFIG_REVISION_TAG) || /
defined (CONFIG_LCD) || /
defined (CONFIG_VFD)
/* 初始化TAG结构体开始 */
setup_start_tag ( bd );
#ifdef CONFIG_SERIAL_TAG
setup_serial_tag ( & params );
#endif
#ifdef CONFIG_REVISION_TAG
setup_revision_tag ( & params );
#endif
#ifdef CONFIG_SETUP_MEMORY_TAGS
/* 设置RAM参数 */
setup_memory_tags ( bd );
#endif
#ifdef CONFIG_CMDLINE_TAG
setup_commandline_tag ( bd , commandline );
#endif
#ifdef CONFIG_INITRD_TAG
if ( initrd_start && initrd_end )
setup_initrd_tag ( bd , initrd_start , initrd_end );
#endif
#if defined (CONFIG_VFD) || defined (CONFIG_LCD)
setup_videolfb_tag (( gd_t * ) gd );
#endif
/* 初始化TAG结构体结束 */
setup_end_tag ( bd );
#endif
/* we assume that the kernel is in place */
printf ( " /n Starting kernel ... /n/n " );
#ifdef CONFIG_USB_DEVICE
{
extern void udc_disconnect ( void );
udc_disconnect ();
}
#endif
cleanup_before_linux ();
/* 将控制权交给内核,让内核自解压启动 */
/* 传给KERNEL的参数:(struct tag *)bd->bi_boot_params */
/* 在board/atmel/at91sam9g20ek/At91sam9g20ek.c文件中有如下定义:
gd->bd->bi_boot_params = PHYS_SDRAM + 0x100;(PHYS_SDRAM = 0x20000000)
*/
theKernel ( 0 , machid , bd -> bi_boot_params );
/* does not return */
return ;
error:
do_reset ( cmdtp , flag , argc , argv );
return ;
}