Ubuntu 10.04下安装OpenCV 2.2
下面的方法转自:http://www.linuxidc.com/Linux/2011-08/40344.htm
1. 下载OpenCV 2.2源码包,地址http://www.opencv.org.cn/download/OpenCV-2.2.0.tar.bz2,其实可以通过apt-get install命令找到opencv相关包直接安装,但是建议从源码包MAKE,编译开始。
2. 安装cmake. OpenCV官方论坛的安装教程,我看了下,貌似不适用于2.2版本了,2.2源码解压后得到文件夹OpenCV-2.2.0后,里面有个文件叫CMakeList.txt,这是cmake的"makefile",通过这个文件,cmake先把源码配置成常规安装包,生成gcc的make的Makefile文件。
好了,首先,在与源码包同级的目录下新建一个文件夹OpenCV-build,然后安装cmake。终端下sudo apt-get install cmake,然后sudo apt-get install cmake-qt-gui,两个安装成功后,终端输入cmake-gui,会打开一个界面:
点击Browse Source选择刚才解压的源码文件夹,再点击Browse Build选择刚才新建的OpenCV-build文件夹,点击configure按钮,这时Generate按钮应该已经可以点击了,不过Generate按钮还是灰色,再点一次configure按钮试试,应该就可以了,点击Generate按钮之后,可以看到下方有提示成功。
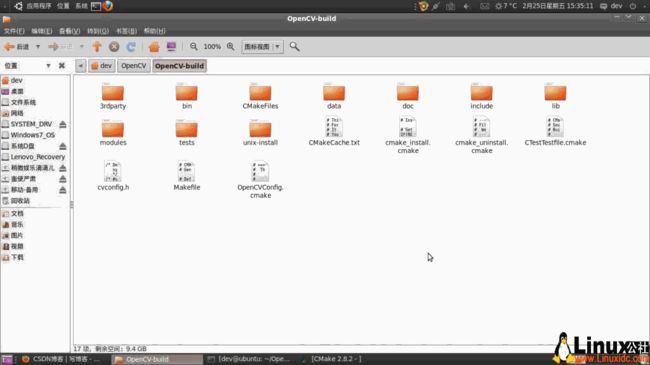
3. 打开OpenCV-build文件夹,里面已经出现了Makefile文件,像这样:
打开终端, 转到OpenCV-build下,输入make,应该就会出现这么一连串犀利的安装过程了...
4. 最后,输入sudo make install ,完成整个安装。
5. 好了,现在来测试一下安装成功没有:
终端下转到刚才解压的OpenCV-2.2.0/samples/c文件夹下,里面有一个build_all.sh脚本,执行之:bash ./build_all.sh,成功之后,ls命令查看,生成了一个facedetect执行文件,./facedetect执行之!如果弹出一个捕捉脸部的窗口,那么恭喜,你成功了。
注:如果在最后执行facedetect时报错:./facedetect: error while loading shared libraries: libopencv_core.so.2.2: cannot open shared object file: No such file or directory。
这是因为你没有装ffmpeg,这好办,输入sudo -apt-get install ffmpeg安装,安装成功之后再执行facedectect即可!
————————————————————————————
一、注意事项
Ubuntu 11.04 下安装 OpenCV2.2 由于2.6.38内核移除了videodev.h,一般会出现以下错误:
错误1:
/home/user/OpenCV-2.2.0/modules/highgui/src/cap_v4l.cpp:217:28: fatal error:
linux/videodev.h: No such file or directory
compilation terminated.
make[2]: *** [modules/highgui/CMakeFiles/opencv_highgui.dir/src/cap_v4l.o] Error 1
make[1]: *** [modules/highgui/CMakeFiles/opencv_highgui.dir/all] Error 2
make: *** [all] Error 2
错误2:
../../lib/libopencv_highgui.so.2.2.0: undefined reference to `cvCreateCameraCapture_V4L(int)
其解决方案如下:
在 OpenCV-2.2.0/modules/highgui/src/cap_v4l.cpp 中第217行前后分别加上的 #ifdef HAVE_CAMV4L 及 #endif;
同时将 OpenCV-2.2.0/modules/highgui/src/cap.cpp 中174行改为 #if defined (HAVE_CAMV4L)
参考链接: https://code.ros.org/trac/opencv/attachment/ticket/862/OpenCV-2.2-nov4l1.patch
各种错误汇总:http://cn.waterlin.org/CVCG/OpenCV-installation-error.html
1 OpenCV2.2 在 Ubuntu 11.04 下编译安装错误及解决办法
1.1 错误1:undefined reference to `cvCreateCameraCapture_V4L(int)'
在 Ubuntu 11.04 下编译 OpenCV2.2,出现了如下错误:
Linking CXX static library ../../lib/libopencv_haartraining_engine.a
[ 80%] Built target opencv_haartraining_engine
Scanning dependencies of target opencv_createsamples
[ 80%] Building CXX object modules/haartraining/CMakeFiles/opencv_createsamples.dir/createsamples.o
Linking CXX executable ../../bin/opencv_createsamples
../../lib/libopencv_highgui.so.2.2.0: undefined reference to `cvCreateCameraCapture_V4L(int)'
collect2: ld returned 1 exit status
make[2]: *** [bin/opencv_createsamples] Error 1
make[1]: *** [modules/haartraining/CMakeFiles/opencv_createsamples.dir/all] Error 2
make: *** [all] Error 2
其中关键的错误提示在于:
undefined reference to `cvCreateCameraCapture_V4L(int)'
在 Ubuntu 11.04 下,网上的资料解释可以有两种方法解决这个问题:
(1) make ubuntu 11.04 compile with libv4l,具体的解决办法查看这里。
(2) fixed "undefined cvCreateCameraCapture_V4L" linker errors on some linux distros (thanks to miguelinux for the patch),具体的解决方法查看这里。
这两个解决办法里,我试验了第一种方法,的确是可以解决上述问题;不过我没测试第二种方法。
知其然还要知其所以然,根本的原因在于:
In some linux distros where V4L2 is enabled, CMake does not define the HAVE_CAMV4L macro, but the macro HAVE_CAMV4L2 is defined.
When the highgui.so is building and linked with an other program, a Link error undefined reference to cvCreateCameraCapture_V4L is detected, and the library is not finished. The compilation terminated at [ 83%] Building.
中文翻译为:
在某些 Linux 发行版本中启用了V4L2,CMake并没有定义 HAVE_CAMV4L 这个宏定义,但是定义了 HAVE_CAMV4L2 这个宏定义。

当编译 highgui.so 并需要和其他程序链接时,一个错误 undefined reference to cvCreateCameraCapture_V4L 就会产生。
详细的解释可以参看 Ticket #324 和《Ubuntu11.04下安装opencv2.2编译(make)出错的原因解析及解决方法》。
1.2 错误2: linux/videodev.h: No such file or directory
我今天在 Ubuntu 11.04 上编译 OpenCV2.2,又碰到这样一个问题,在安装好 Utuntu-11.04-server 以及相应的依赖包后,再用 cmake, make 编译 OpenCV2.2 出错,提示如下错误:
/home/water/OpenCV/OpenCV-2.2.0/modules/highgui/src/cap_v4l.cpp:217:28: fatal error: linux/videodev.h: No such file or directory
compilation terminated.
make[2]: *** [modules/highgui/CMakeFiles/opencv_highgui.dir/src/cap_v4l.o] Error 1
make[1]: *** [modules/highgui/CMakeFiles/opencv_highgui.dir/all] Error 2
make: *** [all] Error 2
这个问题在 OpenCV 的讨论组里也有讨论,由于 Ubuntu11.04 版本附带的 Linux 内核已经去掉了对 libv4L 的支持,因此需要自己安装 libv4L 库的头文件,尤其是 lib4l 包,该包是用命令
$ sudo apt-get install libv4l-dev
来安装的,注意这里是 libv4L 而不是 libv41;
可是,现在你继续安装,依然会出现上述错误。这是由于这样安装的 libv4L 库把头文件名称改为
/usr/include/libv4l1-videodev.h
等。知道了原因,解决办法也很简单,只需要把出错这行代码的 #include 头文件改掉,即把文件
/modules/highgui/src/cap_v4l.cpp
第 217 行的
#include <linux/videodev.h>
代码,改为下面这行
#include <libv4l1-videodev.h>
这行代码。
这样,就可以顺利进行编译了。
1.3 OpenCV2.2 为 Ubuntu11.04 修订后的源代码
为了方便,可以使用浏忙绪绪针对 Ubuntu11.04 修改打包后的 OpenCV2.2.0 代码:
./attachments/OpenCV-2.2.0-Ubuntu11.04-WaterLin.zip
