Cocos2d-x 中使用多线程
一直以为Cocos2d-x中只有事件队列,只有一个主线程。。。
首先设置头文件
E:\Cocos2d-X\cocos2d-2.1rc0-x-2.1.2\cocos2dx\platform\third_party\win32\pthread
然后添加Lib
pthreadVCE2.lib
pthread_mutex_init(&mutex,NULL);
理解为初始化互斥锁吧。。
pthread_create(&pidgo,NULL,thread_go,0);
创建一个线程,第一个参数是线程ID,第二个描述为空,第三个是线程函数,在这个函数里写需要在线程里执行的事件,第四个是传递参数给函数。
pthread_mutex_lock(&mutex);
在一个线程中操作资源的时候就先把资源锁起来,以免其他线程使用。
pthread_mutex_unlock(&mutex);
线程中使用完毕后就可以把资源释放了。这样别的线程就可以使用资源。
下面是源代码:
HelloWorldScene.h
#pragma once

#include "cocos2d.h"

#include "Box2D/Box2D.h"

#include "SimpleAudioEngine.h"

#include "pthread.h"

#include<string>

class HelloWorld : public cocos2d::CCLayer
{
public:
    // Here's a difference. Method 'init' in cocos2d-x returns bool, instead of returning 'id' in cocos2d-iphone
    virtual bool init();

    // there's no 'id' in cpp, so we recommand to return the exactly class pointer
    static cocos2d::CCScene* scene();

    // a selector callback
    void menuCloseCallback(CCObject* pSender);

    // implement the "static node()" method manually
    CREATE_FUNC(HelloWorld);

	//Create two function and two tag of thread
	pthread_t pidrun,pidgo;
	static void* thread_run(void *r);
	static void* thread_go(void* r);

};


class Student
{
public :
	Student(void){};
	Student(std::string name,int age,std::string sex)
	{
		this->m_age=age;
		this->m_name=name;
		this->m_sex=sex;
	}
	~Student()
	{
		cocos2d::CCLog("delete data");
	}

	std::string m_name;
	std::string m_sex;
	int m_age;
};
HelloWorldScene.cpp
#include "HelloWorldScene.h"

#include<windows.h>


using namespace cocos2d;

static int ticket=100;
static pthread_mutex_t mutex;

CCScene* HelloWorld::scene()
{
    CCScene * scene = NULL;
    do
    {
        // 'scene' is an autorelease object
        scene = CCScene::create();
        CC_BREAK_IF(! scene);

        // 'layer' is an autorelease object
        HelloWorld *layer = HelloWorld::create();
        CC_BREAK_IF(! layer);

        // add layer as a child to scene
        scene->addChild(layer);
    } while (0);

    // return the scene
    return scene;
}

// on "init" you need to initialize your instance
bool HelloWorld::init()
{
    bool bRet = false;
    do
    {
        //////////////////////////////////////////////////////////////////////////
        // super init first
        //////////////////////////////////////////////////////////////////////////

        CC_BREAK_IF(! CCLayer::init());

        //////////////////////////////////////////////////////////////////////////
        // add your codes below...
        //////////////////////////////////////////////////////////////////////////

        // 1. Add a menu item with "X" image, which is clicked to quit the program.

        // Create a "close" menu item with close icon, it's an auto release object.
        CCMenuItemImage *pCloseItem = CCMenuItemImage::create(
            "CloseNormal.png",
            "CloseSelected.png",
            this,
            menu_selector(HelloWorld::menuCloseCallback));
        CC_BREAK_IF(! pCloseItem);

        // Place the menu item bottom-right conner.
        pCloseItem->setPosition(ccp(CCDirector::sharedDirector()->getWinSize().width - 20, 20));

        // Create a menu with the "close" menu item, it's an auto release object.
        CCMenu* pMenu = CCMenu::create(pCloseItem, NULL);
        pMenu->setPosition(CCPointZero);
        CC_BREAK_IF(! pMenu);

        // Add the menu to HelloWorld layer as a child layer.
        this->addChild(pMenu, 1);

        // 2. Add a label shows "Hello World".

        // Create a label and initialize with string "Hello World".
        CCLabelTTF* pLabel = CCLabelTTF::create("Hello World", "Arial", 24);
        CC_BREAK_IF(! pLabel);

        // Get window size and place the label upper.
        CCSize size = CCDirector::sharedDirector()->getWinSize();
        pLabel->setPosition(ccp(size.width / 2, size.height - 50));

        // Add the label to HelloWorld layer as a child layer.
        this->addChild(pLabel, 1);

        // 3. Add add a splash screen, show the cocos2d splash image.
        CCSprite* pSprite = CCSprite::create("HelloWorld.png");
        CC_BREAK_IF(! pSprite);

        // Place the sprite on the center of the screen
        pSprite->setPosition(ccp(size.width/2, size.height/2));

        // Add the sprite to HelloWorld layer as a child layer.
        this->addChild(pSprite, 0);

        bRet = true;
    } while (0);

    return bRet;
}

void HelloWorld::menuCloseCallback(CCObject* pSender)
{
    // "close" menu item clicked
    //CCDirector::sharedDirector()->end();

	Student *temp=new Student(std::string("ThisisGame"),22,std::string("Boy"));
	pthread_mutex_init(&mutex,NULL);
	pthread_create(&pidrun,NULL,thread_run,temp);
	pthread_create(&pidgo,NULL,thread_go,0);
}


void* HelloWorld::thread_run(void* r)
{
	Student* s=(Student*)(r);
	CCLog("Student age=%d,name=%s,sex=%s",s->m_age,s->m_name.c_str(),s->m_sex.c_str());
	//delete s;
	while (true)
	{
		pthread_mutex_lock(&mutex);
		if(ticket>0)
		{
			CCLog("thread run sell %d",ticket);
			ticket--;
			pthread_mutex_unlock(&mutex);
		}
		else
		{
			pthread_mutex_unlock(&mutex);
			return NULL;
		}
#ifdef WIN32
		Sleep(1000);
#else
		Usleep(1);
#endif
	}
	return NULL;
}


void* HelloWorld::thread_go(void* r)
{
	while (true)
	{
		pthread_mutex_lock(&mutex);
		if(ticket>0)
		{
			CCLog("thread go sell %d",ticket);
			ticket--;
			pthread_mutex_unlock(&mutex);
		}
		else
		{
			pthread_mutex_unlock(&mutex);
			return NULL;
		}
#ifdef WIN32
		Sleep(1000);
#else
		Usleep(1);
#endif
	}
	return NULL;
}
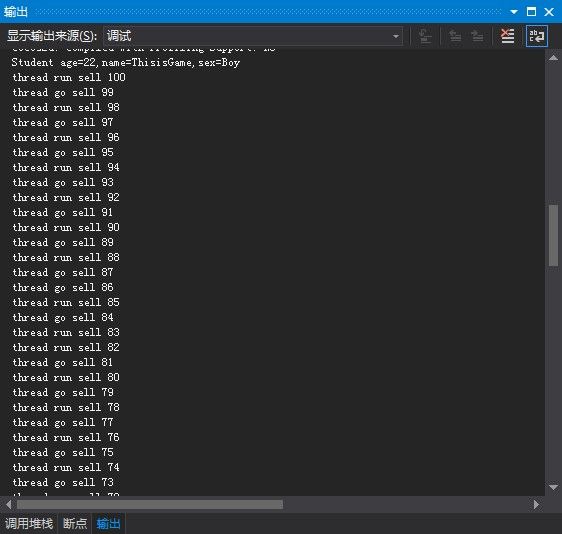
程序运行结果:
然后是工程打包:
http://download.csdn.net/detail/cp790621656/5905699

