Windows8 Metro开发 (03) : AppBar控件之BottomAppBar
Josè Mourinho的专栏 http://blog.csdn.net/zyc13701469860
转载请注明原作者和出处。
BottomAppBar
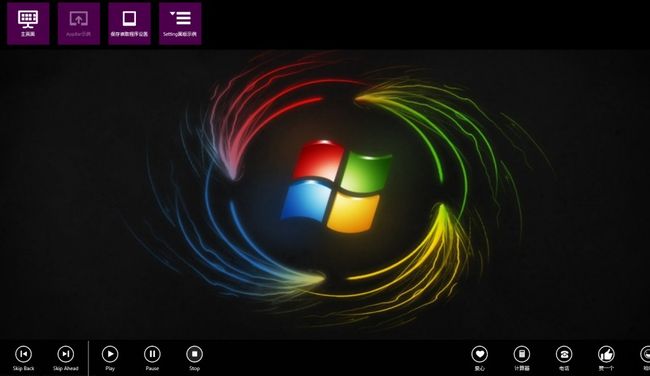
在介绍BottomAppBar之前还是先上张图。
这次我们关注底部的AppBar.
上图的AppBar分为左右2个部分。
左侧是引用系统自带的AppBar按钮,右侧是自定义的AppBar按钮。其实写法都一样。
下面来看看布局文件
<Page.BottomAppBar>
        <!-- ApplicationBar -->
        <AppBar x:Name="BottomAppbar">
            <Grid>
                <Grid.RowDefinitions>
                    <RowDefinition Height="Auto"/>
                    <RowDefinition Height="Auto"/>
                </Grid.RowDefinitions>
                <StackPanel x:Name="systemAppBarPanel" Orientation="Horizontal">
                    <Button x:Name="SkipBackAppBarButton" Style="{StaticResource SkipBackAppBarButtonStyle}" Click="OnSkipBackAppBarButtonCilcked" />
                    <Button x:Name="SkipAheadAppBarButton" Style="{StaticResource SkipAheadAppBarButtonStyle}" Click="OnSkipAheadAppBarButtonCilcked"/>
                    <Line Width="5" Stroke="White" Stretch="Fill" Y2="{Binding ActualHeight, ElementName=systemAppBarPanel, Mode=OneWay}"/>
                    <Button x:Name="PlayAppBarButton" Style="{StaticResource PlayAppBarButtonStyle}" Click="OnPlayAppBarButtonCilcked"/>
                    <Button x:Name="PauseAppBarButton" Style="{StaticResource PauseAppBarButtonStyle}" Click="OnPauseAppBarButtonCilcked"/>
                    <Button x:Name="StopAppBarButton" Style="{StaticResource StopAppBarButtonStyle}" Click="OnStopAppBarButtonCilcked"/>
                </StackPanel>
                <StackPanel x:Name="customAppBarPanel" Orientation="Horizontal" HorizontalAlignment="Right">
                    <Button x:Name="LoveAppBarButton" Style="{StaticResource LoveAppBarButtonStyle}" Click="OnLoveAppBarButtonCilcked"/>
                    <Button x:Name="CalcAppBarButton"  Style="{StaticResource CalcAppBarButtonStyle}" Click="OnCalcAppBarButtonCilcked"/>
                    <Button x:Name="TelAppBarButton"  Style="{StaticResource TelAppBarButtonStyle}" Click="OnTelAppBarButtonCilcked"/>
                    <Button x:Name="GoodAppBarButton"  Style="{StaticResource GoodAppBarButtonStyle}" Click="OnGoodAppBarButtonCilcked"/>
                    <Button x:Name="LaughAppBarButton"  Style="{StaticResource LaughAppBarButtonStyle}" Click="OnLaughAppBarButtonCilcked"/>
                </StackPanel>
            </Grid>
        </AppBar>
    </Page.BottomAppBar>
里面每一个Button的样式都是不同的。这些样式是什么呢?先来看看系统的样式。
以SkipBackAppBarButtonStyle为例:
<Style x:Key="SkipBackAppBarButtonStyle" TargetType="ButtonBase" BasedOn="{StaticResource AppBarButtonStyle}">
<Setter Property="AutomationProperties.AutomationId" Value="SkipBackAppBarButton"/>
<Setter Property="AutomationProperties.Name" Value="Skip Back"/>
<Setter Property="Content" Value=""/>
</Style>
SkipBackAppBarButton是以AppBarButtonStyle为基本样式的一个AppBar按钮,在这里我们只需注意最后2个Setter.
<Setter Property="AutomationProperties.Name" Value="Skip Back"/>用来显示按钮下面的字串
<Setter Property="Content" Value=""/> 用来显示按钮中间圆圈里的字符串,再次强调这个不是“图片”。
看到这里,你们也许知道了自定义按钮该怎样定义了。代码还是贴下吧。
<Style x:Key="LoveAppBarButtonStyle" TargetType="ButtonBase" BasedOn="{StaticResource AppBarButtonStyle}">
<Setter Property="AutomationProperties.AutomationId" Value="LoveAppBarButton"/>
<Setter Property="AutomationProperties.Name" Value="爱心"/>
<Setter Property="Content" Value=""/>
</Style>
每一个按钮的事件都很简单,就是弹出一个相应的对话框,这里就省略了。
Snap模式处理
同TopAppBar一样,BottomAppBar在Snap模式下的时候需要进行UI转换。
Snap模式后面会详细介绍。这里先省略概念。
Snap模式后面会详细介绍。这里先省略概念。
如果不做处理,当你把程序拖到侧边栏时,你会发现此时BottomAppBar上面的按钮只剩下了3个!并且按钮上面的文字显示不全。
因此我们需要对BottomAppBar的布局做下调整。当程序拖到侧边栏时,将左右两侧的按钮分两排显示,缩小按钮尺寸并且隐去按钮下面文字。
不过系统并没有定义这种按钮的样式,需要我们自己来实现:
创建文件AppBarPageStyle.xaml,在StandardStyles.xaml里找到AppBarButtonStyle,将其复制到AppBarPageStyle.xaml中,并更名为
AppBarButtonSnapStyle,修改Template属性。
AppBarButtonSnapStyle,修改Template属性。
<ControlTemplate TargetType="ButtonBase">
<Grid x:Name="RootGrid" Width="60" Background="Transparent">
<StackPanel VerticalAlignment="Top" Margin="0,12,0,11">
<Grid Width="40" Height="40" Margin="0,0,0,5" HorizontalAlignment="Center">
<TextBlock x:Name="BackgroundGlyph" Text="" FontFamily="Segoe UI Symbol" FontSize="53.333" Margin="-4,-19,0,0" Foreground="{StaticResource AppBarItemBackgroundThemeBrush}"/>
<TextBlock x:Name="OutlineGlyph" Text="" FontFamily="Segoe UI Symbol" FontSize="53.333" Margin="-4,-19,0,0"/>
<ContentPresenter x:Name="Content" HorizontalAlignment="Center" Margin="-1,-1,0,0" VerticalAlignment="Center"/>
</Grid>
</StackPanel>
...
</Grid>
</ControlTemplate>
然后定义相对应的Snap AppBar按钮
<Style x:Key="LoveAppBarButtonSnapStyle" TargetType="ButtonBase" BasedOn="{StaticResource AppBarButtonSnapStyle}">
<Setter Property="Content" Value=""/>
</Style>
在AppBarPage页面进入Snap模式的时候,如果在XAML里面注册状态监听,程序会根据XAML代码变换UI布局。
<VisualState x:Name="Snapped">
                    <Storyboard>
                        <ObjectAnimationUsingKeyFrames Storyboard.TargetName="backButton" Storyboard.TargetProperty="Style">
                            <DiscreteObjectKeyFrame KeyTime="0" Value="{StaticResource SnappedBackButtonStyle}"/>
                        </ObjectAnimationUsingKeyFrames>
                        <ObjectAnimationUsingKeyFrames Storyboard.TargetName="pageTitle" Storyboard.TargetProperty="Style">
                            <DiscreteObjectKeyFrame KeyTime="0" Value="{StaticResource SnappedPageHeaderTextStyle}"/>
                        </ObjectAnimationUsingKeyFrames>
                        <ObjectAnimationUsingKeyFrames Storyboard.TargetName="customAppBarPanel"  Storyboard.TargetProperty="(Grid.Row)">
                            <DiscreteObjectKeyFrame KeyTime="0" Value="1"/>
                        </ObjectAnimationUsingKeyFrames>
                        <ObjectAnimationUsingKeyFrames Storyboard.TargetName="customAppBarPanel"  Storyboard.TargetProperty="HorizontalAlignment">
                            <DiscreteObjectKeyFrame KeyTime="0" Value="Left"/>
                        </ObjectAnimationUsingKeyFrames>

                        <!--appbar button-->
                        <ObjectAnimationUsingKeyFrames Storyboard.TargetName="SkipBackAppBarButton" Storyboard.TargetProperty="Style">
                            <DiscreteObjectKeyFrame KeyTime="0" Value="{StaticResource SkipBackAppBarButtonSnapStyle}"/>
                        </ObjectAnimationUsingKeyFrames>

                        <ObjectAnimationUsingKeyFrames Storyboard.TargetName="SkipAheadAppBarButton" Storyboard.TargetProperty="Style">
                            <DiscreteObjectKeyFrame KeyTime="0" Value="{StaticResource SkipAheadAppBarButtonSnapStyle}"/>
                        </ObjectAnimationUsingKeyFrames>

                        <ObjectAnimationUsingKeyFrames Storyboard.TargetName="PlayAppBarButton" Storyboard.TargetProperty="Style">
                            <DiscreteObjectKeyFrame KeyTime="0" Value="{StaticResource PlayAppBarButtonSnapStyle}"/>
                        </ObjectAnimationUsingKeyFrames>

                        <ObjectAnimationUsingKeyFrames Storyboard.TargetName="PauseAppBarButton" Storyboard.TargetProperty="Style">
                            <DiscreteObjectKeyFrame KeyTime="0" Value="{StaticResource PauseAppBarButtonSnapStyle}"/>
                        </ObjectAnimationUsingKeyFrames>

                        <ObjectAnimationUsingKeyFrames Storyboard.TargetName="StopAppBarButton" Storyboard.TargetProperty="Style">
                            <DiscreteObjectKeyFrame KeyTime="0" Value="{StaticResource StopAppBarButtonSnapStyle}"/>
                        </ObjectAnimationUsingKeyFrames>

                        <ObjectAnimationUsingKeyFrames Storyboard.TargetName="LoveAppBarButton"  Storyboard.TargetProperty="Style">
                            <DiscreteObjectKeyFrame KeyTime="0" Value="{StaticResource LoveAppBarButtonSnapStyle}"/>
                        </ObjectAnimationUsingKeyFrames>
                        <ObjectAnimationUsingKeyFrames Storyboard.TargetName="CalcAppBarButton"  Storyboard.TargetProperty="Style">
                            <DiscreteObjectKeyFrame KeyTime="0" Value="{StaticResource CalcAppBarButtonSnapStyle}"/>
                        </ObjectAnimationUsingKeyFrames>
                        <ObjectAnimationUsingKeyFrames Storyboard.TargetName="TelAppBarButton"  Storyboard.TargetProperty="Style">
                            <DiscreteObjectKeyFrame KeyTime="0" Value="{StaticResource TelAppBarButtonSnapStyle}"/>
                        </ObjectAnimationUsingKeyFrames>
                        <ObjectAnimationUsingKeyFrames Storyboard.TargetName="GoodAppBarButton"  Storyboard.TargetProperty="Style">
                            <DiscreteObjectKeyFrame KeyTime="0" Value="{StaticResource GoodAppBarButtonSnapStyle}"/>
                        </ObjectAnimationUsingKeyFrames>
                        <ObjectAnimationUsingKeyFrames Storyboard.TargetName="LaughAppBarButton"  Storyboard.TargetProperty="Style">
                            <DiscreteObjectKeyFrame KeyTime="0" Value="{StaticResource LaughAppBarButtonSnapStyle}"/>
                        </ObjectAnimationUsingKeyFrames>
                    </Storyboard>
                </VisualState>
Snap模式下的BottomAppBar如下图所示:
注意:
1.别忘了在App.xaml中引用AppBarPageStyle.xaml
<ResourceDictionary Source="Common/StandardStyles.xaml"/>
<ResourceDictionary Source="Pages/Home/GlobalPageStyle.xaml"/>
<ResourceDictionary Source="Pages/Home/HomePageStyle.xaml"/>
<ResourceDictionary Source="Pages/01-AppBar/AppBarPageStyle.xaml"/>
2.AppBar控件的功能(应该是所有控件)需要符合微软制定的规范,不能随便制定。具体内容可参考MSDN。

