qtdbus的简单用法
Nokia最近宣布把Qt团队裁了,听闻此消息倍感遗憾,如此利器竟弃之不用,但想想诺记已投入微软的怀抱,meego已弃,qt似乎确实已无用,但对于公司的长足发展,绝对是损失,闲话不多说,下面正式介绍用法。
关于dbus的介绍请参考相关文章,这里默认读者已经知道什么是Session Bus, Bus Name, Object Paths, Interfaces, Methods。
其实我们最终调用的是method,前面几个无非是个分类方法,便于检索。即是session bus下bus name为xxx的bus下面位于Object paths下有个interface,里面提供了method供用户调用。
如图示:
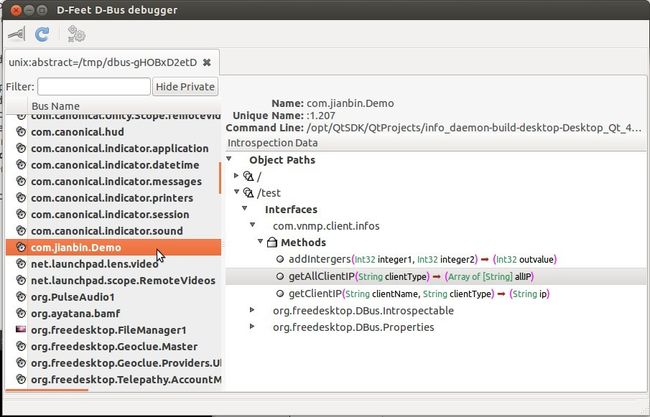
在session bus下有个bus名为com.jianbin.Demo,提供了一个object名为test,test拥有个名为com.vnmp.client.infos的interface,此interface下有三个method,分别为addIntegers, getAllClientIP, getClientIP。
下面就介绍使用qtdbus来实现图示的dbus。
首先,定义dbus的xml文件,xml文件:
clientInfo.xml
<!DOCTYPE node PUBLIC "-//freedesktop//DTD D-BUS Object Introspection 1.0//EN"
        "http://www.freedesktop.org/standards/dbus/1.0/introspect.dtd">
<node name="/com/vnmp/client/info">
        <interface name="com.vnmp.client.infos">
                <method name="getClientIP">
                        <arg name="clientName" type="s" direction="in"/>
                        <arg name="clientType" type="s" direction="in"/>
                        <arg name="ip" type="s" direction="out"/>
                </method>
                <method name="getAllClientIP">
                        <arg name="clientType" type="s" direction="in"/>
                        <arg name="allIP" type="as" direction="out"/>
                </method>
                <method name="addIntergers">
                        <arg name="integer1" type="i" direction="in"/>
                        <arg name="integer2" type="i" direction="in"/>
                        <arg name="outvalue" type="i" direction="out"/>
                </method>
        </interface>
</node>
此xml文件很直白地对自身进行了描述,就不细说了。
下面使用QT提供的工具对此文件进行解析,生成对应的c++文件,当然可以手工地完成此项工作,但是考虑到这步相对地机械,所以推荐使用工具进行。
服务器端:qdbusxml2cpp -c InfoIfAdaptor -a infoadaptor.h:infoadaptor.cpp clientInfo.xml
在相应的文件夹下应该会生成infoadaptor.h 和 infoadaptor.cpp,
这个类的实现了xml文件中的所有方法从qt方法到dbus方法的映射,方法的实际实现,还需我们另外实现一个类
#ifndef INFO_H
#define INFO_H

#include <QObject>
#include <QStringList>

class QStringList;

class Info : public QObject
{
    Q_OBJECT
public:
    explicit Info(QObject *parent = 0);

signals:

public slots:

public Q_SLOTS:
    QStringList getAllClientIP(const QString &clientType);
    QString getClientIP(const QString &clientName, const QString &clientType);
    int addIntergers(int integer1, int integer2);
};

#endif // INFO_H
Info::Info(QObject *parent) :
    QObject(parent)
{
}

QStringList Info::getAllClientIP(const QString &clientType)
{
    QStringList retList;
    retList.append("ip1");
    retList.append("ip2");
    return retList;
}

QString Info::getClientIP(const QString &clientName, const QString &clientType)
{
    return QString("hello");
}

int Info::addIntergers(int integer1, int integer2)
{
    return integer1 + integer2;
}
main文件
int main(int argc, char *argv[])
{
    QCoreApplication a(argc, argv);

    Info* infoServer = new Info;
    new InfoIfAdaptor(infoServer);

    QDBusConnection connection = QDBusConnection::sessionBus();
    bool ret = connection.registerService("com.jianbin.Demo");
    ret = connection.registerObject("/test", infoServer);
    return a.exec();
}
注意new InfoAdaptor(infoServer)这行,正是这里,将实际执行的方法映射到了适配器中。
另外qt的.pro文件中千万别忘了加上 CONFIG += qdbus,否则编译不通过
图示查看dbus总线的工具为d-feet
client端就更简单了,所有的工作qt都可以帮我们做好,我们全部所需要做的就是调用下qdbusxml2cpp
qdbusxml2cpp -v -c InfoIf -p infoif.h:infoif.cpp clientInfo.xml
将生成的infoif.h infoif.cpp加入项目
main文件:
int main(int argc, char *argv[])
{
    QCoreApplication a(argc, argv);

    InfoIf* client = new InfoIf("com.jianbin.Demo", "/test", QDBusConnection::sessionBus());

    cout<<client->addIntergers(20, 30)<<endl;
    QStringList slist = client->getAllClientIP("null");
    for(QStringList::const_iterator it = slist.begin(); it != slist.end(); ++it)
        cout<<(*it).toLocal8Bit().constData()<<endl;

    return a.exec();
}
连接上总线后,直接调用相应的方法,是不是很简单^-^。简单的用法就讲这么多,深入的请参考 官方文档。