【Android】实现非root的 Traceroute -- 非Root权限下移植可执行二进制文件 脚本文件
作者 : 万境绝尘
转载请著名出处 : http://blog.csdn.net/shulianghan/article/details/36438365
示例代码下载 :
-- CSDN : http://download.csdn.net/detail/han1202012/7639253;
-- GitHub : https://github.com/han1202012/TracerouteAndBusybox ;
1. 原理思路
文件权限修改无法实现 : 如果 没有 root 权限, 就不能改变二进制文件的文件权限;
-- 将busybox推送到Android系统中 : 使用 adb push 命令, 将 busybox 传入到 sd 卡中, 注意, 上传到内存中无法实现;
-- 上传到sd卡成功 : 使用 adb push 文件名 手机中的文件全路径名 命令;
- octopus@octopus:~/csdn$ adb push busybox-armv7l /sdcard/octopus/busybox
- 3256 KB/s (1109128 bytes in 0.332s)
- octopus@octopus:~/csdn$ adb push busybox-armv7l /data/busybox
- failed to copy 'busybox-armv7l' to '/data/busybox': Permission denied
- shell@android:/sdcard/octopus $ ll
- -rw-rw-r-- root sdcard_rw 1109128 2014-07-08 19:49 busybox
- shell@android:/sdcard/octopus $ chmod 755 busybox
- Unable to chmod busybox: Operation not permitted
应用程序解决方案 :
-- 应用程序专属用户 : Android 操作系统会为每个应用程序设置一个用户, 这个用户对其安装目录(/data/data/包名/)下的文件有完整的权限;
-- 将可执行二进制文件拷贝到安装目录中 : 将交叉编译好的 busybox 放到 工程目录下的 res/assets/ 目录下;
2. 实现策略
文件初始放置 : 将 交叉编译好的 busybox 文件放在 工程目录的 /res/assets/ 目录下;
文件拷贝 : 将该 二进制文件 拷贝到 app 的安装目录的 files 目录下, 即 /data/data/包名/files/下;
修改文件权限 : 使用命令可以直接修改该目录下的权限, 注意这个操作是可以执行的;
执行busybox : 在代码中执行 ./data/data/包名/files/busybox ;
获取执行结果 :
3. 使用到的api解析
(1) 获取 assets 目录文件的输入流
- InputStream is = context.getAssets().open(source);
-- 获取输入流 : 调用 AssetsManager 的 open(String fileName) 即可获取对应文件名的输入流;
(2) 文件流相关操作
根据输入流获取文件大小 : 调用输入流的 inputStream.available() 方法;
- int size = is.available();
将文件读取到缓冲区中 : 创建一个与文件大小相同的字节数组缓冲区, 输入流将数据存放到缓冲区中;
- byte[] buffer = new byte[size];
- is.read(buffer);
- is.close();
将文件写到内存中 : 调用上下文对象的 openFileOutput(绝对路径名, 权限), 即可创建一个文件的输出流;
- FileOutputStream output = context.openFileOutput(destination, Context.MODE_PRIVATE);
- output.write(buffer);
- output.close();
(3) 获取文件的绝对路径
获取app绝对安装路径 : 调用 上下文对象的 getFilesDir().getAbsolutePath() 方法;
- String filesPath = context.getFilesDir().getAbsolutePath();
(4) 执行二进制文件
创建 Process 对象, 并使用该 process 执行shell脚本命令 :
- Runtime runtime = Runtime.getRuntime();
- process = runtime.exec(cmd);
获取执行的命令行结果 :
- InputStream is = process.getInputStream();
- BufferedReader br = new BufferedReader(new InputStreamReader(is));
- String line = null;
- while ((line = br.readLine()) != null) {
- processList.add(line);
- }
- br.close();
4. 代码示例
MainActivity 主程序代码 :
- package cn.org.octopus.tracerouteandbusybox;
- import java.io.BufferedReader;
- import java.io.FileNotFoundException;
- import java.io.FileOutputStream;
- import java.io.IOException;
- import java.io.InputStream;
- import java.io.InputStreamReader;
- import java.util.ArrayList;
- import java.util.List;
- import android.content.Context;
- import android.os.Bundle;
- import android.support.v7.app.ActionBarActivity;
- import android.view.View;
- import android.widget.EditText;
- import android.widget.TextView;
- /** 看不懂注释我就吃半斤狗粮 :-) */
- public class MainActivity extends ActionBarActivity {
- private EditText et_cmd;
- private String app_path;
- private TextView tv_result;
- @Override
- protected void onCreate(Bundle savedInstanceState) {
- super.onCreate(savedInstanceState);
- setContentView(R.layout.home_activity);
- /*初始化控件*/
- et_cmd = (EditText) findViewById(R.id.et_cmd);
- tv_result = (TextView) findViewById(R.id.tv_result);
- /* 获取app安装路径 */
- app_path = getApplicationContext().getFilesDir().getAbsolutePath();
- }
- /** 按钮点击事件 */
- public void onClick(View view) {
- int id = view.getId();
- switch (id) {
- case R.id.copy_busybox: /* 拷贝busybox可执行文件 */
- varifyFile(getApplicationContext(), "busybox");
- break;
- case R.id.copy_traceroute:/* 拷贝traceroute可执行文件 */
- varifyFile(getApplicationContext(), "traceroute");
- break;
- case R.id.exe_busybox:/* 将busybox命令添加到Editext中 */
- String cmd = "." + app_path + "/busybox";
- System.out.println(et_cmd);
- et_cmd.setText(cmd);
- break;
- case R.id.exe_traceroute:/* 将traceroute命令添加到Editext中 */
- cmd = "." + app_path + "/traceroute 8.8.8.8";
- et_cmd.setText(cmd);
- break;
- case R.id.exe: /* 执行Editext中的命令 */
- cmd = et_cmd.getText().toString();
- /* 执行脚本命令 */
- List<String> results = exe(cmd);
- String result = "";
- /* 将结果转换成字符串, 输出到 TextView中 */
- for(String line : results){
- result += line + "\n";
- }
- tv_result.setText(result);
- break;
- default:
- break;
- }
- }
- /** 验证文件是否存在, 如果不存在就拷贝 */
- private void varifyFile(Context context, String fileName) {
- try {
- /* 查看文件是否存在, 如果不存在就会走异常中的代码 */
- context.openFileInput(fileName);
- } catch (FileNotFoundException notfoundE) {
- try {
- /* 拷贝文件到app安装目录的files目录下 */
- copyFromAssets(context, fileName, fileName);
- /* 修改文件权限脚本 */
- String script = "chmod 700 " + app_path + "/" + fileName;
- /* 执行脚本 */
- exe(script);
- } catch (Exception e) {
- e.printStackTrace();
- }
- }
- }
- /** 将文件从assets目录中拷贝到app安装目录的files目录下 */
- private void copyFromAssets(Context context, String source,
- String destination) throws IOException {
- /* 获取assets目录下文件的输入流 */
- InputStream is = context.getAssets().open(source);
- /* 获取文件大小 */
- int size = is.available();
- /* 创建文件的缓冲区 */
- byte[] buffer = new byte[size];
- /* 将文件读取到缓冲区中 */
- is.read(buffer);
- /* 关闭输入流 */
- is.close();
- /* 打开app安装目录文件的输出流 */
- FileOutputStream output = context.openFileOutput(destination,
- Context.MODE_PRIVATE);
- /* 将文件从缓冲区中写出到内存中 */
- output.write(buffer);
- /* 关闭输出流 */
- output.close();
- }
- /** 执行 shell 脚本命令 */
- private List<String> exe(String cmd) {
- /* 获取执行工具 */
- Process process = null;
- /* 存放脚本执行结果 */
- List<String> list = new ArrayList<String>();
- try {
- /* 获取运行时环境 */
- Runtime runtime = Runtime.getRuntime();
- /* 执行脚本 */
- process = runtime.exec(cmd);
- /* 获取脚本结果的输入流 */
- InputStream is = process.getInputStream();
- BufferedReader br = new BufferedReader(new InputStreamReader(is));
- String line = null;
- /* 逐行读取脚本执行结果 */
- while ((line = br.readLine()) != null) {
- list.add(line);
- }
- br.close();
- } catch (IOException e) {
- e.printStackTrace();
- }
- return list;
- }
- }
home_activity.xml 布局文件代码 :
- <?xml version="1.0" encoding="utf-8"?>
- <LinearLayout xmlns:android="http://schemas.android.com/apk/res/android"
- android:layout_width="match_parent"
- android:layout_height="match_parent"
- android:orientation="vertical" >
- <LinearLayout
- android:layout_width="match_parent"
- android:layout_height="wrap_content"
- android:gravity="center"
- android:orientation="horizontal" >
- <Button
- android:id="@+id/copy_busybox"
- android:layout_width="wrap_content"
- android:layout_height="wrap_content"
- android:onClick="onClick"
- android:text="拷贝busybox"
- android:textSize="7dp"
- android:textStyle="bold" />
- <Button
- android:id="@+id/copy_traceroute"
- android:layout_width="wrap_content"
- android:layout_height="wrap_content"
- android:onClick="onClick"
- android:text="拷贝traceroute"
- android:textSize="7dp"
- android:textStyle="bold" />
- <Button
- android:id="@+id/exe_busybox"
- android:layout_width="wrap_content"
- android:layout_height="wrap_content"
- android:onClick="onClick"
- android:text="执行busybox"
- android:textSize="7dp"
- android:textStyle="bold" />
- <Button
- android:id="@+id/exe_traceroute"
- android:layout_width="wrap_content"
- android:layout_height="wrap_content"
- android:onClick="onClick"
- android:text="执行traceroute"
- android:textSize="7dp"
- android:textStyle="bold" />
- </LinearLayout>
- <LinearLayout
- android:layout_width="match_parent"
- android:layout_height="wrap_content"
- android:orientation="horizontal" >
- <EditText
- android:id="@+id/et_cmd"
- android:layout_width="0dp"
- android:layout_height="wrap_content"
- android:layout_weight="4"
- android:hint="输入要执行的命令"
- android:textStyle="bold" />
- <Button
- android:id="@+id/exe"
- android:layout_width="0dp"
- android:layout_height="wrap_content"
- android:layout_weight="1"
- android:onClick="onClick"
- android:text="执行"
- android:textSize="10dp"
- android:textStyle="bold" />
- </LinearLayout>
- <TextView
- android:id="@+id/tv_result"
- android:layout_width="match_parent"
- android:layout_height="match_parent"
- android:background="#000000"
- android:textColor="#FFF"
- android:textSize="10dp"
- android:textStyle="bold" />
- </LinearLayout>
5. 执行结果
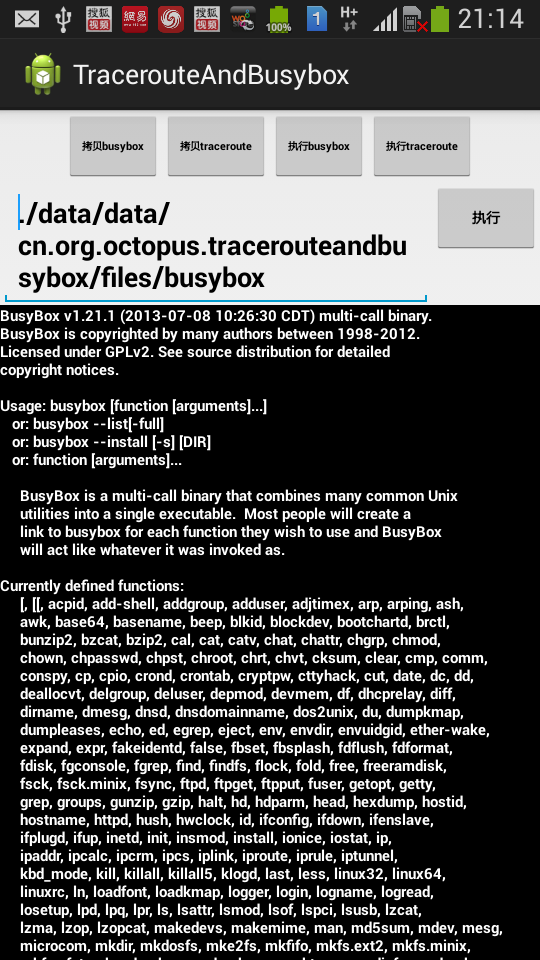
执行 busybox 程序 :
执行 traceroute 程序 :
示例代码下载 :
-- CSDN : http://download.csdn.net/detail/han1202012/7639253;
-- GitHub : https://github.com/han1202012/TracerouteAndBusybox ;
作者 : 万境绝尘
转载请著名出处 : http://blog.csdn.net/shulianghan/article/details/36438365

