Grunt插件autoprefixer使用指南
在grunt安装、配置和应用中,我介绍了几种插件的使用。今天再介绍一个为兼容各大浏览器自动添加前缀的插件autoprefixer。
要想使用它得先安装 Browserslist caniuse-db num2fraction 等插件,具体安装方法见上一篇文章。

该插件的github地址为:autoprefixer
环境配置好了后,gruntfile.js文件配置如下:
module.exports = function(grunt){
    grunt.loadNpmTasks('grunt-autoprefixer');
    grunt.initConfig({
        pkg:grunt.file.readJSON('package.json'),
        autoprefixer:{
            options:{
                //任务设置
                browserslist:['last 2 versions','chrome','ie'],
                map:true,
            },
            single_file: {
                src: 'css/test.css',
                dest: 'result/test.css'
            },
        }
    });
    grunt.registerTask('default',[]);
};
这里的options.browserslist是兼容的浏览器类型,
Single_file则指的是单个css任务。Src是源文件,dest是目标文件。
源文件内容如下:
.class { transform:rotate(20deg); transition: 1s; background-image: linear-gradient(to bottom, #444444, #999999); }目标文件变为:
.class { -webkit-transform:rotate(20deg); -ms-transform:rotate(20deg); transform:rotate(20deg); -webkit-transition: 1s; transition: 1s; background-image: -webkit-linear-gradient(top, #444444, #999999); background-image: linear-gradient(to bottom, #444444, #999999); }可以看到,兼容了ie和chrome浏览器。
当然,除了single_file这个单文件任务,还可以选择其他任务,具体参考:
gruntfile.js的demo
我们再以其中的多文件任务来示例,其gruntfile.js文件配置如下:
module.exports = function(grunt){
    grunt.loadNpmTasks('grunt-autoprefixer');
    grunt.initConfig({
        pkg:grunt.file.readJSON('package.json'),
        autoprefixer:{
            options:{
                //任务设置
                browserslist:['last 2 versions','chrome','ie'],
                map:true,
            },
            //单文件任务
            single_file: {
                src: 'css/test.css',
                dest: 'result/test.css'
            },
            //多文件任务
            mutiple_files: {
                expand: true,
                flatten: true,//是否取代原先文件名
                src: 'cssB/*.css',
                dest: './resultB/'
            }
        }
    });
    grunt.registerTask('default',[]);
};
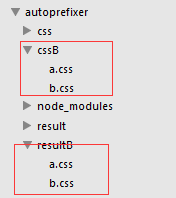
执行后就将cssB文件夹下的css文件全部兼容性处理后转入resultB文件夹:

还有很多其他的任务,同学们可以自行查阅上文提到的demo。
