Android-自定义图像资源的使用(2)
Android-自定义图像资源的使用
2014年4月29日
上一篇博客,介绍前面几种图像资源的使用,本篇博客把剩下的全部介绍完:
- 普通图像资源
- XML图像资源
- Nine-patch图像资源
- XML Nine-patch图像资源
- 图层(Layer)图像资源
- 图像状态(state)资源
- 图像级别(Level)资源
- 淡入淡出(transition)资源
- 嵌入(Inset)图像资源
- 剪切(Clip)图像资源
- 比例(Scale)图像资源
- 外形(Shape)图像资源
代码资源:http://download.csdn.net/detail/wwj_748/7263481
有兴趣的朋友可以加本人创建的群,里面有丰富的学习资源哦:299402133(移动开发狂热者群)
图像状态资源的使用
注:部分例子来源《Android应用实战-李宁》,经由本人整理。
按钮状态变化,大家应该知道了吧。按下一个效果,松开又一个效果,这就是状态的改变。
/05_KindOfDrawableUse/res/drawable/button.xml
- <?xml version="1.0" encoding="utf-8"?>
- <selector xmlns:android="http://schemas.android.com/apk/res/android">
- <item android:state_pressed="true"
- android:drawable="@drawable/pressed" /> <!-- pressed -->
- <item android:state_focused="true"
- android:drawable="@drawable/focused" />
- <item android:drawable="@drawable/normal" />
- </selector>
在drawable目录下,定义一个selector标签的选择器,并在布局文件中使用
/05_KindOfDrawableUse/res/layout/state_res.xml
- <?xml version="1.0" encoding="utf-8"?>
- <LinearLayout xmlns:android="http://schemas.android.com/apk/res/android"
- android:layout_width="match_parent"
- android:layout_height="match_parent"
- android:orientation="vertical" >
- <Button
- android:layout_width="wrap_content"
- android:layout_height="wrap_content"
- android:background="@drawable/button"
- android:text="按钮" />
- </LinearLayout>
上面的Button通过设置background来引用我们定义好的selector
效果如下:
图像级别资源的使用
/05_KindOfDrawableUse/res/drawable/lamp_level.xml
- <?xml version="1.0" encoding="utf-8"?>
- <level-list xmlns:android="http://schemas.android.com/apk/res/android">
- <item android:drawable="@drawable/lamp_off" android:minLevel="6"
- android:maxLevel="10" />
- <item android:drawable="@drawable/lamp_on" android:minLevel="12"
- android:maxLevel="20" />
- </level-list>
/05_KindOfDrawableUse/res/layout/level_res.xml
- <?xml version="1.0" encoding="utf-8"?>
- <LinearLayout xmlns:android="http://schemas.android.com/apk/res/android"
- android:layout_width="fill_parent"
- android:layout_height="fill_parent"
- android:orientation="vertical" >
- <ImageView
- android:id="@+id/imageview_lamp"
- android:layout_width="fill_parent"
- android:layout_height="wrap_content"
- android:src="@drawable/lamp_level" />
- <Button
- android:layout_width="wrap_content"
- android:layout_height="wrap_content"
- android:onClick="onClick_LampOn"
- android:text="开灯" />
- <Button
- android:layout_width="wrap_content"
- android:layout_height="wrap_content"
- android:onClick="onClick_LampOff"
- android:text="关灯" />
- </LinearLayout>
/05_KindOfDrawableUse/src/com/wwj/drawable/LevelDrawableRes.java
- package com.wwj.drawable;
- import android.app.Activity;
- import android.os.Bundle;
- import android.view.View;
- import android.widget.ImageView;
- /**
- * 图像级别资源的使用
- *
- * 在res/drawable建立图像级别资源
- *
- * 然后在布局文件的控件中使用
- *
- * @author wwj
- *
- */
- public class LevelDrawableRes extends Activity {
- private ImageView ivLamp;
- @Override
- public void onCreate(Bundle savedInstanceState) {
- super.onCreate(savedInstanceState);
- setContentView(R.layout.level_res);
- ivLamp = (ImageView) findViewById(R.id.imageview_lamp);
- // 设置Level为8,显示lamp_off.png
- ivLamp.setImageLevel(8);
- }
- public void onClick_LampOn(View view) {
- // LevelListDrawable levelListDrawable =
- // (LevelListDrawable)ivLamp.getDrawable();
- // levelListDrawable.setLevel(15);
- // 设置Level为15,显示lamp_on.png
- ivLamp.setImageLevel(15);
- }
- public void onClick_LampOff(View view) {
- // 设置Level为6,显示lamp_off.png
- ivLamp.getDrawable().setLevel(6);
- }
- }
效果图如下:
过渡图像资源的使用
这个图像资源是用来展示图像过渡的,比如一盏灯从不亮到亮的缓慢过渡。
/05_KindOfDrawableUse/res/drawable/lamp_transition.xml
- <?xml version="1.0" encoding="utf-8"?>
- <transition xmlns:android="http://schemas.android.com/apk/res/android">
- <item android:drawable="@drawable/lamp_off" />
- <item android:drawable="@drawable/lamp_on" />
- </transition>
/05_KindOfDrawableUse/res/layout/cross_fade_res.xml
- <?xml version="1.0" encoding="utf-8"?>
- <LinearLayout xmlns:android="http://schemas.android.com/apk/res/android"
- android:layout_width="fill_parent"
- android:layout_height="fill_parent"
- android:orientation="vertical" >
- <ImageView
- android:id="@+id/imageview_lamp"
- android:layout_width="wrap_content"
- android:layout_height="wrap_content"
- android:src="@drawable/lamp_transition" />
- <Button
- android:layout_width="wrap_content"
- android:layout_height="wrap_content"
- android:onClick="onClick_LampOn"
- android:text="开灯" />
- <Button
- android:layout_width="wrap_content"
- android:layout_height="wrap_content"
- android:onClick="onClick_LampOff"
- android:text="关灯" />
- </LinearLayout>
/05_KindOfDrawableUse/src/com/wwj/drawable/CrossFadeDrawableRes.java
- package com.wwj.drawable;
- import android.app.Activity;
- import android.graphics.drawable.TransitionDrawable;
- import android.os.Bundle;
- import android.view.View;
- import android.widget.ImageView;
- /**
- * 淡入淡出资源的使用
- *
- * @author wwj
- *
- */
- public class CrossFadeDrawableRes extends Activity {
- private ImageView ivLamp;
- @Override
- public void onCreate(Bundle savedInstanceState) {
- super.onCreate(savedInstanceState);
- setContentView(R.layout.cross_fade_res);
- ivLamp = (ImageView) findViewById(R.id.imageview_lamp);
- }
- public void onClick_LampOn(View view) {
- // 从第一个图像切换到第二个图像。其中使用1秒的时间完成淡入淡出效果
- TransitionDrawable drawable = (TransitionDrawable) ivLamp.getDrawable();
- drawable.startTransition(1000);
- }
- public void onClick_LampOff(View view) {
- // 从第二个图像切换第一个图像。其中使用1秒的时间完成淡入淡出效果
- TransitionDrawable drawable = (TransitionDrawable) ivLamp.getDrawable();
- drawable.reverseTransition(1000);
- }
- }
效果图如下:
嵌入图像资源的使用
/05_KindOfDrawableUse/res/drawable/inset.xml
- <?xml version="1.0" encoding="utf-8"?>
- <inset xmlns:android="http://schemas.android.com/apk/res/android"
- android:drawable="@drawable/logo"
- android:insetBottom="10dp"
- android:insetLeft="10dp"
- android:insetRight="10dp"
- android:insetTop="10dp" >
- </inset>
- <!--
- android:insetBottom="10dp" 图像距离下边的距离
- android:insetLeft="10dp" 图像距离左标的距离
- android:insetRight="10dp" 图像距离右边的距离
- android:insetTop="10dp" 图像距离上边的距离
- -->
/05_KindOfDrawableUse/res/layout/inset_res.xml
- <?xml version="1.0" encoding="utf-8"?>
- <LinearLayout xmlns:android="http://schemas.android.com/apk/res/android"
- android:layout_width="match_parent"
- android:layout_height="match_parent"
- android:orientation="vertical" >
- <ImageView
- android:layout_width="wrap_content"
- android:layout_height="wrap_content"
- android:background="@drawable/inset" />
- </LinearLayout>
效果图如下:
剪切图像资源的使用
/05_KindOfDrawableUse/res/drawable/clip.xml
- <?xml version="1.0" encoding="utf-8"?>
- <clip xmlns:android="http://schemas.android.com/apk/res/android"
- android:clipOrientation="horizontal"
- android:drawable="@drawable/progress"
- android:gravity="left" />
/05_KindOfDrawableUse/res/layout/clip_res.xml
- <?xml version="1.0" encoding="utf-8"?>
- <LinearLayout xmlns:android="http://schemas.android.com/apk/res/android"
- android:layout_width="fill_parent"
- android:layout_height="wrap_content"
- android:background="@drawable/background"
- android:orientation="vertical" >
- <ImageView
- android:id="@+id/image"
- android:layout_width="fill_parent"
- android:layout_height="wrap_content"
- android:background="@drawable/clip" />
- </LinearLayout>
/05_KindOfDrawableUse/src/com/wwj/drawable/ClipDrawableRes.java
- package com.wwj.drawable;
- import android.app.Activity;
- import android.graphics.drawable.ClipDrawable;
- import android.os.Bundle;
- import android.widget.ImageView;
- /**
- * 剪切图像的使用
- *
- * 在res/drawable目录下定义clip资源
- *
- * @author wwj
- *
- */
- public class ClipDrawableRes extends Activity {
- @Override
- protected void onCreate(Bundle savedInstanceState) {
- super.onCreate(savedInstanceState);
- setContentView(R.layout.clip_res);
- ImageView imageview = (ImageView) findViewById(R.id.image);
- ClipDrawable drawable = (ClipDrawable) imageview.getBackground();
- // 截取30%的图像
- drawable.setLevel(3000);
- }
- }
效果图如下:
比例图像资源的使用
/05_KindOfDrawableUse/res/drawable/scale.xml
- <?xml version="1.0" encoding="utf-8"?>
- <scale xmlns:android="http://schemas.android.com/apk/res/android"
- android:drawable="@drawable/logo"
- android:scaleGravity="center_vertical|center_horizontal"
- android:scaleHeight="80%"
- android:scaleWidth="80%" >
- </scale>
这个比例图片没有效果,不知道为何
外形图像资源的使用
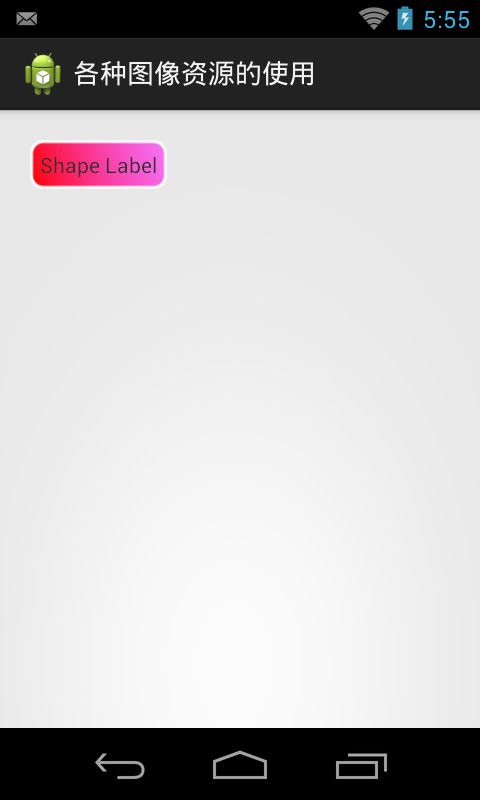
外形图像是用得比较多,可以实现自己想要的效果,比如一个文本框
/05_KindOfDrawableUse/res/drawable/shape.xml
- <?xml version="1.0" encoding="utf-8"?>
- <shape xmlns:android="http://schemas.android.com/apk/res/android"
- android:shape="rectangle" >
- <gradient
- android:angle="45"
- android:endColor="#80FF00FF"
- android:startColor="#FFFF0000" />
- <padding
- android:bottom="7dp"
- android:left="7dp"
- android:right="7dp"
- android:top="7dp" />
- <stroke
- android:width="2dp"
- android:color="#FFF" />
- <corners android:radius="8dp" />
- </shape>
/05_KindOfDrawableUse/res/layout/shape_res.xml
- <?xml version="1.0" encoding="utf-8"?>
- <LinearLayout xmlns:android="http://schemas.android.com/apk/res/android"
- android:layout_width="fill_parent"
- android:layout_height="fill_parent"
- android:orientation="vertical" >
- <TextView
- android:layout_width="wrap_content"
- android:layout_height="wrap_content"
- android:layout_margin="20dp"
- android:background="@drawable/shape"
- android:text="Shape Label" />
- </LinearLayout>
效果图如下:
关于Android提供的所有图像资源已经通过两篇博文给大家介绍完了,一些具体的参数没有列出来,也没有详细解释,各位想了解更多的话,可以到官网查看具体参数的使用。


