Android Layout 布局 && Android自带样式(theme)&& CheckBox样例 && View三种属性
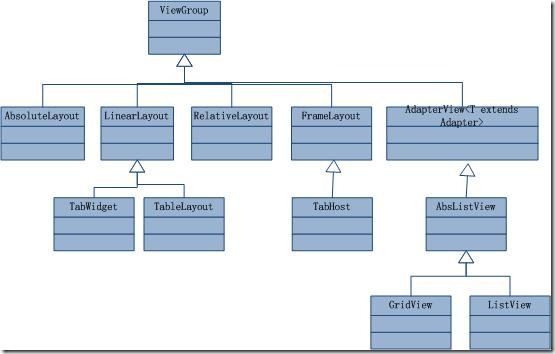
一个Android视图有很多控件,用户界面通过View和ViewGroup对象构建,那么怎么来控制它们的位置排列呢?Android布局主要有以下几种:FrameLayout、LinearLayout、RelativeLayout、TableLayout、AbsoluteLayout等,FrameLayout是最简单的Layout,而最后一种AbsoluteLayout是通过指定控件的x/y坐标来定位的,因为不太灵活所以已经不推荐使用了。
以上这些布局的关系如下:
Layout中view的常用的属性主要包括:
A,Orientation方向,即指定是代表一行还是一列,可以为horizontal或vertical,如android:orientation="vertical",当然也在可以在代码里通过setOrientation()方法来设置。
B,FillMode填充方式,所有在的控件都必须指定它的填充方式,即设置android:layout_width和android:layout_height,可以为三种值(1)具体的像素值,如20px;(2)wrap_content,表示按控件文本实际长度显示;(3)fill_parent,表示填充剩下的所有可用空间。
C,Weight权重,如果你想让一行或一列的控件按比例显示,这时候权重就起到作用了。
D,layout_gravity,用来确定View在Layout中的停靠位置。
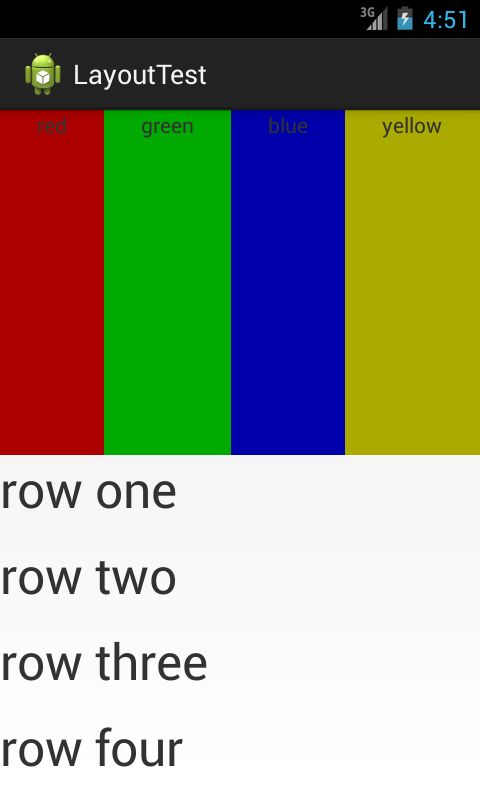
(1)LinearLayout, 实例:
<LinearLayout  xmlns:android="http://schemas.android.com/apk/res/android"
    	android:orientation="vertical"
		android:layout_width="fill_parent"
		android:layout_height="fill_parent">

		<LinearLayout
			android:orientation="horizontal"
			android:layout_width="fill_parent"
			android:layout_height="fill_parent"
			android:layout_weight="1">

			<TextView
				android:text="red"
				android:gravity="center_horizontal"
				android:background="#aa0000"
				android:layout_width="wrap_content"
				android:layout_height="fill_parent"
				android:layout_weight="1" />

			<TextView
				android:text="green"
				android:gravity="center_horizontal"
				android:background="#00aa00"
				android:layout_width="wrap_content"
				android:layout_height="fill_parent"
				android:layout_weight="1" />

			<TextView
				android:text="blue"
				android:gravity="center_horizontal"
				android:background="#0000aa"
				android:layout_width="wrap_content"
				android:layout_height="fill_parent"
				android:layout_weight="1" />

			<TextView
				android:text="yellow"
				android:gravity="center_horizontal"
				android:background="#aaaa00"
				android:layout_width="wrap_content"
				android:layout_height="fill_parent"
				android:layout_weight="1" />

		</LinearLayout>

		<LinearLayout
			android:orientation="vertical"
			android:layout_width="fill_parent"
			android:layout_height="fill_parent"
			android:layout_weight="1">

			<TextView
				android:text="row one"
				android:textSize="15pt"
				android:layout_width="fill_parent"
				android:layout_height="wrap_content"
				android:layout_weight="1" />

			<TextView
				android:text="row two"
				android:textSize="15pt"
				android:layout_width="fill_parent"
				android:layout_height="wrap_content"
				android:layout_weight="1" />

			<TextView
				android:text="row three"
				android:textSize="15pt"
				android:layout_width="fill_parent"
				android:layout_height="wrap_content"
				android:layout_weight="1" />

			<TextView
				android:text="row four"
				android:textSize="15pt"
				android:layout_width="fill_parent"
				android:layout_height="wrap_content"
				android:layout_weight="1" />

		</LinearLayout>

</LinearLayout >
实验结果是:
(2)TableLayout的行TableRow是一个横向的(horizontal)的LinearLayout
(3) RelativeLayout有16个align相关的XML属性:
layout_alignParentBottom 当前控件低端与父控件的低端对齐(重合)
layout_alignParentLeft 当前控件左端与父控件的左端对齐(重合)
layout_alignParentRight 当前控件右端与父控件的右端对齐(重合)
layout_alignParentTop 当前控件上端与父控件的上端对齐(重合)
layout_centerHorizontal 当前控件位于父控件的横向中间位置(水平方向上的中间)
layout_centerInParent 当前控件位于父控件的纵横向中间位置(垂直方向上的中间)
layout_centerVertical 当前控件位于父控件的纵向中间位置(平面上的正中间)
layout_above 使当前控件位于给出id控件的上方
layout_below 使当前控件位于给出id控件的下方
layout_toLeftOf 使当前控件位于给出id控件的左侧
layout_toRightOf 使当前控件位于给出id控件的右侧
layout_alignBottom 使当前控件与给出id控件的底部部重合(注意可用和给出id控件来对齐)
layout_alignLeft 使当前控件与给出id控件的左边重合
layout_alignRight 使当前控件与给出id控件的右边重合
layout_alignTop 使当前控件与给出id控件的顶部重合
layout_alignBaseline 使当前控件的BaseLine与给出id控件t的BaseLine重合,这个主要用于Label或者其他包含文本的widgets。
实例:
<?xml version="1.0" encoding="utf-8"?>
<RelativeLayout xmlns:android="http://schemas.android.com/apk/res/android"
    android:layout_width="fill_parent"
    android:layout_height="fill_parent">
    <TextView
        android:id="@+id/label"
        android:layout_width="fill_parent"
        android:layout_height="wrap_content"
        android:text="Type here:"/>
    <EditText
        android:id="@+id/entry"
        android:layout_width="fill_parent"
        android:layout_height="wrap_content"
        android:background="@android:drawable/editbox_background"
        android:layout_below="@id/label"/><!-- have an eye on ! -->
    <Button
        android:id="@+id/ok"
        android:layout_width="wrap_content"
        android:layout_height="wrap_content"
        android:layout_below="@id/entry"
       android:layout_alignParentRight="true"
        android:layout_marginLeft="10dip"
        android:text="OK" />
    <Button
        android:layout_width="wrap_content"
        android:layout_height="wrap_content"
        android:layout_toLeftOf="@id/ok"
        android:layout_alignTop="@id/ok"
        android:text="Cancel" />
</RelativeLayout>
运行结果是:
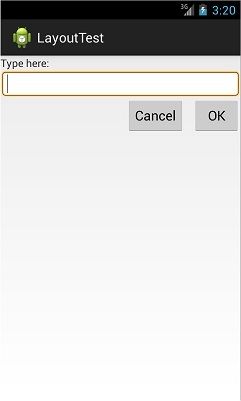
可以看出里面每个控件的设置都有使用相对布局的一些属性。很多时候需要在XML编辑和控件编辑界面之间切换,以达到满意效果。
======================================================================================
android:theme决定activity的样式模型,它的典型值域有:
android:theme="@android:style/Theme.Dialog" : Activity显示为对话框模式
android:theme="@android:style/Theme.NoTitleBar" : 不显示应用程序标题栏
android:theme="@android:style/Theme.NoTitleBar.Fullscreen" : 不显示应用程序标题栏,并全屏
android:theme="Theme.Light ": 背景为白色
android:theme="Theme.Light.NoTitleBar" : 白色背景并无标题栏
android:theme="Theme.Light.NoTitleBar.Fullscreen" : 白色背景,无标题栏,全屏
android:theme="Theme.Black" : 背景黑色
android:theme="Theme.Black.NoTitleBar" : 黑色背景并无标题栏
android:theme="Theme.Black.NoTitleBar.Fullscreen" : 黑色背景,无标题栏,全屏
android:theme="Theme.Wallpaper" : 用系统桌面为应用程序背景
android:theme="Theme.Wallpaper.NoTitleBar" : 用系统桌面为应用程序背景,且无标题栏
android:theme="Theme.Wallpaper.NoTitleBar.Fullscreen" : 用系统桌面为应用程序背景,无标题栏,全屏
android:theme="Theme.Translucent : 透明背景
android:theme="Theme.Translucent.NoTitleBar" : 透明背景并无标题
android:theme="Theme.Translucent.NoTitleBar.Fullscreen" : 透明背景并无标题,全屏
android:theme="Theme.Panel ": 面板风格显示
android:theme="Theme.Light.Panel" : 平板风格显示
需要留意的是这些属性是放在<application段还是<activity段,比如让activity不显示的属性android:theme="@android:style/Theme.NoDisplay"是放在<activity段。
============================================================================================
在layout的文件中,建立CheckBox的布局
    <CheckBox
        android:id="@+id/cb"
        android:layout_width="wrap_content"
        android:layout_height="wrap_content"
        android:layout_below="@+id/textView1"
        android:layout_marginTop="46dp"
        android:layout_toRightOf="@+id/textView1"
        android:checked="false"
        android:text="male" />
在 activity中加上测试和监听语句
CheckBox cb = (CheckBox)findViewById(R.id.cb);
cb.setOnCheckedChangeListener(new OnCheckedChangeListener() {
	public void onCheckedChanged(CompoundButton buttonView,boolean isChecked) {
		Toast.makeText(MainActivity.this, isChecked?"选中了":"取消了选中"    , Toast.LENGTH_LONG).show();
	}
});
===========================================================================================
View 的setVisibility有三个值可以设置:
VISIBLE--->可见
INVISIBLE--->不可见,但这个View在ViewGroupt中仍保留它的位置,不重新layout
GONE---->不可见,但这个View在ViewGroupt中不保留位置,重新layout,那后面的view就会取代他的位置。
注意:若你在Adapter中的getView或bindview将某些特殊的位置的View.INVISIBLE之后,要记得在别的判断条件下将其设置 View.Visible.不然你会看到很多怪现象的。
参考原文:http://android.tgbus.com/Android/tutorial/201104/348551.shtml
参考原文:http://www.cnblogs.com/playing/archive/2011/04/07/2008620.html
参考原文:http://www.cnblogs.com/wt616/archive/2011/06/20/2085368.html
参考原文:http://blog.sina.com.cn/s/blog_48964b1201019g9a.html