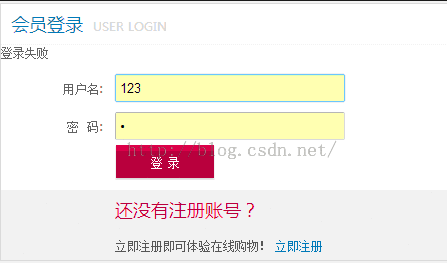
SSH框架-登录界面
这几天一直在敲SSH的一个网上商城的小例子,刚刚接触,还有很多地方不是很理解,现在结合以前所学习的
知识整理一番,加深下印象。
一、登录界面首页
这里的前台登录界面使用jsp写的,给大家看下效果图:
具体的样式代码先不展示了,这里显示最重要的一步,登录界面动作:
<span style="font-family:KaiTi_GB2312;font-size:18px;"><form id="loginForm" action="${ pageContext.request.contextPath }/user_login.action" method="post" novalidate="novalidate"></span>
二、Action (类似于MVC中的controller)
有了前台界面,接下来该编辑界面所触发的动作
<span style="font-family:KaiTi_GB2312;font-size:18px;">/***
	 * 登录的方法
	 */
	public String login() {
		User existUser = userService.login(user);
		if (existUser == null) {
			// 登录失败
			this.addActionError("登录失败");
			return LOGIN;
		} else {
			// 登录成功
			// 将用户信息存入session中
			ServletActionContext.getRequest().getSession()
					.setAttribute("existUser", existUser);
			// 页面跳转
			return "loginSuccess";
		}
	}</span>
三、业务逻辑层Service
<span style="font-family:KaiTi_GB2312;font-size:18px;">        //登录界面方法
	public User login(User user) {
		return userDao.login(user);</span>
<span style="font-family: KaiTi_GB2312;font-size:18px;">	}</span><span style="font-family:KaiTi_GB2312;font-size:18px;">
</span>
四、D层
<span style="font-family:KaiTi_GB2312;font-size:18px;">	// 用户登录的方法
	public User login(User user) {
		String hql = "from User where username= ? and password= ? and state= ?";
		List<User> list = this.getHibernateTemplate().find(hql,
				user.getUsername(), user.getPassword(), 1);
		if (list != null && list.size() > 0) {
			return list.get(0);
		}
		return null;
	}</span>
SSH框架为了减少各层之间的引用,采用了spring注入和Struts
五、applicationContext文件:
<span style="font-family:KaiTi_GB2312;font-size:18px;"><?xml version="1.0" encoding="UTF-8"?>
<beans xmlns="http://www.springframework.org/schema/beans"
	xmlns:xsi="http://www.w3.org/2001/XMLSchema-instance" xmlns:context="http://www.springframework.org/schema/context"
	xmlns:aop="http://www.springframework.org/schema/aop" xmlns:tx="http://www.springframework.org/schema/tx"
	xsi:schemaLocation="http://www.springframework.org/schema/beans
	http://www.springframework.org/schema/beans/spring-beans.xsd
	http://www.springframework.org/schema/context
	http://www.springframework.org/schema/context/spring-context.xsd
	http://www.springframework.org/schema/aop
	http://www.springframework.org/schema/aop/spring-aop.xsd
	http://www.springframework.org/schema/tx
	http://www.springframework.org/schema/tx/spring-tx.xsd">

	<!-- 配置连接池: -->
	<!-- 引入外部属性文件 -->
	<context:property-placeholder location="classpath:jdbc.properties" />
	<!-- 配置C3P0连接池: -->
	<bean id="dataSource" class="com.mchange.v2.c3p0.ComboPooledDataSource">
		<property name="driverClass" value="${jdbc.driver}" />
		<property name="jdbcUrl" value="${jdbc.url}" />
		<property name="user" value="${jdbc.user}" />
		<property name="password" value="${jdbc.password}" />
	</bean>

	<!-- Hibernate的相关信息 -->
	<bean id="sessionFactory"
		class="org.springframework.orm.hibernate3.LocalSessionFactoryBean">
		<!-- 注入连接池 -->
		<property name="dataSource" ref="dataSource" />
		<!-- 配置Hibernate的其他的属性 -->
		<property name="hibernateProperties">
			<props>
				<prop key="hibernate.dialect">org.hibernate.dialect.MySQLDialect</prop>
				<prop key="hibernate.show_sql">true</prop>
				<prop key="hibernate.format_sql">true</prop>
				<prop key="hibernate.connection.autocommit">false</prop>
				<prop key="hibernate.hbm2ddl.auto">update</prop>
			</props>
		</property>
		<!-- 配置Hibernate的映射文件 -->
		<property name="mappingResources">
			<list>
				<value>cn/itcast/shop/user/vo/User.hbm.xml</value>
			</list>
		</property>
	</bean>

	<!-- 事务管理: -->
	<!-- 事务管理器 -->
	<bean id="transactionManager"
		class="org.springframework.orm.hibernate3.HibernateTransactionManager">
		<property name="sessionFactory" ref="sessionFactory" />
	</bean>

	<!-- 开启注解事务 -->
	<tx:annotation-driven transaction-manager="transactionManager" />

	<!-- Action的配置 =========================== -->

	<!-- 首页访问的Action -->
	<bean id="indexAction" class="cn.itcast.shop.index.action.IndexAction"
		scope="prototype">
	</bean>

	<!-- 用户模块的Action -->
	<bean id="userAction" class="cn.itcast.shop.user.action.UserAction"
		scope="prototype">
		<!-- 注入Service -->
		<property name="userService" ref="userService" />
	</bean>

	<!-- Service的配置=========================================================== -->
	<bean id="userService" class="cn.itcast.shop.user.service.UserService">
		<property name="userDao" ref="userDao" />
	</bean>

	<!-- Dao的配置=========================================================== -->
	<bean id="userDao" class="cn.itcast.shop.user.dao.UserDao">
		<property name="sessionFactory" ref="sessionFactory"></property>
	</bean>

	<!-- 配置验证码Action -->
	<bean id="checkImgAction" class="cn.itcast.shop.user.action.CheckImgAction"
		scope="prototype">
	</bean>
</beans>
</span>
六、struts文件:
<span style="font-family:KaiTi_GB2312;font-size:18px;">	<!-- 用户模块的Action -->
		<action name="user_*" class="userAction" method="{1}">
			<result name="registPage">/WEB-INF/jsppackage/regist.jsp</result>
			<result name="input">/WEB-INF/jsppackage/regist.jsp</result>
			<result name="loginPage">/WEB-INF/jsppackage/login.jsp</result>
			<result name="login">/WEB-INF/jsppackage/login.jsp</result>
			<result name="loginSuccess" type="redirectAction">index</result>
		</action></span>
struts文件和applicationContent文件我理解的就是相当于自动减少了实例化各个类,和各个类之间调用的关
系,把他们写在配置文件中,需要用的时候直接在配置文件中调用就行了!如果有不正确的地方,欢迎指正!
