UI组件详解2---- RadioGroup、RadioButton、CheckBox、ListView、Spinner
UI组件详解2
---- RadioGroup、RadioButton、CheckBox、ListView、Spinner
RadioGroup、RadioButton:
单选按钮是一种双状态的按钮,可以选择或不选中。在单选按钮没有被选中时,用户能够按下或点击来选中它。但是,与复选框相反,用户一旦选中就不能够取消选中(可以通过代码来控制,界面上点击的效果是一旦选中之后就不能取消选中了)。
多个单选按钮通常与RadioGroup同时使用。当一个单选组(RadioGroup)包含几个单选按钮时,选中其中一个的同时将取消其它选中的单选按钮。以下为我写的例子:
UITest3Activity代码:
packagecn.class3g.activity;
importandroid.app.Activity;
importandroid.os.Bundle;
importandroid.util.Log;
importandroid.widget.RadioButton;
importandroid.widget.RadioGroup;
importandroid.widget.RadioGroup.OnCheckedChangeListener;
public class UITest3Activity extends Activity implements OnCheckedChangeListener{
RadioGroup rg = null;
private static final String TAG = "TAG";
public void onCreate(Bundle savedInstanceState) {
super.onCreate(savedInstanceState);
setContentView(R.layout.radio_layout);
findViews();
rg.check(R.id.male);
int checkedId = rg.getCheckedRadioButtonId();
RadioButton rb = (RadioButton) this.findViewById(checkedId);
Log.i(TAG, rb.getText().toString());
}
private void findViews() {
rg = (RadioGroup) this.findViewById(R.id.sexRg);
//注册监听器
rg.setOnCheckedChangeListener(this);
}
//覆盖onCheckedChanged接口的抽象方法
public void onCheckedChanged(RadioGroup group, int checkedId) {
if(group.getId() == R.id.sexRg){
RadioButton rb = (RadioButton) this.findViewById(checkedId);
Log.i(TAG, rb.getText().toString());
}
}
}
radio_layout.xml代码如下:
<?xml version="1.0"encoding="utf-8"?>
<LinearLayout xmlns:android="http://schemas.android.com/apk/res/android"
android:layout_width="match_parent"
android:layout_height="match_parent"
android:orientation="vertical">
<TextView
android:layout_width="wrap_content"
android:layout_height="wrap_content"
android:text="RadioDemo" />
<RadioGroup
android:id="@+id/sexRg"
android:layout_width="fill_parent"
android:layout_height="wrap_content"
android:orientation="vertical"
android:checkedButton="@+id/female">
<RadioButton
android:id="@id/female"
android:text="女"/>
<RadioButton
android:id="@+id/male"
android:text="男"/>
</RadioGroup>
</LinearLayout>
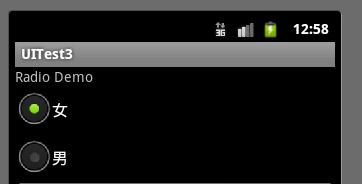
效果如下:
CheckBox:
概述
复选框是一种有双状态按钮的特殊类型,可以选中或者不选中。如下是一个在activity中使用复选框的例子:
CheckBoxDemo代码:
packagecn.class3g.activity;
importjava.util.ArrayList;
importandroid.app.Activity;
importandroid.os.Bundle;
importandroid.util.Log;
importandroid.view.View;
importandroid.view.View.OnClickListener;
importandroid.widget.Button;
importandroid.widget.CheckBox;
importandroid.widget.CompoundButton;
importandroid.widget.CompoundButton.OnCheckedChangeListener;
public class CheckBoxDemo extendsActivity implements OnCheckedChangeListener{
private CheckBox cb1,cb2,cb3,cb4;
Button submitBtn = null;
private ArrayList<CheckBox> list = new ArrayList<CheckBox> ();
protected voidonCreate(Bundle savedInstanceState) {
setContentView(R.layout.checkbox_layout);
super.onCreate(savedInstanceState);
findViewS();
}
private void findViewS() {
cb1 = (CheckBox) this.findViewById(R.id.cb1);
cb2 = (CheckBox) this.findViewById(R.id.cb2);
cb3 = (CheckBox) this.findViewById(R.id.cb3);
cb4 = (CheckBox) this.findViewById(R.id.cb4);
list.add(cb1);
list.add(cb2);
list.add(cb3);
list.add(cb4);
for(CheckBox cb : list){
//为什么参数是this
/*当前类实现了监听器接口,所以当前类的实例this可以
* 当作一个监听器对象放入setOnCheckedChangeListener()
* 方法之中做参数
* */
cb.setOnCheckedChangeListener(this);
}
submitBtn = (Button) this.findViewById(R.id.submitBtn);
submitBtn.setOnClickListener(new OnClickListener() {
public void onClick(View v) {
String fav = "";
for(CheckBox cb : list){
if(cb.isChecked()){
fav += cb.getText() + ",";
}
}
Log.i("TAG", fav);
}
});
}
//onCheckedChanged覆盖接口的抽象方法
public void onCheckedChanged(CompoundButtonbuttonView, boolean isChecked) {
Log.i("TAG",buttonView.getText().toString());
}
}
checkbox_layout.xml代码是:
<?xml version="1.0"encoding="utf-8"?>
<LinearLayout xmlns:android="http://schemas.android.com/apk/res/android"
android:layout_width="match_parent"
android:layout_height="match_parent"
android:orientation="vertical">
<TextView
android:layout_width="wrap_content"
android:layout_height="wrap_content"
android:text="爱好"
android:textSize="20dp"
/>
<TableLayout
android:layout_width="fill_parent"
android:layout_height="wrap_content"
android:stretchColumns="*"
android:id="@+id/tableLayout"
>
<TableRow>
<CheckBox
android:id="@+id/cb1"
android:layout_width="match_parent"
android:layout_height="wrap_content"
android:text="足球"
/>
<CheckBox
android:id="@+id/cb2"
android:layout_width="match_parent"
android:layout_height="wrap_content"
android:text="篮球"
/>
</TableRow>
<TableRow>
<CheckBox
android:id="@+id/cb3"
android:layout_width="match_parent"
android:layout_height="wrap_content"
android:text="游泳"
/>
<CheckBox
android:id="@+id/cb4"
android:layout_width="match_parent"
android:layout_height="wrap_content"
android:text="武术"
/>
</TableRow>
</TableLayout>
<Button
android:id="@+id/submitBtn"
android:layout_width="match_parent"
android:layout_height="wrap_content"
android:text="submitBtn"
/>
</LinearLayout>
运行效果图:
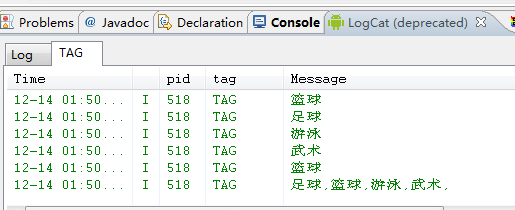
点击按钮后:eclipse中的LogCat

ListView:
直接子类: ExpandableListView (使用竖滚动条查看的两级列表视图)
类概述

通过竖滚动条查看的列表视图。ListAdapter里包含的内容和此视图相关联。
内部类
class ListView.FixedViewInfo
表示一个列表中的固定视图,如放在最顶部的页眉和最底部的页脚
以下为使用ListView的例子:
ListAcitivityDemo代码:
packagecn.class3g.activity;
importandroid.app.ListActivity;
importandroid.os.Bundle;
importandroid.util.Log;
importandroid.view.View;
importandroid.widget.ArrayAdapter;
importandroid.widget.ListView;
public class ListAcitivityDemo extends ListActivity {
String[] names = {"张三","李四","王五","宋六","姜七"};
protected voidonCreate(Bundle savedInstanceState) {
super.onCreate(savedInstanceState);
ArrayAdapter adapter = new ArrayAdapter(this,
android.R.layout.simple_list_item_1,names);
this.setListAdapter(adapter);
}
protected voidonListItemClick(ListView l, View v, int position, long id) {
super.onListItemClick(l, v, position, id);
Log.i("TAG", names[position] +
"position= "+String.valueOf(position)
+"row_id= "+ String.valueOf(id) );
}
}
list_layout.xml代码如下:
<?xml version="1.0"encoding="utf-8"?>
<LinearLayout xmlns:android="http://schemas.android.com/apk/res/android"
android:layout_width="match_parent"
android:layout_height="match_parent"
android:orientation="vertical">
<TextView
android:layout_width="wrap_content"
android:layout_height="wrap_content"
android:text="名单:"
/>
<ListView
android:layout_width="fill_parent"
android:layout_height="wrap_content"
android:id="@+id/nameList"
/>
</LinearLayout>
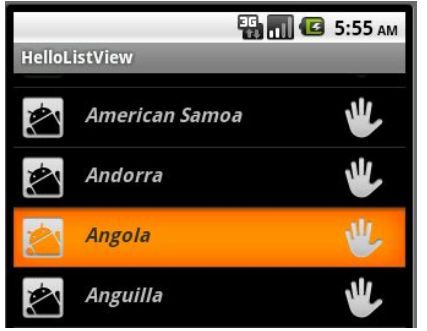
效果图如下:
Spinner:
下拉列表(Spinner)是一个每次只能选择所有项中一项的部件。它的项来自于与之相关联的适配器中。以下为我写的例子:
在sring.xml中添加:
<string name= "spinner_prompt ">运动项目</string>
在values文件夹下新建:
arrays.xml代码如下:
<?xml version="1.0"encoding="utf-8"?>
<resources>
<string-array name="sports"
>
<item>足球</item>
<item>篮球</item>
<item>网球</item>
</string-array>
</resources>
在layout文件夹下新建:
spinner_layout.xml代码如下:
<?xml version="1.0"encoding="utf-8"?>
<LinearLayout xmlns:android="http://schemas.android.com/apk/res/android"
android:layout_width="match_parent"
android:layout_height="match_parent"
android:orientation="vertical">
<TextView
android:id="@+id/textView1"
android:layout_width="wrap_content"
android:layout_height="wrap_content"
android:text="请选择一项运动项目" />
<Spinner
android:id="@+id/sportsSp"
android:layout_width="match_parent"
android:layout_height="wrap_content"
android:prompt="@string/spinner_prompt"
android:entries="@array/sports"
/>
</LinearLayout>
最后
SpinnerDemo.java代码如下:
packagecn.class3g.activity;
importandroid.app.Activity;
importandroid.os.Bundle;
import android.util.Log;
importandroid.view.View;
importandroid.widget.AdapterView;
importandroid.widget.AdapterView.OnItemSelectedListener;
importandroid.widget.Spinner;
importandroid.widget.TextView;
public classSpinnerDemo extends Activity implements
OnItemSelectedListener{
Spinner sportSp = null;
protected void onCreate(BundlesavedInstanceState) {
setContentView(R.layout.spinner_layout);
super.onCreate(savedInstanceState);
findViews();
}
private void findViews() {
sportSp = (Spinner)this.findViewById(R.id.sportsSp);
sportSp.setOnItemSelectedListener(this);
}
public voidonItemSelected(AdapterView<?> arg0, View arg1, int arg2,
long arg3) {
TextView tv = (TextView) arg1;
Log.i("TAG",tv.getText().toString());
}
public voidonNothingSelected(AdapterView<?> arg0) {
// TODO Auto-generated method stub
}
}
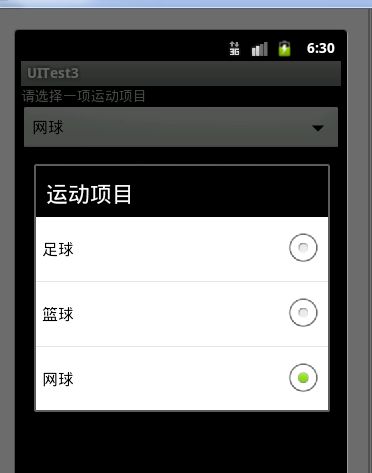
启动虚拟器后 运行效果如下图:

当选择其中的一项后:
eclipse中的LogCat


