openwrt下wifi设置详细过程
可修改为出厂时即启动无线,无线的SSID为指定值等等
		cat <<EOF
config wifi-device  radio$devidx
	option type     mac80211
	option channel  ${channel}
	option hwmode	11${mode_band}
$dev_id
$ht_capab
	# REMOVE THIS LINE TO ENABLE WIFI:
	option disabled 1

config wifi-iface
	option device   radio$devidx
	option network  lan
	option mode     ap
	option ssid     OpenWrt
	option encryption none
<span style="white-space:pre"> </span>option hidden 0
EOF
1.2.2 无线网络Wireless
WiFi设置储存在/etc/config/wireless中(目前支持Broadcom, Atheros 和mac80211)。当第一次启动路由器时,将会自动检测你的卡并且创建简单的配置文件。默认情况下 'option network lan' 是被注释掉的。它提供了一个非安全的无线网络共享。
The WiFi settings are configured in the file /etc/config/wireless(currently supported on Broadcom, Atheros and mac80211). When booting the router for the first time it should detect your card and create a sample configuration file. By default 'option network lan' is commented. This prevents unsecured sharing of the network over the wireless interface.
每一个无线驱动都有自己的配置脚本/lib/wifi/driver_name.sh ,用来处理驱动选项和配置。这个脚本也调用特殊二进制,例如Broadcom的w1c,或者atheros的hostapd 和wpa_supplicant 。
Each wireless driver has its own configuration script in /lib/wifi/driver_name.sh which handles driver specific options and configurations. This script is also calling driver specific binaries like wlc for Broadcom, or hostapd and wpa_supplicant for atheros.
使用不同的架构配置是因为不同的驱动配置。
The reason for using such architecture, is that it abstracts the driver configuration.
标准的Broadcom无线配置: Generic Broadcom wireless config:
option type "broadcom"
option channel "5"
config wifi-iface
option device "wl0"
# option network lan
option mode "ap"
option ssid "OpenWrt"
option hidden "0"
option encryption "none"
标准的Atheros无线配置: Generic Atheros wireless config:
option type "atheros"
option channel "5"
option hwmode "11g"
config wifi-iface
option device "wifi0"
# option network lan
option mode "ap"
option ssid "OpenWrt"
option hidden "0"
option encryption "none"
标准的mac80211无线配置: Generic mac80211 wireless config:
option type "mac80211"
option channel "5"
config wifi-iface
option device "wlan0"
# option network lan
option mode "ap"
option ssid "OpenWrt"
option hidden "0"
option encryption "none"
标准的多播Atheros无线配置: Generic multi-radio Atheros wireless config:
option type atheros
option channel 1
config wifi-iface
option device wifi0
# option network lan
option mode ap
option ssid OpenWrt_private
option hidden 0
option encryption none
config wifi-device wifi1
option type atheros
option channel 11
config wifi-iface
option device wifi1
# option network lan
option mode ap
option ssid OpenWrt_public
option hidden 1
option encryption none
这个文件里有两个类型的配置段。wifi-device针对物理wifi接口,wifi-iface配置了一个在wifi-device之上的虚拟接口(需要被驱动支持)。
There are two types of config sections in this file. The 'wifi-device' refers to the physical wifi interface and 'wifi-iface' configures a virtual interface on top of that (if supported by the driver).
无线配置全概括:A full outline of the wireless configuration file with description of each field:
option type broadcom, atheros, mac80211
option country us, uk, fr, de, etc.
option channel 1-14
option maxassoc 1-128 (broadcom only)
option distance 1-n
option hwmode 11b, 11g, 11a, 11bg (atheros, mac80211)
option rxantenna 0,1,2 (atheros, broadcom)
option txantenna 0,1,2 (atheros, broadcom)
option txpower transmission power in dBm
config wifi-iface
option network the interface you want wifi to bridge with
option device wifi0, wifi1, wifi2, wifiN
option mode ap, sta, adhoc, monitor, or wds
option txpower (deprecated) transmission power in dBm
option ssid ssid name
option bssid bssid address
option encryption none, wep, psk, psk2, wpa, wpa2
option key encryption key
option key1 key 1
option key2 key 2
option key3 key 3
option key4 key 4
option server ip address
option port port
option hidden 0,1
option isolate 0,1
wifi-device的配置项: Options for the wifi-device :
- type
该接口使用的驱动。The driver to use for this interface. - country
国家代码用来指名规定设置。The country code used to determine the regulatory settings. - channel
wifi频道(例如1-14,取决于country设置)The wifi channel (e.g. 1-14, depending on your country setting). - maxassoc
可选:最大的可连接客户端。这个特性只在broadcom芯片组上可选。可选的: Maximum number of associated clients. This feature is supported only on the broadcom chipset. - distance
可选的: Distance between the ap and the furthest client in meters. This feature is supported only on the atheros chipset. - mode
The frequency band (b, g, bg, a). This feature is only supported on the atheros chipset. - diversity
可选的: Enable diversity for the Wi-Fi device. This feature is supported only on the atheros chipset. - rxantenna
可选的: Antenna identifier (0, 1 or 2) for reception. This feature is supported by atheros and some broadcom chipsets. - txantenna
可选的: Antenna identifier (0, 1 or 2) for emission. This feature is supported by atheros and some broadcom chipsets. - txpowerSet the transmission power to be used. The amount is specified in dBm.
wifi-iface的配置: Options for the wifi-iface :
- network
选择/etc/config/network中的接口段 Selects the interface section from /etc/config/networkto be used with this interface - device
设置设备名称Set the wifi device name. - mode
可选模式:Operating mode:- ap
接入点模式Access point mode - sta
客户端模式Client mode - adhoc
Ad-Hoc mode - monitor
监控模式Monitor mode - wds
WDS点对点连接 WDS point-to-point link
- ap
- ssid 设置wifi设备使用的SSID Set the SSID to be used on the wifi device.
- bssid设置BSSID 地址用来设置wds的mac地址。Set the BSSID address to be used for wds to set the mac address of the other wds unit.
- txpower(Deprecated, set in wifi-device) Set the transmission power to be used. The amount is specified in dBm.
- encryption
加密设置。可设置为以下值:Encryption setting. Accepts the following values:- none
- wep
- psk, psk2
WPA(2) Pre-shared Key - wpa, wpa2
WPA(2) RADIUS
- key, key1, key2, key3, key4(wep, wpa and psk)
WEP key, WPA key (PSK mode) or the RADIUS shared secret (WPA RADIUS mode) - server(wpa)
The RADIUS server ip address - port(wpa)
The RADIUS server port (defaults to 1812) - hidden
0 broadcasts the ssid; 1 disables broadcasting of the ssid - isolate
可选的: Isolation is a mode usually set on hotspots that limits the clients to communicate only with the AP and not with other wireless clients. 0 disables ap isolation (default); 1 enables ap isolation.
WDS( Wireless Distribution System )是非标准模式,用来互联两个Broadcom设备,而不能连接一个Broadcom和一个Atheros设备。
Wireless Distribution System WDS is a non-standard mode which will be working between two Broadcom devices for instance but not between a Broadcom and Atheros device.
非加密WDS连接。这个配置例程展示了你如何去设置一个非加密的WD连接。我们假定节点已经配置了BSSID ca:fe:ba:be:00:01 和远程WDS 节点ca:fe:ba:be:00:02 (option bssid field Unencrypted WDS) connections
This configuration 例子 shows you how to setup unencrypted WDS connections. We assume that the peer configured as below as the BSSID ca:fe:ba:be:00:01 and the remote WDS endpoint ca:fe:ba:be:00:02 (option bssid field).
option type "broadcom"
option channel "5"
config wifi-iface
option device "wl0"
option network lan
option mode "ap"
option ssid "OpenWrt"
option hidden "0"
option encryption "none"
config wifi-iface
option device "wl0"
option network lan
option mode wds
option ssid "OpenWrt WDS"
option bssid "ca:fe:ba:be:00:02"
加密的WDS连接。支持加密的WDS连接,支持psk, psk2and psk+psk2模式。下面是使用AES算法的Pre-Shared-Keys 的例子。
Encrypted WDS connections It is also possible to encrypt WDS connections. psk, psk2andpsk+psk2modes are supported. Configuration below is an 例子 configuration using Pre-Shared-Keys with AES algorithm.
option type broadcom
option channel 5
config wifi-iface
option device "wl0"
option network lan
option mode ap
option ssid "OpenWrt"
option encryption psk2
option key "<key< span=""> for clients>"
config wifi-iface
option device "wl0"
option network lan
option mode wds
option bssid ca:fe:ba:be:00:02
option ssid "OpenWrt WDS"
option encryption psk2
option key "<psk< span=""> for WDS>"
802.1x configurations OpenWrt supports both 802.1x client and Access Point configurations. 802.1x client is only working with Atheros or mac80211 drivers. Configuration only supports EAP types TLS, TTLS or PEAP.
EAP-TLS
option device "ath0"
option network lan
option ssid OpenWrt
option eap_type tls
option ca_cert "/etc/config/certs/ca.crt"
option priv_key "/etc/config/certs/priv.crt"
option priv_key_pwd "PKCS#12 passphrase"
EAP-PEAP
option device "ath0"
option network lan
option ssid OpenWrt
option eap_type peap
option ca_cert "/etc/config/certs/ca.crt"
option auth MSCHAPV2
option identity username
option password password
限制:在选择模式的时候有一些限制。只支持如下的模式组合: Limitations: There are certain limitations when combining modes. Only the following mode combinations are supported:
- Broadcom:
- 1x sta, 0-3x ap
- 1-4x ap
- 1x adhoc
- 1x monitor
WDS links can only be used in pure AP mode and cannot use WEP (except when sharing the settings with the master interface, which is done automatically).
- Atheros:
- 1x sta, 0-Nx ap
- 1-Nx ap
- 1x adhoc
N is the maximum number of VAPs that the module allows, it defaults to 4, but can be changed by loading the module with the maxvaps=N parameter.
加入新的驱动配置。因为我们目前只支持Broadcom, Atheros and mac80211三种不同的无线驱动,你可能对加入其它驱动感兴趣,比如Ralink RT2x00, Texas Instruments ACX100/111。
Adding a new driver configuration Since we currently only support thread different wireless drivers : Broadcom, Atheros and mac80211, you might be interested in adding support for another driver like Ralink RT2x00, Texas Instruments ACX100/111.
这些驱动的特定脚本要放在/lib/wifi/.脚本必须包括以下几个方法:
The driver specific script should be placed in /lib/wifi/.shand has to include several functions providing :
- 检测驱动是否存在detection of the driver presence
- 使能/禁用wifi接口enabling/disabling the wifi interface(s)
- 配置读取和设置configuration reading and setting
- 第三方程序的调用(nas, supplicant) third-party programs calling (nas, supplicant)
每个驱动都应该附加到全局变量DRIVERS 中:
Each driver script should append the driver to a global DRIVERS variable :
scan_ ,这个方法将会分析/etc/config/wireless并且保证没有不兼容的配置,例如在ad-hoc模式下隐藏了SSIDS。如果你的设备支持很多配置选项,将是一件非常麻烦的事。 scan_ This function will parse the /etc/config/wireless and make sure there are no configuration incompatibilities, like enabling hidden SSIDS with ad-hoc mode for instance. This can be more complex if your driver supports a lof of configuration options. It does not change the state of the interface.
例子:
local device="$1"
config_get vifs "$device" vifs
for vif in $vifs; do
# check config consistency for wifi-iface sections
done
# check mode combination
}
enable_ ,这个方法将会启动wifi设备,并且可以建立特定的配置文件,例如针对WPA鉴别者或者提供者。
enable_ This function will bring up the wifi device and 可选的ly create application specific configuration files, e.g. for the WPA authenticator or supplicant.
例子:
local device="$1"
config_get vifs "$device" vifs
for vif in $vifs; do
# bring up virtual interface belonging to
# the wifi-device "$device"
done
}
disable_ ,这个方法将会关闭wifi设备和它的所有虚拟接口。
disable_ This function will bring down the wifi device and all its virtual interfaces (if supported).
例子:
local device="$1"
# bring down virtual interfaces belonging to
# "$device" regardless of whether they are
# configured or not. Don't rely on the vifs
# variable at this point
}
detect_ ,这个方法寻找驱动可用的接口。为新设备编写的配置模版应该输出到stdout。还必须在建立新模板时,检查是否已经存在属于该接口的配置段。
detect_ This function looks for interfaces that are usable with the driver. Template config sections for new devices should be written to stdout. Must check for already existing config sections belonging to the interfaces before creating new templates.
例子:
[ wifi-device = "$(config_get dummydev type)" ] && return 0
cat <<eof< span="">
config wifi-device dummydev
option type dummy
# REMOVE THIS LINE TO ENABLE WIFI:
option disabled 1
config wifi-iface
option device dummydev
option mode ap
option ssid OpenWrt
EOF
}
1.3 高级配置 Advanced configuration
配置文件结构 Structure of the configuration files
这个配置文件被分为段和选项/值两部分。
The config files are divided into sections and options/values.
每一个段都有一个类型,但是不需要都有名字。每个选项都有一个名字和一个值并且分配到一个段中。
Every section has a type, but does not necessarily have a name. Every option has a name and a value and is assigned to the section it was written under.
语法 Syntax:
option "" # Option
每个参数都必须是一个单独的字符串,并且被格式化为shell方法的参数。
Every parameter needs to be a single string and is formatted exactly like a parameter for a shell function. The same rules for Quoting and special characters also apply, as it is parsed by the shell.
自定义解析配置文件的脚本 Parsing configuration files in custom scripts
为了能够加载配置文件,你需要include通用方法:
To be able to load configuration files, you need to include the common functions with:
这样你就可以使用config_load 来加载配置文件。这个函数首先检查的文件名,然后从 /etc/config中调用它。Then you can use config_load to load config files. The function first checks for as absolute filename and falls back to loading it from /etc/config (which is the most common way of using it).
如果你希望使用特殊的回调函数来调用段或者选项,在使用config_load前你需要首先定义你的shell方法(在including /etc/functions.sh之后),如下。
If you want to use special callbacks for sections and/or options, you need to define the following shell functions before running config_load(after including /etc/functions.sh):
local type="$1"
local name="$2"
# commands to be run for every section
}
option_cb() {
# commands to be run for every option
}
你还可以从You can also alter option_cbfrom config_cbbased on the section type. This allows you to process every single config section based on its type individually.
config_cb在每个新段开始后都会运行(在选项被处理之前)。可以通过CONFIG_SECTION变量查看最后的配置段。在config_load完成之后也会调用config_cb(不需要新的配置段)。这就可以再所有选项被处理之前或者之后处理配置段。
config_cbis run every time a new section starts (before options are being processed). You can access the last section through the CONFIG_SECTIONvariable. Also an extra call to config_cb(without a new section) is generated after config_loadis done. That allows you to process sections both before and after all options were processed.
Another way of iterating on config sections is using the config_foreach command.
语法Syntax:
This command will run the supplied function for every single config section in the currently loaded config. The section name will be passed to the function as argument 1. If the section type is added to the command line, the function will only be called for sections of the given type.
You can access already processed options with the config_getcommand Syntax:
config_get
# store the value inside the variable
config_get
In busybox ash the three-option config_getis faster, because it does not result in an extra fork, so it is the preferred way.
Additionally you can also modify or add options to sections by using the config_set command.
Syntax:
If a config section is unnamed, an automatically generated name will be assigned internally, e.g. cfg1, cfg2, ...
While it is possible, using unnamed sections through these autogenerated names is strongly discouraged. Use callbacks orconfig_foreachinstead.
1.3.1 热插拔
1.3.2 初始化脚本Init scripts
因为OpenWRT使用它自己的初始化脚本系统,所有其他初始化脚本必须安装在/etc/init.d/ name,使用/etc/rc.common作为封装。
Because OpenWrt uses its own init script system, all init scripts must be installed as /etc/init.d/ nameuse/etc/rc.commonas a wrapper.
例子: /etc/init.d/httpd
# Copyright (C) 2006 OpenWrt.org
START=50
start() {
[ -d /www ] && httpd -p 80 -h /www -r OpenWrt
}
stop() {
killall httpd
}
正如你所看到的,这个脚本并不实际分析命令行参数。这些都是/etc/rc.common来完成的。
as you can see, the script does not actually parse the command line arguments itself. This is done by the wrapper script/etc/rc.common.
start()and stop()是基本的方法,几乎所有的初始化脚本都需要提供。start()将会在用户执行/etc/init.d/httpd start或者在系统启动的时候(如果该脚本使能了并且没有)执行。
start()and stop()are the basic functions, which almost any init script should provide. start()is called when the user runs/etc/init.d/httpd startor (if the script is enabled and does not override this behavior) at system boot time.
使能和禁用初始化脚本是通过/etc/init.d/ name enableor /etc/init.d/ name disable。实际上是在/etc/rc.d中建立或撤销连接,它在启动的时候由/etc/init.d/rcS来处理。
Enabling and disabling init scripts is done by running /etc/init.d/ name enableor /etc/init.d/ name disable. This creates or removes symbolic links to the init script in /etc/rc.d, which is processed by /etc/init.d/rcSat boot time.
这些脚本的默认启动顺序在初始化脚本的START变量中。改变它需要重新该脚本的运行/etc/init.d/ nameenable 。
The order in which these scripts are run is defined in the variable STARTin the init script. Changing it requires running/etc/init.d/ name enable again.
你还可以重写这些标准的初始化脚本函数:You can also override these standard init script functions:
- boot()
Commands to be run at boot time. Defaults to start() - restart()
Restart your service. Defaults to stop(); start() - reload()
Reload the configuration files for your service. Defaults to restart()
你也可以通过建立适当的函数并且在EXTRA_COMMANDS变量里声明他们来自定义命令。帮助文档加在EXTRA_HELP里。
You can also add custom commands by creating the appropriate functions and referencing them in theEXTRA_COMMANDSvariable. Helptext is added in EXTRA_HELP.
例子:
# print the status info
}
EXTRA_COMMANDS="status"
EXTRA_HELP=" status Print the status of the service"
1.3.3 网络脚本 Network scripts
使用网络脚本 Using the network scripts
为了能够访问网络功能,你需要通过执行如下命令来include一些必须得shell脚本。
To be able to access the network functions, you need to include the necessary shell scripts by running:
include /lib/network # include /lib/network/*.sh
scan_interfaces # 读取并且分析网络配置
一些协议,如PPP可能在运行的时候改变接口名称(例如eth0=> ppp0for PPPoE)。这就是为什么你要运行scan_interfaces,而不仅仅是从配置中直接读取变量。在运行scan_interfaces之后,ifname选项将始终包含有效地接口名称(用来IP通信),并且如果物理设备名字和他不同,物理设备名称将被储存在device选项中。这就意味着在scan_interfaces之后执行config_get lan ifname可能得到与反序执行不同的返回值。
Some protocols, such as PPP might change the configured interface names at run time (e.g. eth0=> ppp0for PPPoE). That's why you have to run scan_interfacesinstead of reading the values from the config directly. After running scan_interfaces, the'ifname'option will always contain the effective interface name (which is used for IP traffic) and if the physical device name differs from it, it will be stored in the 'device'option. That means that running config_get lan ifnameafterscan_interfacesmight not return the same result as running it before.
在执行scan_interfaces之后,如下的方法是有效的:
After running scan_interfaces, the following functions are available:
- find_config interface
寻找一个带有特定网络接口的配置项looks for a network configuration that includes the specified network interface. - setup_interface interface [config] [protocol]
将会配置指定的接口,也可以重写网络配置名称或者它使用的协议。will set up the specified interface, 可选的ly overriding the network configuration name or the protocol that it uses.
编写协议句柄 Writing protocol handlers
你可以加入自己的协议处理句柄,通过在/lib/network下增加脚本。提供了如下的两个脚本函数:You can add custom protocol handlers by adding shell scripts to /lib/network. They provide the following two shell functions:
local config="$1"
# change the interface names if necessary
}
setup_interface_() {
local interface="$1"
local config="$2"
# set up the interface
}
scan_ protocolname是可选的并且只在你的协议需要使用一个自定义设备时。例如管道或者一个ppp设备。
scan_ protocolnameis 可选的 and only necessary if your protocol uses a custom device, e.g. a tunnel or a PPP device.
1.缺省情况下,openwrt中的无线是关闭的,系统起来后,ifconfig和ifconfig -a, iwconfig均看不到wlan0接口
原始的wireless配置文件如下:
root@OpenWrt:/# cat /etc/config/wireless
config wifi-device radio0
option type mac80211
option channel 11
option macaddr 00:90:4b:24:ff:2a
option hwmode 11ng
option htmode HT20
list ht_capab SHORT-GI-40
list ht_capab DSSS_CCK-40
# REMOVE THIS LINE TO ENABLE WIFI:
option disabled 1
config wifi-iface
option device radio0
option network lan
option mode ap
option ssid OpenWrt
option encryption none
root@OpenWrt:/#
root@OpenWrt:/# cat /etc/config/network
config 'interface' 'loopback'
option 'ifname' 'lo'
option 'proto' 'static'
option 'ipaddr' '127.0.0.1'
option 'netmask' '255.0.0.0'
config 'interface' 'lan'
option 'ifname' 'eth0'
option 'type' 'bridge'
option 'proto' 'static'
option 'ipaddr' '192.168.1.1'
option 'netmask' '255.255.255.0'
config 'interface' 'wwan'
option 'proto' 'dhcp'
root@OpenWrt:/#
可以先删除以前的,再用wifi命令生成,如下:
rm -f /etc/config/wireless; wifi detect > /etc/config/wireless
mtg板子lan--连笔记本网口,Ip地址选dhcp模式,则笔记本会获得一个192.168.1.x的IP地址,
br-lan的ip地址为192.168.1.1,则在笔记本的地址栏输入192.168.1.1,打开板子的openwrt luci web 界面,network--->wifi,
如图一,点一下enable

串口打印如下:
root@OpenWrt:/# [ 35.704581] ADDRCONF(NETDEV_UP): wlan0: link is not ready
[ 35.732884] device wlan0 entered promiscuous mode
[ 35.742912] br-lan: port 2(wlan0) entering forwarding state
[ 35.748496] br-lan: port 2(wlan0) entering forwarding state
[ 37.953439] device wlan0 left promiscuous mode
[ 37.958101] br-lan: port 2(wlan0) entering forwarding state
[ 38.122524] device wlan0 entered promiscuous mode
[ 38.127514] br-lan: port 2(wlan0) entering forwarding state
[ 38.133145] br-lan: port 2(wlan0) entering forwarding state
此时在用ifconfig和iwconfig查看均能看到wlan0接口
再查看wireless配置文件如下:
root@OpenWrt:/# cat /etc/config/wireless
config 'wifi-device' 'radio0'
option 'type' 'mac80211'
option 'channel' '11'
option 'macaddr' '00:90:4b:24:ff:2a'
option 'hwmode' '11ng'
option 'htmode' 'HT20'
list 'ht_capab' 'SHORT-GI-40'
list 'ht_capab' 'DSSS_CCK-40'
config 'wifi-iface'
option 'device' 'radio0'
option 'network' 'lan'
option 'mode' 'ap'
option 'ssid' 'OpenWrt'
option 'encryption' 'none'
root@OpenWrt:/#
可见前面的 # REMOVE THIS LINE TO ENABLE WIFI:
option disabled 1
两行已经没有了
2. web上点一下wifi标签,则会回到图一的状态,点scan,则会扫描出很多AP,选择要用的AP,并将其的BSSID号复制下来,后面有用,
这里的BSSID号即为AP的MAC地址
选择要用的AP,点join network,会出现Join Network: Settings页面,如图二,


WPA passphrase: 此处输入AP访问密码,如Flexcomm_WIFI的密码为123456789a,TP-LINK_CPN/TP-LINK_CPN1的密码为12345678
name of the new network: 缺省为wwan
Create/Assign firewall-zone: 缺省为wan:wwan:(empty)
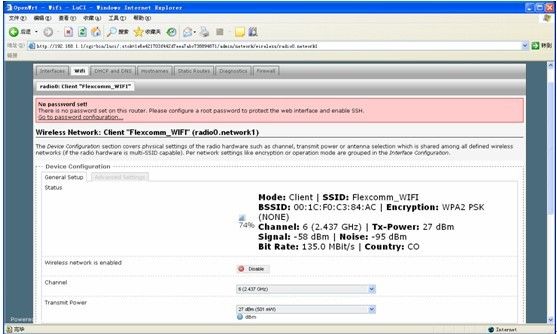
再点submit,则会显示wifi配置界面,和图一中直接选edit之后的界面一样,如图三,再将前面保存的BSSID粘贴到BSSID栏中,其他的参数都不要改

再点save&apply
此时串口打印如下:
root@OpenWrt:/# [ 26.962420] br-lan: port 1(eth0) entering forwarding state
[ 26.987437] device eth0 left promiscuous mode
[ 26.991893] br-lan: port 1(eth0) entering disabled state
[ 27.040168] eth0: link down
[ 30.500184] ADDRCONF(NETDEV_UP): eth0: link is not ready
[ 31.003220] ADDRCONF(NETDEV_UP): eth0: link is not ready
[ 31.040777] eth0: link up, speed 100 Mb/s, full duplex
[ 31.046025] ADDRCONF(NETDEV_CHANGE): eth0: link becomes ready
[ 31.195658] device eth0 entered promiscuous mode
[ 31.259063] br-lan: port 1(eth0) entering forwarding state
[ 31.264621] br-lan: port 1(eth0) entering forwarding state
[ 32.373424] ADDRCONF(NETDEV_UP): wlan0: link is not ready
[ 35.279518] ADDRCONF(NETDEV_CHANGE): wlan0: link becomes ready
root@OpenWrt:/#
查看配置文件为:
root@OpenWrt:/# cat /etc/config/wireless
config 'wifi-device' 'radio0'
option 'type' 'mac80211'
option 'macaddr' '00:90:4b:24:ff:2a'
option 'hwmode' '11ng'
option 'htmode' 'HT20'
list 'ht_capab' 'SHORT-GI-40'
list 'ht_capab' 'DSSS_CCK-40'
option 'disabled' '0'
option 'channel' '6'
option 'country' 'CO'
option 'txpower' '17'
config 'wifi-iface'
option 'ssid' 'Flexcomm_WIFI'
option 'encryption' 'psk2'
option 'device' 'radio0'
option 'mode' 'sta'
option 'network' 'wwan'
option 'key' '123456789a'
option 'bssid' '00:1C:F0:C3:84:AC '
root@OpenWrt:/#
root@OpenWrt:/# ifconfig wlan0
wlan0 Link encap:Ethernet HWaddr 00:90:4B:24:FF:2A
inet addr:192.168.5.182 Bcast:192.168.5.255 Mask:255.255.255.0
inet6 addr: fe80::290:4bff:fe24:ff2a/64 Scope:Link
UP BROADCAST RUNNING MULTICAST MTU:1500 Metric:1
RX packets:82 errors:0 dropped:0 overruns:0 frame:0
TX packets:27 errors:0 dropped:0 overruns:0 carrier:0
collisions:0 txqueuelen:32
RX bytes:6239 (6.0 KiB) TX bytes:3576 (3.4 KiB)
root@OpenWrt:/# iwconfig wlan0
wlan0 IEEE 802.11abgn ESSID:"Flexcomm_WIFI"
Mode:Managed Frequency:2.437 GHz Access Point: 00:1C:F0:C3:84:AC
Bit Rate=135 Mb/s Tx-Power=17 dBm
RTS thr:off Fragment thr:off
Encryption key:off
Power Management:off
Link Quality=53/70 Signal level=-57 dBm
Rx invalid nwid:0 Rx invalid crypt:0 Rx invalid frag:0
Tx excessive retries:0 Invalid misc:4 Missed beacon:0
root@OpenWrt:/#
可见wlan0已经成功连上了AP,并自动获得了IP地址,AP为192.168.5.x网段的,并开了DHCP服务,所以wlan0能自动获得IP地址
root@OpenWrt:/# ping 192.168.5.1 //ping网关能通
PING 192.168.5.1 (192.168.5.1): 56 data bytes
64 bytes from 192.168.5.1: seq=0 ttl=64 time=4.500 ms
64 bytes from 192.168.5.1: seq=1 ttl=64 time=4.163 ms
^C
--- 192.168.5.1 ping statistics ---
2 packets transmitted, 2 packets received, 0% packet loss
round-trip min/avg/max = 4.163/4.331/4.500 ms
root@OpenWrt:/# ping www.baidu.com //ping 外网能通
PING www.baidu.com (220.181.111.147): 56 data bytes
64 bytes from 220.181.111.147: seq=0 ttl=54 time=222.212 ms
64 bytes from 220.181.111.147: seq=1 ttl=54 time=290.069 ms
64 bytes from 220.181.111.147: seq=2 ttl=54 time=212.674 ms
^C
--- www.baidu.com ping statistics ---
3 packets transmitted, 3 packets received, 0% packet loss
round-trip min/avg/max = 212.674/241.651/290.069 ms
root@OpenWrt:/#
root@OpenWrt:/#
此时web页面wifi页状态显示连接,如图四:

说明:如果上面ping外网不通,可能是DNS没有设置
选一个可用的DNS,如8.8.8.8 为google的DNS服务器地址
可以在web页,DHCP and DNS页面中设置DNS forwardings: 8.8.8.8, save&apply
这样设置之后,就能ping通大网了
接mtgd的笔记本(网口接mtgd lan口)也可以直接上大网了。
3.直接在命令行下手动配置wifi如下:
可以先删除老的配置文件rm -rf /etc/config/wireless
新建一个配置文件 wifi detect > /etc/config/wireless
在上面生成的配置文件/etc/config/wireless基础上修改,改成如下:
主要设置'disabled','channel','network','mode','ssid','encryption' ,'key','bssid'
即主要设置option参数
设置之后保存退出,再运行wifi命令
root@OpenWrt:/# vi /etc/config/wireless
config 'wifi-device' 'radio0'
option 'type' 'mac80211'
option 'macaddr' '00:90:4b:24:ff:2a'
option 'hwmode' '11ng'
option 'htmode' 'HT20'
list 'ht_capab' 'SHORT-GI-40'
list 'ht_capab' 'DSSS_CCK-40'
option 'country' 'CN'
option 'disabled' '0'
option 'channel' '1'
option 'txpower' '17'
config 'wifi-iface'
option 'device' 'radio0'
option 'network' 'wwan' --------这个地方一定不能为lan,否则连不通,可为wan,wwan等,wwan只是一个别名
option 'mode' 'sta'
option 'ssid' 'TP-LINK_CPN'
option 'encryption' 'psk2'
option 'key' '12345678'
option 'bssid' '5C:63:BF:FD:CF:FC'
~
root@OpenWrt:/# wifi //启动wifi,可见下面已经连接
[ 61.914007] cfg80211: Calling CRDA for country: CN
[ 62.058611] cfg80211: Regulatory domain changed to country: CN
[ 62.064531] cfg80211: (start_freq - end_freq @ bandwidth), (max_antenna_gain, max_eirp)
[ 62.072894] cfg80211: (2402000 KHz - 2482000 KHz @ 40000 KHz), (N/A, 2000 mBm)
[ 62.080467] cfg80211: (5735000 KHz - 5835000 KHz @ 40000 KHz), (N/A, 3000 mBm)
[ 63.112131] ADDRCONF(NETDEV_UP): wlan0: link is not ready
root@OpenWrt:/# [ 0.464589] ADDRCONF(NETDEV_CHANGE): wlan0: link becomes ready
root@OpenWrt:/# iwconfig wlan0
wlan0 IEEE 802.11abgn ESSID:"TP-LINK_CPN"
Mode:Managed Frequency:2.412 GHz Access Point: 5C:63:BF:FD:CF:FC
Bit Rate=180 Mb/s Tx-Power=17 dBm
RTS thr:off Fragment thr:off
Encryption key:off
Power Management:off
Link Quality=70/70 Signal level=-29 dBm
Rx invalid nwid:0 Rx invalid crypt:0 Rx invalid frag:0
Tx excessive retries:0 Invalid misc:7 Missed beacon:0
root@OpenWrt:/# ifconfig wlan0
wlan0 Link encap:Ethernet HWaddr 00:90:4B:24:FF:2A
inet addr:192.168.8.108 Bcast:192.168.8.255 Mask:255.255.255.0
inet6 addr: fe80::290:4bff:fe24:ff2a/64 Scope:Link
UP BROADCAST RUNNING MULTICAST MTU:1500 Metric:1
RX packets:66 errors:0 dropped:0 overruns:0 frame:0
TX packets:39 errors:0 dropped:0 overruns:0 carrier:0
collisions:0 txqueuelen:32
RX bytes:14386 (14.0 KiB) TX bytes:4828 (4.7 KiB)
root@OpenWrt:/#