android tabHost布局 大全
转自http://blog.csdn.net/chenzheng_java/article/details/6208020
一: 不继承TabActivity并以布局文件进行布局
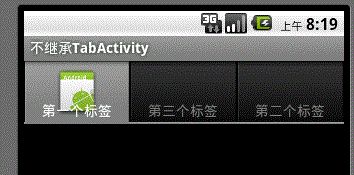
上图为最终效果图
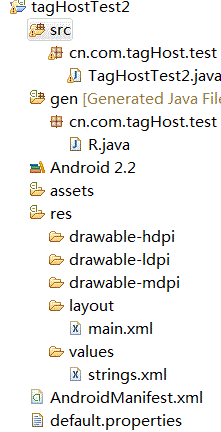
代码结构图
main.xml
- <?xml version="1.0" encoding="utf-8"?>
- <LinearLayout xmlns:android="http://schemas.android.com/apk/res/android"
- android:id="@+id/hometabs"
- android:orientation="vertical"
- android:layout_width="fill_parent"
- android:layout_height="fill_parent">
- <!-- TabHost必须包含一个 TabWidget和一个FrameLayout-->
- <TabHost android:id="@+id/tabhost"
- android:layout_width="fill_parent"
- android:layout_height="wrap_content"
- >
- <LinearLayout
- android:orientation="vertical"
- android:layout_width="fill_parent"
- android:layout_height="fill_parent">
- <!-- TabWidget的id属性必须为 @android:id/tabs-->
- <TabWidget android:id="@android:id/tabs"
- android:orientation="horizontal"
- android:layout_width="fill_parent"
- android:layout_height="wrap_content">
- </TabWidget>
- <!-- FrameLayout的id属性必须为 @android:id/tabcontent-->
- <FrameLayout android:id="@android:id/tabcontent"
- android:layout_width="fill_parent"
- android:layout_height="fill_parent">
- <TextView android:id="@+id/view1"
- android:layout_width="fill_parent"
- android:layout_height="fill_parent"/>
- <TextView android:id="@+id/view2"
- android:layout_width="fill_parent"
- android:layout_height="fill_parent"/>
- <TextView android:id="@+id/view3"
- android:layout_width="fill_parent"
- android:layout_height="fill_parent"/>
- </FrameLayout>
- </LinearLayout>
- </TabHost>
- </LinearLayout>
java代码如下
- package cn.com.tagHost.test;
- import android.app.Activity;
- import android.os.Bundle;
- import android.widget.TabHost;
- import android.widget.TabWidget;
- public class TagHostTest2 extends Activity {
- @Override
- public void onCreate(Bundle savedInstanceState) {
- super.onCreate(savedInstanceState);
- setContentView(R.layout.main);
- // 获取TabHost对象
- TabHost tabHost = (TabHost) findViewById(R.id.tabhost);
- // 如果没有继承TabActivity时,通过该种方法加载启动tabHost
- tabHost.setup();
- tabHost.addTab(tabHost.newTabSpec("tab1").setIndicator("第一个标签",
- getResources().getDrawable(R.drawable.icon)).setContent(
- R.id.view1));
- tabHost.addTab(tabHost.newTabSpec("tab3").setIndicator("第三个标签")
- .setContent(R.id.view3));
- tabHost.addTab(tabHost.newTabSpec("tab2").setIndicator("第二个标签")
- .setContent(R.id.view2));
- }
- }
运行得到正确的结果。
废话连篇:这里需要注意的是
第一:布局文件的格式。以及TabWidget和FrameLayout的id属性值。
第二:TabWidget代表的是标签部分,FrameLayout代表的点击标签后看到的内容部分。FrameLayout里面声明的组件意为具备成为标签内容的资格,具体的还要在代码中具体指定。
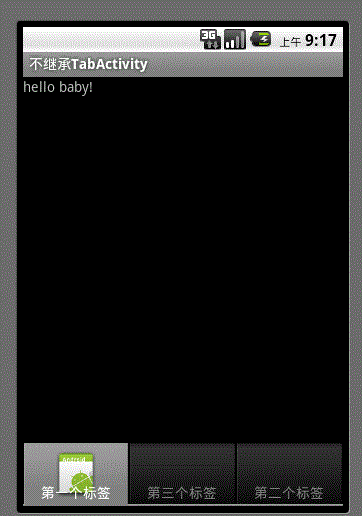
你是否也想要这种结果呢。让标签在下部分显示
那么你只需要给main.xml进行下布局修改就可以了。
main.xml
- <?xml version="1.0" encoding="utf-8"?>
- <LinearLayout xmlns:android="http://schemas.android.com/apk/res/android"
- android:id="@+id/hometabs" android:orientation="vertical"
- android:layout_width="fill_parent" android:layout_height="fill_parent">
- <!-- TabHost必须包含一个 TabWidget和一个FrameLayout-->
- <TabHost android:id="@+id/tabhost" android:layout_width="fill_parent"
- android:layout_height="wrap_content">
- <LinearLayout android:orientation="vertical"
- android:layout_width="fill_parent" android:layout_height="fill_parent">
- <!-- FrameLayout的id属性必须为 @android:id/tabcontent-->
- <FrameLayout android:id="@android:id/tabcontent"
- android:layout_width="fill_parent" android:layout_height="fill_parent">
- <TextView android:id="@+id/view1" android:layout_width="fill_parent"
- android:layout_height="fill_parent"
- android:text="hello baby!"
- />
- <TextView android:id="@+id/view2" android:layout_width="fill_parent"
- android:layout_height="fill_parent" />
- <TextView android:id="@+id/view3" android:layout_width="fill_parent"
- android:layout_height="fill_parent" />
- </FrameLayout>
- <RelativeLayout android:layout_width="fill_parent"
- android:layout_height="fill_parent">
- <!-- TabWidget的id属性必须为 @android:id/tabs-->
- <TabWidget android:id="@android:id/tabs"
- android:orientation="horizontal" android:layout_width="fill_parent"
- android:layout_height="wrap_content"
- android:layout_alignParentBottom="true"
- android:paddingBottom="0dp"
- >
- </TabWidget>
- </RelativeLayout>
- </LinearLayout>
- </TabHost>
- </LinearLayout>
为了让标签和父容器底部持平,我们使用了android:layout_alignParentBottom="true",该属性只有在RelativeLayout布局中才会存在哦、这也是为什么我们将tabWidget放入一个RelativeLayout中的原因。
此外,在lineaerLayout布局中,TabWidget和FrameLayout的位置可是调换了哦。
二、继承TabActivity并以activity布局
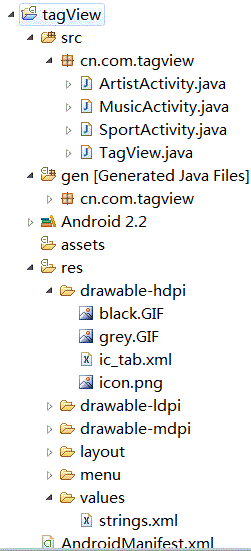
再看下代码结构:
其中black.gif顾名思义就是一个黑背景图片,grey.gif就是一张灰色的背景图片
然后直接上代码:
ArtistActivity.java
- package cn.com.tagview;
- import android.app.Activity;
- import android.os.Bundle;
- import android.widget.TextView;
- public class ArtistActivity extends Activity {
- @Override
- protected void onCreate(Bundle savedInstanceState) {
- super.onCreate(savedInstanceState);
- TextView textView = new TextView(this);
- // 该文档将会作为标签的内容进行显示
- textView.setText("艺术内容");
- setContentView(textView);
- }
- }
MusicActivity.java
- package cn.com.tagview;
- import android.app.Activity;
- import android.os.Bundle;
- import android.widget.TextView;
- public class MusicActivity extends Activity {
- @Override
- protected void onCreate(Bundle savedInstanceState) {
- super.onCreate(savedInstanceState);
- TextView textView = new TextView(this);
- // 该文档将会作为标签的内容进行显示
- textView.setText("音乐内容");
- setContentView(textView);
- }
- }
SportActivity.java
- package cn.com.tagview;
- import android.app.Activity;
- import android.os.Bundle;
- import android.widget.TextView;
- public class SportActivity extends Activity {
- @Override
- protected void onCreate(Bundle savedInstanceState) {
- super.onCreate(savedInstanceState);
- TextView textView = new TextView(this);
- // 该文档将会作为标签的内容进行显示
- textView.setText("运动内容");
- setContentView(textView);
- }
- }
ArtistActivity.java MusicActivity.java SportActivity.java三个activity是用做标签内容的activity。即当用户点击相应的标签时,下边会显示相应的activity内容。
ic_tab.xml代码
- <?xml version="1.0" encoding="utf-8"?>
- <selector
- xmlns:android="http://schemas.android.com/apk/res/android"
- >
- <item android:drawable="@drawable/grey"
- android:state_selected="true"
- ></item>
- <item android:drawable="@drawable/black"
- ></item>
- </selector>
这里一定要注意ic_tab.xml文件的位置,是放在res/drawable文件夹下的。有些朋友说怎么没有这个文件夹啊,实际上大家看到了我将它放在了drawable-hdpi中了,实际上drawable-hdpi、drawable-ldpi、drawable-mdpi三个文件夹都属于drawable文件夹的哦。该文件它规定了,当标签获得焦点和失去焦点时,标签上显示什么图片。
例如本例中,就是当state_selected="true"(当标签被选中时),显示@drawable/grey指定的资源图片。当未被选中时,显示@drawable/black指定的资源图片。
tagView.java代码:
- package cn.com.tagview;
- import android.app.TabActivity;
- import android.content.Intent;
- import android.content.res.Resources;
- import android.os.Bundle;
- import android.widget.TabHost;
- /**
- * @author chenzheng_Java
- * @description 注意,该类一定要继承TabActivity
- */
- public class TagView extends TabActivity {
- @Override
- public void onCreate(Bundle savedInstanceState) {
- super.onCreate(savedInstanceState);
- // setContentView(R.layout.main);
- // android代码中访问application资源的一个类
- Resources resources = getResources();
- // 获取当前activity的标签,该方法的实现中已经执行了setContentView(com.android.internal.R.layout.tab_content);
- TabHost tabHost = getTabHost();
- // 每一个标签项
- TabHost.TabSpec spec;
- // 声明一个意图,该意图告诉我们,下一个跳转到的activity是ArtistActivity。
- Intent intent = new Intent(this, ArtistActivity.class);
- /**
- * tabHost.newTabSpec("artist")创建一个标签项,其中artist为它的标签标识符,相当于jsp页面标签的name属性
- * setIndicator("艺术标签",resources.getDrawable(R.drawable.ic_tab))设置标签显示文本以及标签上的图标(该图标并不是一个图片,而是一个xml文件哦)
- * setContent(intent)为当前标签指定一个意图
- * tabHost.addTab(spec); 将标签项添加到标签中
- */
- spec = tabHost.newTabSpec("artist").setIndicator("艺术标签",
- resources.getDrawable(R.drawable.ic_tab)).setContent(intent);
- tabHost.addTab(spec);
- Intent intent2 = new Intent(this, MusicActivity.class);
- spec = tabHost.newTabSpec("music").setIndicator("音乐标签",
- resources.getDrawable(R.drawable.ic_tab)).setContent(intent2);
- tabHost.addTab(spec);
- Intent intent3 = new Intent(this, SportActivity.class);
- spec = tabHost.newTabSpec("sport").setIndicator("体育标签",
- resources.getDrawable(R.drawable.ic_tab)).setContent(intent3);
- tabHost.addTab(spec);
- // tabHost.setCurrentTabByTag("music");设置第一次打开时默认显示的标签,该参数与tabHost.newTabSpec("music")的参数相同
- tabHost.setCurrentTab(1);//设置第一次打开时默认显示的标签,参数代表其添加到标签中的顺序,位置是从0开始的哦。
- }
- }
AndroidManifest.xml
- <?xml version="1.0" encoding="utf-8"?>
- <manifest xmlns:android="http://schemas.android.com/apk/res/android"
- package="cn.com.tagview"
- android:versionCode="1"
- android:versionName="1.0">
- <uses-sdk android:minSdkVersion="8" />
- <application android:icon="@drawable/icon" android:label="@string/app_name">
- <!-- android:theme="@android:style/Theme.NoTitleBar" 的意思是将系统默认的tag标签去掉,为咱们自己的标签空出位置-->
- <activity android:name=".TagView"
- android:label="@string/app_name"
- android:theme="@android:style/Theme.NoTitleBar"
- >
- <intent-filter>
- <action android:name="android.intent.action.MAIN" />
- <category android:name="android.intent.category.LAUNCHER" />
- </intent-filter>
- </activity>
- <!-- 在主配置文件中声明用于标签切换的3个activity,记住此处一定要声明,否则会出错
- android:name="ArtistActivity"里面ArtistActivity前面是否有.都可以,你只需要保证该类是在manifest标签下package属性的包中即可。
- -->
- <activity android:name="ArtistActivity" android:label="@string/app_name"></activity>
- <activity android:name="MusicActivity" android:label="@string/app_name"></activity>
- <activity android:name="SportActivity" android:label="@string/app_name"></activity>
- </application>
- </manifest>
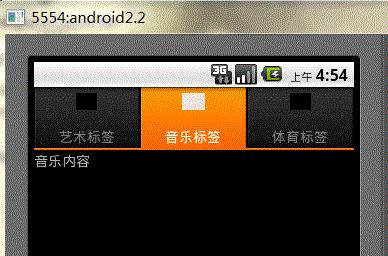
一切都弄好之后,运行,就出现了最终效果。这里要注意,main.xml是一直都没有用到的哦。
废话连篇:
其实,利用TabHost布局与ListView有很多相似之处,系统也同样为他们提供了帮助类,TabHost-TabActivity ListView-ListActivity .当我们的activity集成了这些类之后,一般在里面我们只需要整理绑定下数据就可以。
再次声明一下,代码中是存在setContentView方法的调用的,只不过因为我们集成了TabActivity,TabActivity的getTabHost方法中已经进行了实现而已。对用户隐藏了,并不代表没有。
项目中为了简单易懂,我们只是在每个标签的内容部分添加了一个文本。实际上,我们完全可以在里面添加图片、视频等等。只要在相应的activity中实现就行了。我们可以看到,这种方式其实有很好的分层结构,activity与activity之间没有太多耦合。
可能一直到现在,有些朋友对TabActivity和ListActivity这种实现都特别的别扭。我这里就简单的说一下,实际上这其实是一种设计模式,模板模式。系统给你提供了一个实现了大部分内容的模板,然后你通过继承模板,去做修改(例如模板中有一个方法没有任何实现,你重写该方法并对其进行具体实现),让其符合你的要求。这就是模板模式的原理。
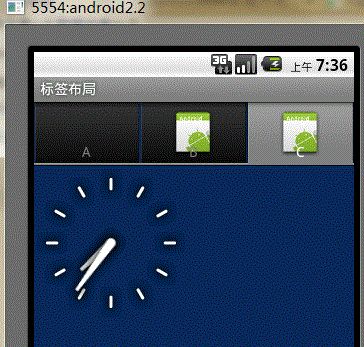
三、 继承TabActivity并以布局文件进行布局
上面的是最终效果图。
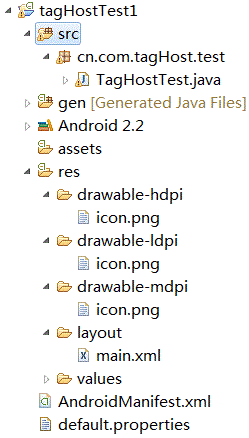
代码结构如下。
main.xml代码:
- <?xml version="1.0" encoding="utf-8"?>
- <!-- 该布局文件定义了标签的内容部分,该布局文件一定要以FrameLayout为根元素 -->
- <FrameLayout xmlns:android="http://schemas.android.com/apk/res/android"
- android:layout_width="fill_parent" android:layout_height="fill_parent">
- <!-- 第一个标签内容 -->
- <LinearLayout android:id="@+id/widget_layout_Blue"
- android:layout_width="fill_parent" android:layout_height="fill_parent"
- android:orientation="vertical" >
- <EditText android:id="@+id/widget34" android:layout_width="fill_parent"
- android:layout_height="wrap_content" android:text="EditText"
- android:textSize="18sp">
- </EditText>
- <Button android:id="@+id/widget30" android:layout_width="wrap_content"
- android:layout_height="wrap_content" android:text="Button">
- </Button>
- </LinearLayout>
- <!-- 第二个标签内容 AnalogClock为钟表组件-->
- <LinearLayout android:id="@+id/widget_layout_red"
- android:layout_width="fill_parent" android:layout_height="fill_parent"
- android:orientation="vertical" >
- <AnalogClock android:id="@+id/widget36"
- android:layout_width="wrap_content" android:layout_height="wrap_content">
- </AnalogClock>
- </LinearLayout>
- <!-- 第三个标签内容 RadioButton必须在RadioGroup中哦 -->
- <LinearLayout android:id="@+id/widget_layout_green"
- android:layout_width="fill_parent" android:layout_height="fill_parent"
- android:orientation="vertical">
- <RadioGroup android:id="@+id/widget43"
- android:layout_width="166px" android:layout_height="98px"
- android:orientation="vertical">
- <RadioButton android:id="@+id/widget44"
- android:layout_width="wrap_content" android:layout_height="wrap_content"
- android:text="RadioButton">
- </RadioButton>
- <RadioButton android:id="@+id/widget45"
- android:layout_width="wrap_content" android:layout_height="wrap_content"
- android:text="RadioButton">
- </RadioButton>
- </RadioGroup>
- </LinearLayout>
- </FrameLayout>
TagHostTest.java的代码:
- package cn.com.tagHost.test;
- import android.app.TabActivity;
- import android.graphics.Color;
- import android.os.Bundle;
- import android.view.LayoutInflater;
- import android.view.ViewGroup;
- import android.widget.TabHost;
- public class TagHostTest extends TabActivity {
- private TabHost myTabhost;
- @Override
- protected void onCreate(Bundle savedInstanceState) {
- super.onCreate(savedInstanceState);
- myTabhost = this.getTabHost();
- /**
- * inflate(int resource, ViewGroup root, boolean attachToRoot)
- * resource 很显然是一个资源索引id
- * 当attachToRoot为true时,root代表一个可放置于容器中的组件
- * 当attachToRoot为false时,root仅代表一个存储值的对象
- * 该方法的意思是,将根据R.layout.main生成的标签View,添加到由myTabhost.getTabContentView()获得的父容器中
- * LayoutInflater类的inflate方法中有如下片段
- * if (root != null && attachToRoot) {
- root.addView(temp, params);
- }
- 其中temp是根据resource指定的资源生成的一个和标签有关的view
- */
- LayoutInflater.from(this).inflate(R.layout.main,
- myTabhost.getTabContentView(), true);
- myTabhost.setBackgroundColor(Color.argb(150, 22, 70, 150));
- myTabhost.addTab(myTabhost.newTabSpec("One")
- .setIndicator("A").setContent(R.id.widget_layout_Blue));
- myTabhost.addTab(myTabhost.newTabSpec("Two")
- .setIndicator("B", getResources().getDrawable(R.drawable.icon))
- .setContent(R.id.widget_layout_green));
- myTabhost.addTab(myTabhost.newTabSpec("Three")
- .setIndicator("C", getResources().getDrawable(R.drawable.icon))
- .setContent(R.id.widget_layout_red));
- }
- }
这种方法实现起来比较简单,看看我们都做了些什么。
第一步:定义标签内容部分的布局文件,该布局文件必须以FrameLayout为根节点。
第二步:让activity继承TabActivity,然后实现自己的代码。
