ActiveReports工作总结11——麻烦的线线框框
在我使用AR的过程当中,碰到最大的困难,不是数据的组织(虽然也很麻烦),而是画面的布局,尤其是一些奇怪的线线框框,常常会为了一些特殊的线框要求,浪费很多时间调试。
本节我就把在项目的碰到的一些常见框线问题,简单的进行一下分析。
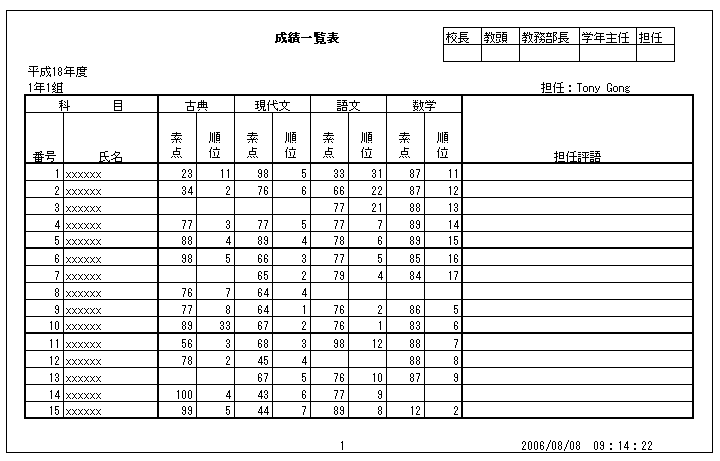
1,帐票式样,还是上节那张帐票。
该帐票的框线要求是:3个sub模版的四周要求粗线;Detail中的纪录,要求每5行为粗线。
2,对于一个textbox或label等控件,初始状态是没有边框的(就像图中的”成绩一览表”这个控件),为控件提供边框,一般有2种方法。
1)给控件设置border(right click控件,选border),这样可以很方便的给控件设置4条边框。
当然,也可以代码中控制:
Me .TextBox3.Border.Style = BorderLineStyle.Solid
' Set the top border.
Me .TextBox3.Border.TopStyle = BorderLineStyle.Solid
style可以设置成虚线,实线等。粗细有普通,2倍,4倍像素(仅适用于实线)
2)给控件四周手动画4条line。
你可以直接在rpt画面上画上4条线,然后在界面或代码中控制他们的位置。
当然,你也可以在代码中直接动态生成4条line
方法1)的好处是方便,而且一样可以在代码中做控制(比如加粗top line,隐藏right line等);但同时也有一点局限性比如框线的粗细设定不够灵活(只能1,2,4倍),对于有严格规定的帐票,并不适用,而且当控件比较多的话,给每个控件设置border也是挺麻烦的。
方法2)的好处是很灵活,同时可以写个共通方法,对整个section内的控件一次性画线。缺点是稍微麻烦了点。
用哪种方法可以根据实际情况,图中,右上角的教师承认栏肯定是用方法1)简单,而下面数据区域一般用方法2),这样比较容易控制框线。
3先确定一些概念。
1)整个rpt上,不管是section、控件的位置,高宽,还是实际打印的printWidth都是用Inch(英寸)为单位;
而line的weight和控件border的粗细,确是以pixels为单位的
2)不管是画线,还是直接调整控件的border,框线的粗细都是以中点为基点,向2边扩张或缩小的,如图:
<!--[if !vml]-->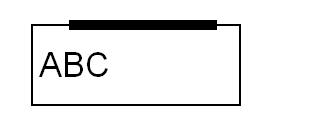
<!--[endif]-->
这样就会产生一个问题,如图:
<!--[if !vml]-->
<!--[endif]-->
用的是方法1),由于border向2边扩张,所以产生了字和框线重叠的问题。这在控件比较小,而框线特别粗的情况下会发生。
为了解决这个问题,我们有一种偏移控件的方法:
用方法2),把线画在控件的外面,比如要在控件top上画一条4单位宽的线,则就在控件上2单位高度的地方画线,这条线会向上和向下各扩张2单位,这样,线的下部正好和控件的顶部碰到,而又不会发生重叠的现象。当然,用这种方法的话,需要控制好控件之间的间距,否则2个控件之间的框线会互相重叠。
恩,我在这里仅仅提供一个思路,具体怎么做自己可以实践一下。我下面的示例没有用这种偏移控件的方法,只是简单的在控件上画线而已。
4,改造example10,改成方法2)画线(直接在控件上画线了,没有去设置控件的偏移)
先把sub1,sub2,sub3上面控件的border都去掉,然后再代码中动态生成line(示例代码为sub1.vb)
Private secGroupHeader2 As SectionLines
Private secDetail As SectionLines
Public Structure SectionLines
Public TopLine As Line
Public BottomLine As Line
Public LeftLine As Line
Public RightLine As Line
End Structure
Private Sub sub1_ReportStart( ByVal sender As Object , ByVal e As System.EventArgs) Handles Me .ReportStart
'
'
Me .secGroupHeader1 = Me .DrawLine( Me .GroupHeader1, New ARControl() { Me .lbl1})
Me .secGroupHeader2 = Me .DrawLine( Me .GroupHeader1, New ARControl() { Me .lblID, Me .lblName})
Me .DrawLine( Me .Detail, New ARControl() { Me .txtID, Me .txtName})
'
'
End Sub
' '' <summary>
' '' 對一排控件進行集体画綫,不在同一排上的控件,不能一起画
' '' </summary>
' '' <param name="section">The section.</param>
' '' <param name="controls">The controls.</param>
' '' <param name="outlineBorderWeight">外框的粗細.</param>
' '' <param name="inlineBorderWeight">内框的粗細.</param>
' '' <returns></returns>
' '' <remarks></remarks>
Private Function DrawLine( ByVal section As Section, ByVal outlineBorderWeight As Single , ByVal inlineBorderWeight As Single , ByVal controls As ARControl()) As SectionLines
If controls Is Nothing OrElse controls.Length = 0 Then
Return Nothing
End If
Dim sec As New SectionLines
Dim ln As Line
Dim controlsNum As Int32 = controls.Length
' 画第一个控件到倒数第2个控件的右綫
For iForControls As Int32 = 0 To controlsNum - 2
' Right line
ln = New Line
ln.LineWeight = inlineBorderWeight
ln.BringToFront()
section.Controls.Add(ln)
With ln
.X1 = controls(iForControls).Left + controls(iForControls).Width
.Y1 = controls(iForControls).Top
.X2 = .X1
.Y2 = controls(iForControls).Top + controls(iForControls).Height
End With
Next
' 画所有控件的top綫
' Top line
ln = New Line
ln.LineWeight = outlineBorderWeight
ln.BringToFront()
section.Controls.Add(ln)
With ln
' x1和x2要増加偏移量
.X1 = controls( 0 ).Left - 0 .007F * outlineBorderWeight / 2
.Y1 = controls( 0 ).Top
.X2 = controls(controlsNum - 1 ).Left + controls(controlsNum - 1 ).Width + 0 .007F * outlineBorderWeight / 2
.Y2 = .Y1
End With
sec.TopLine = ln
' 画所有控件的bottom綫
ln = New Line
ln.LineWeight = outlineBorderWeight
ln.BringToFront()
section.Controls.Add(ln)
With ln
' x1和x2要増加偏移量
.X1 = controls( 0 ).Left - 0 .007F * outlineBorderWeight / 2
.Y1 = controls( 0 ).Top + controls( 0 ).Height
.X2 = controls(controlsNum - 1 ).Left + controls(controlsNum - 1 ).Width + 0 .007F * outlineBorderWeight / 2
.Y2 = .Y1
End With
sec.BottomLine = ln
' 画最左面的left綫
' Left line
ln = New Line
ln.LineWeight = outlineBorderWeight
ln.BringToFront()
section.Controls.Add(ln)
With ln
.X1 = controls( 0 ).Left
.Y1 = controls( 0 ).Top - 0 .007F * outlineBorderWeight / 2
.X2 = .X1
.Y2 = controls( 0 ).Top + controls( 0 ).Height + 0 .007F * outlineBorderWeight / 2
End With
sec.LeftLine = ln
' 画最右面的right綫
' Right line
ln = New Line
ln.LineWeight = outlineBorderWeight
ln.BringToFront()
section.Controls.Add(ln)
With ln
.X1 = controls(controlsNum - 1 ).Left + controls(controlsNum - 1 ).Width
.Y1 = controls(controlsNum - 1 ).Top - 0 .007F * outlineBorderWeight / 2
.X2 = .X1
.Y2 = controls(controlsNum - 1 ).Top + controls(controlsNum - 1 ).Height + 0 .007F * outlineBorderWeight / 2
End With
sec.RightLine = ln
Return sec
End Function
其中SectionLines 结构和DrawLine方法可以写成共通的,sub1,sub2,sub3都会用到.
这里定义一个SectionLines的用途是,可以对返回的四根线进行处理。
<!--[if !vml]-->
<!--[endif]-->
ok,效果是一样的
5,在DrawLine方法中,已经实现了最外面的框线用粗线,里面的框线用细线。
由于刚才定义了结构SectionLines,把画好的线返回给了它,所以要控制线条,就很方便了。
比如sub1的GroupHeader中,”科目”的bottom线和”番号””氏名”的top线是粗线,实际需要变成细线,这种效果都可以在代码中通过SectionLines控制,代码:
Me .secGroupHeader2.TopLine.LineWeight = 1
看看效果:
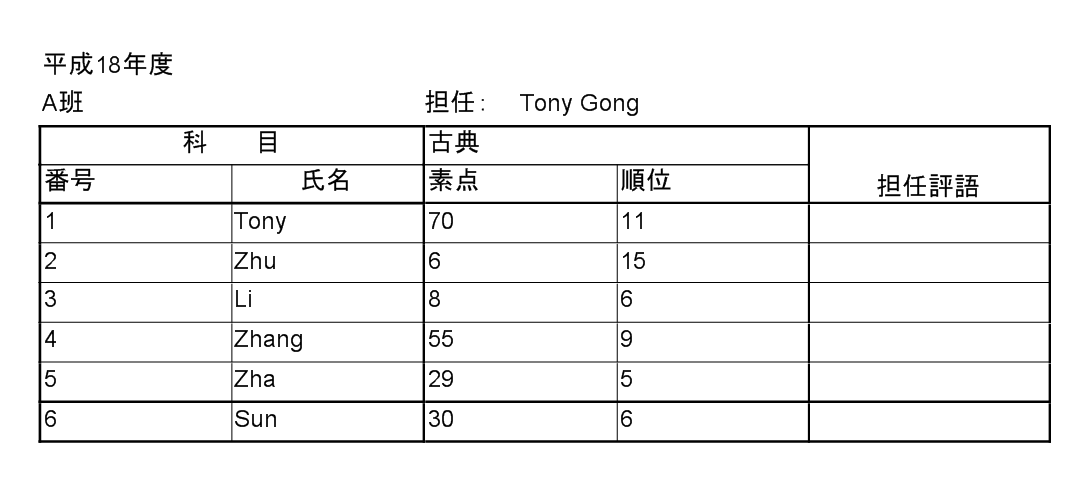
<!--[if !vml]-->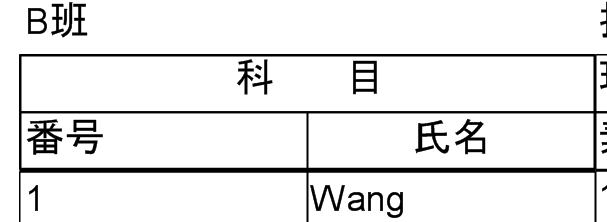
<!--[endif]-->
仔细看的话,会发现groupheader的bottom line 的确变粗了,但其他3根线比较奇怪,虽然向内也变粗了,但向外却没变粗。
这是由于我们主模版上sub1的容器设定的宽度,正好是子模版里“科目”控件的宽度,而我现在的画线方法是在控件的边上画线,线条有一半的粗细被遮掉了。
解决方法:子模版中,控件left,top,预留线粗的一半距离,然后把整个子模版的ReportWidth加上线粗的偏移量。1单位的线粗,转换到Inch是0.007。改动的代码如下:
'
'
Me .lbl1.Left = 0.007
Me .lbl1.Top = 0.007
Me .PrintWidth = Me .lblName.Left + Me .lblName.Width + 0 .007F
Me .Detail.Height = Me .txtID.Top + Me .txtID.Height + 0 .007F
'
'
End Sub
Public ReadOnly Property ReportWidth() As Single
Get
Return Me .txtID.Width + Me .txtName.Width + 0 .007F
End Get
End Property
效果:
<!--[if !vml]-->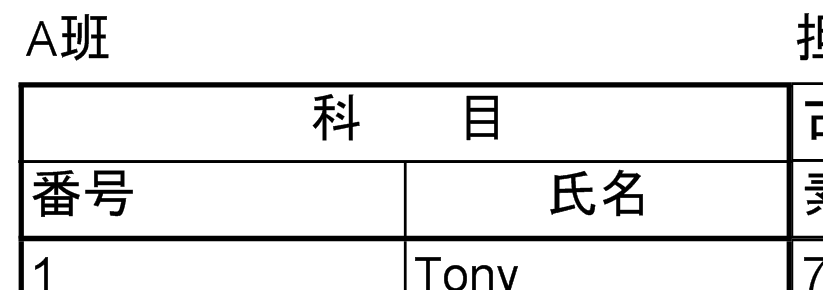
<!--[endif]-->
由于bottom和right和其他区域控件的线重叠了,所以看上去比较粗,可以把其他线隐藏掉(比如把sub2的left 线隐藏掉)
然后,用相同的方法弄好sub1的detail,以及sub2,sub3。出来这样的效果:
<!--[if !vml]-->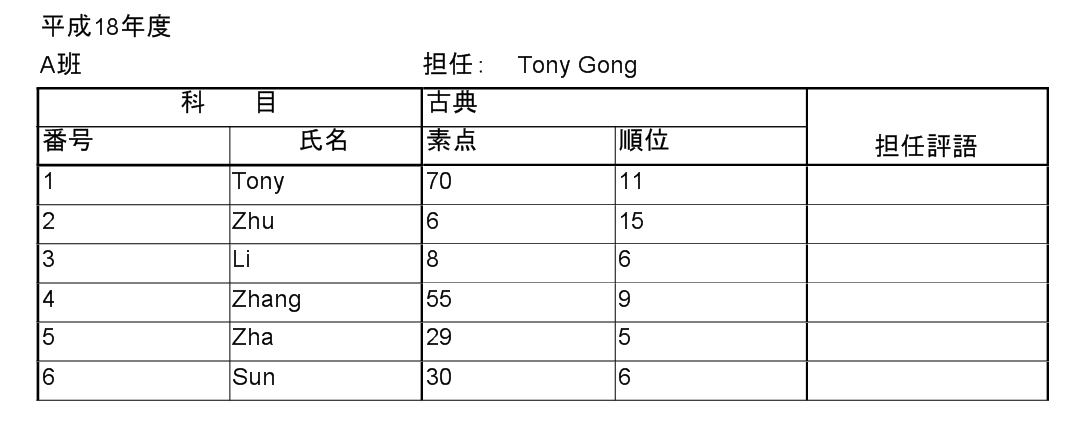
<!--[endif]-->
6,整个帐票top,left,right的粗线画好了,现在有个需求是detail中每5行画一条粗线。
直接给detail中控件的bottom画粗线当然不可以,那会使得detail中每一行都变成粗线。
我们项目中的做法是:
1)在组织数据源时,为数据源增加一个字段,用来判断改行是印刷粗线还是细线。
比如sub1的数据源
| 番号 |
氏名 |
| 1 |
Tony |
| 2 |
Zhu |
| 3 |
Li |
| 4 |
Zhang |
| 5 |
Zha |
| 6 |
Sun |
增加一个字段,变成:
| 番号 |
氏名 |
LineFlag |
| 1 |
Tony |
0 |
| 2 |
Zhu |
0 |
| 3 |
Li |
0 |
| 4 |
Zhang |
0 |
| 5 |
Zha |
1 |
| 6 |
Sun |
1 |
5的这一行印刷粗线,6由于是最后一行了,也要印刷粗线。
2)数据源有了这个字段,然后在detail中放一个隐藏的textbox,邦定LineFlag
<!--[if !vml]-->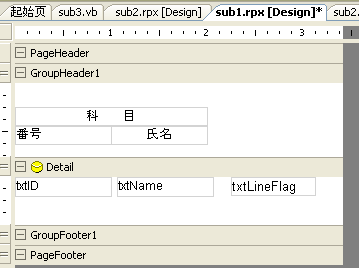
<!--[endif]-->
3)Detail_BeforePrint事件中根据lineflag的值,来判断是否要把该Detail下的控件的bottom线变粗
If Me .txtLineFlag.Text = " 1 " Then
Me .secDetail.BottomLine.LineWeight = 2
End If
End Sub
4)最后的效果
7,这节就讲到这里。
AR里线框的处理的确很麻烦。
不过在我们项目中,像DrawLine这种方法,以及5行粗线的方法,都做好了共通方法。而且大部分功能都写在了基类里,对于开发帐票的同学来说,只管调用方法就可以了,具体这些个方法是怎么实现的,可以不用理睬。当然,为了更深的理解,有空也可以研究一下。
