也来一篇关于Infragistics WPF Report的使用教程 (一)
前言
Infragistics Report是一款比较灵活的报表控件, 比微软的rdlc控件至少在页面打印上, 页面的控制比较好调整.
这里使用的是Infragistics Ultimate v14.1 试用版
开发工具是Visual Studio 2013 Framework 4.0 WPF Windows应用程序.
添加报表
将XamReportViewer从左侧的工具栏中拖到右侧的窗体中.
<ig:XamReportViewer HorizontalAlignment="Stretch" VerticalAlignment="Stretch">
</ig:XamReportViewer>
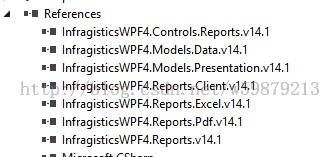
系统会自动的添加引用, 记住这些引用,发布的时候, 把这些引用一并打包. 这样在客户端运行时就不会出现问题了.
1. 先定义一个Person的类, 实现INofifyPropertyChanged接口.
   public class Person:INotifyPropertyChanged
    {
        #region  Implement of INotifyProeprtyChanged.
        public event PropertyChangedEventHandler PropertyChanged;


        private void OnPropertyChanged(string propertyName)
        {
            PropertyChangedEventHandler handler = this.PropertyChanged;
            if (handler != null)
            {
                handler(this, new PropertyChangedEventArgs(propertyName));
            }
        }
        #endregion

        private string _name;
        private int _age;
        private byte[] _profilePhoto;
        public string Name
        {
            get { return _name; }
            set { _name = value;
                OnPropertyChanged("Name");
            }
        }

        public int Age
        {
            get { return _age; }
            set { _age = value; OnPropertyChanged("Age"); }
        }

        public byte[] ProfilePhoto
        {
            get { return _profilePhoto; }
            set { _profilePhoto = value; OnPropertyChanged("ProfilePhoto"); }
        }
    }
2. 我们再定义一个MainWindowViewModel, 用于关联MainWindow.xaml的DataContext.
在MainWindow.xaml 中我们要New出一个 MainWindowViewModel的实体, 并对实体中的属性赋值. 这样才可以将对应的参数绑定到报表中. 即MVVM模式.
public class MainWindowViewModel : INotifyPropertyChanged
    {
        #region  Implement of INotifyProeprtyChanged.

        public event PropertyChangedEventHandler PropertyChanged;

        private void OnPropertyChanged(string propertyName)
        {
            PropertyChangedEventHandler handler = this.PropertyChanged;
            if (handler != null)
            {
                handler(this, new PropertyChangedEventArgs(propertyName));
            }
        }

        #endregion

        private ObservableCollection<Person> _personCollection;
        private DateTime _printDateTime;

        public ObservableCollection<Person> PersonCollection
        {
            get { return _personCollection; }
            set
            {
                _personCollection = value;
                OnPropertyChanged("PersonCollection");
            }
        }

        public DateTime PrintDateTime
        {
            get { return _printDateTime; }
            set
            {
                _printDateTime = value;
                OnPropertyChanged("PrintDateTime");
            }
        }
    }
创建报表
添加数据源
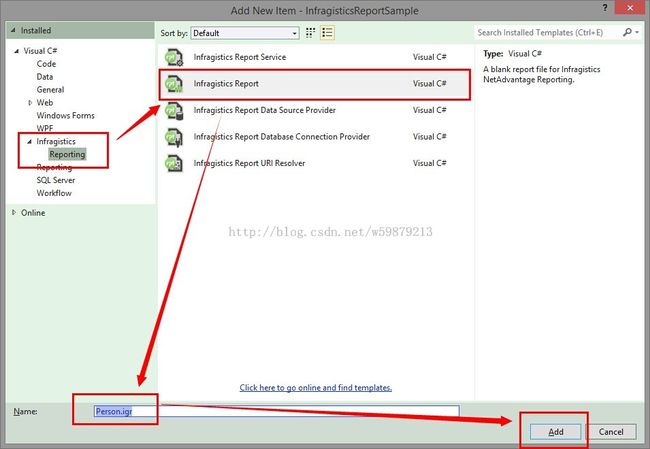
1. 创建报表, 安装Infragistics之后, 新添加项目的时候, 会有一项infragistics, 按图所示, 添加报表.
2. 创建数据源
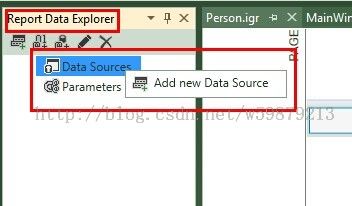
通过Report Data Explorer工具栏, 右击, 选择 DataSource - Add new Data Source,
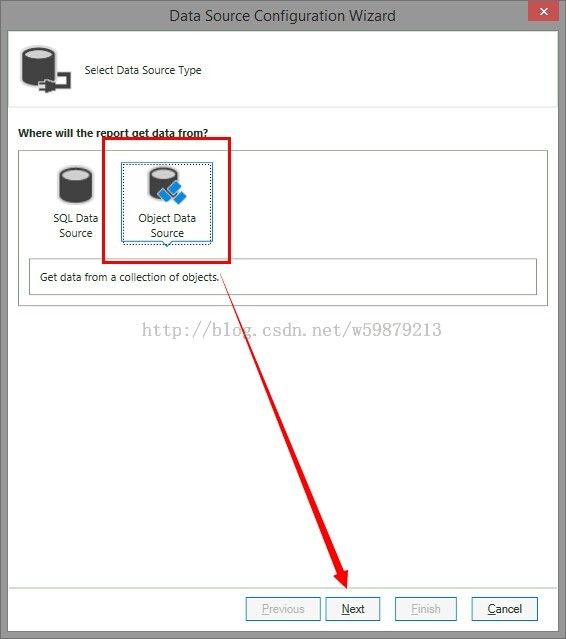
在后面弹出的窗口中选择"Object Data Source", 点击下一步,
选择我们刚刚定义好的MainWindowViewModel.cs, 这里需要注意一下, 在创建编辑好MainViewModel.cs之后, 需要编译一下, 添加数据源的时候才能显示出来. 否则是不会显示的.
添加参数
添加参数的相对简单, 从左侧的Report Data Explorer中右击Parameter, 选择"Add Static Value List Parameter", 输入参数名称即可.
添加完成之后, 点击OK即可, 然后将数据源, 参数直接拖到右侧的报表区域中.
绑定参数
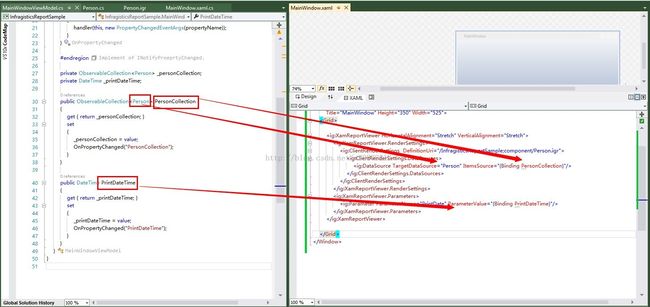
绑定的参数之后的代码
        <ig:XamReportViewer HorizontalAlignment="Stretch" VerticalAlignment="Stretch">
            <ig:XamReportViewer.RenderSettings>
                <ig:ClientRenderSettings  DefinitionUri="/InfragisticsReportSample;component/Person.igr">
                    <ig:ClientRenderSettings.DataSources>
                        <ig:DataSource TargetDataSource="Person" ItemsSource="{Binding PersonCollection}"/>
                    </ig:ClientRenderSettings.DataSources>
                </ig:ClientRenderSettings>
            </ig:XamReportViewer.RenderSettings>
            <ig:XamReportViewer.Parameters>
                <ig:Parameter ParameterName="PrintDate" ParameterValue="{Binding PrintDateTime}"/>
            </ig:XamReportViewer.Parameters>
        </ig:XamReportViewer>
TargetDataSource = "Person" 指的是绑定的Collection的类型为Person
ItemsSource = "{Binding PersonCollection}" 指的是绑定数据源为PersonCollection
Parametername = "PrintDate" 是指我们在报表中创建的参数名称为PrintDate, ParameterValue = {Binding PrintDateTime} 是指绑定PrintDateTime的属性.
添加数据
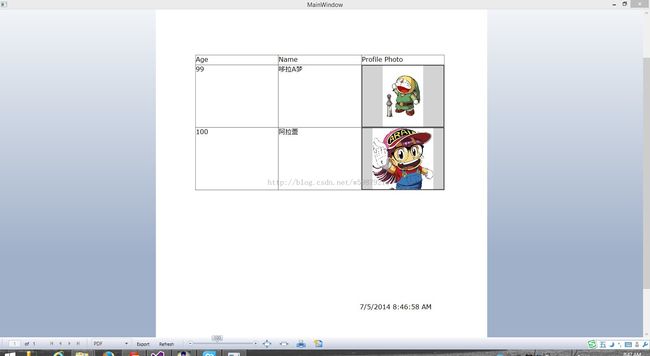
在创建出MainWindowViewModel的时候, 指定数据源, 就可以显示出报表了.
       public MainWindow()
        {
            InitializeComponent();

            MainWindowViewModel model = new MainWindowViewModel();

            model.PersonCollection = new ObservableCollection<Person>();
            model.PrintDateTime = DateTime.Now;

            Person p = new Person();
            p.Name = "哆拉A梦";
            p.Age = 99;
            p.ProfilePhoto = GetByteImage("doraemon.jpg");
            model.PersonCollection.Add(p);

            p = new Person();
            p.Name = "阿拉蕾";
            p.Age = 100;
            p.ProfilePhoto = GetByteImage("arale.jpg");
            model.PersonCollection.Add(p);

            this.DataContext = model;
        }

        public byte[] GetByteImage(string imagepath)
        {
            FileStream fs = new FileStream(imagepath, FileMode.Open);
            byte[] byData = new byte[fs.Length];
            fs.Read(byData, 0, byData.Length);
            fs.Close();
            return byData;
        }
    }
最后的报表结果
