搭建Groovy开发环境
介绍
刚接触Groovy,开发环境比较重要,这里将从控制台环境开始讲述如何编写Groovy,然后
一、使用Groovy控制台环境
从“http://groovy.codehaus.org/Download”下载Groovy的最新版本,然后解压。记得配置好JAVA_HOME。然后进入Groovy的解压目录下的bin目录中,执行下面命令来看看是否一切都配置得当。
C:/groovy-1.7.8/bin>groovy -e "print 'hello world'"
hello world
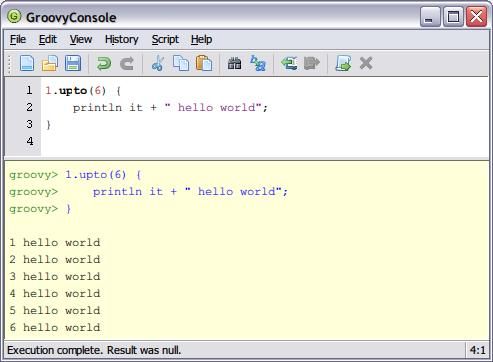
使用“groovy -e”可以直接运行Groovy脚本。接下来我们尝试在“groovyConsole”环境下运行Groovy脚本,在bin目录下键入“groovyConsole”就可以了。
C:/groovy-1.7.8/bin>groovy -e "print 'hello world'"
hello world
C:/groovy-1.7.8/bin>groovyConsole
上面介绍的方法都是直接运行脚本语言,接下来学习下编译Groovy脚本,类似于*.java到*.class,而Groovy是*.groovy到*.class。还是在bin目录中,使用groovyc就可以编译Groovy脚本。
先在C盘下准备一个Groovy脚本文件GroovyEnvDemo.groovy,内容如下:
class Demo { static { println "hello world"; } } new Demo();
然后在控制台下执行下面命令:
C:/groovy-1.7.8/bin>groovyc "C:/GroovyEnvDemo.groovy"

C:/groovy-1.7.8/bin>dir *class
 Volume in drive C has no label.
 Volume Serial Number is 6806-ABBD

 Directory of C:/groovy-1.7.8/bin

2011-06-26  12:20             5,898 Demo.class
2011-06-26  12:20             7,336 GroovyEnvDemo.class
               2 File(s)         13,234 bytes
               0 Dir(s)  89,398,063,104 bytes free

C:/groovy-1.7.8/bin>
从编译的结果可以看出,有两个class文件,一个是与文件名相同的GroovyEnvDemo类文件,另一个是脚本内容所定义的Demo类文件。
二、使用Ant编译并运行Groovy和Java
上面的环境做做练习还可以,如果做开发就有所牵强。Groovy对Ant做了编译与运行的任务扩展,我们可以在eclipse中用这两个任务扩展很方便地执行编译与运行。下面我们看一个完整的案例。
先在eclipse中创建一个Java项目,并取消自动编译,这是因为有的Java的源码程序可能需要依赖Groovy编译后的class文件,如果使用自动编译IDE可能会显示源码有错。之后把编译输出目录设置为构建用的class目录,同时也需要把groovy-all-x.x.x.jar加到构建目录里。
<?xml version="1.0" encoding="UTF-8"?> <classpath> <classpathentry kind="src" path="src/groovy"/> <classpathentry kind="src" path="src/java"/> <classpathentry kind="src" path="src/java_groovy"/> <classpathentry kind="con" path="org.eclipse.jdt.launching.JRE_CONTAINER"/> <classpathentry kind="lib" path="groovy-all-1.7.8.jar"/> <classpathentry kind="lib" path="C:/Documents and Settings/Administrator/My Documents/Workspace/rsa/GroovyExample/bin"/> <classpathentry kind="output" path="bin"/> </classpath>
下面需要创建一个Ant的build.xml文件,在项目图标上点击右键然后选择“Export”,从General下选取Ant Buildfiles就可以输出了。
下面是build.xml的内容:
<?xml version="1.0" encoding="UTF-8"?><!-- WARNING: Eclipse auto-generated file. Any modifications will be overwritten. To include a user specific buildfile here, simply create one in the same directory with the processing instruction <?eclipse.ant.import?> as the first entry and export the buildfile again. --><project basedir="." default="test" name="GroovyExample"> <property environment="env"/> <property name="ECLIPSE_HOME" value="../../../../../../Program Files/IBM/SDP"/> <property name="debuglevel" value="source,lines,vars"/> <property name="target" value="1.6"/> <property name="source" value="1.6"/> <path id="GroovyExample.classpath"> <pathelement location="bin"/> <pathelement location="groovy-all-1.7.8.jar"/> </path> <target name="init"> <mkdir dir="bin"/> <copy includeemptydirs="false" todir="bin"> <fileset dir="src/groovy" excludes="**/*.launch, **/*.java, **/*.groovy"/> </copy> <copy includeemptydirs="false" todir="bin"> <fileset dir="src/java" excludes="**/*.launch, **/*.java"/> </copy> <copy includeemptydirs="false" todir="bin"> <fileset dir="src/java_groovy" excludes="**/*.launch, **/*.java, **/*.groovy"/> </copy> </target> <target name="clean"> <delete dir="bin"/> </target> <target depends="clean" name="cleanall"/> <target depends="build-subprojects,build-project" name="build"/> <target name="build-subprojects"/> <target depends="init" name="build-project"> <echo message="${ant.project.name}: ${ant.file}"/> <groovyc srcdir="src/groovy" destdir="bin"> <classpath refid="GroovyExample.classpath"/> <!-- only Java source file will be compiled --> </groovyc> <javac debug="true" debuglevel="${debuglevel}" destdir="bin" source="${source}" target="${target}"> <src path="src/java"/> <classpath refid="GroovyExample.classpath"/> </javac> <groovyc srcdir="src/java_groovy" destdir="bin"> <classpath refid="GroovyExample.classpath"></classpath> <!-- "javac" will enable "groovyc" to compile both Java and Groovy source file --> <javac debug="true" debuglevel="${debuglevel}" source="${source}" target="${target}" /> </groovyc> </target> <target description="Build all projects which reference this project. Useful to propagate changes." name="build-refprojects"/> <target description="copy Eclipse compiler jars to ant lib directory" name="init-eclipse-compiler"> <copy todir="${ant.library.dir}"> <fileset dir="${ECLIPSE_HOME}/plugins" includes="org.eclipse.jdt.core_*.jar"/> </copy> <unzip dest="${ant.library.dir}"> <patternset includes="jdtCompilerAdapter.jar"/> <fileset dir="${ECLIPSE_HOME}/plugins" includes="org.eclipse.jdt.core_*.jar"/> </unzip> </target> <target description="compile project with Eclipse compiler" name="build-eclipse-compiler"> <property name="build.compiler" value="org.eclipse.jdt.core.JDTCompilerAdapter"/> <antcall target="build"/> </target> <target name="test"> <antcall target="build"/> <groovy src="src/java_groovy/GroovyFileList.groovy" mce_src="src/java_groovy/GroovyFileList.groovy" classname="GroovyFileList" classpathref="GroovyExample.classpath" /> <!-- <java classname="JGroovyCaller" classpathref="GroovyExample.classpath"></java> <groovy src="src/java_groovy/GroovyCaller.groovy" mce_src="src/java_groovy/GroovyCaller.groovy" classname="GroovyCaller" classpathref="GroovyExample.classpath" /> <groovy src="src/groovy/GroovyClosure.groovy" mce_src="src/groovy/GroovyClosure.groovy" classname="GroovyClosure" classpathref="GroovyExample.classpath" /> <antcall target="build"></antcall> <antcall target="MixedGroovyEntry"></antcall> <antcall target="MixedJavaEntry"></antcall> <antcall target="PureJavaEntry"></antcall> <antcall target="PureGroovyEntry"></antcall> <antcall target="JavaEntry"></antcall> <antcall target="GroovyEntry"></antcall> --> </target> <target name="MixedJavaEntry"> <java classname="MixedJavaEntry" classpathref="GroovyExample.classpath"></java> </target> <target name="MixedGroovyEntry"> <groovy src="src/java_groovy/MixedGroovyEntry.groovy" mce_src="src/java_groovy/MixedGroovyEntry.groovy" classname="MixedGroovyEntry" classpathref="GroovyExample.classpath" /> </target> <target name="PureJavaEntry"> <java classname="PureJavaEntry" classpathref="GroovyExample.classpath"></java> </target> <target name="PureGroovyEntry"> <groovy src="src/groovy/PureGroovyEntry.groovy" mce_src="src/groovy/PureGroovyEntry.groovy" classname="PureGroovyEntry" classpathref="GroovyExample.classpath" /> </target> <target name="JavaEntry"> <java classname="JavaEntry" classpathref="GroovyExample.classpath"></java> </target> <target name="GroovyEntry"> <groovy src="src/java_groovy/GroovyEntry.groovy" mce_src="src/java_groovy/GroovyEntry.groovy" classname="GroovyEntry" classpathref="GroovyExample.classpath" /> </target> </project>
上面的build.xml使用了两个groovy和groovyc两个任务,这个是在eclipse中设置的。具体做法是在eclipse中【Windows】->【Perferences】->【Ant】->【Runtime】->【Tasks】->【Add Task...】,定义一个Name为groovy另一个Name为groovyc的任务。
定义成功后,就会在Ant的任务列表中出现下面的信息:
最后一步就是直接运行build.xml,运行时可以选择运行什么样的任务,从上面提供的build.xml文件源码中可以看出,常用的任务是test和build。有时可能需要调整下test中的内容。
三、利用eclipse插件来编写Groovy
上面的方法是利用Ant的任务来编译与执行,不过还有更为简单方法,就是利用Groovy官网所提供的eclipse插件。
在“http://groovy.codehaus.org/Eclipse+Plugin”可以选择下载合适你的eclipse版本的插件。可以按照上面的说明选择在线安装,也可以下载zip包之后离线安装,这里所介绍的是离线安装方法。
zip包下载之后,从【Help】->【Install New Software...】->【Add】->【Archive...】中选择zip包。
安装后重新启动eclipse,【File】->【New】->【Project...】->【Groovy】->【Groovy Project】创建一个Groovy项目。
准备好一个Groovy源码文件后,就可以直接【Run As】->【Groovy Script】就可以直接看到程序的输出内容了!
package info.knightrcom class MyFirstExample { def id; def name; def value; public static void main(String[] args) { 1.upto(9, { i -> println(i); }); def m = new MyFirstExample(); } }
结论
三种环境搭建方法都介绍完了,相比之下第三种最简单,使用起来也最方便。使用到的源码可以在“http://download.csdn.net/source/3396344”下载到,Good luck!
