Android - TabHost 选项卡功能用法详解&&TabWidget切换卡的实现应用&&实例说明
一. TabHost介绍
TabHost组件可以在界面中存放多个选项卡, 很多软件都使用了改组件进行设计;
1. TabHost常用组件
TabWidget : 该组件就是TabHost标签页中上部 或者 下部的按钮, 可以点击按钮切换选项卡;
TabSpec : 代表了选项卡界面, 添加一个TabSpec即可添加到TabHost中;
-- 创建选项卡 : newTabSpec(String tag), 创建一个选项卡;
-- 添加选项卡 : addTab(tabSpec);
2. TabHost使用步骤
a. 定义布局 : 在XML文件中使用TabHost组件, 并在其中定义一个FrameLayout选项卡内容;
b. 继承TabActivity : 显示选项卡组件的Activity继承TabActivity;
c. 获取组件 : 通过调用getTabHost()方法, 获取TabHost对象;
d. 创建添加选项卡 : 通过TabHost创建添加选项卡;
3. 将按钮放到下面
布局文件中TabWidget代表的就是选项卡按钮, Fragement组件代表内容;
设置失败情况 : 如果Fragement组件没有设置 android:layout_weight属性, 那么将TabWidget放到下面, 可能不会显示按钮;
设置权重 : 设置了Fragment组件的权重之后, 就可以成功显示该选项卡按钮;
二. TabHost布局文件
1. 根标签及id
设置Android自带id : XML布局文件中, 可以使用 标签设置, 其中的id 需要引用 android的自带id : android:id=@android:id/tabhost ;
getHost()获取前提 : 设置了该id之后, 在Activity界面可以使用 getHost(), 获取这个TabHost 视图对象;
示例 :
|
1
|
<tabhost android:id=
"@android:id/tabhost"
android:layout_height=
"match_parent"
android:layout_width=
"match_parent"
></tabhost>
|
2. TabWidget组件
选项卡切换 : 该组件是选项卡切换按钮, 通过点击该组件可以切换选项卡;
设置android自带id : 这个组件的id要设置成android的自带id : android:id=@android:id/tabs ;
TabHost必备组件 : 该组件与FrameLayout组件是TabHost组件中必备的两个组件;
切换按钮下方显示 : 如果想要将按钮放到下面, 可以将该组件定义在下面, 但是注意,FrameLayout要设置android:layout_widget = 1;
设置TabWidget大小 : 如果想要设置该按钮组件的大小, 可以设置该组件与FrameLayout组件的权重;
示例 :
|
1
|
<tabwidget android:id=
"@android:id/tabs"
android:layout_height=
"wrap_content"
android:layout_width=
"fill_parent"
android:orientation=
"horizontal/"
></tabwidget>
|
3. FrameLayout组件
组件作用 : 该组件中定义的子组件是TabHost中每个页面显示的选项卡, 可以将TabHost选项卡显示的视图定义在其中;
设置android自带id : 这个组件的id要设置成android的自带的id : android:id=@android:id/tabcontent ;
示例 :
|
1
|
<framelayout android:id=
"@android:id/tabcontent"
android:layout_height=
"fill_parent"
android:layout_weight=
"1"
android:layout_width=
"fill_parent"
></framelayout>
|
二. Activity方法
1. 获取TabHost
获取方法 : getHost();
前提 : 调用getHost()方法获取TabHost组件的方法的前提是在布局文件中, 设置了android自带的id android:id=@android:id/tabhost 才可以;
2. 创建选项卡
创建选项卡 : 调用TabHost组件的newTabHost(tag), 其中的tag是字符串, 即在选项卡的唯一标识;
设置选项卡 :
-- 设置按钮名称 : setIndicator(叫兽);
-- 设置选项卡内容 : setContent(), 可以设置视图组件, 可以设置Activity, 也可以设置Fragement;
添加选项卡 : tabHost.add(tag), 传入的参数是创建选项卡的时候定义的唯一标识;
三 代码
XML布局文件 :
|
1
2
3
4
5
6
7
8
9
10
11
12
13
14
15
16
17
18
19
20
21
22
23
24
25
26
|
<!--?xml version=
1.0
encoding=utf-
8
?-->
<tabhost android:id=
"@android:id/tabhost"
android:layout_height=
"match_parent"
android:layout_width=
"match_parent"
xmlns:android=
"http://schemas.android.com/apk/res/android"
>
<linearlayout android:layout_height=
"fill_parent"
android:layout_width=
"fill_parent"
android:orientation=
"vertical"
>
<tabwidget android:id=
"@android:id/tabs"
android:layout_height=
"wrap_content"
android:layout_width=
"fill_parent"
android:orientation=
"horizontal/"
>
<framelayout android:id=
"@android:id/tabcontent"
android:layout_height=
"fill_parent"
android:layout_weight=
"1"
android:layout_width=
"fill_parent"
>
<linearlayout android:id=
"@+id/alwayswet"
android:layout_height=
"fill_parent"
android:layout_width=
"fill_parent"
android:orientation=
"vertical"
>
<imageview android:layout_height=
"fill_parent"
android:layout_width=
"fill_parent"
android:scaletype=
"fitXY"
android:src=
"@drawable/alwayswet/"
>
</imageview></linearlayout>
<linearlayout android:id=
"@+id/isanimal"
android:layout_height=
"fill_parent"
android:layout_width=
"fill_parent"
android:orientation=
"vertical"
>
<imageview android:layout_height=
"fill_parent"
android:layout_width=
"fill_parent"
android:scaletype=
"fitXY"
android:src=
"@drawable/isanimal/"
>
</imageview></linearlayout>
<linearlayout android:id=
"@+id/nezha"
android:layout_height=
"fill_parent"
android:layout_width=
"fill_parent"
android:orientation=
"vertical"
>
<imageview android:layout_height=
"fill_parent"
android:layout_width=
"fill_parent"
android:scaletype=
"fitXY"
android:src=
"@drawable/nazha/"
>
</imageview></linearlayout>
</framelayout>
</tabwidget></linearlayout>
</tabhost>
|
Activity主界面代码 :
|
1
2
3
4
5
6
7
8
9
10
11
12
13
14
15
16
17
18
19
20
21
22
23
24
25
26
27
28
29
30
31
32
33
|
package
shuliang.han.tabhost_test;
import
android.app.TabActivity;
import
android.os.Bundle;
import
android.widget.TabHost;
import
android.widget.TabHost.TabSpec;
public
class
MainActivity
extends
TabActivity {
@Override
protected
void
onCreate(Bundle savedInstanceState) {
super
.onCreate(savedInstanceState);
setContentView(R.layout.tabhost);
TabHost tabHost = getTabHost();
TabSpec page1 = tabHost.newTabSpec(tab1)
.setIndicator(叫兽)
.setContent(R.id.isanimal);
tabHost.addTab(page1);
TabSpec page2 = tabHost.newTabSpec(tab2)
.setIndicator(老湿)
.setContent(R.id.alwayswet);
tabHost.addTab(page2);
TabSpec page3 = tabHost.newTabSpec(tab3)
.setIndicator(哪吒)
.setContent(R.id.nezha);
tabHost.addTab(page3);
}
}
|
<TabHost xmlns:android="http://schemas.android.com/apk/res/android"
android:layout_width="match_parent"
android:layout_height="match_parent"
android:id="@android:id/tabhost">
<LinearLayout android:orientation="vertical" android:layout_width="fill_parent" android:layout_height="fill_parent">
<FrameLayout android:id="@android:id/tabcontent" android:layout_width="fill_parent" android:layout_height="0.0dip" android:layout_weight="1.0" />
<TabWidget android:id="@android:id/tabs" android:visibility="gone" android:layout_width="fill_parent" android:layout_height="wrap_content" android:layout_weight="0.0" />
<RadioGroup android:gravity="center_vertical" android:layout_gravity="bottom" android:orientation="horizontal" android:id="@+id/main_radio" android:background="@drawable/tab_menu_bottom" android:layout_width="fill_parent" android:layout_height="50dp">
<RadioButton android:id="@+id/radio_buttonequipment" android:tag="radio_button1" android:layout_marginBottom="2.0dip" android:text="设备" android:drawableTop="@drawable/btn_equipment" style="@style/main_tab_bottom" android:layout_weight="1"/>
<RadioButton android:id="@+id/radio_buttonalarm" android:tag="radio_button0" android:layout_marginBottom="2.0dip" android:text="报警" android:drawableTop="@drawable/btn_alarm" style="@style/main_tab_bottom" android:layout_weight="1"/>
<RadioButton android:id="@+id/radio_buttonexpand" android:tag="radio_button2" android:layout_marginBottom="2.0dip" android:text="扩展" android:drawableTop="@drawable/btn_expand" style="@style/main_tab_bottom" android:layout_weight="1"/>
<RadioButton android:id="@+id/radio_buttonset" android:tag="radio_button3" android:layout_marginBottom="2.0dip" android:text="设置" android:drawableTop="@drawable/btn_set" style="@style/main_tab_bottom" android:layout_weight="1"/>
</RadioGroup>
</LinearLayout>
</TabHost>
--------------------------------------------
<TabHost xmlns:android="http://schemas.android.com/apk/res/android"
xmlns:tools="http://schemas.android.com/tools"
android:id="@android:id/tabhost"
android:layout_width="fill_parent"
android:layout_height="fill_parent"
android:background="@android:color/white" >
<LinearLayout
android:layout_width="fill_parent"
android:layout_height="fill_parent"
android:orientation="vertical" >
<TabWidget
android:id="@android:id/tabs"
android:layout_width="fill_parent"
android:layout_height="wrap_content"
android:visibility="gone" />
<FrameLayout
android:id="@android:id/tabcontent"
android:layout_width="fill_parent"
android:layout_height="0.0dip"
android:layout_weight="1.0" />
<!-- 底部菜单 -->
<FrameLayout
android:id="@+id/buttom_menu"
android:layout_width="fill_parent"
android:layout_height="wrap_content"
>
<RadioGroup
android:id="@+id/rgp_maintab"
android:layout_width="fill_parent"
android:layout_height="50dip"
android:layout_gravity="bottom"
android:background="@drawable/bottom_bg"
android:gravity="bottom"
android:orientation="horizontal" >
<RadioButton
android:id="@+id/rb_01"
style="@style/main_btn_style"
android:layout_width="fill_parent"
android:layout_height="fill_parent"
android:layout_weight="1.0"
android:drawableBottom="@drawable/tab_home_btn"
android:gravity="bottom|center_horizontal" />
<RadioButton
android:id="@+id/rb_02"
style="@style/main_btn_style"
android:layout_width="fill_parent"
android:layout_height="fill_parent"
android:layout_weight="1.0"
android:drawableBottom="@drawable/tab_search_btn"
android:gravity="bottom|center_horizontal" />
<RadioButton
android:id="@+id/rb_03"
style="@style/main_btn_style"
android:layout_width="fill_parent"
android:layout_height="fill_parent"
android:layout_weight="1.0"
android:drawableBottom="@drawable/tab_category_btn"
android:gravity="bottom|center_horizontal" />
<RadioButton
android:id="@+id/rb_04"
style="@style/main_btn_style"
android:layout_width="fill_parent"
android:layout_height="fill_parent"
android:layout_weight="1.0"
android:drawableBottom="@drawable/tab_shop_btn"
android:gravity="bottom|center_horizontal" />
<RadioButton
android:id="@+id/rb_05"
style="@style/main_btn_style"
android:layout_width="fill_parent"
android:layout_height="fill_parent"
android:layout_weight="1.0"
android:drawableBottom="@drawable/tab_user_btn"
android:gravity="bottom|center_horizontal" />
</RadioGroup>
<ImageView
android:id="@+id/tab_select"
android:layout_width="wrap_content"
android:layout_height="wrap_content"
android:layout_gravity="bottom"
android:src="@drawable/bottom_actived" />
</FrameLayout>
</LinearLayout>
</TabHost>
--------------------------------------------------------------------------------------------------------------------
1、布局文件
<TabHost xmlns:android="http://schemas.android.com/apk/res/android"
android:layout_width="match_parent"
android:layout_height="match_parent"
android:id="@android:id/tabhost">
<LinearLayout android:orientation="vertical" android:layout_width="fill_parent" android:layout_height="fill_parent">
<FrameLayout android:id="@android:id/tabcontent" android:layout_width="fill_parent" android:layout_height="0.0dip" android:layout_weight="1.0" />
<TabWidget android:id="@android:id/tabs" android:visibility="gone" android:layout_width="fill_parent" android:layout_height="wrap_content" android:layout_weight="0.0" />
<RadioGroup android:gravity="center_vertical" android:layout_gravity="bottom" android:orientation="horizontal" android:id="@+id/main_radio" android:background="@drawable/tab_menu_bottom" android:layout_width="fill_parent" android:layout_height="50dp">
<RadioButton android:id="@+id/radio_buttonequipment" android:tag="radio_button1" android:layout_marginBottom="2.0dip" android:text="设备" android:drawableTop="@drawable/btn_equipment" style="@style/main_tab_bottom" android:layout_weight="1"/>
<RadioButton android:id="@+id/radio_buttonalarm" android:tag="radio_button0" android:layout_marginBottom="2.0dip" android:text="报警" android:drawableTop="@drawable/btn_alarm" style="@style/main_tab_bottom" android:layout_weight="1"/>
<RadioButton android:id="@+id/radio_buttonexpand" android:tag="radio_button2" android:layout_marginBottom="2.0dip" android:text="扩展" android:drawableTop="@drawable/btn_expand" style="@style/main_tab_bottom" android:layout_weight="1"/>
<RadioButton android:id="@+id/radio_buttonset" android:tag="radio_button3" android:layout_marginBottom="2.0dip" android:text="设置" android:drawableTop="@drawable/btn_set" style="@style/main_tab_bottom" android:layout_weight="1"/>
</RadioGroup>
</LinearLayout>
</TabHost>
2、修改TabmenuActivity,注意是继承自TabActivity
public class TabmenuActivity extends TabActivity
{
private RadioGroup group;
private TabHost tabHost;
public static final String TAB_EQUIPMENT="tab_equipment";
public static final String TAB_ALARM="tab_alarm";
public static final String TAB_EXPAND="tab_expand";
public static final String TAB_SET="tab_set";
@Override
public void onCreate(Bundle savedInstanceState)
{
super.onCreate(savedInstanceState);
setContentView(R.layout.activity_tabmenu);
group = (RadioGroup)findViewById(R.id. main_radio);
tabHost = getTabHost();
tabHost.addTab(tabHost.newTabSpec(TAB_EQUIPMENT)
.setIndicator(TAB_EQUIPMENT)
.setContent(new Intent(this,EquipmentActivity.class)));
tabHost.addTab(tabHost.newTabSpec(TAB_ALARM)
.setIndicator(TAB_ALARM)
.setContent(new Intent(this,AlarmActivity.class)));
tabHost.addTab(tabHost.newTabSpec(TAB_EXPAND)
.setIndicator(TAB_EXPAND)
.setContent(new Intent(this,ExpandActivity.class)));
tabHost.addTab(tabHost.newTabSpec(TAB_SET)
.setIndicator(TAB_SET)
.setContent(new Intent(this,SetActivity.class)));
handleBundle();
group.setOnCheckedChangeListener(new OnCheckedChangeListener()
{
@Override
public void onCheckedChanged(RadioGroup group, int checkedId)
{
switch (checkedId)
{
case R.id.radio_buttonequipment:
tabHost.setCurrentTabByTag(TAB_EQUIPMENT);
break;
case R.id.radio_buttonalarm:
tabHost.setCurrentTabByTag(TAB_ALARM);
break;
case R.id.radio_buttonexpand:
tabHost.setCurrentTabByTag(TAB_EXPAND);
break;
case R.id.radio_buttonset:
tabHost.setCurrentTabByTag(TAB_SET);
break;
default:
break;
}
}
});
}
@SuppressWarnings("unchecked")
private void handleBundle()
{
// TODO Auto-generated method stub
Bundle bundle=this.getIntent().getExtras();
if(bundle!=null)
{
//设置当前显示报警界面
tabHost.setCurrentTabByTag(TAB_ALARM);
DeamonRunningService.IS_NOTIFICATION_CLICKED = true;
RadioButton buttonAlarm = (RadioButton)findViewById(R.id.radio_buttonalarm);
buttonAlarm.setChecked(true);
}
else
{
RadioButton buttonEquipment = (RadioButton)findViewById(R.id.radio_buttonequipment);
buttonEquipment.setChecked(true);
}
}
}
============================================================================================
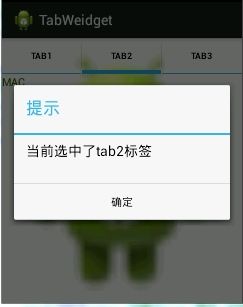
TabWidget类似于Android 中查看电话薄的界面,通过多个标签切换显示不同内容。要实现这一效果,首先要了解TabHost,它是一个用来存放多个Tab标签的容器。每一个Tab都可以对应自己的布局,比如,电话薄中的Tab布局就是一个List的线性布局了。
要使用TabHost,首先需要通过getTabHost方法来获取TabHost的对象,然后通过addTab方法来向TabHost中添加 Tab。当然每个Tab在切换时都会产生一个事件,要捕捉这个事件需要设置TabActivity的事件监听 setOnTabChangedListener。
1、布局文件
<TabHost xmlns:android="http://schemas.android.com/apk/res/android"
android:id="@android:id/tabhost"
android:layout_width="fill_parent"
android:layout_height="fill_parent" >
<LinearLayout
android:layout_width="fill_parent"
android:layout_height="fill_parent"
android:orientation="vertical" >
<TabWidget
android:id="@android:id/tabs"
android:layout_width="fill_parent"
android:layout_height="wrap_content" />
<FrameLayout
android:id="@android:id/tabcontent"
android:layout_width="fill_parent"
android:layout_height="fill_parent" >
<TextView
android:id="@+id/textview1"
android:layout_width="fill_parent"
android:layout_height="fill_parent"
android:text="Linux"
android:textColor="#FF0000" />
<TextView
android:id="@+id/textview2"
android:layout_width="fill_parent"
android:layout_height="fill_parent"
android:text="MAC"
android:textColor="#385E0F" />
<TextView
android:id="@+id/textview3"
android:layout_width="fill_parent"
android:layout_height="fill_parent"
android:text="Windows"
android:textColor="#1E90FF" />
</FrameLayout>
</LinearLayout>
</TabHost>
2、修改MainActivity,注意是继承自TabActivity
public class MainActivity extends TabActivity {

 private TabHost tabHost;

 @Override
 protected void onCreate(Bundle savedInstanceState) {
 super.onCreate(savedInstanceState);
 setContentView(R.layout.activity_main);

 tabHost = getTabHost();

 addTab();// 添加标签
 // 设置TabHost背景颜色
 tabHost.setBackgroundColor(Color.argb(150, 20, 80, 150));
 // 设置TabHost背景图片资源
 tabHost.setBackgroundResource(R.drawable.ic_launcher);
 // 设置当前显示哪一个标签 我的理解就是当你第一次启动程序默认显示那个标签 这里是指定的选项卡的ID从0开始
 tabHost.setCurrentTab(0);
 // 标签切换事件处理,setOnTabChangedListener 注意是标签切换事件不是点击事件,而是从一个标签切换到另外一个标签会触发的事件
 tabHost.setOnTabChangedListener(new OnTabChangeListener() {
  @Override
  public void onTabChanged(String tabId) {
  AlertDialog.Builder builder = new AlertDialog.Builder(MainActivity.this);
  Dialog dia;
  builder.setTitle("提示");
  builder.setMessage("当前选中了" + tabId + "标签");
  builder.setPositiveButton("确定", new OnClickListener() {
   @Override
   public void onClick(DialogInterface dialog, int which) {
   dialog.cancel();
   }
  });
  dia = builder.create();
  dia.show();
  }
 });
 }

 // 为TabHost添加标签 新建一个newTabSped(new TabSpec) 设置其标签和图标(setIndicator)、设置内容(setContent)
 // TabSpec是TabHost的内部类 TabHost对象的 newTabSpec()方法返回一个TabSpec对象
 // 源码里边是这么写的 public TabSpec newTabSpec(String tag)
 // { return new TabSpec(tag); }
 private void addTab() {
 tabHost.addTab(tabHost
  .newTabSpec("tab1")
  .setIndicator("TAB1",
   getResources().getDrawable(R.drawable.ic_launcher))// setIndicator()此方法用来设置标签和图表
  .setContent(R.id.textview1));
 // 指定内容为一个TextView --->public TabHost.TabSpec setContent(int viewId) 此方法需要一个 viewId 作为参数
 tabHost.addTab(tabHost
  .newTabSpec("tab2")
  .setIndicator("TAB2",
   getResources().getDrawable(R.drawable.ic_launcher))
  .setContent(R.id.textview2));

 tabHost.addTab(tabHost
  .newTabSpec("tab3")
  .setIndicator("TAB3",
   getResources().getDrawable(R.drawable.ic_launcher))
  .setContent(R.id.textview3));
 }
}
3、运行程序:如下!

