git简明教程
1 git简介
Git是一款自由和开源的分布式版本控制系统,它是Linux内核开发者林纳斯·托瓦兹(Linus Torvalds)为更好地管理Linux内核开发而设计,可用于敏捷高效地处理任何或小或大的项目。它具有极为丰富的命令集,对内部系统提供了高级操作和完全访问。Git与你熟悉的大部分版本控制系统如Subversion、CVS、Perforce、Mercurial的差别是很大的,他们使用“增量文件系统” (Delta Storage systems), 就是说它们存储每次提交(commit)之间的差异。Git正好与之相反,它会把你的每次提交的文件的全部内容(snapshot)都会记录下来。理论上,Git 可以保存任何文档,但是最善于保存文本文档,因为它本来就是为解决软件源代码(也是一种文本文档)版本管理问题而开发的,提供了许多有助于文本分析的工具。对于非文本文档,Git 只是简单地为其进行备份并实施版本管理。
2 git特点
1.直接快照,而非比较差异。2.近乎所有操作本地执行。
2.1.从服务器上克隆数据库(包括代码和版本信息)到单机上。
2.2.在自己的机器上创建分支,修改代码。
2.3.在单机上自己创建的分支上提交代码。
2.4.在单机上合并分支。
2.5.新建一个分支,把服务器上最新版的代码fetch下来,然后跟自己的主分支合并。
3.时刻保持数据完整性。
在保存到 Git 之前,所有数据都要进行内容的校验和(checksum)计算,并将此结果作为数据的唯一标识和索引。所以如果文件在传输时变得不完整,或者磁盘损坏导致文件数据缺失,Git都能立即察觉。
4.生成补丁(patch),把补丁发送给主开发者。
5.看主开发者的反馈,如果主开发者发现两个一般开发者之间有冲突(他们之间可以合作解决的冲突),就会要求他们先解决冲突,然后再由其中一个人提交。如果主开发者可以自己解决,或者没有冲突,就通过。
6.一般开发者之间解决冲突的方法,开发者之间可以使用pull命令解决冲突,解决完冲突之后再向主开发者提交补丁。
3 常用版本控制软件对比
3.1 gitGit是一个开源的分布式版本控制系统,用以有效、高速的处理从很小到非常大的项目版本管理。
3.2 svn
Subversion是一个版本控制系统,相对于的RCS、CVS,采用了分支管理系统,它的设计目标就是取代CVS。互联网上免费的版本控制服务多基于Subversion。
3.3 OpenCVS
OPENCVS 是自由的协作版本系统(CVS)实现,CVS 是最流行的开放源代码版本控制软件。它可以用于客户端, 以及服务器端的版本库,提供了对存储在版本库中的数据的细粒度访问控制。 它的目标是除了完全减少系统安全性的特性之外, 尽可能的与其它的 CVS 实现兼容。
OPENCVS 项目是在最近 GNU CVS 弱点暴露之后,经过讨论之后启动的。 尽管 CVS 被广泛使用,但是最近几年它的开发已经基本停止了。 CVS 的实现和设计,已经被发现许多安全问题。
3.5 Bazaar
Bazaar 是一个分布式的版本控制系统,它发布在 GPL 许可协议之下,并可用于 Windows、GNU/Linux、UNIX 以及 Mac OS 系统。Bazaar 由 Canonical 公司赞助,目前已服务于 Samba、Drupal 等知名的开源项目。
Bazaar 当前已经包含许多有用的功能,这些功能使之具有如下鲜明的特点:
容易使用
稳定可靠
使用灵活
Bazaar 也包括智能合并、支持插件、可与第三方工具整合、文档支持等其他特性。
3.5 Mercurial
Mercurial 是一种轻量级分布式版本控制系统,采用 Python 语言实现,易于学习和使用,扩展性强。相对于传统的版本控制,具有如下优点:
更轻松的管理。
传统的版本控制系统使用集中式的 repository,一些和 repository相关的管理就只能由管理员一个人进行。由于采用了分布式的模型,Mercurial 中就没有这样的困扰,每个用户管理自己的 repository,管理员只需协调同步这些repository。
更健壮的系统。
分布式系统比集中式的单服务器系统更健壮,单服务器系统一旦服务器出现问题整个系统就不能运行了,分布式系统通常不会因为一两个节点而受到影响。
对网络的依赖性更低。
由于同步可以放在任意时刻进行,Mercurial 甚至可以离线进行管理,只需在有网络连接时同步
3.6 Darcs
Darcs 是新一代轻量级分布式版本控制系统. 完全使用Haskell编写而成。不同于以往的版本控制系统, Darcs没有中央服务器. 任何一个本地repository都可以既是客户端也是服务器, 节点之间可以任意同步. 这样我们可以不依赖网络离线comit任何修改
4 git状态及组成
4.1 Git的三种状态
git内部只有三种工作状态,即:
已提交(committed)
已修改(modified)
已暂存(staged)
对于没有加入Git控制的文件,可以视为第四种状态未跟踪untracked。
4.2 Git的三个工作区域
Git 管理项目时,文件流转的三个工作区域:Git 的工作目录,暂存区域,,本地数据目录
Git本地数据目录( .git )
每个项目都只有一个.git目录,为项目存储所有元数据和对象数据库。包括所有的对象(commits,trees,blobs,tags),这些对象指向不同的分支。
该目录非常重要,每次克隆镜像仓库的时候,实际拷贝的就是这个目录里面的数据。
Git 工作目录
Git的工作目录存储从项目中取出的某个版本的所有文件和目录。
当在项目的不同分支间切换时,工作目录里的文件经常会被替换和删除。所有历史信息都保存在GIT目录(.git)中;
Git 暂存区域
所谓的暂存区域只不过是一个简单的文件,一般都放在 Git 目录中。有时候人们会把这个文件叫做索引文件
4.3 Git文件存储
blob--文件内容,没有属性信息tree -- 所有文件名字及其属性的列表
commit--表示修改历史,描述一个个tree之间如何联系起来
tag--标签,它可以指向blob,tree,commit,大部分是commit
假定git库中有三个文件:file1,file2,file3。git库存储三个文件的结构如下:
每一次提交(commit),都会产生一个提交记录,并有一个指针指向前一个提交记录。对git库多次提交(commit)后,库的记录结构如下:
5 git常用命令
5.1 查看、添加、提交、删除、找回,重置修改文件
git help <command> # 显示command的help
git init # 初始化版本库
git show # 显示某次提交的内容 git show $id
git status #查看目前工作目录的代码状态,自上次提交以来的添加、修改和删除等
git add <file> # 将工作文件修改提交到本地暂存区
git add . # 将所有修改过的工作文件提交暂存区
git rm <file> # 从版本库中删除文件,包含本地目录和index中的此文件记录
git rm <file> --cached # 从版本库中删除文件,不会删除本地目录文件,只删除index中的文件记录
git rm –r * # 进入某个目录中,执行此语句,会删除该目录下的所有文件和子目录
git reset <file> # 从暂存区恢复到工作文件
git reset -- . # 从暂存区恢复到工作文件
git reset --hard # 恢复最近一次提交过的状态,即放弃上次提交后的所有本次修改
git commit -m "说明" # 提交当前工作目录的修改内容。
git commint <file> git ci . git ci -a # 将git add, git rm和git commit等操作都合并在一起做git commit -am "some comments"
git commint --amend # 修改最后一次提交记录
git revert <$id> # 恢复某次提交的状态,恢复动作本身也创建次提交对象
git revert HEAD # 恢复最后一次提交的状态
5.2 查看文件diff
git diff <file> # 比较当前文件和暂存区文件差异 git diff
git diff <$id1> <$id2> # 比较两次提交之间的差异
git diff <branch1>..<branch2> # 在两个分支之间比较
git diff --staged # 比较暂存区和版本库差异
git diff --cached # 比较暂存区和版本库差异
git diff --stat # 仅仅比较统计信息
5.3 查看提交记录
git log git log <file> # 查看该文件每次提交记录
git log -p <file> # 查看每次详细修改内容的diff
git log -p -2 # 查看最近两次详细修改内容的diff
git log --stat # 查看提交统计信息
5.4 Git 本地分支管理
5.4.1 查看、切换、创建和删除分支
git branch -r # 查看远程分支
git branch <new_branch> # 创建新的分支
git branch -v # 查看各个分支最后提交信息
git branch --merged # 查看已经被合并到当前分支的分支
git branch --no-merged # 查看尚未被合并到当前分支的分支
git checkout <branch> # 切换到某个分支
git checkout -b <new_branch> # 创建新的分支,并且切换过去
git checkout -b <new_branch> <branch> # 基于branch创建新的new_branch
git checkout $id # 把某次历史提交记录checkout出来,但无分支信息,切换到其他分支会自动删除
git checkout $id -b <new_branch> # 把某次历史提交记录checkout出来,创建成一个分支
git branch -d <branch> # 删除某个分支
git branch -D <branch> # 强制删除某个分支 (未被合并的分支被删除的时候需要强制)
5.4.2 分支合并和rebase
git merge <branch> # 将branch分支合并到当前分支
git merge origin/master --no-ff # 不要Fast-Foward合并,这样可以生成merge提交
git rebase master <branch> # 将master rebase到branch,相当于: git co <branch> && git rebase master && git co master && git merge <branch>
5.5 Git补丁管理(方便在多台机器上开发同步时用)
git diff > ../sync.patch # 生成补丁
git apply ../sync.patch # 打补丁
git apply --check ../sync.patch #测试补丁能否成功
5.6 Git暂存管理
git stash # 暂存
git stash list # 列所有stash
git stash apply # 恢复暂存的内容
git stash drop # 删除暂存区
5.7 Git远程分支管理
git pull # 抓取远程仓库所有分支更新并合并到本地
git pull --no-ff # 抓取远程仓库所有分支更新并合并到本地,不要快进合并
git fetch origin # 抓取远程仓库更新
git merge origin/master # 将远程主分支合并到本地当前分支
git checkout --track origin/branch # 跟踪某个远程分支创建相应的本地分支
git checkout -b <local_branch> origin/<remote_branch> # 基于远程分支创建本地分支,功能同上
git push # push所有分支
git push origin master # 将本地主分支推到远程主分支
git push -u origin master # 将本地主分支推到远程(如无远程主分支则创建,用于初始化远程仓库)
git push origin <local_branch> # 创建远程分支, origin是远程仓库名
git push origin <local_branch>:<remote_branch> # 创建远程分支
git push origin :<remote_branch>#先删除本地分支(git br -d <branch>),然后再push删除远程分支
5.8 Git远程仓库管理
5.8.1 GitHub
git remote -v # 查看远程服务器地址和仓库名称
git remote show origin # 查看远程服务器仓库状态
git remote add origin [email protected]:jesseyoung/mygit.git# 添加远程仓库地址
git remote set-url origin [email protected]:jesseyoung/mygit.git # 设置远程仓库地址(用于修改远程仓库地址)
git remote rm <repository> # 删除远程仓库
5.8.2 创建远程仓库
git clone --bare robbin_site robbin_site.git # 用带版本的项目创建纯版本仓库
scp -r my_project.git git@ git.csdn.net:~ # 将纯仓库上传到服务器上
mkdir robbin_site.git && cd robbin_site.git && git --bare init # 在服务器创建纯仓库
git remote add origin git@ github.com:robbin/robbin_site.git # 设置远程仓库地址
git push -u origin master # 客户端首次提交
git push -u origin develop # 首次将本地develop分支提交到远程develop分支,并且track
git remote set-head origin master # 设置远程仓库的HEAD指向master分支
5.8.3 命令设置跟踪远程库和本地库
git branch --set-upstream master origin/master
git branch --set-upstream develop origin/develop
6 git客户端安装及测试版本库创建
6.1 git客户端安装
操作系统为centos6.5下载源码:
[root@localhost ~]# wget https://www.kernel.org/pub/software/scm/git/git-2.1.0.tar.gz安装环境依赖:
[root@localhost ~]# yum install gcc
[root@localhost ~]# yum install make
[root@localhost ~]# yum install zlib-devel
编译安装git:
[root@localhost ~]# tar xzvf git-2.1.0.tar.gz
[root@localhost ~]# cd git-2.1.0
[root@localhost git-2.1.0]# ./configure --prefix=/usr/local/git
[root@localhost git-2.1.0]# make & make install
查看版本信息:
[root@localhost bin]# /usr/local/git/bin/git --version
git version 2.1.0
配置客户端:
因为Git是分布式版本控制系统,所以,每个机器都必须自报家门:你的名字和Email地址,这样就可以识别代码推送者了。
[root@localhost bin]# /usr/local/git/bin/git config --global user.name "jesseyoung"
[root@localhost bin]# /usr/local/git/bin/git config --global user.email [email protected]
6.2 创建测试版本库
选择一个合适的地方,创建一个空目录/mygit,在该目录下init之后多了一个.git的隐藏目录,这个目录是Git来跟踪管理版本库的,没事千万不要手动修改这个目录里面的文件,不然改乱了,就把Git仓库给破坏了。[root@localhost /]# mkdir /mygit [root@localhost /]# cd mygit/ [root@localhost mygit]# /usr/local/git/bin/git init Initialized empty Git repository in /mygit/.git/ [root@localhost mygit]# ll -a total 12 drwxr-xr-x. 3 root root 4096 Aug 26 06:15 . dr-xr-xr-x. 28 root root 4096 Aug 26 06:15 .. drwxr-xr-x. 7 root root 4096 Aug 26 06:15 .git [root@localhost mygit]# ll /mygit/.git/ total 32 drwxr-xr-x. 2 root root 4096 Aug 26 06:15 branches -rwxr--r--. 1 root root 92 Aug 26 06:15 config -rw-r--r--. 1 root root 73 Aug 26 06:15 description -rw-r--r--. 1 root root 23 Aug 26 06:15 HEAD drwxr-xr-x. 2 root root 4096 Aug 26 06:15 hooks drwxr-xr-x. 2 root root 4096 Aug 26 06:15 info drwxr-xr-x. 4 root root 4096 Aug 26 06:15 objects drwxr-xr-x. 4 root root 4096 Aug 26 06:15 refs创建测试文件
[root@localhost mygit]# touch /mygit/readme.txt
[root@localhost mygit]# vi /mygit/readme.txt
git test line 1
git test line 2
提交测试文件
[root@localhost mygit]# /usr/local/git/bin/git add readme.txt [root@localhost mygit]# /usr/local/git/bin/git commit -m "commit a readme file" [master (root-commit) 819b9d5] commit a readme file 1 file changed, 2 insertions(+) create mode 100644 readme.txt [root@localhost mygit]# /usr/local/git/bin/git status On branch master nothing to commit, working directory clean [root@localhost mygit]#注:git文件提交分两步,add把文件添加到仓库,commit把文件提交到仓库,commit命令,-m后面输入的是本次提交的说明,可以输入任意内容,commit可以一次提交多个add文件。如:
$ git add file1.txt
$ git add file2.txt
$ git add file3.txt
$ git commit -m "commit 3 files."
git status命令可以让我们时刻掌握仓库当前的状态,上面的命令告诉我们,工作区是空的,没有什么需要提交。
7 github注册与使用
7.1 github简介
除了自己手动搭建git服务器,还可以将代码托管在远程git服务器github上,只需要注册并简单配置下就可以使用。
github地址:https://github.com/
7.2 创建ssh传输公钥
由于本地Git仓库和GitHub仓库之间的传输是通过SSH加密的,所以要先在本地生成公钥。
[root@localhost /]# ssh-keygen -t rsa -C "[email protected]"
Generating public/private rsa key pair.
Enter file in which to save the key (/root/.ssh/id_rsa):
Enter passphrase (empty for no passphrase):
Enter same passphrase again:
Your identification has been saved in /root/.ssh/id_rsa.
Your public key has been saved in /root/.ssh/id_rsa.pub.
The key fingerprint is:
68:0d:89:42:6e:02:15:0b:aa:1a:1f:b2:1b:33:02:5d [email protected]
The key's randomart image is:
+--[ RSA 2048]----+
|o.+.             |
|o+ . . .         |
|o = E o          |
|.+ o   +         |
|= o   o S        |
|o= . .           |
|B .              |
|.=               |
|.                |
+-----------------+
[root@localhost /]# cd /root/.ssh/
[root@localhost .ssh]# ls
id_rsa  id_rsa.pub  known_hosts
注:1.需要把邮件地址换成自己的邮件地址,然后一路回车,使用默认值即可,也无需设置密码。
2.顺利的话,可以在用户主目录里找到.ssh目录,里面有id_rsa和id_rsa.pub两个文件,这两个就是SSH Key的秘钥对,id_rsa是私钥,不能泄露,id_rsa.pub是公钥,可以放心地告诉任何人。
7.3 将公钥添加到github
登陆GitHub,打开“Account settings”,“SSH Keys”页面:
https://github.com/settings/ssh
然后,点“Add SSH Key”,填上任意Title,在Key文本框里粘贴id_rsa.pub文件的内容,点“Add Key”,你就应该看到已经添加的Key:
所有添加的key都可以在如下页面看到。

GitHub使用SSH Key是因为GitHub需要识别出你推送的提交确实是你推送的,而不是别人冒充的,而Git支持SSH协议,所以,GitHub只要知道了你的公钥,就可以确认只有你自己才能推送。
GitHub允许你添加多个Key,只需要把每台电脑的Key都添加到GitHub。
在GitHub上免费托管的Git仓库,任何人都可以看到,但只有你自己才能改。如果你不想让别人看到Git库,有两个办法,一个是注册为VIP用户。另一个办法是自己动手,搭一个Git服务器。
7.4 将本地仓库同步到github
首先,登陆GitHub,然后,在右上角找到“Create a new repo”按钮,创建一个新的仓库,在Repository name填入mygit,其他保持默认设置,点击“Create repository”按钮,就成功地创建了一个新的Git仓库:

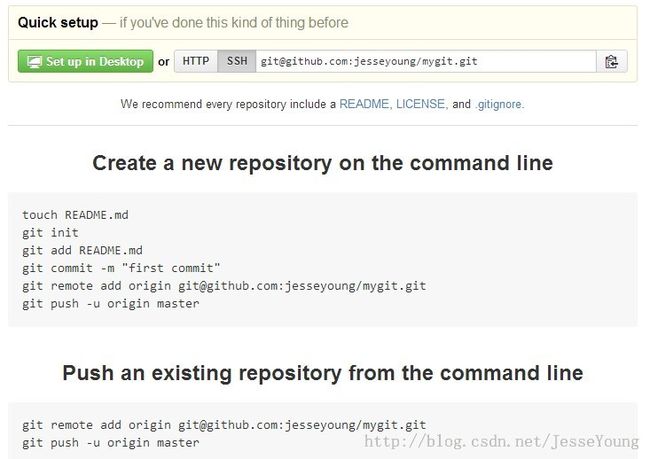
目前,在GitHub上的这个mygit仓库还是空的,GitHub告诉我们,可以从这个仓库克隆出新的仓库,也可以把一个已有的本地仓库与之关联,然后,把本地仓库的内容推送到GitHub仓库

现在,我们根据GitHub的提示,在本地的mygit仓库下运行命令进行关联:
[root@localhost mygit]# /usr/local/git/bin/git remote add origin [email protected]:jesseyoung/mygit.git注:把上面的jesseyoung替换成你自己的GitHub账户名,否则,你在本地关联的就是我的远程库,关联没有问题,但是你以后推送是推不上去的,因为你的SSH Key公钥不在我的账户列表中。
添加后,远程库的名字就是origin,这是Git默认的叫法,也可以改成别的,但是origin这个名字一看就知道是远程库。
把本地库的内容推送到远程,用git push命令,实际上是把当前分支master推送到远程。由于远程库是空的,我们第一次推送master分支时,加上了-u参数,Git不但会把本地的master分支内容推送的远程新的master分支,还会把本地的master分支和远程的master分支关联起来,在以后的推送或者拉取时就可以简化命令。
[root@localhost mygit]# /usr/local/git/bin/git push -u origin master
The authenticity of host 'github.com (192.30.252.131)' can't be established.
RSA key fingerprint is 16:27:ac:a5:76:28:2d:36:63:1b:56:4d:eb:df:a6:48.
Are you sure you want to continue connecting (yes/no)? yes
Warning: Permanently added 'github.com,192.30.252.131' (RSA) to the list of known hosts.
Counting objects: 3, done.
Writing objects: 100% (3/3), 234 bytes | 0 bytes/s, done.
Total 3 (delta 0), reused 0 (delta 0)
To [email protected]:jesseyoung/mygit.git
 * [new branch]      master -> master
Branch master set up to track remote branch master from origin.
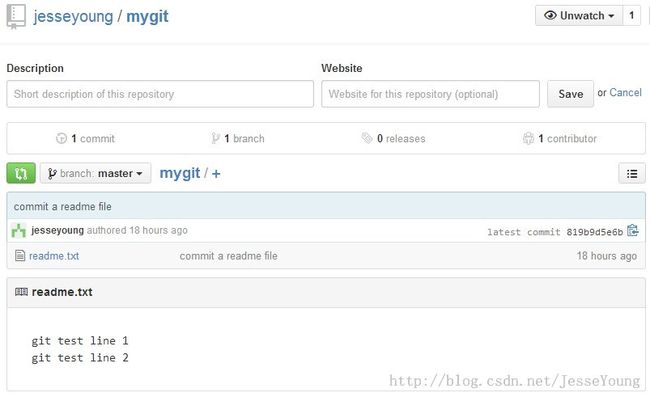
推送成功后,可以立刻在GitHub页面中看到远程库的内容已经和本地一模一样。
从现在起,只要本地作了提交,就可以通过命令:
[root@localhost mygit]# /usr/local/git/bin/git push origin master把本地master分支的最新修改推送至GitHub,现在,你就拥有了真正的分布式版本库!
7.5 将github上的仓库下载到本地
用命令git clone克隆一个本地库
[root@localhost /]# mkdir /mygit_clone
[root@localhost /]# cd /mygit_clone/
[root@localhost mygit_clone]# /usr/local/git/bin/git clone [email protected]:jesseyoung/mygit.git
Cloning into 'mygit'...
remote: Counting objects: 3, done.
remote: Total 3 (delta 0), reused 3 (delta 0)
Receiving objects: 100% (3/3), done.
Checking connectivity... done.
[root@localhost mygit_clone]# ls
mygit
[root@localhost mygit_clone]# ls mygit/
readme.txt
如果有多个人协作开发,那么每个人各自从远程克隆一份就可以了。
注:GitHub给出的地址不止一个,还可以用https://github.com/jesseyoung/mygit.git这样的地址。实际上,Git支持多种协议,默认的git://使用ssh,但也可以使用https等其他协议。使用https除了速度慢以外,还有个最大的麻烦是每次推送都必须输入口令,但是在某些只开放http端口的公司内部就无法使用ssh协议而只能用https。
8 git服务端安装与使用
除了使用github,也可自己手动搭建git server
8.1 centos上安装配置git server
安装git
[root@localhost ~]# yum install -y git创建一个git用户:
[root@localhost ~]# useradd -m git
创建证书登录
收集所有需要登录的用户的公钥,就是客户端机器自己的id_rsa.pub文件(参考上面第7节),把所有公钥导入到/home/git/.ssh/authorized_keys文件里,一行一个。
在服务端执行:
[root@localhost ~]# su git
[git@localhost root]$  ssh-keygen -b 1024 -t rsa
[git@localhost root]$ exit
[root@localhost ~]# ls /home/git/.ssh/
id_rsa  id_rsa.pub
[root@localhost ~]# touch /home/git/.ssh/authorized_keys
[root@localhost ~]# chmod 644 /home/git/.ssh/authorized_keys
即:authorized_keys文件不存在的话手动建立一个,将客户端机器自己的id_rsa.pub文件内容添加到authorized_keys,如果有多个客户端,添加多行。
先选定一个目录如/gitserver,作为Git仓库,假定是/gitserver/mygit.git,先在/gitserver目录下执行初始化操作,Git就会创建一个裸仓库,裸仓库没有工作区,因为服务器上的Git仓库纯粹是为了共享,所以不让用户直接登录到服务器上去改工作区,并且服务器上的Git仓库通常都以.git结尾。然后,把owner改为git:
[root@localhost mygit]# mkdir /gitserver
[root@localhost mygit]# cd /gitserver/
[root@localhost gitserver]# git init --bare mygit.git
Initialized empty Git repository in /gitserver/mygit.git/
[root@localhost gitserver]# ls
mygit.git
[root@localhost gitserver]# ls mygit.git/
branches  config  description  HEAD  hooks  info  objects  refs
[root@localhost gitserver]# chown -R git.git mygit.git
[root@localhost gitserver]# ll
total 4
drwxr-xr-x. 7 git git 4096 Aug 26 05:45 mygit.git
禁用shell登陆
出于安全考虑,创建的git用户不允许登录shell,这可以通过编辑/etc/passwd文件完成。找到类似下面的一行:
[root@localhost gitserver]# vim /etc/passwd
git:x:501:501::/home/git:/bin/bash
修改为
git:x:501:501::/home/git:/usr/bin/git-shell
这样,git用户可以正常通过ssh使用git,但无法登录shell,因为我们为git用户指定的git-shell每次一登录就自动退出。
8.2 将本地仓库同步到git server
初次执行分为两步:1.本地仓库与git server进行关联,2.推送本地的master分支内容推送的远程新的master分支,并把本地的master分支和远程的master分支关联起来(带参数-u)
后续执行就可以直接运行git push origin_server master即可。
[root@localhost mygit]# /usr/local/git/bin/git remote add origin_server [email protected]:/gitserver/mygit.git
[root@localhost mygit]# /usr/local/git/bin/git push -u origin_server master
The authenticity of host '192.168.85.142 (192.168.85.142)' can't be established.
RSA key fingerprint is 5e:07:2b:15:08:15:1a:79:3c:d1:4f:7f:68:98:44:e1.
Are you sure you want to continue connecting (yes/no)? yes
Warning: Permanently added '192.168.85.142' (RSA) to the list of known hosts.
Counting objects: 3, done.
Writing objects: 100% (3/3), 234 bytes | 0 bytes/s, done.
Total 3 (delta 0), reused 0 (delta 0)
To [email protected]:/gitserver/mygit.git
 * [new branch]      master -> master
Branch master set up to track remote branch master from origin_server.
详细说明参考7.4。
8.3 将git server上的仓库下载到本地
[root@localhost /]# mkdir mygit_clone_server
[root@localhost /]# cd mygit_clone_server/
[root@localhost mygit_clone_server]# /usr/local/git/bin/git clone [email protected]:/gitserver/mygit.git
Cloning into 'mygit'...
remote: Counting objects: 3, done.
remote: Total 3 (delta 0), reused 0 (delta 0)
Receiving objects: 100% (3/3), done.
Checking connectivity... done.
[root@localhost mygit_clone_server]# ls
mygit
[root@localhost mygit_clone_server]# ls mygit/
readme.txt
下载到本地成功!
9 git深入学习-
10 git深入学习-
未完待续......
****************************************************************************************
原文地址:http://blog.csdn.net/jesseyoung/article/details/38846227
博客主页:http://blog.csdn.net/jesseyoung
****************************************************************************************

