GTK+ layout management 转载http://zetcode.com/tutorials/gtktutorial/gtklayoutmanagement/
GTK+ layout management
In this chapter we will show how to lay out our widgets in windows or dialogs.
When we design the GUI of our application, we decide what widgets we will use and how we will organize those widgets in the application. To organize our widgets, we use specialized non visible widgets called layout containers. In this chapter, we will mention GtkAlignment, GtkFixed, GtkVBox and GtkTable.
GtkFixed
The GtkFixed container places child widgets at fixed positions and with fixed sizes. This container performs no automatic layout management. In most applications, we don't use GtkFixed container. There are some specialized areas, where we use this container. For example games, specialized applications that work with diagrams, resizable components that can be moved (like a chart in a spreadsheet application), small educational examples.
#include <gtk/gtk.h>


int main( int argc, char *argv[])
{
  GtkWidget *window;
  GtkWidget *fixed;

  GtkWidget *button1;
  GtkWidget *button2;
  GtkWidget *button3;

  gtk_init(&argc, &argv);

  window = gtk_window_new(GTK_WINDOW_TOPLEVEL);
  gtk_window_set_title(GTK_WINDOW(window), "GtkFixed");
  gtk_window_set_default_size(GTK_WINDOW(window), 290, 200);
  gtk_window_set_position(GTK_WINDOW(window), GTK_WIN_POS_CENTER);

  fixed = gtk_fixed_new();
  gtk_container_add(GTK_CONTAINER(window), fixed);

  button1 = gtk_button_new_with_label("Button");
  gtk_fixed_put(GTK_FIXED(fixed), button1, 150, 50);
  gtk_widget_set_size_request(button1, 80, 35);

  button2 = gtk_button_new_with_label("Button");
  gtk_fixed_put(GTK_FIXED(fixed), button2, 15, 15);
  gtk_widget_set_size_request(button2, 80, 35);

  button3 = gtk_button_new_with_label("Button");
  gtk_fixed_put(GTK_FIXED(fixed), button3, 100, 100);
  gtk_widget_set_size_request(button3, 80, 35);

  g_signal_connect_swapped(G_OBJECT(window), "destroy",
      G_CALLBACK(gtk_main_quit), NULL);

  gtk_widget_show_all(window);

  gtk_main();

  return 0;
}
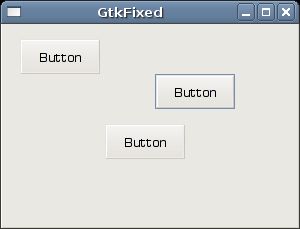
In our example, we create three buttons and place them at fixed coordinates. When we resize the window of the application, the buttons keep their size and positions.
fixed = gtk_fixed_new();
Here a GtkFixed container widget is created.
gtk_fixed_put(GTK_FIXED(fixed), button1, 150, 50);
The first button is placed using the gtk_fixed_put() function at coordinates x=150, y=50.
GtkVBox
GtkVBox is a vertical box container. It places it's child widgets into a single column. GtkHBox is a very similar container This container places it's child widgets into a single row.
#include <gtk/gtk.h>


int main( int argc, char *argv[])
{

  GtkWidget *window;
  GtkWidget *vbox;

  GtkWidget *settings;
  GtkWidget *accounts;
  GtkWidget *loans;
  GtkWidget *cash;
  GtkWidget *debts;

  gtk_init(&argc, &argv);

  window = gtk_window_new(GTK_WINDOW_TOPLEVEL);
  gtk_window_set_position(GTK_WINDOW(window), GTK_WIN_POS_CENTER);
  gtk_window_set_default_size(GTK_WINDOW(window), 230, 250);
  gtk_window_set_title(GTK_WINDOW(window), "GtkVBox");
  gtk_container_set_border_width(GTK_CONTAINER(window), 5);

  vbox = gtk_vbox_new(TRUE, 1);
  gtk_container_add(GTK_CONTAINER(window), vbox);

  settings = gtk_button_new_with_label("Settings");
  accounts = gtk_button_new_with_label("Accounts");
  loans = gtk_button_new_with_label("Loans");
  cash = gtk_button_new_with_label("Cash");
  debts = gtk_button_new_with_label("Debts");

  gtk_box_pack_start(GTK_BOX(vbox), settings, TRUE, TRUE, 0);
  gtk_box_pack_start(GTK_BOX(vbox), accounts, TRUE, TRUE, 0);
  gtk_box_pack_start(GTK_BOX(vbox), loans, TRUE, TRUE, 0);
  gtk_box_pack_start(GTK_BOX(vbox), cash, TRUE, TRUE, 0);
  gtk_box_pack_start(GTK_BOX(vbox), debts, TRUE, TRUE, 0);

  g_signal_connect_swapped(G_OBJECT(window), "destroy",
        G_CALLBACK(gtk_main_quit), G_OBJECT(window));

  gtk_widget_show_all(window);

  gtk_main();

  return 0;
}
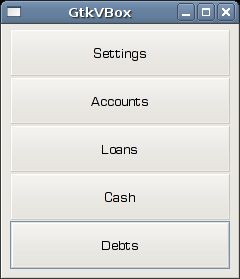
This example shows a GtkVBox in action. It packs five buttons into one column. If we resize the window of the application, the child widgets are resized as well.
vbox = gtk_vbox_new(TRUE, 1);
The GtkVBox is created. We set the homogeneous parameter to TRUE. This means that all our buttons will be of the same size. The spacing between widgets is set to 1 pixel.
gtk_box_pack_start(GTK_BOX(vbox), settings, TRUE, TRUE, 0);
We pack a settings button into the container. The first two parameters are the container and the child widget. The next three parameters are expand, fill and padding. Note that the fill parameter has no effect, if the expand paramater is set to FALSE. Similarly, the expand parameter has no effect if we have created the container with homegeneous parameter set to TRUE.
GtkTable
The GtkTable widget arranges widgets in rows and columns.
#include <gtk/gtk.h>


int main( int argc, char *argv[])
{

  GtkWidget *window;

  GtkWidget *table;
  GtkWidget *button;

  char *values[16] = { "7", "8", "9", "/",
     "4", "5", "6", "*",
     "1", "2", "3", "-",
     "0", ".", "=", "+"
  };

  gtk_init(&argc, &argv);

  window = gtk_window_new(GTK_WINDOW_TOPLEVEL);
  gtk_window_set_position(GTK_WINDOW(window), GTK_WIN_POS_CENTER);
  gtk_window_set_default_size(GTK_WINDOW(window), 250, 180);
  gtk_window_set_title(GTK_WINDOW(window), "GtkTable");

  gtk_container_set_border_width(GTK_CONTAINER(window), 5);

  table = gtk_table_new(4, 4, TRUE);
  gtk_table_set_row_spacings(GTK_TABLE(table), 2);
  gtk_table_set_col_spacings(GTK_TABLE(table), 2);

  int i = 0;
  int j = 0;
  int pos = 0;

  for( i=0; i < 4; i++) {
    for( j=0; j < 4; j++) {
      button = gtk_button_new_with_label(values[pos]);
      gtk_table_attach_defaults(GTK_TABLE(table), button, j, j+1, i, i+1 );
      pos++;
    }
  }

  gtk_container_add(GTK_CONTAINER(window), table);

  g_signal_connect_swapped(G_OBJECT(window), "destroy",
        G_CALLBACK(gtk_main_quit), G_OBJECT(window));

  gtk_widget_show_all(window);

  gtk_main();

  return 0;
}
In this example, we will create a set of buttons, that we see in calculators.
table = gtk_table_new(4, 4, TRUE);
We create a new GtkTable widget with 4 rows and 4 columns.
 gtk_table_set_row_spacings(GTK_TABLE(table), 2);
 gtk_table_set_col_spacings(GTK_TABLE(table), 2);
We set some space between every row and every column.
 for( i=0; i < 4; i++) {
   for( j=0; j < 4; j++) {
     button = gtk_button_new_with_label(values[pos]);
     gtk_table_attach_defaults(GTK_TABLE(table), button, j, j+1, i, i+1 );
     pos++;
   }
 }
This code will create 16 buttons and place them into the container.
GtkAlignment
The GtkAlignment container controls the alignment and the size of it's child widget.
#include <gtk/gtk.h>


int main( int argc, char *argv[])
{

  GtkWidget *window;
  GtkWidget *ok;
  GtkWidget *close;

  GtkWidget *vbox;
  GtkWidget *hbox;
  GtkWidget *halign;
  GtkWidget *valign;

  gtk_init(&argc, &argv);

  window = gtk_window_new(GTK_WINDOW_TOPLEVEL);
  gtk_window_set_position(GTK_WINDOW(window), GTK_WIN_POS_CENTER);
  gtk_window_set_default_size(GTK_WINDOW(window), 350, 200);
  gtk_window_set_title(GTK_WINDOW(window), "GtkAlignment");
  gtk_container_set_border_width(GTK_CONTAINER(window), 10);

  vbox = gtk_vbox_new(FALSE, 5);

  valign = gtk_alignment_new(0, 1, 0, 0);
  gtk_container_add(GTK_CONTAINER(vbox), valign);
  gtk_container_add(GTK_CONTAINER(window), vbox);

  hbox = gtk_hbox_new(TRUE, 3);

  ok = gtk_button_new_with_label("OK");
  gtk_widget_set_size_request(ok, 70, 30);
  gtk_container_add(GTK_CONTAINER(hbox), ok);
  close = gtk_button_new_with_label("Close");
  gtk_container_add(GTK_CONTAINER(hbox), close);

  halign = gtk_alignment_new(1, 0, 0, 0);
  gtk_container_add(GTK_CONTAINER(halign), hbox);

  gtk_box_pack_start(GTK_BOX(vbox), halign, FALSE, FALSE, 0);

  g_signal_connect_swapped(G_OBJECT(window), "destroy",
        G_CALLBACK(gtk_main_quit), G_OBJECT(window));

  gtk_widget_show_all(window);

  gtk_main();

  return 0;
}
In the code example, we place two buttons into the right bottom corner of the window. To accomplish this, we use one horizontal box and one vertical box and two alignment containers.
valign = gtk_alignment_new(0, 1, 0, 0);
This will put the child widget to the bottom.
gtk_container_add(GTK_CONTAINER(vbox), valign);
Here we place the alignment widget into the vertical box.
 hbox = gtk_hbox_new(TRUE, 3);

 ok = gtk_button_new_with_label("OK");
 gtk_widget_set_size_request(ok, 70, 30);
 gtk_container_add(GTK_CONTAINER(hbox), ok);
 close = gtk_button_new_with_label("Close");
 gtk_container_add(GTK_CONTAINER(hbox), close);
We create a horizontal box and put two buttons inside it.
 halign = gtk_alignment_new(1, 0, 0, 0);
 gtk_container_add(GTK_CONTAINER(halign), hbox);

 gtk_box_pack_start(GTK_BOX(vbox), halign, FALSE, FALSE, 0);
This will create an alignment container that will place it's child widget the right. We add the horizontal box into the alignment container and pack the alignment container into the vertical box. We must keep in mind that the alignment container takes only one child widget. That's why we must use boxes.
Windows
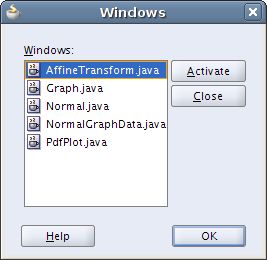
Next we will create a more advanced example. We show a window, that can be found in the JDeveloper IDE.
The dialog shows all opened windows, or more precisely tabs in JDeveloper application.
#include <gtk/gtk.h>


int main( int argc, char *argv[])
{

  GtkWidget *window;
  GtkWidget *table;

  GtkWidget *title;
  GtkWidget *activate;
  GtkWidget *halign;
  GtkWidget *halign2;

  GtkWidget *valign;
  GtkWidget *close;
  GtkWidget *wins;

  GtkWidget *help;
  GtkWidget *ok;

  gtk_init(&argc, &argv);

  window = gtk_window_new(GTK_WINDOW_TOPLEVEL);
  gtk_window_set_position(GTK_WINDOW(window), GTK_WIN_POS_CENTER);
  gtk_widget_set_size_request (window, 300, 250);
  gtk_window_set_resizable(GTK_WINDOW(window), FALSE);

  gtk_window_set_title(GTK_WINDOW(window), "Windows");

  gtk_container_set_border_width(GTK_CONTAINER(window), 15);

  table = gtk_table_new(8, 4, FALSE);
  gtk_table_set_col_spacings(GTK_TABLE(table), 3);

  title = gtk_label_new("Windows");
  halign = gtk_alignment_new(0, 0, 0, 0);
  gtk_container_add(GTK_CONTAINER(halign), title);
  gtk_table_attach(GTK_TABLE(table), halign, 0, 1, 0, 1,
      GTK_FILL, GTK_FILL, 0, 0);

  wins = gtk_text_view_new();
  gtk_text_view_set_editable(GTK_TEXT_VIEW(wins), FALSE);
  gtk_text_view_set_cursor_visible(GTK_TEXT_VIEW(wins), FALSE);
  gtk_table_attach(GTK_TABLE(table), wins, 0, 2, 1, 3,
      GTK_FILL | GTK_EXPAND, GTK_FILL | GTK_EXPAND, 1, 1);

  activate = gtk_button_new_with_label("Activate");
  gtk_widget_set_size_request(activate, 50, 30);
  gtk_table_attach(GTK_TABLE(table), activate, 3, 4, 1, 2,
      GTK_FILL, GTK_SHRINK, 1, 1);

  valign = gtk_alignment_new(0, 0, 0, 0);
  close = gtk_button_new_with_label("Close");

  gtk_widget_set_size_request(close, 70, 30);
  gtk_container_add(GTK_CONTAINER(valign), close);
  gtk_table_set_row_spacing(GTK_TABLE(table), 1, 3);
  gtk_table_attach(GTK_TABLE(table), valign, 3, 4, 2, 3,
      GTK_FILL, GTK_FILL | GTK_EXPAND, 1, 1);

  halign2 = gtk_alignment_new(0, 1, 0, 0);
  help = gtk_button_new_with_label("Help");
  gtk_container_add(GTK_CONTAINER(halign2), help);
  gtk_widget_set_size_request(help, 70, 30);
  gtk_table_set_row_spacing(GTK_TABLE(table), 3, 6);
  gtk_table_attach(GTK_TABLE(table), halign2, 0, 1, 4, 5,
      GTK_FILL, GTK_FILL, 0, 0);

  ok = gtk_button_new_with_label("OK");
  gtk_widget_set_size_request(ok, 70, 30);
  gtk_table_attach(GTK_TABLE(table), ok, 3, 4, 4, 5,
      GTK_FILL, GTK_FILL, 0, 0);

  gtk_container_add(GTK_CONTAINER(window), table);

  g_signal_connect_swapped(G_OBJECT(window), "destroy",
        G_CALLBACK(gtk_main_quit), G_OBJECT(window));

  gtk_widget_show_all(window);
  gtk_main();

  return 0;
}
This code shows, how we could create a similar window in GTK+.
table = gtk_table_new(8, 4, FALSE);
We use a table container widget.
 title = gtk_label_new("Windows");
 halign = gtk_alignment_new(0, 0, 0, 0);
 gtk_container_add(GTK_CONTAINER(halign), title);
 gtk_table_attach(GTK_TABLE(table), halign, 0, 1, 0, 1,
     GTK_FILL, GTK_FILL, 0, 0);
This code creates a label, that is aligned to the left. The label is placed in the first row of the GtkTable container.
 wins = gtk_text_view_new();
 gtk_text_view_set_editable(GTK_TEXT_VIEW(wins), FALSE);
 gtk_text_view_set_cursor_visible(GTK_TEXT_VIEW(wins), FALSE);
 gtk_table_attach(GTK_TABLE(table), wins, 0, 2, 1, 3,
     GTK_FILL | GTK_EXPAND, GTK_FILL | GTK_EXPAND, 1, 1);
The text view widget spans two rows and two columns. We make the widget non editable and hide the cursor.
 valign = gtk_alignment_new(0, 0, 0, 0);
 close = gtk_button_new_with_label("Close");

 gtk_widget_set_size_request(close, 70, 30);
 gtk_container_add(GTK_CONTAINER(valign), close);
 gtk_table_set_row_spacing(GTK_TABLE(table), 1, 3);
 gtk_table_attach(GTK_TABLE(table), valign, 3, 4, 2, 3,
     GTK_FILL, GTK_FILL | GTK_EXPAND, 1, 1);
We put the close button next to the text view widget into the fourth column. (we count from zero) We add the button into the alignment widget, so that we can align it to the top.


