UI组件之TextView及其子类(一)TextView和EditText
先来整理一下TexView,EditView的用法。
Textview是最基本的组件,直接继承了View,也是众多组件的父类,所以了解她的属性会对学习其他组件很有帮助。
TextView的属性:
android:autoLink 设置是否当文本为URL链接/email/电话号码/map时,文本显示为可点击的链接。可选值(none/web/email/phone/map/all)
android:autoText 如果设置,将自动执行输入值的拼写纠正。此处无效果,在显示输入法并输入的时候起作用。
android:bufferType 指定getText()方式取得的文本类别。选项editable 类似于StringBuilder可追加字符, 也就是说getText后可调用append方法设置文本内容。spannable 则可在给定的字符区域使用样式,参见这里1、这里2。
android:capitalize 设置英文字母大写类型。此处无效果,需要弹出输入法才能看得到,参见EditView此属性说明。 none不转换,sentence每个句子的首字母大写,words每个单词字母大写,characters每个字母都大写
android:cursorVisible 设定光标为显示/隐藏,默认显示。
android:digits 设置允许输入哪些字符。如“1234567890.+-*/% ()”
设置图片和文本的位置关系:
android:drawableBottom 在text的下方输出一个drawable,如图片。如果指定一个颜色的话会把text的背景设为该颜色,并且同时和background使用时覆盖后者。
android:drawableLeft 在text的左边输出一个drawable,如图片。
android:drawablePadding 设置text与drawable(图片)的间隔,与drawableLeft、drawableRight、drawableTop、drawableBottom一起使用,可设置为负数,单独使用没有效果。
android:drawableRight在text的右边输出一个drawable。
android:drawableTop 在text的正上方输出一个drawable。
android:editable设置是否可编辑。
android:editorExtras设置文本的额外的输入数据。
android:ellipsize 设置当文字过长时,该控件该如何显示。有如下值设置:”start”—?省略号显示在开头;”end”——省略号显示在结尾;”middle”—-省略号显示在中间; ”marquee” ——以跑马灯的方式显示(动画横向移动)
android:freezesText 设置保存文本的内容以及光标的位置。
android:gravity 设置文本位置,是指控件中文本的位置,区分layout_gravity属性,如设置成“center”,文本将居中显示。
android:hintText 为空时显示的文字提示信息,可通过textColorHint设置提示信息的颜色。此属性在EditView中使用,但是这里也可以用。
android:imeOptions 附加功能,设置右下角IME动作与编辑框相关的动作,如actionDone右下角将显示一个“完成”,而不设置默认是一个回车符号。这个在EditView中再详细说明,此处无用。
android:imeActionId 设置IME动作ID。
android:imeActionLabel 设置IME动作标签。
android:includeFontPadding 设置文本是否包含顶部和底部额外空白,默认为true。
android:inputMethod 为文本指定输入法,需要完全限定名(完整的包名)。例如:com.google.android.inputmethod.pinyin,但是这里报错找不到。
android:inputType 设置文本的类型,用于帮助输入法显示合适的键盘类型。在EditView中再详细说明,这里无效果。
android:linksClickable 设置链接是否点击连接,即使设置了autoLink。
android:marqueeRepeatLimit 在ellipsize指定marquee的情况下,设置重复滚动的次数,当设置为marquee_forever时表示无限次。
android:ems 设置TextView的宽度为N个字符的宽度。这里测试为一个汉字字符宽度
android:maxEms 设置TextView的宽度为最长为N个字符的宽度。与ems同时使用时覆盖ems选项。
android:minEms 设置TextView的宽度为最短为N个字符的宽度。与ems同时使用时覆盖ems选项。
android:maxLength 限制显示的文本长度,超出部分不显示。
android:lines 设置文本的行数,设置两行就显示两行,即使第二行没有数据。
android:maxLines 设置文本的最大显示行数,与width或者layout_width结合使用,超出部分自动换行,超出行数将不显示。
android:minLines 设置文本的最小行数,与lines类似。
android:lineSpacingExtra 设置行间距。
android:lineSpacingMultiplier 设置行间距的倍数。如”1.2”
android:numeric 如果被设置,该TextView有一个数字输入法。此处无用,设置后唯一效果是TextView有点击效果,此属性在EdtiView将详细说明。
android:password 以小点”.”显示文本
android:phoneNumber 设置为电话号码的输入方式。
android:privateImeOptions 设置输入法选项,此处无用,在EditText将进一步讨论。
android:scrollHorizontally 设置文本超出TextView的宽度的情况下,是否出现横拉条。
android:selectAllOnFocus 如果文本是可选择的,让他获取焦点而不是将光标移动为文本的开始位置或者末尾位置。TextView中设置后无效果。
设置文本阴影:
android:shadowColor 指定文本阴影的颜色,需要与shadowRadius一起使用。
android:shadowDx 设置阴影横向坐标开始位置。
android:shadowDy 设置阴影纵向坐标开始位置。
android:shadowRadius 设置阴影的半径。设置为0.1就变成字体的颜色了,一般设置为3.0的效果比较好。
android:singleLine 设置单行显示。如果和layout_width一起使用,当文本不能全部显示时,后面用“…”来表示。如android:text="test_ singleLine "
android:singleLine="true" android:layout_width="20dp"将只显示“t…”。如果不设置singleLine或者设置为false,文本将自动换行
android:text设置显示文本.
android:textAppearance设置文字外观。如“?android:attr/textAppearanceLargeInverse”这里引用的是系统自带的一个外观,?表示系统是否有这种外观,否则使用默认的 外观。可设置的值如下:
textAppearanceButton/textAppearanceInverse/textAppearanceLarge/textAppearanceLargeInverse/textAppearanceMedium/textAppearanceMediumInverse/textAppearanceSmal l/textAppearanceSmallInverse
android:textColor 设置文本颜色
android:textColorHighlight 被选中文字的底色,默认为蓝色
android:textColorHint 设置提示信息文字的颜色,默认为灰色。与hint一起使用。
android:textColorLink 文字链接的颜色.
android:textScaleX 设置文字之间间隔,默认为1.0f。
android:textSize 设置文字大小,推荐度量单位”sp”,如”15sp”
android:textStyle设 置字形[bold(粗体) 0, italic(斜体) 1, bolditalic(又粗又斜) 2] 可以设置一个或多个,用“|”隔开
android:typeface 设置文本字体,必须是以下常量值之一:normal 0, sans 1, serif 2, monospace(等宽字体) 3]
android:height 设置文本区域的高度,支持度量单位:px(像素)/dp/sp/in/mm(毫米)
android:maxHeight 设置文本区域的最大高度
android:minHeight 设置文本区域的最小高度
android:width 设置文本区域的宽度,支持度量单位:px(像素)/dp/sp/in/mm(毫米),与layout_width的区别看这里http://blog.csdn.net/tuke_tuke/article/details/50464882
android:maxWidth 设置文本区域的最大宽度
android:minWidth 设置文本区域的最小宽度
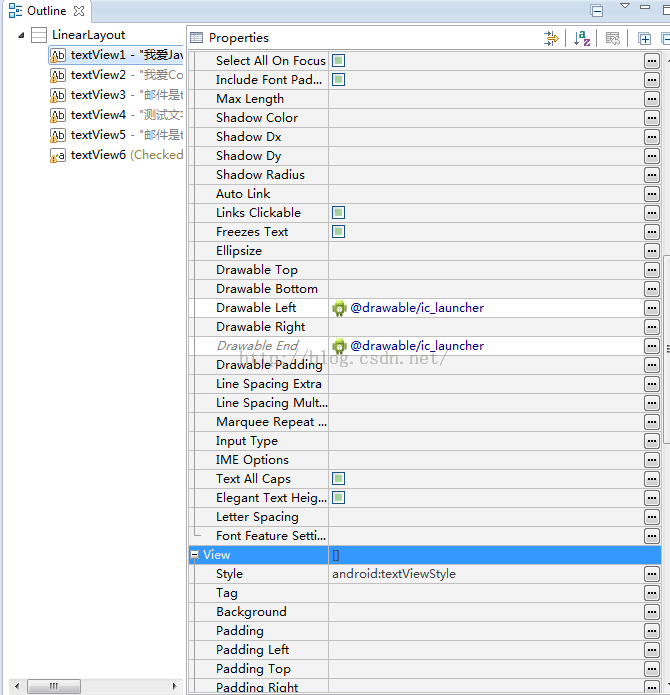
在设置TexView属性时,可以使用Graphical Layout图形布局的右边可以看到当前android版本API下的所有属性,如图
在右边的属性栏中还有该组件的父组件的属性列表,设置方便。
例子:不同颜色字体带链接的TexView
Main_Activity.xml
<?xml version="1.0" encoding="utf-8"?>
<LinearLayout xmlns:android="http://schemas.android.com/apk/res/android"
    android:layout_width="fill_parent"
    android:layout_height="fill_parent"
    android:orientation="vertical">
<!-- 文本框结尾处和文本前处绘制图片 -->
    <TextView
        android:id="@+id/textView1"
        android:layout_width="fill_parent"
        android:layout_height="wrap_content"
        android:drawableEnd="@drawable/ic_launcher"
        android:drawableLeft="@drawable/ic_launcher"
        android:text="我爱我的祖国"
        android:textSize="20dp" />
  <!-- 设置中间省略,所有字母大写 -->
    <TextView
        android:id="@+id/textView2"
        android:layout_width="fill_parent"
        android:layout_height="wrap_content"
        android:text="我爱Contry我爱contry是吗是啊啊我爱Contry我爱contry是吗是啊啊"
        android:ellipsize="middle"
        android:textAllCaps="true"
        android:singleLine="true"
        />
    <!-- 对电话,邮件增加链接 -->
      <TextView
        android:id="@+id/textView3"
        android:layout_width="fill_parent"
        android:layout_height="wrap_content"
        android:text="邮件是[email protected],电话是15927007602"
        android:autoLink="email|phone"
        />
    <!-- 设置设置文字的大小颜色,阴影 -->
     <TextView
        android:id="@+id/textView4"
        android:layout_width="fill_parent"
        android:layout_height="wrap_content"
        android:text="测试文字大小颜色阴影"
        android:textColor="#00f"
        android:textSize="18dp"
        android:shadowColor="#00f"
        android:shadowDx="10.0"
        android:shadowDy="3.0"
        android:shadowRadius="3.0"
        />
   <!-- 测试密码框-->
     <TextView
        android:id="@+id/textView5"
        android:layout_width="fill_parent"
        android:layout_height="wrap_content"
        android:text="邮件是[email protected],电话是02725614445"
        android:password="true"
        />
    <!-- 测试可勾选textview -->
     <CheckedTextView
         android:id="@+id/textView6"
         android:layout_width="fill_parent"
         android:layout_height="wrap_content"
         android:checkMark="@drawable/ok"
         android:text="可勾选文本" />

</LinearLayout>
例:圆角边框,渐变背景的TextView
xml文件是:
<?xml version="1.0" encoding="utf-8"?>
<LinearLayout xmlns:android="http://schemas.android.com/apk/res/android"
    android:layout_width="fill_parent"
    android:layout_height="fill_parent"
    android:orientation="vertical">
   <!-- 使用xml定义drawable对象作为背景 -->
    <TextView
        android:id="@+id/textView1"
        android:layout_width="wrap_content"
        android:layout_height="wrap_content"
        android:background="@drawable/bg_border"
        android:text="带边框的文本"
        android:textSize="20dp" />

    <TextView
        android:id="@+id/textView2"
        android:layout_width="wrap_content"
        android:layout_height="wrap_content"
        android:background="@drawable/bg_border2"
        android:text="圆角边框,渐变背景的文本"
        android:textSize="20dp" />

</LinearLayout>
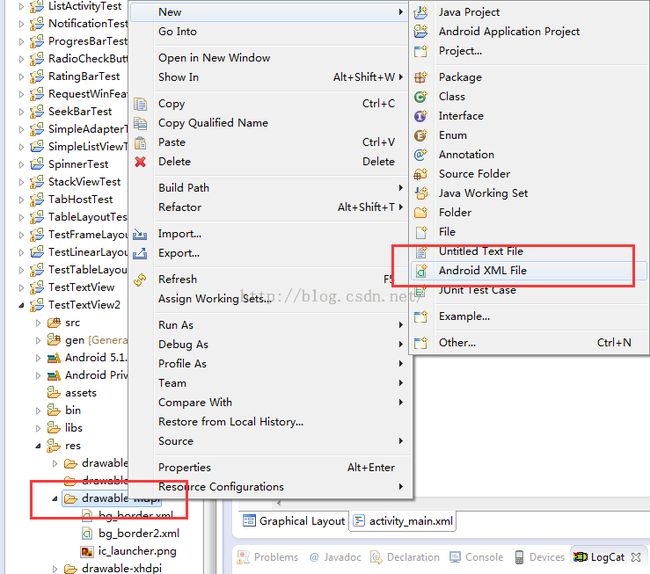
默认情况下TexView是不带边框的,如果想为TextView加边框,可以设置一个背景drawable对象,使用xml定义Drawable对象
在res/drawable文件夹中可以有直接的drawable资源对象,如.jpg,.png等图片资源,也有使用xml定义的drawable对象,xml 定义的drawable对象有五种:StateListDrawable(selector根元素),LayerDrawable(layer-list根元素),ShapeDrwable(shape根元素),AnimationDrawable(set根元素),xxx。详细的介绍以后会写文章的
这里的是shape根元素,可以定义形状背景等,大约有下边的5个元素。
bg_border.xml
<?xml version="1.0" encoding="utf-8"?>
<shape xmlns:android="http://schemas.android.com/apk/res/android" >
     <!-- 设置矩形的背景色 -->
     <solid android:color="#0000"></solid>
     <!-- 设置边框,宽度和颜色 -->
     <stroke android:width="4px" android:color="#f00"></stroke>
</shape>
bg_border2.xml
<?xml version="1.0" encoding="utf-8"?>
<shape xmlns:android="http://schemas.android.com/apk/res/android" android:shape="rectangle">"
    <!-- 设置矩形的4个圆角的半径 -->
    <corners android:topLeftRadius="5px" android:topRightRadius="5px" android:bottomLeftRadius="5px" android:bottomRightRadius="5px"></corners>
    <!-- 设置边框,宽度和颜色 -->
    <stroke android:width="4px" android:color="#f0f"></stroke>
     <!-- 设置渐变色,使用线性类型的渐变色,红色,绿色,蓝色 -->
    <gradient android:startColor="#f00" android:centerColor="#0f0" android:endColor="#00f" android:type="linear"></gradient>"
</shape>
EditView的用法:
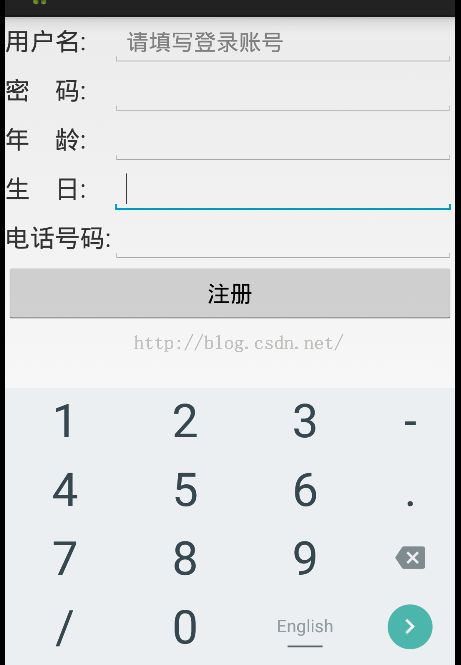
EditView的最重要的属性是inputType属性,根据不同的值,调出不同的输入键盘。
下面用例子说明,例子:用户友好的输入界面
xml
<?xml version="1.0" encoding="utf-8"?>
<TableLayout xmlns:android="http://schemas.android.com/apk/res/android"
    android:layout_width="fill_parent"
    android:layout_height="fill_parent"
    android:stretchColumns="1" >

    <TableRow
        android:id="@+id/tableRow1"
        android:layout_width="wrap_content"
        android:layout_height="wrap_content" >

        <TextView
            android:id="@+id/textView1"
            android:layout_width="fill_parent"
            android:layout_height="wrap_content"
            android:text="用户名:"
            android:textSize="20dp" />

        <EditText
            android:id="@+id/editText1"
            android:layout_width="wrap_content"
            android:layout_height="wrap_content"
            android:ems="10"
            android:hint="请填写登录账号"
            android:selectAllOnFocus="true" >

        </EditText>
    </TableRow>

    <TableRow
        android:id="@+id/tableRow2"
        android:layout_width="wrap_content"
        android:layout_height="wrap_content" >

        <TextView
            android:id="@+id/textView2"
            android:layout_width="fill_parent"
            android:layout_height="wrap_content"
            android:text="密    码:"
            android:textSize="20dp" />
  <!--  android:inputType="numberPassword"表明只接受数字密码 -->
        <EditText
            android:id="@+id/editText2"
            android:layout_width="fill_parent"
            android:layout_height="wrap_content"
            android:ems="10"
            android:inputType="numberPassword" />
    </TableRow>

    <TableRow
        android:id="@+id/tableRow3"
        android:layout_width="fill_parent"
        android:layout_height="wrap_content" >

        <TextView
            android:id="@+id/textView3"
            android:layout_width="wrap_content"
            android:layout_height="wrap_content"
            android:text="年    龄:"
            android:textSize="20dp" />
<!-- android:inputType="number"表明是数字输入框 -->
        <EditText
            android:id="@+id/editText3"
            android:layout_width="wrap_content"
            android:layout_height="wrap_content"
            android:ems="10"
            android:inputType="number" />
    </TableRow>

    <TableRow
        android:id="@+id/tableRow4"
        android:layout_width="wrap_content"
        android:layout_height="wrap_content" >

        <TextView
            android:id="@+id/textView4"
            android:layout_width="fill_parent"
            android:layout_height="wrap_content"
            android:text="生    日:"
            android:textSize="20dp" />
<!-- android:inputType="date"表明是日期输入框 -->
        <EditText
            android:id="@+id/editText4"
            android:layout_width="fill_parent"
            android:layout_height="wrap_content"
            android:ems="10"
            android:inputType="date" />
    </TableRow>

    <TableRow
        android:id="@+id/tableRow5"
        android:layout_width="wrap_content"
        android:layout_height="wrap_content" >

        <TextView
            android:id="@+id/textView5"
            android:layout_width="wrap_content"
            android:layout_height="wrap_content"
            android:text="电话号码:"
            android:textSize="20dp" />
<!-- android:inputType="phone"表明是电话号码输入框 -->
        <EditText
            android:id="@+id/editText5"
            android:layout_width="wrap_content"
            android:layout_height="wrap_content"
            android:ems="10"
            android:inputType="phone"
            android:selectAllOnFocus="true" />
    </TableRow>

    <Button
        android:id="@+id/button1"
        android:layout_width="wrap_content"
        android:layout_height="wrap_content"
        android:text="注册" />

</TableLayout>

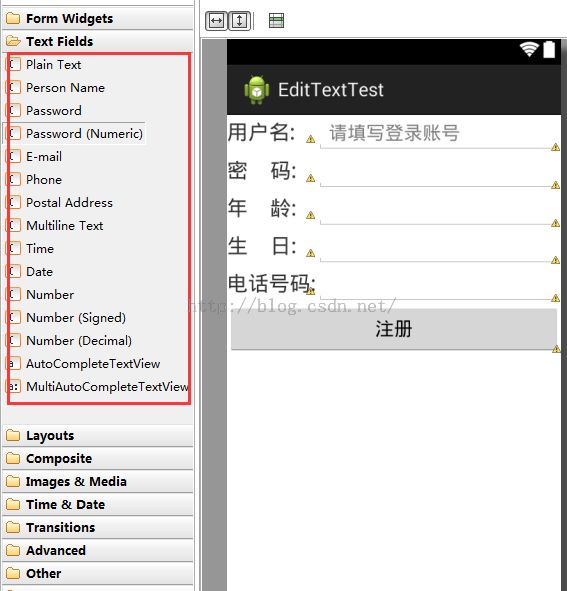
其实图形化设计的时候可以直接拖动组件就好了,android已经定制好了组件


