扣丁学堂——TelephoneManager
一丶代码见本文
二丶课程讲解
下面代码简单输出一下手机状态:
权限:
 <uses-permission android:name="android.permission.READ_PHONE_STATE" />

   //电话服务管理的API方法
    public void testTelePhoneManager() {

        TelephonyManager tm = (TelephonyManager) getSystemService(Context.TELEPHONY_SERVICE);
        System.out.print("电话状态:" + tm.getCallState());
        System.out.print("唯一的设备ID:" + tm.getDeviceId());
        System.out.print("设备的软件版本号:" + tm.getDeviceSoftwareVersion());
        System.out.print("手机号:" + tm.getLine1Number());
        System.out.print("获取ISO标准的国家码,即国际长途区号:" + tm.getLine1Number());
        System.out.print("当前使用的网络类型:" + tm.getNetworkType());
        System.out.print("手机类型:" + tm.getPhoneType());
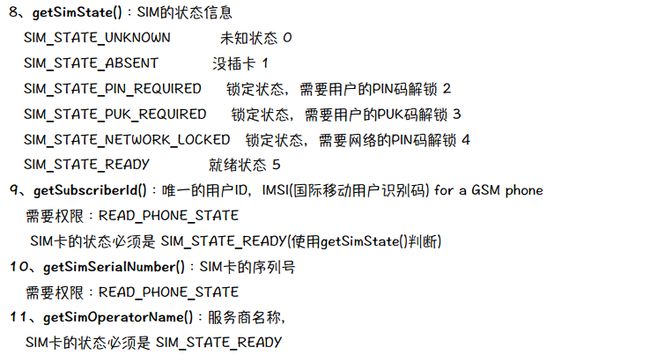
        System.out.print("SIM的状态信息:" + tm.getSimState());
        System.out.print("唯一的用户ID:" + tm.getSubscriberId());
        System.out.print("SIM卡的序列号:" + tm.getSimSerialNumber());
        System.out.print("服务商名称:" + tm.getSimOperator());
    }

获取手机状态并监听
public class MainActivity extends AppCompatActivity {

    TextView t01;
    TextView t02;
    TextView t03;
    TextView t04;
    TextView t05;
    TextView t06;
    TextView t07;
    TextView t08;
    TextView t09;
    TextView t10;
    TextView t11;


    @Override
    protected void onCreate(Bundle savedInstanceState) {
        super.onCreate(savedInstanceState);
        setContentView(R.layout.activity_main);

        t01 = (TextView) findViewById(R.id.t01);
        t02 = (TextView) findViewById(R.id.t02);
        t03 = (TextView) findViewById(R.id.t03);
        t04 = (TextView) findViewById(R.id.t04);
        t05 = (TextView) findViewById(R.id.t05);
        t06 = (TextView) findViewById(R.id.t06);
        t07 = (TextView) findViewById(R.id.t07);
        t08 = (TextView) findViewById(R.id.t08);
        t09 = (TextView) findViewById(R.id.t09);
        t10 = (TextView) findViewById(R.id.t10);
        t11 = (TextView) findViewById(R.id.t11);

        testTelePhoneManager();
    }

    //电话服务管理的API方法
    public void testTelePhoneManager() {

        TelephonyManager tm = (TelephonyManager) getSystemService(Context.TELEPHONY_SERVICE);
        t01.setText("电话状态:" + tm.getCallState());
        t02.setText("唯一的设备ID:" + tm.getDeviceId());
        t03.setText("设备的软件版本号:" + tm.getDeviceSoftwareVersion());
        t04.setText("手机号:" + tm.getLine1Number());
        t05.setText("获取ISO标准的国家码,即国际长途区号:" + tm.getLine1Number());
        t06.setText("当前使用的网络类型:" + tm.getNetworkType());
        t07.setText("手机类型:" + tm.getPhoneType());
        t08.setText("SIM的状态信息:" + tm.getSimState());
        t09.setText("唯一的用户ID:" + tm.getSubscriberId());
        t10.setText("SIM卡的序列号:" + tm.getSimSerialNumber());
        t11.setText("服务商名称:" + tm.getSimOperator());

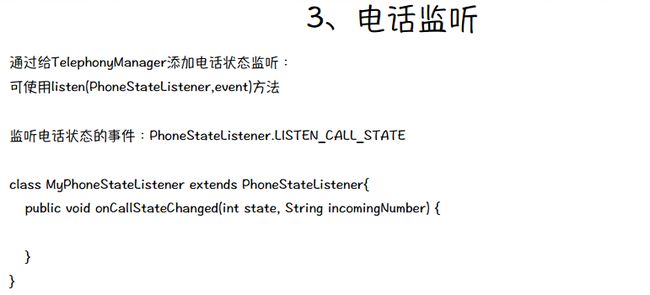
        //监听打电话的状态;
        tm.listen(new MyPhoneStateListener(), PhoneStateListener.LISTEN_CALL_STATE);
    }

    //电话监听事件:
    private class MyPhoneStateListener extends PhoneStateListener {

        //电话监听状态:
        @Override
        public void onCallStateChanged(int state, String incomingNumber) {
            super.onCallStateChanged(state, incomingNumber);

            switch (state) {
                case TelephonyManager.CALL_STATE_IDLE:
                    Toast.makeText(MainActivity.this, "挂机状态", Toast.LENGTH_LONG).show();
                    break;
                case TelephonyManager.CALL_STATE_RINGING:
                    Toast.makeText(MainActivity.this, "电话响铃状态", Toast.LENGTH_LONG).show();
                    break;
                case TelephonyManager.CALL_STATE_OFFHOOK:
                    Toast.makeText(MainActivity.this, "接听状态", Toast.LENGTH_LONG).show();
                    break;
            }
        }
    }
}
简单的来电监听并显示,有用到Windowmanager
//来电显示:
public class MainActivity extends AppCompatActivity {
    @Override
    protected void onCreate(Bundle savedInstanceState) {
        testTelePhoneManager();
    }

    //电话服务管理的API方法
    public void testTelePhoneManager() {
        //测试来电显示,直接发送一个广播
        sendBroadcast(new Intent(this,PhoneListenerReceiver.class));

    }


//广播接书器:
public class PhoneListenerReceiver extends BroadcastReceiver {
    public PhoneListenerReceiver() {
    }

    @Override
    public void onReceive(Context context, Intent intent) {

        //获取电话管理器对象,并注册监听器
        TelephonyManager tm = (TelephonyManager) context.getApplicationContext().getSystemService(Context.TELEPHONY_SERVICE);
        tm.listen(new MyPhoneStateListener(context), PhoneStateListener.LISTEN_CALL_STATE);
    }

    static WindowManager wm = null;

    private class MyPhoneStateListener extends PhoneStateListener {

        private Context context;
        TextView textView = null; //显示文字组件

        public MyPhoneStateListener(Context context) {
            this.context = context;
        }

        @Override
        public void onCallStateChanged(int state, String incomingNumber) {
            super.onCallStateChanged(state, incomingNumber);

            //响铃状态:
            if (state == TelephonyManager.CALL_STATE_RINGING) {

                //获取窗体对象
                wm = (WindowManager) context.getSystemService(Context.WINDOW_SERVICE);

                //窗体参数对象
                WindowManager.LayoutParams params = new WindowManager.LayoutParams();

                //设置为一个浮动层
                params.type = WindowManager.LayoutParams.TYPE_SYSTEM_OVERLAY;

                //设置窗体为不能触摸和没有焦点的
                params.flags = WindowManager.LayoutParams.FLAG_NOT_TOUCH_MODAL | WindowManager.LayoutParams.FLAG_NOT_FOCUSABLE;

                params.width = WindowManager.LayoutParams.WRAP_CONTENT;
                params.height = WindowManager.LayoutParams.WRAP_CONTENT;

                textView = new TextView(context);
                textView.setText("当前电话号码:" + incomingNumber);

                wm.addView(textView, params); //添加浮动视图

                //挂机状态
            } else if (state == TelephonyManager.CALL_STATE_IDLE) {
                if (wm != null) {
                    wm.removeView(textView);
                    wm = null;
                }
            }

        }
    }


}


//配置清单:
<?xml version="1.0" encoding="utf-8"?>
<manifest xmlns:android="http://schemas.android.com/apk/res/android"
    package="com.example.zhangjianbin.myapplication" >

    <uses-permission android:name="android.permission.READ_PHONE_STATE" />

    //开机启动
    <uses-permission android:name="android.permission.RECEIVE_BOOT_COMPLETED" />

   //实现悬浮窗口
    <uses-permission android:name="android.permission.SYSTEM_ALERT_WINDOW" />

    <application
        android:allowBackup="true"
        android:icon="@mipmap/ic_launcher"
        android:label="@string/app_name"
        android:theme="@style/AppTheme" >
        <activity
            android:name=".MainActivity"
            android:label="@string/app_name" >
            <intent-filter>
                <action android:name="android.intent.action.MAIN" />

                <category android:name="android.intent.category.LAUNCHER" />
            </intent-filter>
        </activity>

        <receiver
            android:name=".PhoneListenerReceiver"
            android:enabled="true"
            android:exported="true" >

            <intent-filter>
                <action android:name="android.intent.action.BOOT_COMPLETED" />
            </intent-filter>

        </receiver>
    </application>

</manifest>
