opencv实现全景图_1
简介
  这一篇讲下使用opencv来实现图片拼接,也就是常说的取景模式。
在这一篇:http://blog.sina.com.cn/s/blog_4b27c38d01019xlv.html ,有对该模式做基本介绍。
在opencv官网:http://docs.opencv.org/modules/stitching/doc/stitching.html ,有对这一部分的API做全面的基本介绍。
opencv_source_code/samples/cpp/stitching.cpp:是opencv官网提供简单版图像拼接实例。
opencv_source_code/samples/cpp/stitching_detailed.cpp:是opencv官网提供的复杂全面版图像拼接实例。
简单实例
首先看下,opencv实现图像拼接的最简单实例,这是将stitching.cpp裁剪到最简单的代码,和表现效果。
具体代码
#include <iostream>
#include <fstream>
#include "opencv2/highgui/highgui.hpp"
#include "opencv2/stitching/stitcher.hpp"

using namespace std;
using namespace cv;

bool try_use_gpu = true; //false;
vector<Mat> imgs;
string result_name = "result.jpg";

int parseCmdArgs(int argc, char** argv){
	for (int i = 1; i < argc; ++i){
		Mat img = imread(argv[i]);
		if (img.empty()){
			cout << "Can't read image '" << argv[i] << "'\n";
			return -1;
		}
		imgs.push_back(img);
		imshow(argv[i], img);
	}
	return 0;
}

int main(int argc, char* argv[]){
	int retval = parseCmdArgs(argc, argv);
	if (retval) return -1;

	Mat pano;
	Stitcher stitcher = Stitcher::createDefault(try_use_gpu);
	Stitcher::Status status = stitcher.stitch(imgs, pano);

	if (status != Stitcher::OK){
		cout << "Can't stitch images, error code = " << int(status) << endl;
		return -1;
	}

	imwrite(result_name, pano);
	imshow("show", pano);
	cv::waitKey(0);
	return 0;
}
效果演示
运行本例:./tmp 1.jpg 2.jpg 3.jpg
实现效果如下:
                                                              输入图像

输出图像
全景图实例2
在前面的例子中,只是简单的使用函数:stitcher.stitch来生成里默认设置的全景图,这里继续使用新的方式来生成各种类型的全景图。
实现代码
具体代码如下:
#include <iostream>
#include <fstream>
#include "opencv2/highgui/highgui.hpp"
#include "opencv2/stitching/stitcher.hpp"

using namespace std;
using namespace cv;

bool try_use_gpu = false;
vector<Mat> imgs;
string result_name = "result.jpg";

int parseCmdArgs(int argc, char** argv){
	for (int i = 1; i < argc-1; ++i){
		Mat img = imread(argv[i]);
		if (img.empty()){
			cout << "Can't read image '" << argv[i] << "'\n";
			return -1;
		}
		imgs.push_back(img);

		imshow(argv[i], img);
	}
	return 0;
}

int main(int argc, char* argv[]){
	int retval = parseCmdArgs(argc, argv);
	if (retval) return -1;

	Mat pano;

	/*创建一个stitcher对象*/
	Stitcher stitcher = Stitcher::createDefault(try_use_gpu);

	/*设置生成结果图为:1:平面, 2:柱面, 3:立体画面*/
	if(argv[4][0] == '1'){
		PlaneWarper* cw = new PlaneWarper();
		stitcher.setWarper(cw);
	}else if(argv[4][0] == '2'){
		SphericalWarper* cw = new SphericalWarper();
		stitcher.setWarper(cw);
	}else if(argv[4][0] == '3'){
		StereographicWarper *cw = new cv::StereographicWarper();
		stitcher.setWarper(cw);
	}

	/*使用Surf算法来寻找特征点*/
	detail::SurfFeaturesFinder *featureFinder = new detail::SurfFeaturesFinder();
	stitcher.setFeaturesFinder(featureFinder);

	/*匹配给定的图像和估计相机的旋转*/
	Stitcher::Status status = stitcher.estimateTransform(imgs);
	if (status != Stitcher::OK)
	{
		cout << "Can't stitch images, error code = " << int(status) << endl;
		return -1;
	}

	/*生成全景图像*/
	status = stitcher.composePanorama(pano);
	if (status != Stitcher::OK)
	{
		cout << "Can't stitch images, error code = " << int(status) << endl;
		return -1;
	}

	imwrite(result_name, pano);
	imshow("show", pano);
	cv::waitKey(0);
	return 0;
}
代码讲解
1、填充imgs,将输入的图片全部填充到容器imgs中,并将输入的图片,一一显示出来。
int parseCmdArgs(int argc, char** argv){
	for (int i = 1; i < argc-1; ++i){
		Mat img = imread(argv[i]);
		if (img.empty()){
			cout << "Can't read image '" << argv[i] << "'\n";
			return -1;
		}
		imgs.push_back(img);

		imshow(argv[i], img);
	}
	return 0;
}
2、创建一个stitcher对象。
Stitcher stitcher = Stitcher::createDefault(try_use_gpu);
  3、设置生成结果图为:1:平面, 2:柱面, 3:立体画面。opencv中提供了很多可以生成的全景图种类。在它提供的复杂版实例:stitching_detailed.cpp,
有如下种类可以选择:
  plane|cylindrical|spherical|fisheye|stereographic|compressedPlaneA2B1|
  compressedPlaneA1.5B1|compressedPlanePortraitA2B1|compressedPlanePortraitA1.5B1|paniniA2B1|
  paniniA1.5B1|paniniPortraitA2B1|paniniPortraitA1.5B1|mercator|transverseMercator
  本例中,只使用了3种作为选择:
/*设置生成结果图为:1:平面, 2:柱面, 3:立体画面*/
if(argv[4][0] == '1'){
	PlaneWarper* cw = new PlaneWarper();
	stitcher.setWarper(cw);
}else if(argv[4][0] == '2'){
	SphericalWarper* cw = new SphericalWarper();
	stitcher.setWarper(cw);
}else if(argv[4][0] == '3'){
	StereographicWarper *cw = new cv::StereographicWarper();
	stitcher.setWarper(cw);
}
4、选择寻找特征点的算法,opencv中提供了Surf和Orb两种方式可以选择,本例中使用的是Surf。
detail::SurfFeaturesFinder *featureFinder = new detail::SurfFeaturesFinder();
stitcher.setFeaturesFinder(featureFinder);
5、生成输出全景图,这里使用另一种方式来实现。
     /*匹配给定的图像和估计相机的旋转*/
        Stitcher::Status status = stitcher.estimateTransform(imgs);

	/*生成全景图像*/
	status = stitcher.composePanorama(pano);
	imwrite(result_name, pano);
	imshow("show", pano);
效果演示
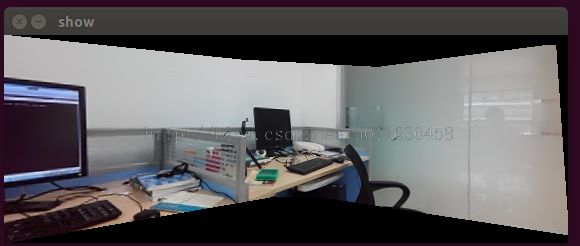
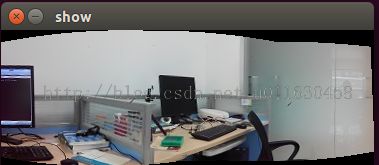
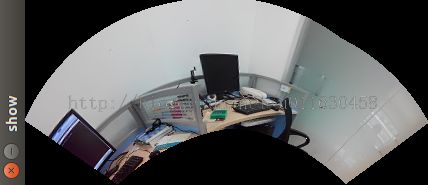
本例的三种效果图,对应显示如下:
1、平面
2、球面
3、立体


