MFC 创建和操作Excel2007 文件
目标:
生成一个excel文件,该文件可以使用office2007打开,也可以使用office2003打开,而不弹出提示;
实现数据写入自动换行,换列的操作;
实现写入实数、复数、字符串的操作;
实现在指定位置,指定范围写入的操作。
该程序在VS2005,VS2008,VS2010测试通过!
步骤:
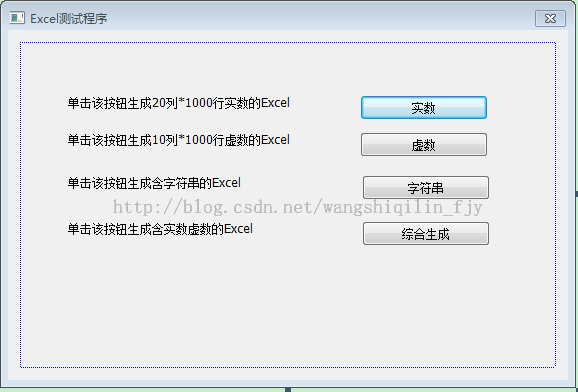
我们首先建立一个基于对话框的MFC程序,我将程序名命名为:GenenalCreateExcelFileDlg。然后打开界面,拖拽如图所示的四个static控件以及四个button控件。将界面更名为:“Excel测试程序”。其他界面的细节略过。
第一步:导入需要的库文件;
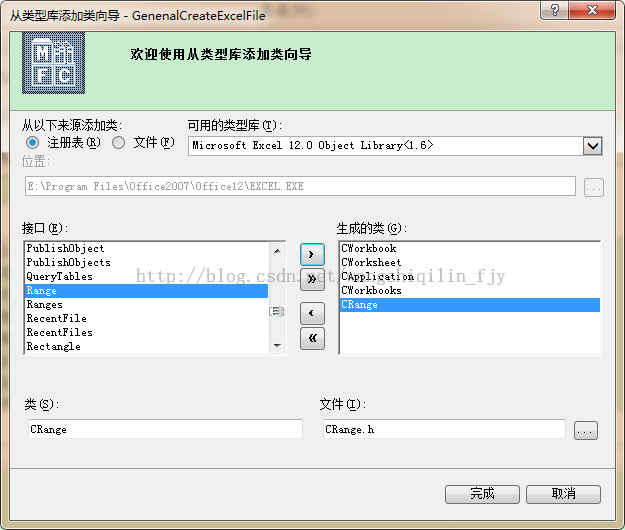
打开类向导,选择“类型库中的MFC类”如图:
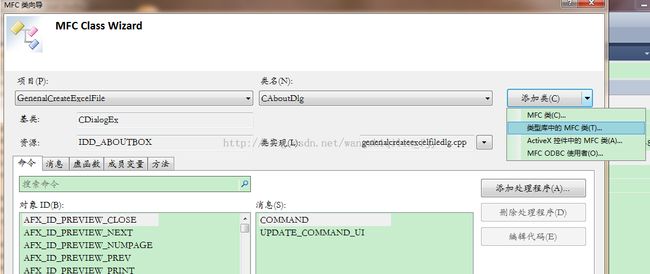 接着我们在打开的对话框中选择源:注册表,类型库为:Excel 12.0。选择的库文件如图所示
第二步:修改库文件中的部分语句,否则编译后讲弹出大量bug;
上述步骤完成后,编译一下发现很多bug,此时,注释掉,步骤一中添加的库文件的#import语句:“//#import "E:\\Program Files\\Office2007\\Office12\\EXCEL.EXE" no_namespace”,同时,将这些库文件中“DialogBox()”更改为“_DialogBox()”,以防止重名冲突。
第三步:设计思路:excel2003 的行共有:256列,65536行,2007 更是有:1048576行、16384列;我们需要往不同的行不同的列写入数据,手动指定的话,谁也受不了,但是,excel列的排序符合26进制,因此,一个小小的函数,就可以让输入换列,而行的规律就是简单的十进制,指定了列的话往该列的不同行写不是问题。因此程序中有一个inline函数。再者,生成excel一般的思维就是:生成一个空白文件,往该文件中写入不同的数据,然后保存到指定位置即可。程序中实现这些函数即可。
第四步:设计相关函数:
首先添加一个操作excel的类:CMyExcel。其头文件如下:
#include "CApplication.h"
#include "CRange.h"
#include "CWorkbook.h"
#include "CWorksheet.h"
#include "CWorkbooks.h"
#include "CWorksheets.h"
#include <string>
using namespace std;
class CMyExcel
{
private:
	//标记Excel对象的变量
	CApplication m_app;
	CWorkbooks m_books;
	CWorkbook m_book;
	CWorksheets m_sheets;
	//标记excel中当前写入的标签页
	CWorksheet m_sheet;
	CRange m_range;		//标记写入的范围
	COleVariant m_covTrue,m_covFalse,m_coverOptional,m_filePath;
	long m_rowCount;	//标记Excel当前写入的列数
	long m_sheetCount;	//标记Excel使用了多少标签页的变量
	long m_totalRow;	//标记Excel总列数的变量
	long m_totalCol;	//标记Excel总行数的变量
	char *m_colPst;		//一个含有A-Z的数组

	//列计数器
	long m_matricImagCount;

	//注释信息计数器,写完注释后写入数据
	long m_comCount;

public:
	CMyExcel();
	virtual ~CMyExcel();

	//string 字符串转换为CString
	CString String2CString(const string& inStr);

	//CString 字符串转换为string
	string CString2String(const CString & inStr);

	//打开文件用于读写
	//输入:文件名,打开模式
	//输出:文件打开状态
	int openfile(const string& filepath ,int mode);

	//写入实数组
	//输入:文件名,待写入文件的内容指针,待写入的行,待写入的列
	//输出:文件写入状态
	int writeMatrix(const string &matName ,double *mateData,long row,long col);

	//写入复数组
	//输入文件名,待写入文件的内容实部指针,待写入文件的内容虚部指针,待写入的行,待写入的列
	//输出:文件写入状态
	int writeMatrix(const string &matName ,double *mateDataReal,double *mateDataImag,long row,long col);

	//写入字符串
	//在Excel的指定范围生成含有指定字符串的文件
	int writeString(const string& str,int& col1,int& col2,int& row1,int& row2);

	//一个计算当前数据输入列的函数(输入到指定列需要得到列的标题:A,AX等,而他们满足26进制)
	inline void rowName(CString &mRowName,const long& mCount )
	{
		if(mCount < 27 )
		{
			mRowName += m_colPst[mCount];
		}
		else
		{
			int i = mCount / 26;
			int j = mCount %26;
			mRowName += m_colPst[i];
			mRowName += m_colPst[j];
		}
	}
};
其实现文件如下:
#include"stdafx.h"
#include"MyExcel.h"

CMyExcel::CMyExcel():m_rowCount(1),m_sheetCount(1),m_totalCol(256),m_totalRow(65536),m_matricImagCount(1),m_comCount(1)
{
	//获取系统的excel句柄
	if(!m_app.CreateDispatch(TEXT("Excel.Application")))
	{
		AfxMessageBox(_T("Could not start Excel and get Application object !"));
		return;
	}
	m_covTrue = COleVariant((short)TRUE);
	m_covFalse = COleVariant((short)FALSE);
	m_coverOptional = COleVariant((long)DISP_E_PARAMNOTFOUND,VT_ERROR);
	m_books = m_app.get_Workbooks();
	m_book = m_books.Add(m_coverOptional);
	m_sheets = m_book.get_Sheets();

	//m_colPst初始化为A-Z,其中下表为0的为一个无意义的占位符
	m_colPst = new char[27];
	m_colPst[0] = '#';
	for(int i = 1;i<27;i++)
	{
		m_colPst[i]=64+i;
	}
}
CMyExcel::~CMyExcel()
{
	//在这里保存生成的excel
	m_book.SaveAs(
		m_filePath,
		_variant_t((long)56),//该参数使得保存的时候使用兼容模式,避免了使用excel2003打开的时候弹出提示框
		m_coverOptional,
		m_coverOptional,
		m_coverOptional,
		m_coverOptional,
		0,
		m_coverOptional,
		m_coverOptional,
		m_coverOptional,
		m_coverOptional,
		m_coverOptional
		);
	//释放占用的excel资源
	m_book.ReleaseDispatch();
	m_books.ReleaseDispatch();
	m_app.Quit();
	m_app.DetachDispatch();

	//将一些计数器变量复原
	m_comCount = 1;
	m_matricImagCount = 1;
}
CString CMyExcel::String2CString(const string& inStr)
{
	int nLen = (int)inStr.length()+1;
	int nwLen = MultiByteToWideChar(CP_ACP,0,inStr.c_str(),nLen,NULL,0);
	TCHAR* lpszOut = new TCHAR[nwLen];	//最多1024字节
	MultiByteToWideChar(CP_ACP,0,inStr.c_str(),nLen,lpszOut,nwLen);
	CString outStr;
	outStr += lpszOut;

	delete []lpszOut;
	lpszOut = NULL;
	return outStr;
}

string CMyExcel::CString2String(const CString & inStr)
{
	int nLength = 0;
	//获取需要的字节数
	nLength = WideCharToMultiByte(CP_ACP,NULL,inStr,-1,NULL,0,NULL,NULL);
	//申请char存储空间
	char *buffer = (char*)malloc(nLength);

	//转换
	WideCharToMultiByte(CP_ACP,NULL,inStr,-1,buffer,nLength,NULL,NULL);
	string str(buffer);

	//释放缓存区
	free(buffer);
	return str;

}
int CMyExcel::openfile(const string& filepath ,int mode)
{
	if(m_books)
	{
		m_filePath = COleVariant(String2CString(filepath));
		return 1;
	}
	else
		return -1;
}
int CMyExcel::writeMatrix(const string &matName ,double *mateData,long row,long col)
{
	m_sheet = m_sheets.get_Item(COleVariant((short)m_sheetCount));

	//用于标记当前写入的是哪一列:A、B、C、......
	long matrixCt = 0;

	//指定当前写入的行:需要先写入一些注释信息(m_comcount计数),然后在写入数据,因此将他们赋值即可
	m_rowCount = m_comCount;

	//标记当前列标题的变量:比如说(A,AX,BX等)
	CString locPst(_T(""));

	//标记保存位置的变量
	CString position0(_T(""));
	CString locPstReal(_T(""));

	//超过列数就不继续
	if(m_matricImagCount > m_totalCol)
	{
		return -1;
	}

	matrixCt = m_matricImagCount++;
	CString mRow(_T("row="));
	CString mCol(_T("col="));
	CString temp;
	temp.Format(_T("%ld"),row);
	mRow = mRow + temp;
	temp.Empty();
	temp.Format(_T("%ld"),col);
	mCol = mCol + temp;
	rowName(locPst,matrixCt);
	position0 = locPst;
	temp.Empty();
	temp.Format(_T("%ld"),m_rowCount++);
	position0+=temp;
	CString myMatName(matName.c_str());
	m_range = m_sheet.get_Range(COleVariant(position0),COleVariant(position0));
	m_range.put_Value2(_variant_t(myMatName));


	position0 = locPst;
	temp.Empty();
	temp.Format(_T("%ld"),m_rowCount++);
	position0+=temp;
	m_range = m_sheet.get_Range(COleVariant(position0),COleVariant(position0));
	m_range.put_Value2(COleVariant(TEXT("----")));

	//数据写入文件
	for(long iRow = 0;iRow < row;iRow++)
	{
		locPstReal.Empty();
		long tmpCol = matrixCt++;
		rowName(locPstReal, tmpCol);
		position0 = locPstReal;
		long rowCount = m_rowCount;
		for(long icol = 0;icol<col; icol++)
		{
			long idx = iRow*col + icol;
			position0 = locPst;
			temp.Empty();
			temp.Format(_T("%ld"),rowCount++);
			position0 += temp;
			m_range = m_sheet.get_Range(COleVariant(position0),COleVariant(position0));
			m_range.put_Value2(COleVariant(mateData[idx]));
			//超过行数,就不再写入文件
			if(rowCount > m_totalRow)
			{
				break;
			}
		}
	}
	m_comCount = 1;
	return 1;
}

int CMyExcel::writeMatrix(const string &matName ,double *mateDataReal,
	double *mateDataImag,long row,long col)
{
	m_sheet = m_sheets.get_Item(COleVariant((short)m_sheetCount));

	//用于标记当前写入的是哪一列:A、B、C、......
	long matrixCt = 0;

	//指定当前写入的行:需要先写入一些注释信息(m_comcount计数),然后在写入数据,因此将他们赋值即可
	m_rowCount = m_comCount;

	//标记当前列标题的变量:比如说(A,AX,BX等)
	CString locPstReal(_T(""));
	CString locPstImge(_T(""));

	//标记写入位置的变量:实数部分、虚数部分
	CString colReal(_T(""));
	CString colImge(_T(""));

	//描述信息
	CString mRow(_T("row = "));
	CString mCol(_T("col = "));
	CString temp;
	temp.Format(_T("%ld"),row);
	mRow = mRow + temp;
	temp.Empty();
	temp.Format(_T("%ld"),col);
	mCol = mCol + temp;

	//超过列数就不继续写
	if(m_matricImagCount > m_totalCol)
	{
		return -1;
	}
	matrixCt = m_matricImagCount;
	m_matricImagCount += (row * 2);
	rowName(locPstReal, matrixCt);
	colReal = locPstReal;
	temp.Empty();
	temp.Format(_T("%ld"),m_rowCount++);
	colReal += temp;

	CString myMatName(matName.c_str());
	m_range = m_sheet.get_Range(COleVariant(colReal),COleVariant(colReal));
	m_range.put_Value2(_variant_t(myMatName));

	colReal = locPstReal;
	temp.Empty();
	temp.Format(_T("%ld"),m_rowCount++);
	colReal+=temp;
	m_range = m_sheet.get_Range(COleVariant(colReal),COleVariant(colReal));
	m_range.put_Value2(COleVariant(TEXT("--------")));

	//数据写入文件
	for(long iRow = 0;iRow < row;iRow++)
	{
		locPstReal.Empty();
		locPstImge.Empty();
		long tmpCol = matrixCt;
		rowName(locPstReal, tmpCol);
		rowName(locPstImge, tmpCol+1);
		matrixCt += 2;
		colReal = locPstReal;
		colImge = locPstImge;
		long rowCount = m_rowCount;
		for(long icol = 0;icol<col; icol++)
		{
			long idx = iRow*col + icol;
			colReal = locPstReal;
			colImge = locPstImge;
			temp.Empty();
			temp.Format(_T("%ld"),rowCount++);
			colReal += temp;
			colImge += temp;
			//写入实数
			m_range = m_sheet.get_Range(COleVariant(colReal),COleVariant(colReal));
			m_range.put_Value2(COleVariant(mateDataReal[idx]));
			//写入虚数
			m_range = m_sheet.get_Range(COleVariant(colImge),COleVariant(colImge));
			m_range.put_Value2(COleVariant(mateDataImag[idx]));

			//超过行数,就不再写入文件
			if(rowCount > m_totalRow)
			{
				break;
			}
		}
	}
	m_comCount = 1;
	return 1;
}
int CMyExcel::writeString(const string& str,int& col1,int& row1,int& col2,int& row2)
{
	m_sheet = m_sheets.get_Item(COleVariant((short)m_sheetCount));
	//获取矩形框走上角写入位置:E3
	CString locPst11(_T(""));
	rowName(locPst11,row1);
	CString temp11(_T(""));
	CString position11(_T(""));
	position11= locPst11;
	temp11.Format(_T("%ld"),col1);
	position11 += temp11;

	//获取矩形框走上角写入位置:E8
	CString locPst12(_T(""));
	rowName(locPst12,row1);
	CString temp12(_T(""));
	CString position12(_T(""));
	position12 = locPst12;
	temp12.Format(_T("%ld"),col2);
	position12 += temp12;

	//获取右上角写入位置 :P3
	CString locPst21(_T(""));
	rowName(locPst21,row2);
	CString temp21(_T(""));
	CString position21(_T(""));
	position21 = locPst21;
	temp21.Format(_T("%ld"),col1);
	position21 += temp21;

	//获取右下角写入位置 :P8
	CString locPst22(_T(""));
	rowName(locPst22,row2);
	CString temp22(_T(""));
	CString position22(_T(""));
	position22 = locPst22;
	temp21.Format(_T("%ld"),col2);
	position22 += temp21;

	CString myMatName(str.c_str());
	//首先将数据写入E3这一格中
	m_range = m_sheet.get_Range(COleVariant(position11),COleVariant(position11));
	m_range.put_Value2(_variant_t(myMatName));
	//然后合并E3-P8,形成矩形框
	m_range = m_sheet.get_Range(COleVariant(position11),COleVariant(position22));
	//这里就是“m_coverOptional”用到的地方!
	m_range.Merge(m_coverOptional);
	return 1;
}
至此,excel的操作都已经实现完毕,有些注释给出了一个参数的定义,比如savsas函数,有兴趣的读者可以将里面的某些参数置换点,看看我在注释后面说的现象到底是什么。
第五步:测试程序:
双击dialog界面中的“实数”按钮,看看写入20列*1000行的效果。代码实现如下:
void CGenenalCreateExcelFileDlg::OnBnClickedRealdigital()
{
	// TODO: 在此添加控件通知处理程序代码
	//打开一个文件保存对话框
	string filePathStr("D:\\ValExcel.xls");

	string comment("");
	CMyExcel Demon;
	//在用户路径下生成文件
	//将鼠标形状更改为漏洞状态
	theApp.BeginWaitCursor();
	if(!Demon.openfile(filePathStr,2))
	{
		MessageBox(_T("数据导出失败!"));
	}
	//我们往里面写入20列,每列1000行
	int iCount = 1;
	//添加一个时钟计数器,看代码导出消耗多少时间
	DWORD start_time=::GetTickCount();
	for(;iCount<=20;iCount++)
	{
		char  valStr[10];
		comment.clear();
		sprintf_s(valStr,"%i",iCount);
		comment += "第";
		comment +=valStr;
		comment +="列";
		Demon.writeMatrix(comment,mateDataReal,1,1000);
	}
	DWORD end_time=::GetTickCount();
	theApp.EndWaitCursor();
	char timecost[1024];
	sprintf_s(timecost,"%lu",end_time-start_time);
	CString msg = _T("Excel生成完成,耗时:");
	msg += Demon.String2CString(timecost);
	msg += _T("毫秒");
	MessageBox(msg);
}
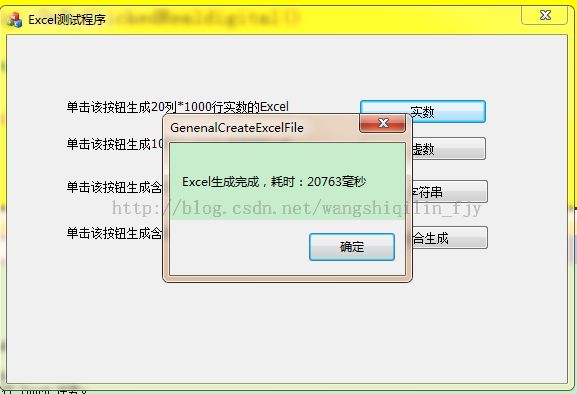
在该代码中,生成路径为D盘根目录,在生成过程中,将鼠标形状更改为等待状态的一个漏洞(XP系统可见),或者一个圈圈(win7系统可见),并且把生成时间打印了出来,效果图如图
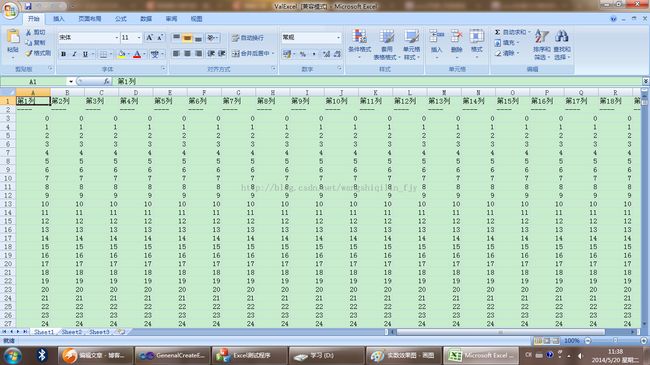
,生成的文件效果图如图所示
双击dialog界面中的“复数”按钮,看看写入10列*1000行复数的效果。因为复数有一个实部和一个虚部,因此一次需要写两列,代码实现如下:
void CGenenalCreateExcelFileDlg::OnBnClickedImagedigital()
{
	// TODO: 在此添加控件通知处理程序代码
	//打开一个文件保存对话框
	string filePathStr("D:\\MatExcer.xls");

	string comment("");
	CMyExcel Demon;
	//在用户路径下生成文件
	//将鼠标形状更改为漏洞状态
	theApp.BeginWaitCursor();
	if(!Demon.openfile(filePathStr,2))
	{
		MessageBox(_T("数据导出失败!"));
	}
	//我们往里面写入10列,每列1000行
	int iCount = 1;
	//添加一个时钟计数器,看代码导出消耗多少时间
	DWORD start_time=::GetTickCount();
	for(;iCount<=10;iCount++)
	{
		char  valStr[10];
		comment.clear();
		sprintf_s(valStr,"%i",iCount);
		comment += "第";
		comment +=valStr;
		comment +="列复数";
		Demon.writeMatrix(comment,mateDataReal,mateDataImge,1,1000);
	}
	DWORD end_time=::GetTickCount();
	theApp.EndWaitCursor();
	char timecost[1024];
	sprintf_s(timecost,"%lu",end_time-start_time);
	CString msg = _T("Excel生成完成,耗时:");
	msg += Demon.String2CString(timecost);
	msg += _T("毫秒");
	MessageBox(msg);
}
双击dialog界面中的“字符串”按钮,看看写入字符串的效果。我们在指定的左上角(3,E)、右下角(8,P)的矩形框范围内写入,代码实现如下:
void CGenenalCreateExcelFileDlg::OnBnClickedStr()
{
	// TODO: 在此添加控件通知处理程序代码
	string filePathStr("D:\\StrExcel.xls");

	string comment("这是一个简单的测试程序!");
	CMyExcel Demon;
	//在用户路径下生成文件

	if(!Demon.openfile(filePathStr,2))
	{
		MessageBox(_T("数据导出失败!"));
	}
	//尝试在Excel的左上角(3,E)、右下角(8,P)的矩形框范围内写入数据!
	int col1 = 3;
	int row1 = 5;
	int col2 = 8;
	int row2 = 16;
	Demon.writeString(comment,col1,row1,col2,row2);
	CString msg = _T("含有字符串的Excel生成完成!");
	MessageBox(msg);
}
双击dialog界面中的“综合生成”按钮,看看写入一列实数和一列复数的效果。代码实现如下:
void CGenenalCreateExcelFileDlg::OnBnClickedTotal()
{
	// TODO: 在此添加控件通知处理程序代码

	string filePathStr("D:\\TotalExcel.xls");
	string comment1("一列实数!");
	string comment2("一列复数!");
	CMyExcel Demon;
	//在用户路径下生成文件
	if(!Demon.openfile(filePathStr,2))
	{
		MessageBox(_T("数据导出失败!"));
	}
	//仅仅写入一列实数以及一列复数,作为测试!
	Demon.writeMatrix(comment1,mateDataReal,1,1000);
	Demon.writeMatrix(comment2,mateDataReal,mateDataImge,1,1000);
	CString msg = _T("Excel生成完成!");
	MessageBox(msg);
}
其他问题分析:我特意在复数以及实数写入的代码段中添加了时间测试语句,从图片中可以看到,但10*1000复数或者20*1000实数的时候,时间都不是很理想,假如数据换成其他的,如100列*60000行的时候,时间的花费就更大了,因此上述程序在数据量小的时候是有效的,但数据量大了的时候是不太理想的。改进的方法是想生成CSV文件,然后将它另存为Excel关于这方面的论述,将在下一篇博客中提及。
由于时间有限,有些注释可能不是非常理想,欢迎提出不同见解。
该文章使用到的源码:点击打开链接
