linux下检测和定位内存泄漏位置的方法
gtest:http://code.google.com/p/googletest/,可以下载最新的代码。下载后,可以参考gtest-1.6.0\make\Makefile写自己的Makefile。
程序内存的信息(/proc/self/smaps):
VMSIZE: 15316 KB
RSS: 2560 KB total
1152 KB shared
428 KB private clean
980 KB private dirty
RSS(private dirty)最接近程序所使用的内存,特别是从heap分配的内存。
使用单元测试可以检测内存泄漏。思路如下:
- 写一个获取当前内存的函数(获取Private Dirty)。
- 函数开始执行时,记录当前内存。
- 循环5万/50万/500万次,执行某个目标函数(可能有泄漏的函数)。
- 每次循环都检查内存,当内存增长了1M时,可以认定有内存泄漏。
当然目标函数是申请了内存,然后释放内存,在生命周期结束时应该要释放它的内存。
从顶级函数开始,或者从任意可能泄漏的函数开始,一直定位到内存泄漏的位置。可以使用utest中的mock来加快内存泄漏的速度。
获取内存信息的代码(memview.cpp):http://blog.csdn.net/winlinvip/article/details/7794558
在gtest-1.6.0同目录下,写Makefile如下:
# A sample Makefile for building Google Test and using it in user
# tests.  Please tweak it to suit your environment and project.  You
# may want to move it to your project's root directory.
#
# SYNOPSIS:
#
#   make [all]  - makes everything.
#   make TARGET - makes the given target.
#   make clean  - removes all files generated by make.

# Please tweak the following variable definitions as needed by your
# project, except GTEST_HEADERS, which you can use in your own targets
# but shouldn't modify.

# Points to the root of Google Test, relative to where this file is.
# Remember to tweak this if you move this file.
GTEST_DIR = gtest-1.6.0

# Where to find user code.
USER_DIR = .

# Flags passed to the preprocessor.
CPPFLAGS += -I$(GTEST_DIR)/include

# Flags passed to the C++ compiler.
CXXFLAGS += -g -Wall -Wextra -O0

# All tests produced by this Makefile.  Remember to add new tests you
# created to the list.
TESTS = winlin_mem_leak_utest

# All Google Test headers.  Usually you shouldn't change this
# definition.
GTEST_HEADERS = $(GTEST_DIR)/include/gtest/*.h \
                $(GTEST_DIR)/include/gtest/internal/*.h

# House-keeping build targets.

all : $(TESTS)

clean :
	rm -f $(TESTS) gtest.a gtest_main.a *.o

# Builds gtest.a and gtest_main.a.

# Usually you shouldn't tweak such internal variables, indicated by a
# trailing _.
GTEST_SRCS_ = $(GTEST_DIR)/src/*.cc $(GTEST_DIR)/src/*.h $(GTEST_HEADERS)

# For simplicity and to avoid depending on Google Test's
# implementation details, the dependencies specified below are
# conservative and not optimized.  This is fine as Google Test
# compiles fast and for ordinary users its source rarely changes.
gtest-all.o : $(GTEST_SRCS_)
	$(CXX) $(CPPFLAGS) -I$(GTEST_DIR) $(CXXFLAGS) -c \
            $(GTEST_DIR)/src/gtest-all.cc

gtest_main.o : $(GTEST_SRCS_)
	$(CXX) $(CPPFLAGS) -I$(GTEST_DIR) $(CXXFLAGS) -c \
            $(GTEST_DIR)/src/gtest_main.cc

gtest.a : gtest-all.o
	$(AR) $(ARFLAGS) $@ $^

gtest_main.a : gtest-all.o gtest_main.o
	$(AR) $(ARFLAGS) $@ $^

# Builds a sample test.  A test should link with either gtest.a or
# gtest_main.a, depending on whether it defines its own main()
# function.

winlin_mem_leak_utest.o : $(USER_DIR)/winlin_mem_leak_utest.cpp $(GTEST_HEADERS)
	$(CXX) $(CPPFLAGS) $(CXXFLAGS) -c $(USER_DIR)/winlin_mem_leak_utest.cpp

winlin_mem_leak_utest : winlin_mem_leak_utest.o gtest_main.a
	$(CXX) $(CPPFLAGS) $(CXXFLAGS) -lpthread $^ -o $@
同目录下,写winlin_mem_leak_utest.cpp,内容如下:
#include <stdio.h>
#include <stdlib.h>
#include <errno.h>
#include <sys/socket.h>
#include <netinet/in.h>
#include <arpa/inet.h>
#include <string.h>
#include <fcntl.h>
#include <sys/ioctl.h>
#include <assert.h>

#include <sys/types.h>
#include <unistd.h>
#include <iostream>
#include <string>
#include <fstream>
using namespace std;

#include "gtest/gtest.h"
using namespace testing;

// less
#define AssertLess(a, b)\
    EXPECT_TRUE(a < b); \
    if(a >= b){ \
        cout << "(" << #a << ")" \
            << "(" << a << ")" \
            << " < " \
            << "(" << #b << ")" \
            << "(" << b << ")" \
            << " failed!" \
            << endl; \
    }
#define LoopAssertLess(exit, a, b)\
    exit = (a >= b) ? true : exit; \
    AssertLess(a, b);
// greater
#define AssertGreater(a, b)\
    EXPECT_TRUE(a > b); \
    if(a < b){ \
        cout << "(" << #a << ")" \
            << "(" << a << ")" \
            << " > " \
            << "(" << #b << ")" \
            << "(" << b << ")" \
            << " failed!" \
            << endl; \
    }
#define LoopAssertGreater(exit, a, b)\
    exit = (a < b) ? true : exit; \
    AssertGreater(a, b);

// the memory leak size, in KB.
// default is 1024(1MB), if the program leak 1MB, we think it's a leak!.
#define MemoryLeakSize 1024
// the biger this value, the more memory leak canbe detected(take more time also).
#define MemoryLeakDetectLoop 1000

// begin the memory leak test loop.
//      usage: BeginLoopMemLeakTest()
// loop 1,000 times. (detect 1000byte leak to 1M).
#define BeginLoopMemLeakTest()\
    BeginLoopMemLeakTestCount(MemoryLeakDetectLoop)
//
// loop 10,000 times. (detect 100byte leak to 1M).
#define BeginLoopMemLeakTest2() \
            BeginLoopMemLeakTestCount(MemoryLeakDetectLoop*10)
//
// loop 50,000 times (detect 10byte leak to 1M).
#define BeginLoopMemLeakTest3()\
            BeginLoopMemLeakTestCount(MemoryLeakDetectLoop*50)
//
// loop 500,000 times (detect 1byte leak to 1M).
#define BeginLoopMemLeakTest4()\
            BeginLoopMemLeakTestCount(MemoryLeakDetectLoop*500)
//
// loop 5,000,000 times
#define BeginLoopMemLeakTest5()\
            BeginLoopMemLeakTestCount(MemoryLeakDetectLoop*5000)
#define BeginLoopMemLeakTestCount(loop_count)\
    MemView __a(0); \
    bool __exit = false; \
    int __alloc_once_size = 0;/*the normal alloc size.*/ \
    for(int __i = 0; __i < loop_count && !__exit; __i++){ \
        if(true){
// end the memory leak test loop.
//      usage: EndLoopMemLeakTest()
// first time, the heap memory will totally free when pool delete it.
// second time, the memory will not free.
// third time, use the previous free memory.
// so here, if the memory is constant, we think it's ok and no memory leak.
#define EndLoopMemLeakTest()\
        } \
        MemView __c(0);\
        if(__alloc_once_size == 0){ \
            __alloc_once_size = __c.private_dirty - __a.private_dirty; \
        } \
        LoopAssertLess(__exit, __c.private_dirty - __a.private_dirty, __alloc_once_size + MemoryLeakSize);\
        if(__exit){ \
            cout << "leak detected loop #" << __i << endl;/**/ \
        } \
    }

#include "memview.cpp"

TEST(SimpleTest, MemoryLeakDetect){
    BeginLoopMemLeakTest3()

    new char[1]; // memory leak here

    EndLoopMemLeakTest()
}
没有泄漏的结果:
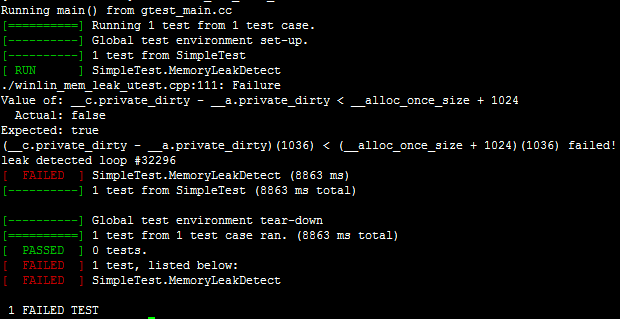
运行3万次可以检测到1个字节的泄漏。结果如下:
可运用在实际项目中。
另外,gperftools也可以检测内存泄漏:http://google-perftools.googlecode.com/svn/trunk/doc/heap_checker.html

