php调用face++ API使用
开始准备
开始用的demo我是从这里下的,github的那一个,快速开始的这一个我没跑起来。
http://www.faceplusplus.com.cn/dev-tools-sdks/
身为php新手,基本上没用过php,很多东西都不知道,这样从零开始写这个项目还是蛮有意思的,中途遇到一些问题,解决之后蛮开心的呀,对php的使用也有了更深的了解啦!
训练的过程简单描述为:首先有很多个类别,每类是一个人,每类都有若干训练图片;这些类别构成一个训练组,对这个组进行训练,之后便可以根据给定的一张人脸图片判断。
所以下面的内容主要分为4个部分:人脸检测,每个类Person的创建以及图片加入,整个训练集Group的创建与训练,对一张图片的测试
facecpp类
这个demo里边提供了一个facecpp类供我们使用,类的具体细节暂时不提,现在的关注点主要在它的使用上边。
在demo.php里边首先把这个类的php文件包含进来,
require_once 'facepp_sdk.php';之后创建类对象,和C++,Java都挺像的。
然后是填写自己的api_key和api_secret,
$facepp = new Facepp();
$facepp->api_key       = '{your_key_here}';
$facepp->api_secret    = '{your_secret_here}';
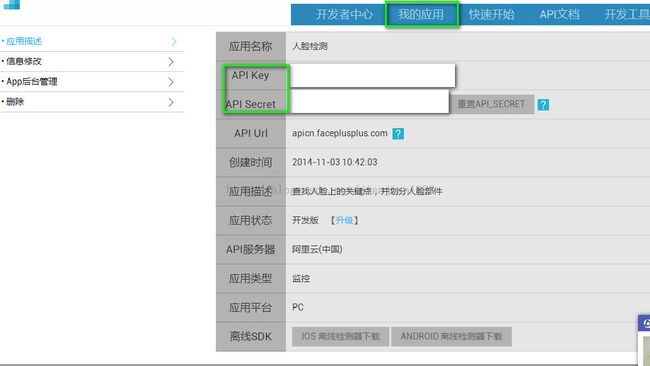
如下图所示,在我的应用里边可以看到。
检测人脸
下一步来试试看检测人脸的使用。
$img = "E:/test/ami.jpg</span>";
$params['img']          = $img;
$params['attribute']    = 'gender,age,race,smiling,glass,pose';
$response               = $facepp->execute('/detection/detect',$params);
这个调用格式和 API文档
提供的很像的啊,
来输出一下params,看看到底是什么样的。
Array ( [img] => E:/test/ami.jpg [attribute] => gender,age,race,smiling,glass,pose )
是一个array,有img和attribute两项。img和attribute其实就是API文档中的参数。
我们还可以这样写:
$response = $facepp->execute('/detection/detect', array('img' => 'E:/test/ami.jpg', 'attribute' => 'gender,age,race,smiling,glass,pose));我们执行一下,并输出$response看看它的返回结果。
array(3) { ["http_code"]=> int(200) ["request_url"]=> string(49) "http://apicn.faceplusplus.com/v2/detection/detect" ["body"]=> string(2107) "{ "face": [ { "attribute": { "age": { "range": 7, "value": 34 }, "gender": { "confidence": 64.1473, "value": "Male" }, "glass": { "confidence": 99.9925, "value": "None" }, "pose": { "pitch_angle": { "value": 1.7e-05 }, "roll_angle": { "value": 0.574331 }, "yaw_angle": { "value": 6.924223 } }, "race": { "confidence": 98.09989999999999, "value": "Asian" }, "smiling": { "value": 1.20888 } }, "face_id": "ce4dbce3a97ee409f3a08ed1318bd614", "position": { "center": { "x": 51.5, "y": 50.444444 }, "eye_left": { "x": 48.573833, "y": 47.064667 }, "eye_right": { "x": 54.293167, "y": 47.141111 }, "height": 14.666667, "mouth_left": { "x": 49.1605, "y": 56.202889 }, "mouth_right": { "x": 53.559333, "y": 55.942889 }, "nose": { "x": 51.5305, "y": 51.136889 }, "width": 11.0 }, "tag": "" } ], "img_height": 480, "img_id": "081505788d175b43646501620e00f941", "img_width": 640, "session_id": "5ba1f65790c24ee3a9388ad2c7a9cda5", "url": null }" } Array ( [0] => Array ( [attribute] => Array ( [age] => Array ( [range] => 7 [value] => 34 ) [gender] => Array ( [confidence] => 64.1473 [value] => Male ) [glass] => Array ( [confidence] => 99.9925 [value] => None ) [pose] => Array ( [pitch_angle] => Array ( [value] => 1.7E-5 ) [roll_angle] => Array ( [value] => 0.574331 ) [yaw_angle] => Array ( [value] => 6.924223 ) ) [race] => Array ( [confidence] => 98.0999 [value] => Asian ) [smiling] => Array ( [value] => 1.20888 ) ) [face_id] => ce4dbce3a97ee409f3a08ed1318bd614 [position] => Array ( [center] => Array ( [x] => 51.5 [y] => 50.444444 ) [eye_left] => Array ( [x] => 48.573833 [y] => 47.064667 ) [eye_right] => Array ( [x] => 54.293167 [y] => 47.141111 ) [height] => 14.666667 [mouth_left] => Array ( [x] => 49.1605 [y] => 56.202889 ) [mouth_right] => Array ( [x] => 53.559333 [y] => 55.942889 ) [nose] => Array ( [x] => 51.5305 [y] => 51.136889 ) [width] => 11 ) [tag] => ) )
结果特别的多呀!!
关于返回结果的具体说明可以看
detection
它是一个Json结构体,所以要
$face_body = json_decode($response['body'], 1);关于Json暂时先不管它是怎么工作的,先用起来就是了。
之后就可以得到body里边的部分了。
那body里边是一个怎样的结构呢?
array(6) { ["face"]=> array(1) { [0]=> array(4) { ["attribute"]=> array(6) { ["age"]=> array(2) { ["range"]=> int(7) ["value"]=> int(34) } ["gender"]=> array(2) { ["confidence"]=> float(64.1473) ["value"]=> string(4) "Male" } ["glass"]=> array(2) { ["confidence"]=> float(99.9925) ["value"]=> string(4) "None" } ["pose"]=> array(3) { ["pitch_angle"]=> array(1) { ["value"]=> float(1.7E-5) } ["roll_angle"]=> array(1) { ["value"]=> float(0.574331) } ["yaw_angle"]=> array(1) { ["value"]=> float(6.924223) } } ["race"]=> array(2) { ["confidence"]=> float(98.0999) ["value"]=> string(5) "Asian" } ["smiling"]=> array(1) { ["value"]=> float(1.20888) } } ["face_id"]=> string(32) "35e53d7cde03406213c6fdbd6077fe0c" ["position"]=> array(8) { ["center"]=> array(2) { ["x"]=> float(51.5) ["y"]=> float(50.444444) } ["eye_left"]=> array(2) { ["x"]=> float(48.573833) ["y"]=> float(47.064667) } ["eye_right"]=> array(2) { ["x"]=> float(54.293167) ["y"]=> float(47.141111) } ["height"]=> float(14.666667) ["mouth_left"]=> array(2) { ["x"]=> float(49.1605) ["y"]=> float(56.202889) } ["mouth_right"]=> array(2) { ["x"]=> float(53.559333) ["y"]=> float(55.942889) } ["nose"]=> array(2) { ["x"]=> float(51.5305) ["y"]=> float(51.136889) } ["width"]=> float(11) } ["tag"]=> string(0) "" } } ["img_height"]=> int(480) ["img_id"]=> string(32) "45f3b829c93c409d871d66a6a1addcad" ["img_width"]=> int(640) ["session_id"]=> string(32) "f15400382b1f49d39c2982d023310eb8" ["url"]=> NULL } Array ( [0] => Array ( [attribute] => Array ( [age] => Array ( [range] => 7 [value] => 34 ) [gender] => Array ( [confidence] => 64.1473 [value] => Male ) [glass] => Array ( [confidence] => 99.9925 [value] => None ) [pose] => Array ( [pitch_angle] => Array ( [value] => 1.7E-5 ) [roll_angle] => Array ( [value] => 0.574331 ) [yaw_angle] => Array ( [value] => 6.924223 ) ) [race] => Array ( [confidence] => 98.0999 [value] => Asian ) [smiling] => Array ( [value] => 1.20888 ) ) [face_id] => 35e53d7cde03406213c6fdbd6077fe0c [position] => Array ( [center] => Array ( [x] => 51.5 [y] => 50.444444 ) [eye_left] => Array ( [x] => 48.573833 [y] => 47.064667 ) [eye_right] => Array ( [x] => 54.293167 [y] => 47.141111 ) [height] => 14.666667 [mouth_left] => Array ( [x] => 49.1605 [y] => 56.202889 ) [mouth_right] => Array ( [x] => 53.559333 [y] => 55.942889 ) [nose] => Array ( [x] => 51.5305 [y] => 51.136889 ) [width] => 11 ) [tag] => ) )
如上,它是一个有6个元素的array结构,array里边有的东西都可以通过API查看得到,一步一步解析下去,便可以得到$face_id了,这一个是之后需要用到的。
$face = $face_body['face'];
$face_1 = $face['0'];
$face_id = $face_1['face_id'];
下面这段代码简单地模拟了一下face的结构
$face = array(array('attribute'=>array('age','gender'),'face_id'=>'abcd','position'=>array('center'),'tag'=>""));
print_r($face);
Array ( [0] => Array ( [attribute] => Array ( [0] => age [1] => gender ) [face_id] => abcd [position] => Array ( [0] => center ) [tag] => ) )
总之按照结构一层层剥开来就可以得到自己想要的东西了
Group的创建
group就是整个训练集,里边可以存很多个类别person。
API可看 group创建,
$response = $facepp->execute('/group/create', array('group_name' => 'oldpeople_qiaoxi'));
如上便创建了一个名为oldpeople_qiaoxi的group。之后便可以在这个组里边加入不同的Person了。
关于它的返回,比较常见的错误便是组名已经存在,会返回如下错误。
所以为了保证自己组的创建,需要为自己的组名创建有区分性的名字哦!
| 453 | NAME_EXIST |
另外可以这样写:
$response = $facepp->execute('/group/delete', array('group_name' => 'oldpeople_qiaoxi'));
$response = $facepp->execute('/group/create', array('group_name' => 'oldpeople_qiaoxi'));
先删除,后创建,这样一定可以创建成功啦。
Person的创建
$response = $facepp->execute('/person/create', array('person_name' => $person_name[$i],'group_name' => 'oldpeople_qiaoxi'));如上,创建Person的参数有Person的名字,以及可选的Person加入的Group的名字。
创建好之后,便是向Person里边加入人脸图片啦。
这就要用到之前的人脸检测中得到的face_id。
$response = $facepp->execute('/person/add_face', array('person_name' => $person_name[$i], 'face_id' => $face_id, 'group_name' => 'oldpeople_qiaoxi'));将属于同一人的图片都加入到同一个Person里边就好了。Detection只是检测出人脸,而人脸属于哪一类是由我们自己设定的,一般来说在各个数据库中都可以根据图片名字来得到类别,如果是自己的数据,那么对于每张图片的命名都要有规律哦。
Group的训练
把所有Person都加入到Group里边以后,就可以训练了,训练有好几种,我选择的是identify方式,也就是判断一张人脸是属于Group中哪个Person。
如果是/train/verify,则是判断一张人脸是否属于具体的一个Person类。
$response = $facepp->execute('/train/identify', array('group_name' => 'oldpeople_qiaoxi'));如果训练和测试写在一个php文件里边,很可能在测试的时候会出现错误,提示模型未训练,所以测试与训练应该分开来写。
我在另一个php文件中写的测试文件。
测试
$response = $facepp->execute('/recognition/identify', array('group_name' => 'oldpeople_qiaoxi', 'img' => $url));
$face_body = json_decode($response['body'], 1);
$face = $face_body['face'];
$face1 = $face[0];
$candidates = $face1['candidate'];
$person_identify = $candidates[0];
$identify_name = $person_identify['person_name'];
echo $identify_name."<br>";
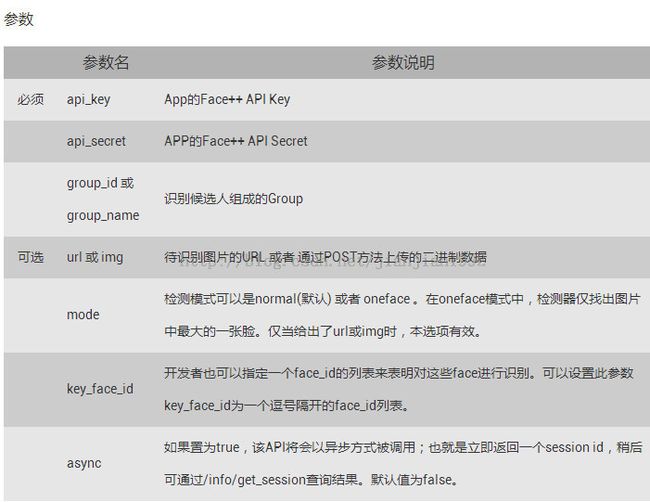
输入参数如下图,group_name要设置成刚才训练好的那个组名,可选参数里边url是网络图片(我没用过),img则是本地图片路径。

看返回值的Json示例里边的"face",给出了3个candidate,按照confidence从高往低依次排序,一般选择第一个作为结果就好了。
"face": [
    {
        "candidate": [
        {
            "confidence": 94.299985,
            "person_id": "c1e580c0665f6ed11d510fe4d194b37a",
            "person_name": "1",
            "tag": ""
        },
        {
            "confidence": 43.930084,
            "person_id": "f5898c65a44771103166c77a8ebdfa37",
            "person_name": "2",
            "tag": ""
        },
        {
            "confidence": 29.234959,
            "person_id": "30b512232c5444779ce0bf5310a44e73",
            "person_name": "3",
            "tag": ""
        }
        ]