用Myeclipse实现Flex与BlazeDS的数据交互
一.搭建环境
1.下好blazeds.war文件就够了,才4MB左右.然后用winrar解压.里面是两个文件夹META-INF与WEB-INF.
2.在Myeclipse中新建一个web项目flexdemo,然后用刚才解压的两个文件夹代替新建项目中webroot下面的两个文件夹,然后删除WEB-INF中的classes文件夹.
3.新建一个类HelloWorld.java.
代码如下:
package com.sr;
public class HelloWorld {
 public String getString(String a) {
  System.out.print("oncall!");
  return "hello !"+a;
 }
}
4.配置web-inf下的remoting-config
添加如下代码:
<destination id="helloworld">
  <properties>
   <source>com.sr.HelloWorld</source>
  </properties>
 </destination>
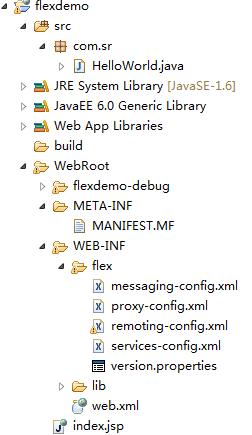
5.环境搭建完成,这是项目文件目录结构:
flexdemo-debug文件夹是后来自动生成的,后面会说.
二.打开flexbuilder新建flex项目flexdemo.代码如下:
<?xml version="1.0" encoding="utf-8"?>
<s:Application xmlns:fx="http://ns.adobe.com/mxml/2009"
      xmlns:s="library://ns.adobe.com/flex/spark"
      xmlns:mx="library://ns.adobe.com/flex/mx"
      minWidth="400" minHeight="300" backgroundColor="#EEEEEE">
 <fx:Declarations>
  <!-- 将非可视元素(例如服务、值对象)放在此处 -->
  <s:RemoteObject id="say"  destination="helloworld" />
 </fx:Declarations>
 <fx:Script>
  <![CDATA[
   protected function btn1_click(event:MouseEvent):void
   {var iname:String=tiname.text;
   say.getString(iname);}
  ]]>
 </fx:Script>
 <s:Panel x="142" y="94" width="427" height="204" title="flex与blazeDS交互">
  <s:Label x="60" y="26" text="姓名"/>
  <s:TextInput x="128" y="16" id="tiname"/>
  <s:Button x="310" y="17" label="提交" click="btn1_click(event)"/>
  <s:Label x="60" y="102" text="{say.getString.lastResult}"/>
 </s:Panel>
</s:Application>
新建项目时的flexbuilder服务器配置:
(1)服务器选blazeds
(2)根文件夹是在myeclipse中刚才新建项目flexdemo在选择的tomcat中运行时webapp中的文件夹;
3.在flexbuilder中修改输出路径
对项目右键属性,选择flex构建路径,修改输出文件夹url.如图
先运行tomcat,在运行Flexbuilder.然后会在Myeclipse的webroot文件夹下面自动生成flexdemo-debug文件夹.
最后运行成功!
这是结果图:
