TabHost的使用理解
翻译为个人理解,有异议可共同讨论;转载须注明出处
==========================================
TabHost class overview
Container for a tabbed window view. This object holds two children: a set of tab labels that the user clicks to select a specific
选项卡式窗口视图的容器。 这个对象(TabHost)拥有两个“孩子”:用户用来点击选择一个特定tab的tab标签集,
tab, and a FrameLayout object that displays the contents of that page. The individual elements are typically controlled using this
以及一个帧布局对象,用来展示那个页面的内容。
container object, rather than setting values on the child elements themselves
TabHost类中的方法
public void setup ()
This method is deprecated.
Don't call the original TabHost setup, you must instead call setup(Context, FragmentManager) orsetup(Context, FragmentManager, int).
Call setup() before adding tabs if loading TabHost using findViewById(). However: You do not need to call setup() after getTabHost() in TabActivity. Example:
mTabHost = (TabHost)findViewById(R.id.tabhost);
mTabHost.setup();
mTabHost.addTab(TAB_TAG_1, "Hello, world!", "Tab 1");
public void addTab (TabHost.TabSpec tabSpec)
Add a tab.
Parameters
| tabSpec | Specifies how to create the indicator and content.//这里说 TabSpec用来规定怎么创建indicator和content |
|---|
展示在parent's tab集合中代表着各选项页的tab标签。 tabwidget的容器对象是TabHost。
is TabHost. When the user selects a tab, this object sends a message to the parent container, TabHost, to tell it to switch the
当用户选择一个tab时,这个tab object就会发送一条消息给它的父容器TabHost,告诉它切换当前显示页面。
displayed page. You typically won't use many methods directly on this object. The container TabHost is used to add labels, add the
通常你不会直接对这个object调用太多方法。 TabHost容器用来添加标签、回调处理handler以及管理这些回调。
callback handler, and manage callbacks. You might call this object to iterate the list of tabs, or to tweak the layout of the tab
你可能调用这个object来迭代tab列表,或者调整tab列表的布局,当大多数犯法应用TabHost 对象调用。
list, but most methods should be called on the containing TabHost object.
例如:TabHost.TabSpec spec = tabs.newTabSpec("tag1");//newTabSpec用来new一个tab(包括indicator和content),同时可以指定这个tab的tag为"tag1"(个人理解为那个选项卡的标题)
spec.setContent(R.id.tab1);
spec.setIndicator("页面一");//setIndicator用来设置这个tab的文字即我说的标题,同时还可以指定图片属性如:setIndicator( "页面一",getResources().getDrawable(android.R.drawable.arrow_down_float))
tabs.addTab(spec);//将spec这个tab添加到tabhost
以下是两个例子:
例1:原文http://my.oschina.net/summerpxy/blog/174184
TabHost的基本使用,主要是layout的声明要使用特定的id号,然后activity继承TabActivity即可。
main.xml:
|
1
2
3
4
5
6
7
8
9
10
11
12
13
14
15
16
17
18
19
20
21
22
23
24
25
26
27
28
29
30
31
32
33
34
35
36
37
38
39
40
41
42
43
44
45
46
47
48
49
50
|
<
TabHost
xmlns:android
=
"http://schemas.android.com/apk/res/android"
xmlns:tools
=
"http://schemas.android.com/tools"
android:id
=
"@android:id/tabhost"
android:layout_width
=
"match_parent"
android:layout_height
=
"match_parent"
tools:context
=
".Main"
>
<
LinearLayout
android:layout_width
=
"match_parent"
android:layout_height
=
"match_parent"
android:orientation
=
"vertical"
>
<
TabWidget
android:id
=
"@android:id/tabs"
android:layout_width
=
"match_parent"
android:layout_height
=
"wrap_content"
>
</
TabWidget
>
<
FrameLayout
android:id
=
"@android:id/tabcontent"
android:layout_width
=
"match_parent"
android:layout_height
=
"wrap_content"
>
<
LinearLayout
android:id
=
"@+id/tab1"
android:layout_width
=
"match_parent"
android:layout_height
=
"wrap_content"
android:orientation
=
"vertical"
>
<
TextView
android:layout_width
=
"match_parent"
android:layout_height
=
"match_parent"
android:text
=
"aa"
/>
</
LinearLayout
>
<
LinearLayout
android:id
=
"@+id/tab2"
android:layout_width
=
"match_parent"
android:layout_height
=
"wrap_content"
android:orientation
=
"vertical"
>
<
TextView
android:layout_width
=
"match_parent"
android:layout_height
=
"match_parent"
android:text
=
"bb"
/>
</
LinearLayout
>
</
FrameLayout
>
</
LinearLayout
>
</
TabHost
>
|
Main.java:
|
1
2
3
4
5
6
7
8
9
10
11
12
13
14
15
16
17
18
19
20
21
22
23
24
25
26
27
28
29
30
31
32
33
34
|
package
com.app.main;
import
android.app.TabActivity;
import
android.os.Bundle;
import
android.view.View;
import
android.view.View.OnClickListener;
import
android.widget.TabHost;
import
android.widget.TabHost.OnTabChangeListener;
import
android.widget.TabHost.TabSpec;
import
android.widget.TabWidget;
public
class
Main
extends
TabActivity {
@Override
protected
void
onCreate(Bundle savedInstanceState) {
super
.onCreate(savedInstanceState);
setContentView(R.layout.main);
final
TabHost tabHost =
this
.getTabHost();
TabSpec tab1 = tabHost.newTabSpec(
"tab1"
).setIndicator(
"tab1"
)
.setContent(R.id.tab1);
tabHost.addTab(tab1);
TabSpec tab2 = tabHost.newTabSpec(
"tab2"
).setIndicator(
"tab2"
)
.setContent(R.id.tab2);
tabHost.addTab(tab2);
}
}
|
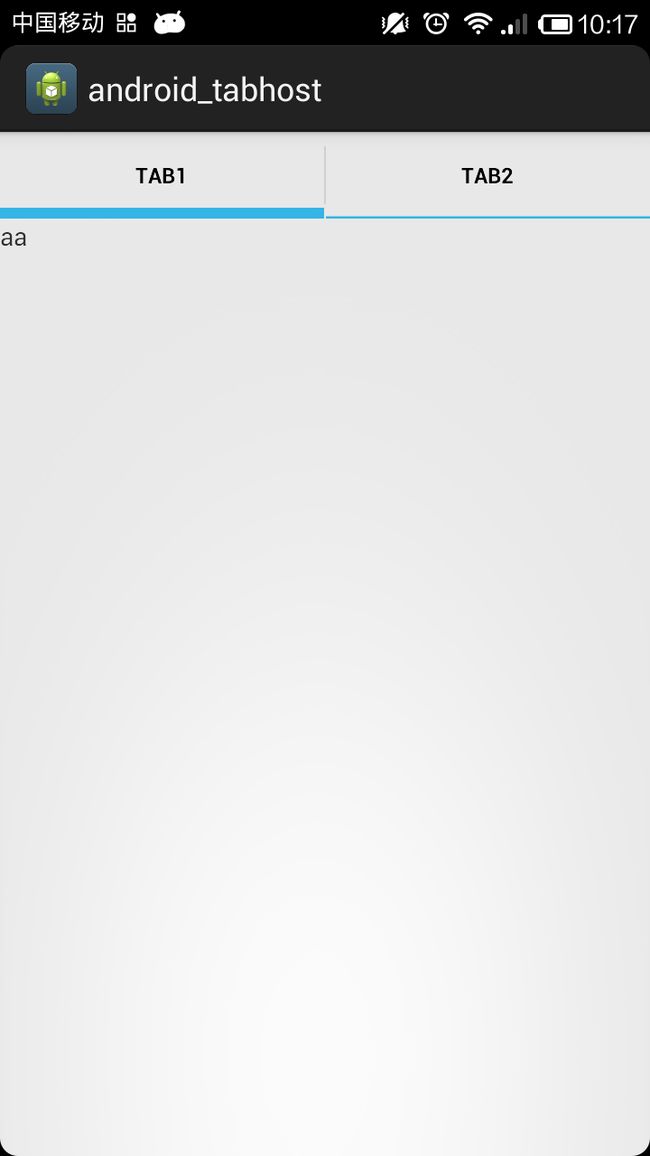
实现效果:
其他:
当点击tabwidget的时候,若想注册事件监听器,可以使用:
1.tabHost.setOnTabChangedListener(new TabChangeListener(){
public void onTabChanged(String id)
{
}
});
这个传入的id,就是tabwidget的indicator,这里是"tab1","tab2";
2.调用tabWidget.getChildAt(0).setOnClickListener(new OnClickListener(){
});
例2:原文出处http://www.tuicool.com/articles/R7Zn2qQ
一: 首先我们看看XML:
1.activity_main.xml
<?xml version="1.0" encoding="utf-8"?>
<LinearLayout xmlns:android="http://schemas.android.com/apk/res/android"
 android:layout_width="fill_parent"
 android:layout_height="fill_parent"
 android:orientation="vertical" >

  <FrameLayout   android:id="@+id/realtabcontent"
  android:layout_width="fill_parent"
  android:layout_height="0dip"
  android:layout_weight="1" />

  <android.support.v4.app.FragmentTabHost   android:id="@android:id/tabhost"
  android:layout_width="fill_parent"
  android:layout_height="wrap_content"
  android:background="@drawable/bg_tabhost_bg">

    <FrameLayout    android:id="@android:id/tabcontent"
   android:layout_width="0dp"
   android:layout_height="0dp"
   android:layout_weight="0" />
  </android.support.v4.app.FragmentTabHost>

</LinearLayout>
2.tab_item_view.xml
<?xml version="1.0" encoding="utf-8"?>
<LinearLayout xmlns:android="http://schemas.android.com/apk/res/android"
 android:layout_width="wrap_content"
 android:layout_height="wrap_content"
 android:gravity="center"
 android:orientation="vertical" >

  <ImageView   android:id="@+id/imageview"
  android:layout_width="wrap_content"
  android:layout_height="wrap_content"
  android:focusable="false"
  android:padding="3dp"
  android:src="@drawable/tab_home_btn">
  </ImageView>

  <TextView   android:id="@+id/textview"
  android:layout_width="wrap_content"
  android:layout_height="wrap_content"
  android:text=""
  android:textSize="10sp"
  android:textColor="#ffffff">
  </TextView>

</LinearLayout>
3.fragment1.xml 就贴一个Fragment XML吧!其他的几个都一样,只是颜色不一样,呵呵!
<?xml version="1.0" encoding="utf-8"?>
<LinearLayout xmlns:android="http://schemas.android.com/apk/res/android"
 android:layout_width="match_parent"
 android:layout_height="match_parent"
 android:orientation="vertical"
 android:background="#FBB55D" >


</LinearLayout>
ok,XML先写完了,那我们看看代码吧!
4. MainActivity
package com.example.fragmenttabhost;

import android.os.Bundle;
import android.support.v4.app.Fragment;
import android.support.v4.app.FragmentActivity;
import android.support.v4.app.FragmentTabHost;
import android.view.LayoutInflater;
import android.view.View;
import android.widget.ImageView;
import android.widget.TabHost.TabSpec;
import android.widget.TextView;

import com.example.fragment.Fragment1;
import com.example.fragment.Fragment2;
import com.example.fragment.Fragment3;
import com.example.fragment.Fragment4;
import com.example.fragment.Fragment5;

/**
 *
 * @author zqy
 *
 */
public class MainActivity extends FragmentActivity {
  /**
  * FragmentTabhost
  */
  private FragmentTabHost mTabHost;

  /**
  * 布局填充器
  *
  */
  private LayoutInflater mLayoutInflater;

  /**
  * Fragment数组界面
  *
  */
  private Class mFragmentArray[] = { Fragment1.class, Fragment2.class,
      Fragment3.class, Fragment4.class, Fragment5.class };
 /**
  * 存放图片数组
  *
  */
 private int mImageArray[] = { R.drawable.tab_home_btn,
      R.drawable.tab_message_btn, R.drawable.tab_selfinfo_btn,
      R.drawable.tab_square_btn, R.drawable.tab_more_btn };

  /**
  * 选修卡文字
  *
  */
  private String mTextArray[] = { "首页", "消息", "好友", "搜索", "更多" };
  /**
  *
  *
  */
  public void onCreate(Bundle savedInstanceState) {
    super.onCreate(savedInstanceState);
    setContentView(R.layout.activity_main);

    initView();
  }

  /**
  * 初始化组件
  */
  private void initView() {
    mLayoutInflater = LayoutInflater.from(this);

    // 找到TabHost
    mTabHost = (FragmentTabHost) findViewById(android.R.id.tabhost);
    mTabHost.setup(this, getSupportFragmentManager(), R.id.realtabcontent);
    // 得到fragment的个数
    int count = mFragmentArray.length;
    for (int i = 0; i < count; i++) {
      // 给每个Tab按钮设置图标、文字和内容
      TabSpec tabSpec = mTabHost.newTabSpec(mTextArray[i])
          .setIndicator(getTabItemView(i));
      // 将Tab按钮添加进Tab选项卡中
      mTabHost.addTab(tabSpec, mFragmentArray[i], null);
      // 设置Tab按钮的背景
      mTabHost.getTabWidget().getChildAt(i)
          .setBackgroundResource(R.drawable.selector_tab_background);
    }
  }

  /**
  *
  * 给每个Tab按钮设置图标和文字
  */
  private View getTabItemView(int index) {
    View view = mLayoutInflater.inflate(R.layout.tab_item_view, null);
    ImageView imageView = (ImageView) view.findViewById(R.id.imageview);
    imageView.setImageResource(mImageArray[index]);
    TextView textView = (TextView) view.findViewById(R.id.textview);
    textView.setText(mTextArray[index]);

    return view;
  }

}
5.Fragment1.java Fragment其他几个都一样,指不过XML不一样!
package com.example.fragment;

import android.os.Bundle;
import android.support.v4.app.Fragment;
import android.view.LayoutInflater;
import android.view.View;
import android.view.ViewGroup;

import com.example.fragmenttabhost.R;

public class Fragment1 extends Fragment{

  @Override
  public View onCreateView(LayoutInflater inflater, ViewGroup container,
      Bundle savedInstanceState) {

    return inflater.inflate(R.layout.fragment1, null);
  }
}
OK 基本上写完了,让我们看看效果!
哈哈,效果还算可以!好了,去吃饭了!
资源下载地址
