Android中文API —— NotificationManager
-
-
下面来谈谈notification,这个notification一般用在电话,短信,邮件,闹钟铃声,在手机的状态栏上就会出现一个小图标,提示用户处理这个快讯,这时手从上方滑动状态栏就可以展开并处理这个快讯。发现这个功能特别好用,所以我就根据我的理解来谈谈。摘自帮助文档 : notification类表示一个持久的通知,将提交给用户使用NotificationManager。已添加的Notification.Builder,使其更容易构建通知。notification是一种让你的应用程序在没有开启情况下或在后台运行警示用户。它是看不见的程序组件(Broadcast Receiver,Service和不活跃的Activity)警示用户有需要注意的事件发生的最好途径。
先来区分以下状态栏和状态条的区别:
1、状态条就是手机屏幕最上方的一个条形状的区域;
在状态条有好多信息量:比如usb连接图标,手机信号图标,电池电量图标,时间图标等等;
2、状态栏就是手从状态条滑下来的可以伸缩的view;
在状态栏中一般有两类(使用FLAG_标记):
(1)正在进行的程序;
(2)是通知事件;
大概来描述创建一个Notification传送的信息有:
1、一个状态条图标;
2、在拉伸的状态栏窗口中显示带有大标题,小标题,图标的信息,并且有处理该点击事件:比如调用该程序的入口类;
3、闪光,LED,或者震动;
快速创建一个Notification的步骤简单可以分为以下四步:
第一步:通过getSystemService()方法得到NotificationManager对象;
第二步:对Notification的一些属性进行设置比如:内容,图标,标题,相应notification的动作进行处理等等;
第三步:通过NotificationManager对象的notify()方法来执行一个notification的快讯;
第四步:通过NotificationManager对象的cancel()方法来取消一个notificatioin的快讯;
下面对Notification类中的一些常量,字段,方法简单介绍一下:
常量:
DEFAULT_ALL 使用所有默认值,比如声音,震动,闪屏等等
DEFAULT_LIGHTS 使用默认闪光提示
DEFAULT_SOUNDS 使用默认提示声音
DEFAULT_VIBRATE 使用默认手机震动
【说明】:加入手机震动,一定要在manifest.xml中加入权限:
<uses-permission android:name="android.permission.VIBRATE" />
以上的效果常量可以叠加,即通过
mNotifaction.defaults =DEFAULT_SOUND | DEFAULT_VIBRATE ;
或mNotifaction.defaults |=DEFAULT_SOUND (最好在真机上测试,震动效果模拟器上没有)
//设置flag位
FLAG_AUTO_CANCEL 该通知能被状态栏的清除按钮给清除掉
FLAG_NO_CLEAR 该通知能被状态栏的清除按钮给清除掉
FLAG_ONGOING_EVENT 通知放置在正在运行
FLAG_INSISTENT 是否一直进行,比如音乐一直播放,知道用户响应
常用字段:
contentIntent 设置PendingIntent对象,点击时发送该Intent
defaults 添加默认效果
flags 设置flag位,例如FLAG_NO_CLEAR等
icon 设置图标
sound 设置声音
tickerText 显示在状态栏中的文字
when 发送此通知的时间戳
Notification.build构造Notification方法介绍:
void setLatestEventInfo(Context context , CharSequencecontentTitle,CharSequence contentText,PendingIntent contentIntent)
功能: 显示在拉伸状态栏中的Notification属性,点击后将发送PendingIntent对象
参数: context 上下文环境
contentTitle 状态栏中的大标题
contentText 状态栏中的小标题
contentIntent 点击后将发送PendingIntent对象
说明:要是在Notification中加入图标,在状态栏和状态条中显示图标一定要用这个方法,否则报错!
最后说一下NotificationManager类的常用方法:
通过获取系统服务来获取该对象:
NotificationManager mNotificationManager = (NotificationManager)getSystemService(Context.NOTIFICATION_SERVICE) ;
NotificationManager常用方法介绍:
public void cancelAll() 移除所有通知 (只是针对当前Context下的Notification)
public void cancel(int id) 移除标记为id的通知 (只是针对当前Context下的所有Notification)
public void notify(String tag ,int id, Notification notification) 将通知加入状态栏, 标签为tag,标记为id
public void notify(int id, Notification notification) 将通知加入状态栏,,标记为id
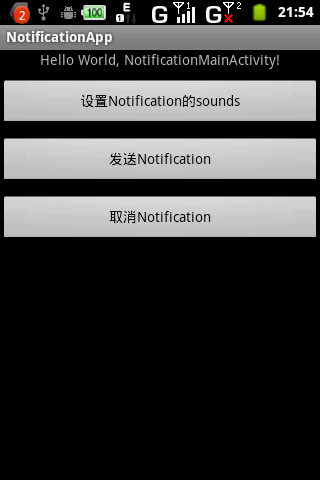
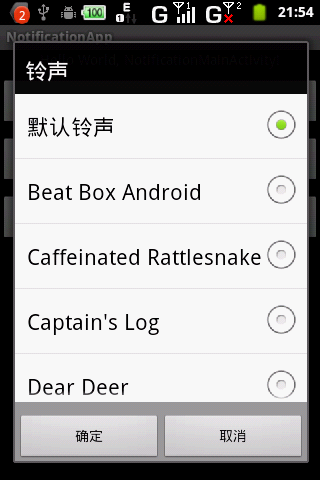
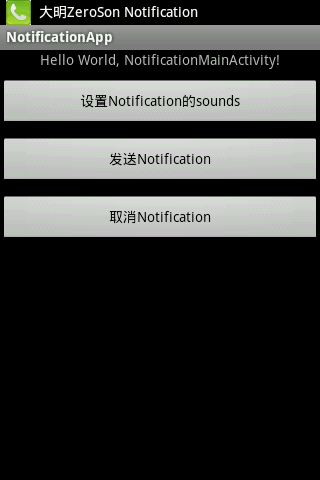
下面看一下demo的效果图:
图(1) 图(2)
图(3) 图(4)
图(5)
源码奉上:
在NotificationApp工程里面:
一、在com.cn.notification.daming包下面NotificationMainActivity.java中的代码:
- package com.cn.notification.daming;
- import android.app.Activity;
- import android.app.Notification;
- import android.app.NotificationManager;
- import android.app.PendingIntent;
- import android.content.Intent;
- import android.content.SharedPreferences;
- import android.media.RingtoneManager;
- import android.net.Uri;
- import android.os.Bundle;
- import android.preference.PreferenceManager;
- import android.view.View;
- import android.view.View.OnClickListener;
- import android.widget.Button;
- public class NotificationMainActivity extends Activity implements OnClickListener {
- private Button setNotificationSoundBtn = null;
- private Button showNotificatioBtn = null;
- private Button cancelNotificationBtn = null;
- private Intent mIntent = null;
- private PendingIntent mPendingIntent = null;
- private Notification mNotification = null;
- private NotificationManager mNotificationManager = null;
- private static final int NOTIFICATION_STATE = 1;
- private static final int RINGTONE_PICKED = 2;
- private Uri notifiSounds = null;
- @Override
- public void onCreate(Bundle savedInstanceState) {
- super.onCreate(savedInstanceState);
- setContentView(R.layout.main);
- mNotificationManager = (NotificationManager)getSystemService(NOTIFICATION_SERVICE);
- setNotificationSoundBtn = (Button)findViewById(R.id.button0);
- setNotificationSoundBtn.setOnClickListener(this);
- showNotificatioBtn = (Button)findViewById(R.id.button1);
- showNotificatioBtn.setOnClickListener(this);
- cancelNotificationBtn = (Button)findViewById(R.id.button2);
- cancelNotificationBtn.setOnClickListener(this);
- mIntent = new Intent(this, ToNotificationActivity.class);
- mPendingIntent = PendingIntent.getActivity(this, 0, mIntent, 0);
- mNotification = new Notification();
- }
- public void onClick(View v) {
- // TODO Auto-generated method stub
- switch(v.getId()){
- case R.id.button0:
- SharedPreferences sharedPreferences = PreferenceManager.getDefaultSharedPreferences(this);
- Intent intent = new Intent(RingtoneManager.ACTION_RINGTONE_PICKER);
- // Allow user to pick 'Default'
- intent.putExtra(RingtoneManager.EXTRA_RINGTONE_SHOW_DEFAULT, true);
- intent.putExtra(RingtoneManager.EXTRA_RINGTONE_DEFAULT_URI, RingtoneManager.getDefaultUri(RingtoneManager.TYPE_NOTIFICATION));
- // Show only ringtones
- intent.putExtra(RingtoneManager.EXTRA_RINGTONE_TYPE, RingtoneManager.TYPE_NOTIFICATION);
- // Don't show 'Silent'
- intent.putExtra(RingtoneManager.EXTRA_RINGTONE_SHOW_SILENT, false);
- String notifi_sound = sharedPreferences.getString("notification_sounds", null);
- if(notifi_sound != null){
- intent.putExtra(RingtoneManager.EXTRA_RINGTONE_EXISTING_URI, Uri.parse(notifi_sound));
- }
- // Launch!
- startActivityForResult(intent, RINGTONE_PICKED);
- break;
- case R.id.button1:
- mNotification.icon = R.drawable.daming;
- mNotification.tickerText = "大明ZeroSon Notification";
- mNotification.sound = notifiSounds;
- mNotification.defaults = Notification.DEFAULT_VIBRATE | Notification.DEFAULT_LIGHTS;
- mNotification.flags = Notification.FLAG_INSISTENT ;
- mNotification.setLatestEventInfo(this, "大明Notification", "This is Daming`s Notification Test!", mPendingIntent);
- mNotificationManager.notify(NOTIFICATION_STATE, mNotification);
- break;
- case R.id.button2:
- mNotificationManager.cancel(NOTIFICATION_STATE);
- break;
- default:break;
- }
- }
- @Override
- protected void onResume() {
- super.onResume();
- }
- @Override
- protected void onActivityResult(int requestCode, int resultCode, Intent data) {
- SharedPreferences sharedPreferences = PreferenceManager.getDefaultSharedPreferences(this);
- SharedPreferences.Editor editor = sharedPreferences.edit();
- if (resultCode != RESULT_OK) {
- return;
- }
- switch (requestCode) {
- case RINGTONE_PICKED: {
- notifiSounds = data.getParcelableExtra(RingtoneManager.EXTRA_RINGTONE_PICKED_URI);
- editor.putString("notification_sounds", notifiSounds.toString());
- editor.commit();
- break;
- }
- default: break;
- }
- }
- }
二、在com.cn.notification.daming包下面ToNotificationActivity.java中的代码:
- package com.cn.notification.daming;
- import android.app.Activity;
- import android.content.SharedPreferences;
- import android.media.Ringtone;
- import android.media.RingtoneManager;
- import android.net.Uri;
- import android.os.Bundle;
- import android.preference.PreferenceManager;
- import android.widget.TextView;
- public class ToNotificationActivity extends Activity{
- private TextView textview = null;
- @Override
- protected void onCreate(Bundle savedInstanceState) {
- super.onCreate(savedInstanceState);
- setContentView(R.layout.main1);
- SharedPreferences sharedPreferences = PreferenceManager.getDefaultSharedPreferences(this);
- textview = (TextView)findViewById(R.id.textview);
- String notificationsound = sharedPreferences.getString("notification_sounds", null);
- if(notificationsound == null){
- textview.setText("默认Notification声音");
- } else{
- Ringtone ringtone = RingtoneManager.getRingtone(ToNotificationActivity.this, Uri.parse(notificationsound));
- String title = ringtone.getTitle(ToNotificationActivity.this);
- textview.setText(title);
- }
- }
- }
三、在layout下main.xml布局文件的代码
- <?xml version="1.0" encoding="utf-8"?>
- <LinearLayout xmlns:android="http://schemas.android.com/apk/res/android"
- android:orientation="vertical"
- android:layout_width="fill_parent"
- android:layout_height="fill_parent"
- >
- <TextView
- android:layout_width="fill_parent"
- android:layout_height="wrap_content"
- android:text="@string/hello"
- android:gravity="center"
- android:layout_marginBottom="10dip"
- />
- <Button
- android:id="@+id/button0"
- android:layout_width="fill_parent"
- android:layout_height="wrap_content"
- android:text="设置Notification的sounds"
- android:layout_marginBottom="10dip"
- />
- <Button
- android:id="@+id/button1"
- android:layout_width="fill_parent"
- android:layout_height="wrap_content"
- android:text="发送Notification"
- android:layout_marginBottom="10dip"
- />
- <Button
- android:id="@+id/button2"
- android:layout_width="fill_parent"
- android:layout_height="wrap_content"
- android:text="取消Notification"
- android:layout_marginBottom="10dip"
- />
- </LinearLayout>
四、在layout下main1.xml布局文件的代码
- <?xml version="1.0" encoding="utf-8"?>
- <LinearLayout xmlns:android="http://schemas.android.com/apk/res/android"
- android:orientation="vertical"
- android:layout_width="fill_parent"
- android:layout_height="fill_parent"
- >
- <TextView
- android:layout_width="fill_parent"
- android:layout_height="wrap_content"
- android:gravity="center"
- android:textSize="10pt"
- android:text="大明原创"
- android:layout_marginTop="10dip"
- android:layout_marginBottom="10dip"
- />
- <TextView
- android:id="@+id/textview"
- android:layout_width="fill_parent"
- android:layout_height="wrap_content"
- android:gravity="center"
- android:textSize="10pt"
- android:layout_marginTop="10dip"
- android:layout_marginBottom="10dip"
- />
- </LinearLayout>
五、manifest.xml中的代码:
- <?xml version="1.0" encoding="utf-8"?>
- <manifest xmlns:android="http://schemas.android.com/apk/res/android"
- package="com.cn.notification.daming"
- android:versionCode="1"
- android:versionName="1.0">
- <uses-sdk android:minSdkVersion="8" />
- <uses-permission android:name="android.permission.VIBRATE" />
- <application android:icon="@drawable/icon" android:label="@string/app_name">
- <activity android:name=".NotificationMainActivity"
- android:label="@string/app_name">
- <intent-filter>
- <action android:name="android.intent.action.MAIN" />
- <category android:name="android.intent.category.LAUNCHER" />
- </intent-filter>
- </activity>
- <activity android:name=".ToNotificationActivity"></activity>
- </application>
- </manifest>
-


