iOS开发-------UIAlertController(弹出视图控制器)
今天在偶尔使用UIAlertView的时候,发现这个组件已经不被推荐使用了,虽然还是可以用的,但是在iOS9出了的情况下,使用前景不容乐观,所以今天就抽时间研究了下,苹果推荐的组件 UIAlertController (弹出视图控制器)。
优先说明一下IOS_8_0之前的两个组件 UIAlertView 和 UIActionSheet ,在IOS_8_0之后,苹果统一用UIAlertController来替代
为了方便验证,用storyboard在主视图控制器中拖入一个button,只为测试,在点击按钮的时候弹出警告视图。
将button拖入viewController.m,并注册一个点击方法,为了好掩饰,一切代码写在button点击事件中
UIAlertView(IOS_8_0之前)
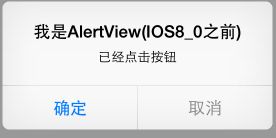
什么叫做UIAlertView,翻译过来就是警告视图,样子如图
当点击按钮的时候,需要弹出这个AlertView,按钮的点击事件如下
/**
 *  button的点击回调方法
 */
- (IBAction)buttonPressed:(id)sender
{
    NSLog(@"按钮被点击!");

    /**
     * 创建一个UIAlertView 对象
     * 设置title(表头)为@“我是AlertView(IOS8_0之前)”
     * 设置message(携带信息) 为@“已经点击按钮”
     * 设置代理为 自身 self
     * 加重字体的button的按钮(默认是第一个的按钮)的文字是 @“确定”
     * 其他的按钮以此是@"取消"
     */
    UIAlertView * alertView = [[UIAlertView alloc]initWithTitle:@"我是AlertView(IOS8_0之前)" message:@"已经点击按钮" delegate:self cancelButtonTitle:@"确定" otherButtonTitles:@"取消",nil];//IOS8_0 之前

    //显示 alertView
    [alertView show];

}
这是当点击按钮的时候,需要回调方法,在初始化的时候已经设置了delegate,所以在延展或头文件中实现?<UIAlertViewDelegate>协议即可,
协议的方法如下,是@option的
#pragma mark -UIAlertViewDelegate 方法
/**
 *  根据button的下标数字 确认是哪一个按钮被点击
 *
 *  @param alertView   调用方法的alertView
 *  @param buttonIndex button的下标数字
 */
- (void)alertView:(UIAlertView *)alertView clickedButtonAtIndex:(NSInteger)buttonIndex
{
    //下标的数字式按照alertView自左往右的顺序
    switch (buttonIndex) {
        case 0:
            NSLog(@"点击了确定按钮!");
            break;
        case 1:
            NSLog(@"点击了取消按钮!");
            break;
        default:
            break;
    }
}

/**
 *  将要出现alert时候进行的回调,也就是在动画执行之前
 *
 *  @param alertView 调用方法的alertView
 */
- (void)willPresentAlertView:(UIAlertView *)alertView
{
    NSLog(@"将要出现AlertView");
}

/**
 *  已经出现alert时候进行的回调,也就是在动画执行之后
 *
 *  @param alertView 调用方法的alertView
 */
- (void)didPresentAlertView:(UIAlertView *)alertView
{
    NSLog(@"已经显示了AlertView");
}

/**
 *  点击按钮,alertView将要消失的时候回调,即消失动画之前
 *
 *  @param alertView   调用方法的alertView
 *  @param buttonIndex 点击按钮的下标
 */
- (void)alertView:(UIAlertView *)alertView willDismissWithButtonIndex:(NSInteger)buttonIndex
{
    NSLog(@"%@按钮被点击,alertView将要消失",(buttonIndex == 0 ? @"确定":@"取消"));
}

/**
 *  点击按钮,alertView已经消失的时候回调,即消失动画之后
 *
 *  @param alertView   调用方法的alertView
 *  @param buttonIndex 点击按钮的下标
 */
- (void)alertView:(UIAlertView *)alertView didDismissWithButtonIndex:(NSInteger)buttonIndex  // after animation
{
     NSLog(@"%@按钮被点击,alertView已经消失",(buttonIndex == 0 ? @"确定":@"取消"));
}
点击view的按钮,弹出的警示框点确定,运行结果如下
此外还有一个方法,是设置除了第一个按钮,其他的按钮不能点击的协议方法,设置为NO时,就如上图,取消按钮是灰色的,不写默认是yes
//除了第一个按钮,其他的按钮能不能被点
- (BOOL)alertViewShouldEnableFirstOtherButton:(UIAlertView *)alertView
{
    return NO;
}
UIActionSheet (IOS_8_0之前)
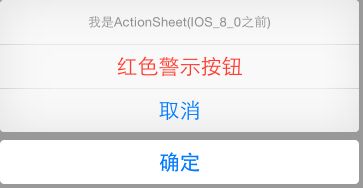
什么叫做actionSheet,翻译过来就是上拉菜单,样子如图
那么点击按钮的时候弹出这个视图,代码如下
/**
 *  button的点击回调方法
 */
- (IBAction)buttonPressed:(id)sender
{
    NSLog(@"按钮被点击!");

    /**
     * 创建一个UIActionSheet 对象
     * 设置title(表头)为@“我是ActionSheet(IOS_8_0之前)”
     * 设置代理为 自身 self
     * 设置最下方的按钮为@“确定”
     * 警示按钮title为@“红色警示按钮”
     * 其他的按钮以此是@"取消"
     */
    UIActionSheet * actionSheet = [[UIActionSheet alloc]initWithTitle:@"我是ActionSheet(IOS_8_0之前)" delegate:self cancelButtonTitle:@"确定" destructiveButtonTitle:@"红色警示按钮" otherButtonTitles:@"取消", nil];

    //在当前视图上显示上拉视图
    [actionSheet showInView:self.view];
}
这是当点击按钮的时候,需要回调方法,在初始化的时候已经设置了delegate,所以在延展或头文件中实现<UIActionSheetDelegate>协议即可,
协议的方法如下,也是@option的
#pragma mark - UIActionSheetDelegate 协议方法

/**
 *  根据所按的按钮进行相应的操作
 *
 *  @param actionSheet 调用该方法的actionSheet
 *  @param buttonIndex 点击按钮的下标
 */
- (void)actionSheet:(UIActionSheet *)actionSheet clickedButtonAtIndex:(NSInteger)buttonIndex
{
    //默认下标为0的是警示按钮
    switch (buttonIndex) {
        case 0:
            NSLog(@"点击了红色警示按钮");
            break;
        case 1:
            NSLog(@"点击了取消按钮");
            break;
        case 2:
            NSLog(@"点击了确定按钮");
            break;
        default:
            break;
    }
}


/**
 *  actionSheet 将要展示视图之前,即出现动画执行之前
 *
 *  @param actionSheet 执行该方法的actionSheet
 */
- (void)willPresentActionSheet:(UIActionSheet *)actionSheet
{
    NSLog(@"将要弹出ActionSheet视图了");
}

/**
 *  actionSheet 将要展示视图之后,即出现动画执行之后
 *
 *  @param actionSheet 执行该方法的actionSheet
 */
- (void)didPresentActionSheet:(UIActionSheet *)actionSheet  // after animation
{
    NSLog(@"已经弹出ActionSheet视图了");
}

/**
 *  点击按钮后,将要消失之前执行的方法
 *
 *  @param actionSheet 执行该方法的actionSheet
 *  @param buttonIndex 点击按钮的下标
 */
- (void)actionSheet:(UIActionSheet *)actionSheet willDismissWithButtonIndex:(NSInteger)buttonIndex
{
    NSLog(@"按钮被点击,ActionSheet视图将要消失");
}

/**
 *  点击按钮后,将要消失之后执行的方法
 *
 *  @param actionSheet 执行该方法的actionSheet
 *  @param buttonIndex 点击按钮的下标
 */
- (void)actionSheet:(UIActionSheet *)actionSheet didDismissWithButtonIndex:(NSInteger)buttonIndex
{
    NSLog(@"按钮已被点击,ActionSheet视图已经消失");
}
写好这些协议方法之后,运行一下,点击红色警示按钮,结果如下
UIAlertController(IOS_8_0之后推荐用的)
iOS8之后将上面的两种组件组合成一件,即现在的UIAlertController,并且省略了繁琐的代理方法,而是用了直接了当的Block代码块回调,看起来更加的清晰
首先用UIAlertController来实现第一种的UIAlertView的效果
/**
 *  button的点击回调方法
 */
- (IBAction)buttonPressed:(id)sender
{
    NSLog(@"按钮被点击!");

    /**
     *  初始化UIAlertController
     *
     *  @param IOS8_0之后 设置标题为@“我是AlertController(IOS8_0之后)”
     *
     *  @param preferredStyle 就是判断是什么风格的,是个枚举,这里先做AlertView风格的
     *  UIAlertControllerStyleActionSheet 是之前actionSheet风格的
     *  UIAlertControllerStyleAlert 是之前的alertView风格的
     */
    UIAlertController * alertController = [UIAlertController alertControllerWithTitle:@"我是AlertController(IOS8_0之后)" message:@"已经点击了按钮" preferredStyle:UIAlertControllerStyleAlert];

    /**
     *  添加第一个动作按钮
     *
     *  @param action 封装后的一个动作类,类似之前的button
     *  title就是之前button的title
     *  style 是一个枚举
     *  UIAlertActionStyleDefault 默认的,也就是一般的
     *  UIAlertActionStyleCancel 这个和以前alert是一样的,就是颜色稍微家加重一点
     *  UIAlertActionStyleDestructive 这个就是红色的警示按钮,在新的语法中,alert中也可以用红色进警示饿了
     *
     *  后面的代码块就是点击按钮之后执行的操作,不用实现代理方法,也不需要区别按钮的下标了,更加简单明了
     */
    [alertController addAction:[UIAlertAction actionWithTitle:@"确定" style:UIAlertActionStyleCancel handler:^(UIAlertAction *action) {

        NSLog(@"点击了确定按钮");
    }]];

    [alertController addAction:[UIAlertAction actionWithTitle:@"取消" style:UIAlertActionStyleDefault handler:^(UIAlertAction *action) {
        NSLog(@"点击了取消按钮");
    }]];

    //弹出alert
    [self presentViewController:alertController animated:YES completion:nil];

}
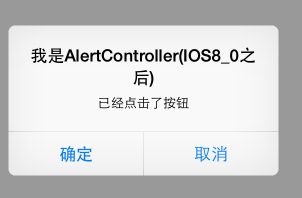
运行效果:
点击确定后,结果,省略了运行前运行后的判断,更加实用
接下来实现UIActionSheet的效果,只需要改变一点点的地方即可
/**
 *  button的点击回调方法
 */
- (IBAction)buttonPressed:(id)sender
{
    NSLog(@"按钮被点击!");

        /**
         *  初始化UIAlertController
         *
         *  @param IOS8_0之后 设置标题为@“我是AlertController(IOS8_0之后)”
         *
         *  @param preferredStyle 就是判断是什么风格的,是个枚举,这里是actionSheet风格的
         *  UIAlertControllerStyleActionSheet 是之前actionSheet风格的
         *  UIAlertControllerStyleAlert 是之前的actionSheet风格的
         */
        UIAlertController * alertController = [UIAlertController alertControllerWithTitle:@"我是AlertController(IOS8_0之后)" message:@"已经点击了按钮" preferredStyle:UIAlertControllerStyleActionSheet];

        /**
         *  添加第一个动作按钮
         *
         *  @param action 封装后的一个动作类,类似之前的button
         *  title就是之前button的title
         *  style 是一个枚举
         *  枚举不再进行重复
         *  后面的代码块就是点击按钮之后执行的操作,不用实现代理方法,也不需要区别按钮的下标了,更加简单明了
         */
        [alertController addAction:[UIAlertAction actionWithTitle:@"确定" style:  UIAlertActionStyleDestructive handler:^(UIAlertAction *action) {

            NSLog(@"点击了确定按钮");
        }]];

        [alertController addAction:[UIAlertAction actionWithTitle:@"取消" style:UIAlertActionStyleDefault handler:^(UIAlertAction *action) {
            NSLog(@"点击了取消按钮");
        }]];

        //弹出alert
        [self presentViewController:alertController animated:YES completion:nil];


}
运行效果如下
点击确定之后,结果
如果加文本呢,如何来做呢,更新之后的UIAlertController带给开发者更简单的方法,与上面添加动作按钮是一样的是一样的,如下
-(void)searchButtonClick
{
    //跳出选择框
    UIAlertController * alertController = [UIAlertController alertControllerWithTitle:@"搜索框" message:@"只支持单一查询" preferredStyle:UIAlertControllerStyleAlert];

    //添加文本框
    [alertController addTextFieldWithConfigurationHandler:^(UITextField * _Nonnull textField) {

          textField.placeholder = @"请输入查询的姓名";
    }];

    //添加文本框
    [alertController addTextFieldWithConfigurationHandler:^(UITextField * _Nonnull textField) {

        textField.placeholder = @"请输入查询的电话";
    }];

    //添加确定按钮
    [alertController addAction:[UIAlertAction actionWithTitle:@"确定" style:UIAlertActionStyleDefault handler:^(UIAlertAction * _Nonnull action) {

        NSLog(@"姓名是%@,电话是%@",alertController.textFields[0].text,alertController.textFields[1].text);//通过文本数组中的下标来获取文本框,顺序于添加顺序一致

    }]];

    //跳出
    [self presentViewController:alertController animated:YES completion:nil];
}
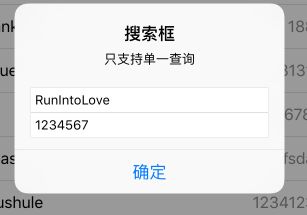
运行一下结果:
点击确定之后的结果是:


