RPL UDP simulated by Cooja
RPL UDP
Introduction
RPL is the IPv6 Routing Protocol for Low-power and Lossy Networks (LLNs). LLNs are a class of network in which both the routers and their interconnect are constrained. LLN routers typically operate with constraints on processing power, memory, and energy. RPL provides a mechanism whereby multipoint-to-point traffic from devices inside the LLN towards a central control point as well as point-to-multipoint traffic from the central control point to the devices inside the LLN are supported. Support for point-to-point traffic is also available.
In this example, UDP is implemented on top of RPL. A LLN is comprised of a UDP server, which accepts available packets, and several UDP clients, which send packets periodically to server through single-hop or multi-hops.
You Will Learn
Through this tutorial, you will learn the basic idea of RPL and operate UDP communications with ease without manipulating lower layer functions.
Source Code
~/contiki-2.7/examples/ipv6/rpl-udp/udp-server.c
~/contiki-2.7/examples/ipv6/rpl-udp/udp-client.c
~/contiki-2.7/core/net/tcpip.c
~/contiki-2.7/core/net/tcpip.h
RPL Basics
RPL was designed with the objective to meet the requirements spelled out in RFC5867,RFC5826, RFC5673, and RFC5548.
In order to be useful in a wide range of LLN application domains, RPL separates packet processing and forwarding from the routing optimization objective. Examples of such objectives includes minimizing energy, minimizing latency, or satisfying constraints. A RPL implementation, in support of a particular LLN application, will include the necessary Objective Function(s) as required by the application.
RPL operations require bidirectional links. In some LLN scenarios, those links may exhibit asymmetric properties. It is required that the reachability of a router be verified before the router can be used as a parent. RPL expects an external mechanism to be triggered during the parent selection phase in order to verify link properties and neighbor reachability.
RPL also expects an external mechanism to access and transport some control information, referred to as the "RPL Packet Information", in data packets. RPL provides a mechanism to disseminate information over the dynamically formed network topology. This dissemination enables minimal configuration in the nodes, allowing nodes to operate mostly autonomously.
In particular, RPL may disseminate IPv6 Neighbor Discovery (ND) information such as the RFC4861 Prefix Information Option (PIO) and the RFC4191 Route Information Option (RIO). ND information that is disseminated by RPL conserves all its original semantics for router to host, with limited extensions for router to router, though it is not to be confused with routing advertisements and it is never to be directly redistributed in another routing protocol. A RPL node often combines host and router behaviors. As a host, it will process the options as specified in RFC4191, RFC4861, RFC4862, and RFC6275. As a router, the RPL node may advertise the information from the options as required for the specific link.
For further information, please refer to RFC 6550, "RPL: IPv6 Routing Protocol for Low-Power and Lossy Networks".
UDP Server
In the example, UDP server does three tasks primarily.
1. Initializes RPL DAG;
2. Sets up UPD connection;
3. Waits for packets from client, receives and print them on stdout.
Initialize RPL DAG
// check whether the ADDR_MANUAL was set succefuly or not
uip_ds6_addr_add(&ipaddr, 0, ADDR_MANUAL);
root_if = uip_ds6_addr_lookup(&ipaddr);
if(root_if != NULL) {
  rpl_dag_t *dag;
  //set the ip adress of server as the root of initial DAG
  dag = rpl_set_root(RPL_DEFAULT_INSTANCE,(uip_ip6addr_t *)&ipaddr);
  uip_ip6addr(&ipaddr, 0xaaaa, 0, 0, 0, 0, 0, 0, 0);
  rpl_set_prefix(dag, &ipaddr, 64);
  PRINTF("created a new RPL dag\n");
} else {
  PRINTF("failed to create a new RPL DAG\n");
}
create UDP connection
//create new UDP connection to client's port
server_conn = udp_new(NULL, UIP_HTONS(UDP_CLIENT_PORT), NULL);
if(server_conn == NULL) {
  PRINTF("No UDP connection available, exiting the process!\n");
  PROCESS_EXIT();
}
//bing the connection to server's local port
udp_bind(server_conn, UIP_HTONS(UDP_SERVER_PORT));

PRINTF("Created a server connection with remote address ");
PRINT6ADDR(&server_conn->ripaddr);
PRINTF(" local/remote port %u/%u\n", UIP_HTONS(server_conn->lport),
       UIP_HTONS(server_conn->rport));
receives and processes incoming packet
while(1) {
  PROCESS_YIELD();
  //if there is packet available
  if(ev == tcpip_event) {//当接收到数据包后,tcpip会设置tcpip_event事件
    tcpip_handler();
  } else if (ev == sensors_event && data == &button_sensor) {
    PRINTF("Initiaing global repair\n");
    rpl_repair_root(RPL_DEFAULT_INSTANCE);
  }
}
//call this function if packet available
static void
tcpip_handler(void)
{
  char *appdata;

  if(uip_newdata()) {
    appdata = (char *)uip_appdata;
    appdata[uip_datalen()] = 0;
    //print the data of packet
    PRINTF("DATA recv '%s' from ", appdata);
    PRINTF("%d",
           UIP_IP_BUF->srcipaddr.u8[sizeof(UIP_IP_BUF->srcipaddr.u8) - 1]);
    PRINTF("\n");
}
UDP Client
In the example, UDP server does two tasks primarily.
1. Sets up UPD connection;
2. Sends packet to UDP server periodically.
Sets up UPD connection
/* new connection with remote host */
client_conn = udp_new(NULL, UIP_HTONS(UDP_SERVER_PORT), NULL);
if(client_conn == NULL) {
  PRINTF("No UDP connection available, exiting the process!\n");
  PROCESS_EXIT();
}
udp_bind(client_conn, UIP_HTONS(UDP_CLIENT_PORT));

PRINTF("Created a connection with the server ");
PRINT6ADDR(&client_conn->ripaddr);
PRINTF(" local/remote port %u/%u\n",
UIP_HTONS(client_conn->lport), UIP_HTONS(client_conn->rport));
Sends packet
//set time interval by SEND_INTERVAL
etimer_set(&periodic, SEND_INTERVAL);
while(1) {
  PROCESS_YIELD();
  if(ev == tcpip_event) {
    tcpip_handler();
  }
  //send packet every SEND_INTERVAL
  if(etimer_expired(&periodic)) {
    etimer_reset(&periodic);
    ctimer_set(&backoff_timer, SEND_TIME, send_packet, NULL);//回调定时器,回调函数send_packet,发送数据包
static void
send_packet(void *ptr)
{
  static int seq_id;
  char buf[MAX_PAYLOAD_LEN];

  seq_id++;
  PRINTF("DATA send to %d 'Hello %d'\n",
         server_ipaddr.u8[sizeof(server_ipaddr.u8) - 1], seq_id);
  sprintf(buf, "Hello %d from the client", seq_id);
  //send packet through client_conn to UDP server
  uip_udp_packet_sendto(client_conn, buf, strlen(buf),
                        &server_ipaddr, UIP_HTONS(UDP_SERVER_PORT));
}
Cooja Simulation
The DGRM model is used. The following are the steps to form a new simulation:
Note: You can refer to Cooja Simulator for an introduction to Cooja.
不明白为什么这里仍然要用DGRM,其实在该例程中已有的仿真文件是采用UDGM的
- Run Cooja
Go to your Contiki folder(contiki-2.7) and then go to /tools/cooja directory
Run the command sudo ant run to open up a cooja GUI.
$ cd contiki-2.7/tools/cooja
$ sudo ant run
- Open an existing simulation file
In the GUI, select File->Open simulation->Browse..
After the dialogue shows up, Open home/contiki-2.7/examples/ipv6/rpl-udp/rpl-udp.csc
Note: If compile error shows up, please run
$ cd contiki-2.7/examples/ipv6/rpl-udp
$ make

You are suppose to see the simulation showing up like this.
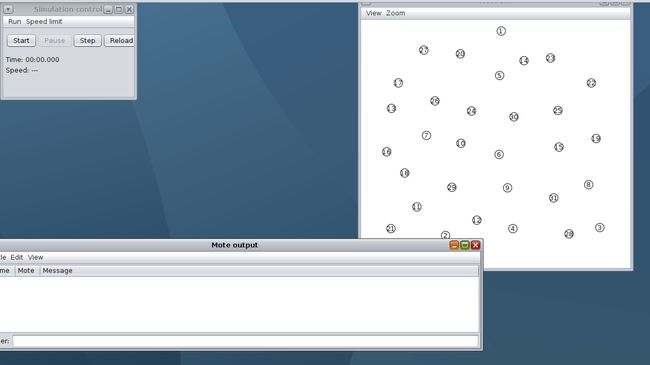
- Run Simulation
Run the simulation by using the Start option in the Simulation Control window. This will initiate the motes and allocate all with a new Rime address and other initialization processes.
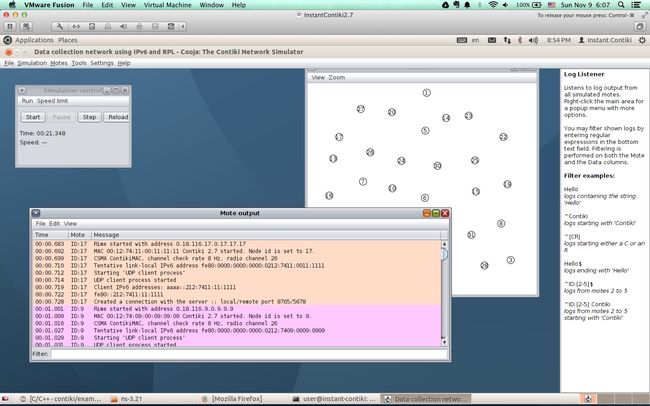
- Watch Output
The motes output and debug messages can be seen in the Motes Output window. You can filter the output based on the node ID:node_id to watch a particular node. You can also watch particular debug messages by filtering them. The other useful functions of the Motes Output are File, Edit and View. The File option helps in saving the output to a file. The Edit has the option of copying the output - either full or a particular selected messages. You can also clear the messages using the Clear all messages option.
You can use these messages saved in file to make observations and plot graphs according to the objective of your experiment.
Further Reading
- RFC 6550, "RPL: IPv6 Routing Protocol for Low-Power and Lossy Networks".