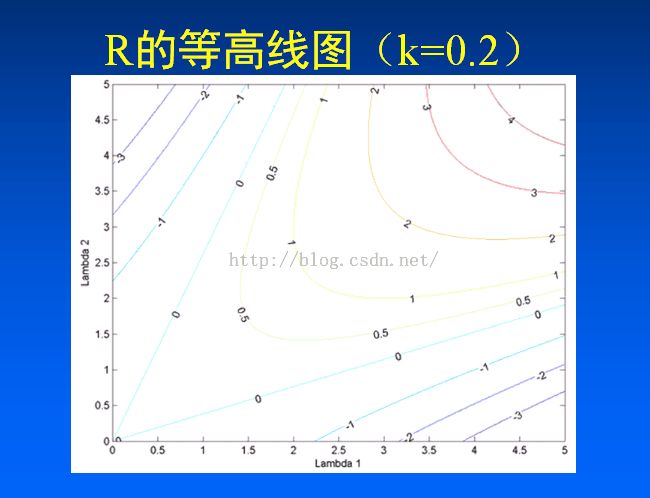
8.2检测图像中的角点
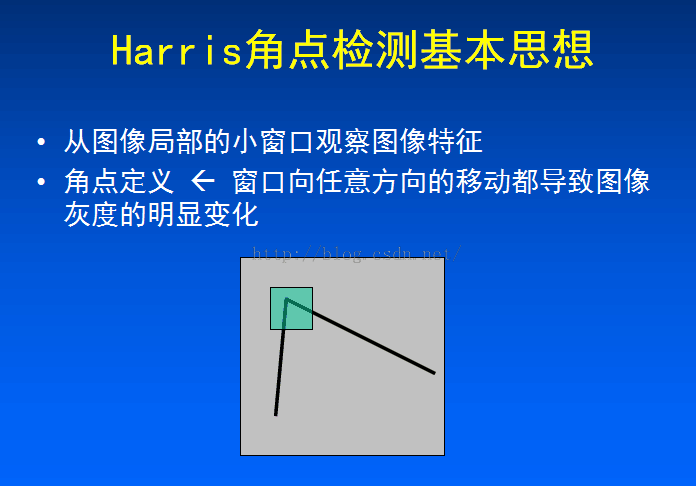
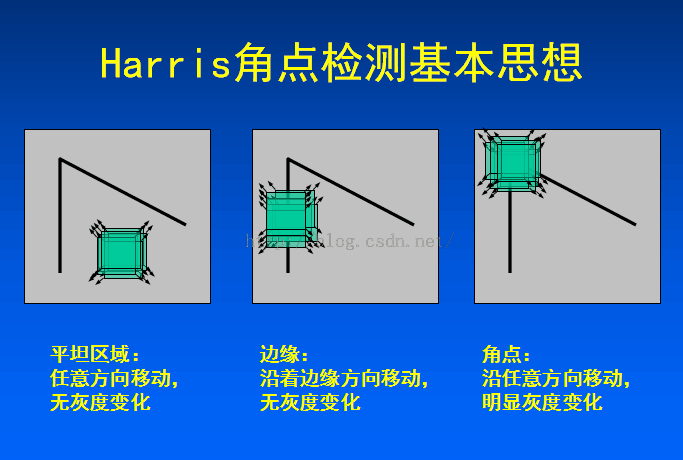
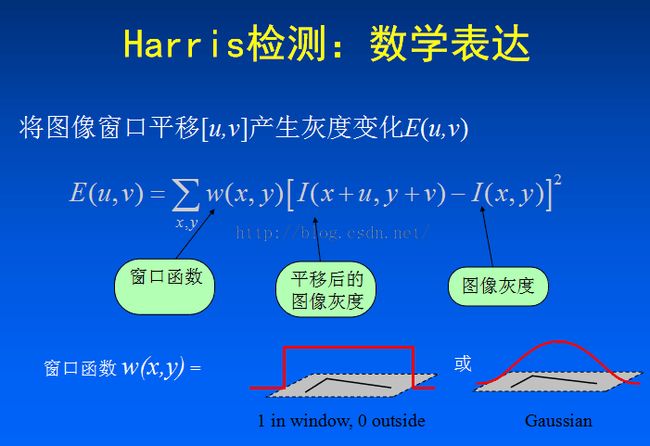
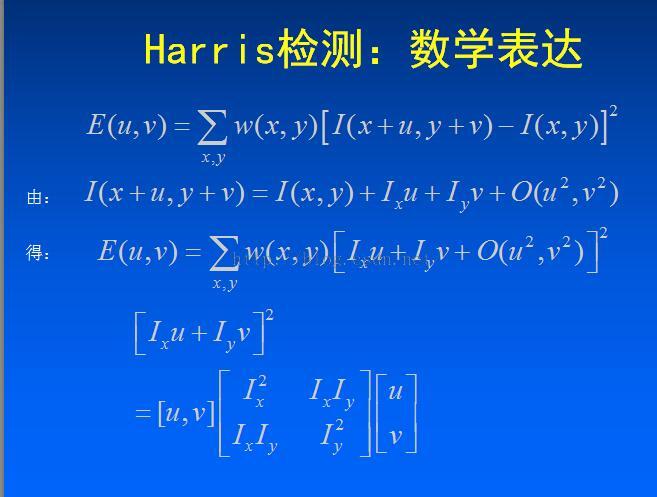
这个ppt讲解的不错,待会看看怎么传上来,链接(http://download.csdn.net/detail/yang332233/9491163)下面是代码:
//"Harris.h"
#ifndef HARRIS_H
#define HARRIS_H
#include "opencv2/opencv.hpp"

class harris
{
private:
	cv::Mat  cornerStrength;  //opencv harris函数检测结果,也就是每个像素的角点响应函数值
	cv::Mat cornerTh; //cornerStrength阈值化的结果
	cv::Mat localMax; //局部最大值结果
	int neighbourhood; //邻域窗口大小
	int aperture;//sobel边缘检测窗口大小(sobel获取各像素点x,y方向的灰度导数)
	double k;
	double maxStrength;//角点响应函数最大值
	double threshold;//阈值除去响应小的值
	int nonMaxSize;//这里采用默认的3,就是最大值抑制的邻域窗口大小
	cv::Mat kernel;//最大值抑制的核,这里也就是膨胀用到的核
public:
	harris():neighbourhood(3),aperture(3),k(0.01),maxStrength(0.0),threshold(0.01),nonMaxSize(3)
	{

	};

	void setLocalMaxWindowsize(int nonMaxSize){
		this->nonMaxSize = nonMaxSize;
	};

	//计算角点响应函数以及非最大值抑制
	void detect(const cv::Mat &image)
	{
		//opencv自带的角点响应函数计算函数
		cv::cornerHarris (image,cornerStrength,neighbourhood,aperture,k);
		double minStrength;
		//计算最大最小响应值
		cv::minMaxLoc (cornerStrength,&minStrength,&maxStrength);

		cv::Mat dilated;
		//默认3*3核膨胀,膨胀之后,除了局部最大值点和原来相同,其它非局部最大值点被
		//3*3邻域内的最大值点取代
		cv::dilate (cornerStrength,dilated,cv::Mat());
		//与原图相比,只剩下和原图值相同的点,这些点都是局部最大值点,保存到localMax
		cv::compare(cornerStrength,dilated,localMax,cv::CMP_EQ);
	}

	//获取角点图
	cv::Mat getCornerMap(double qualityLevel)
	{
		cv::Mat cornerMap;
		// 根据角点响应最大值计算阈值
		threshold= qualityLevel*maxStrength;
		cv::threshold(cornerStrength,cornerTh,
			threshold,255,cv::THRESH_BINARY);
		// 转为8-bit图
		cornerTh.convertTo(cornerMap,CV_8U);
		// 和局部最大值图与,剩下角点局部最大值图,即:完成非最大值抑制
		cv::bitwise_and(cornerMap,localMax,cornerMap);
		return cornerMap;
	}

	void getCorners(std::vector<cv::Point> &points,  double qualityLevel)
	{
			//获取角点图
			cv::Mat cornerMap= getCornerMap(qualityLevel);
			// 获取角点
			getCorners(points, cornerMap);
	}

	// 遍历全图,获得角点
	void getCorners(std::vector<cv::Point> &points,  const cv::Mat& cornerMap)
	{

			for( int y = 0; y < cornerMap.rows; y++ )
			{
				const uchar* rowPtr = cornerMap.ptr<uchar>(y);
				for( int x = 0; x < cornerMap.cols; x++ )
				{
					// 非零点就是角点
					if (rowPtr[x])
					{
						points.push_back(cv::Point(x,y));
					}
				}
			}
	}

	//用圈圈标记角点
	void drawOnImage(cv::Mat &image,const std::vector<cv::Point> &points, cv::Scalar color= cv::Scalar(255,255,255),
		int radius=3, int thickness=2)
	{
			std::vector<cv::Point>::const_iterator it=points.begin();
			while (it!=points.end())
			{
				// 角点处画圈
				cv::circle(image,*it,radius,color,thickness);
				++it;
			}
	}

};

#endif // HARRIS_H
#include"opencv2/imgproc/imgproc.hpp"
#include "Harris.h"
int  main()
{
	cv::Mat  image, image1 = cv::imread ("C:\\Users\\Administrator\\Desktop\\工作\\testp\\church01.jpg");
	//灰度变换
	cv::cvtColor (image1,image,CV_BGR2GRAY);

	// 经典的harris角点方法
	harris Harris;
	// 计算角点
	Harris.detect(image);
	//获得角点
	std::vector<cv::Point> pts;
	Harris.getCorners(pts,0.01);
	// 标记角点
	Harris.drawOnImage(image,pts);

	cv::namedWindow ("harris");
	cv::imshow ("harris",image);
	cv::waitKey (0);
	return 0;

}
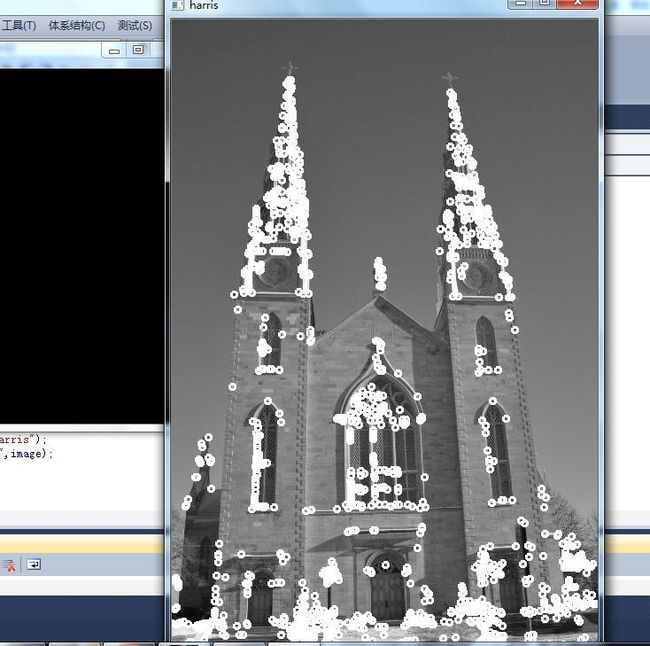
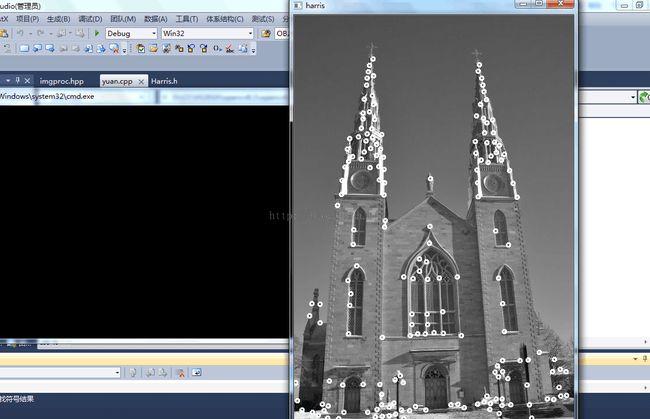
下面是改进的Harris角点检测
#include"opencv2/imgproc/imgproc.hpp"
#include "Harris.h"
int  main()
{
	cv::Mat  image, image1 = cv::imread ("C:\\Users\\Administrator\\Desktop\\工作\\testp\\church01.jpg");
	//灰度变换
	cv::cvtColor (image1,image,CV_BGR2GRAY);

	// 经典的harris角点方法
	harris Harris;
#if 0
	// 计算角点
	Harris.detect(image);
	//获得角点
	std::vector<cv::Point> pts;
	Harris.getCorners(pts,0.01);
	// 标记角点
	Harris.drawOnImage(image,pts);
#endif

#if 1

//	cv::Mat  image, image1 = cv::imread ("test.jpg");
	//灰度变换
	//cv::cvtColor (image1,image,CV_BGR2GRAY);
	// 改进的harris角点检测方法
	std::vector<cv::Point> corners;
	cv::goodFeaturesToTrack(image,corners,
		200,
		//角点最大数目
		0.01,
		// 质量等级,这里是0.01*max(min(e1,e2)),e1,e2是harris矩阵的特征值
		10);
	// 两个角点之间的距离容忍度
	//harris().drawOnImage(image,corners);//标记角点
	Harris.drawOnImage(image,corners);//标记角点

#endif
	cv::namedWindow ("harris");
	cv::imshow ("harris",image);
	cv::waitKey (0);
	return 0;

}
特征点检测和匹配是计算机视觉中一个很有用的技术。在物体检测,视觉跟踪,三维常年关键等领域都有很广泛的应用。这一次先介绍特征点检测的一种方法——FAST(features from accelerated segment test)。很多传统的算法都很耗时,而且特征点检测算法只是很多复杂图像处理里中的第一步,得不偿失。FAST特征点检测是公认的比较快速的特征点检测方法,只利用周围像素比较的信息就可以得到特征点,简单,有效。
FAST特征检测算法来源于corner的定义,这个定义基于特征点周围的图像灰度值,检测候选特征点周围一圈的像素值,如果候选点周围领域内有足够多的像素点与该候选点的灰度值差别够大,则认为该候选点为一个特征点。
其中I(x)为圆周上任意一点的灰度,I(p)为圆心的灰度,Ed为灰度值差得阈值,如果N大于给定阈值,一般为周围圆圈点的四分之三,则认为p是一个特征点。
为了获得更快的结果,还采用了额外的加速办法。如果测试了候选点周围每隔90度角的4个点,应该至少有3个和候选点的灰度值差足够大,否则则不用再计算其他点,直接认为该候选点不是特征点。候选点周围的圆的选取半径是一个很重要的参数,这里我为了简单高效,采用半径为3,共有16个周边像素需要比较。为了提高比较的效率,通常只使用N个周边像素来比较,也就是大家经常说的FAST-N。我看很多文献推荐FAST-9,作者的主页上有FAST-9、FAST-10、FAST-11、FAST-12,大家使用比较多的是FAST-9和FAST-12。上个图说明的更形象一些
OpenCV里对FAST的使用也非常简单,先声明一组特征点,构建FAST特征检测,接下来调用detect函数检测图像中的特征点,最后把特征点绘制到图片上。上代码说的清楚些
#include <opencv2/core/core.hpp>
#include <opencv2/features2d/features2d.hpp>
#include <opencv2/highgui/highgui.hpp>

#include <vector>

using namespace cv;

void main()
{
	Mat image;
	image = imread("C:\\Users\\Administrator\\Desktop\\工作\\testp\\church01.jpg");
	// vector of keyPoints
	std::vector<KeyPoint> keyPoints;
	// construction of the fast feature detector object
	FastFeatureDetector fast(50);	// 检测的阈值为40
	// feature point detection
	fast.detect(image,keyPoints);
	drawKeypoints(image, keyPoints, image, Scalar::all(255), DrawMatchesFlags::DRAW_OVER_OUTIMG);
	imshow("FAST feature", image);
	cvWaitKey(0);
}
左边的是50,右边的是100
