Python-OpenCV(6)
接着上篇,这次写两个主题:
- OpenCV中的颜色空间转换
- OpenCV中的几何变换
OpenCV中的颜色空间转换
颜色空间有许多种,常用有RGB,CMY,HSV,HSI等. 我们平时说的三通道的图就是指的是RGB的图.
贴一段百度百科的介绍:
RGB(红绿蓝)是依据人眼识别的颜色定义出的空间,可表示大部分颜色。但在科学研究一般不采用RGB颜色空间,因为它的细节难以进行数字化的调整。它将色调,亮度,饱和度三个量放在一起表示,很难分开。它是最通用的面向硬件的彩色模型。该模型用于彩色监视器和一大类彩色视频摄像
CMY是工业印刷采用的颜色空间。它与RGB对应。简单的类比RGB来源于是物体发光,而CMY是依据反射光得到的。具体应用如打印机:一般采用四色墨盒,即CMY加黑色墨盒
HSV,HSI两个颜色空间都是为了更好的数字化处理颜色而提出来的。有许多种HSX颜色空间,其中的X可能是V,也可能是I,依据具体使用而X含义不同。H是色调,S是饱和度,I是强度
对于图像处理上,常见的颜色空间转换就是两种:
- RGB—>Gray
- RGB—>HSV
转换API:
cv2.cvtColor(input_image,flag),falg是转换类型
代码:
__author__ = 'gavinzhou'
# -*- coding: utf-8 -*-

import cv2

# read the original images
im = cv2.imread("./images/1.png")
if len(im.shape) == 3:
    print "original image is an RGB image"
else:
    print "original image is an gray image"

# convert to gray
if len(im.shape) == 3:
    im_gray = cv2.cvtColor(im, cv2.COLOR_RGB2GRAY)

# convert to HSV

if len(im.shape) == 3:
    im_hsv = cv2.cvtColor(im, cv2.COLOR_BGR2HSV)

# show the images
cv2.imshow("ori", im)
cv2.imshow("gray", im_gray)
cv2.imshow("hsv", im_hsv)

cv2.waitKey(8000)
cv2.destroyAllWindows()
结果:
这个图的右下角是我的桌面哈,不是显示的图
OpenCV中的几何变换
这个部分的化就比较难了,如果大家只是想实现类似于图像翻转之类的,大家可以不用看这个,直接使用PIL,里面有简单的实现,直接调用就行了,不需要看这个
如果你还想实现点更强大点的功能,那就有必要看看接下来的了
空间变换对应矩阵的仿射变换。一个坐标通过函数变换的新的坐标位置:
就是原始的点坐标(x,y),经过转换以后,新的坐标是(x',y')
所以,实质上几何变换就是点的变换,对应到矩阵就是仿射变换
举个例子:
把图像向右移动两个像素,其实就是将原始的像素的位置,比如(x,y),变为(x+2,y+2),这样就是图像整体向右移动了两个像素
下面,以2x2的矩阵来说明问题
平移变换
对原始的坐标来说,(x,y)变换为(x',y'),所以变换矩阵及逆矩阵:
缩放变换
将图像横坐标放大(或缩小)sx倍,纵坐标放大(或缩小)sy倍,变换矩阵及逆矩阵:
旋转变换
图像绕原点逆时针旋转a角,其变换矩阵及逆矩阵(顺时针选择)为:
代码:
__author__ = 'gavinzhou'
# -*- coding: utf-8 -*-

import cv2
import numpy as np
from matplotlib import pyplot as plt

# read the original images
img = cv2.imread("./images/1.png")

rows, cols, channels = img.shape
res = cv2.resize(img, (cols/2, rows/2))

#Translation:

# 1.shift
M_shift = np.float32([[1, 0, 100], [0, 1, 50]])
img_shift = cv2.warpAffine(img, M_shift, (cols, rows))

# 2.rotate
M_rotate = cv2.getRotationMatrix2D((cols/2, rows/2), 90, 1)
img_rotate = cv2.warpAffine(img, M_rotate, (cols, rows))

# 3.affine
pts1 = np.float32([[50, 50], [200, 50], [50, 200]])
pts2 = np.float32([[10, 100], [200, 50], [100, 250]])
M_affine = cv2.getAffineTransform(pts1,pts2)
img_affine = cv2.warpAffine(img, M_affine, (cols, rows))

# 4.perspective
pts3 = np.float32([[56, 65], [368, 52], [28, 387], [389, 390]])
pts4 = np.float32([[0, 0], [300, 0], [0, 300], [300, 300]])
M_perspective = cv2.getPerspectiveTransform(pts3, pts4)
img_perspective = cv2.warpPerspective(img, M_perspective, (cols, rows))

print 'shift:\n', M_shift
print 'rotate:\n', M_rotate
print 'affine:\n', M_affine
print 'perspective:\n', M_perspective

plt.subplot(231), plt.imshow(img), plt.title('src')
plt.subplot(232), plt.imshow(res), plt.title('scale')
plt.subplot(233), plt.imshow(img_shift), plt.title('shift')
plt.subplot(234), plt.imshow(img_rotate), plt.title('rotate')
plt.subplot(235), plt.imshow(img_affine), plt.title('affine')
plt.subplot(236), plt.imshow(img_perspective), plt.title('perspective')

plt.show()
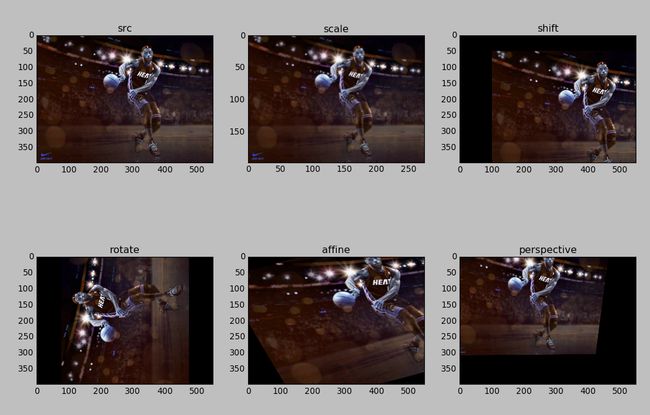
结果:
console打印结果:
shift:
[[ 1. 0. 100.] [ 0. 1. 50.]]
rotate:
[[ 6.12323400e-17 1.00000000e+00 7.70000000e+01] [ -1.00000000e+00 6.12323400e-17 4.73000000e+02]]
affine:
[[ 1.26666667 0.6 -83.33333333] [ -0.33333333 1. 66.66666667]]
perspective:
[[ 1.05587376e+00 9.18151097e-02 -6.50969128e+01] [ 4.69010049e-02 1.12562412e+00 -7.57920240e+01] [ 1.83251448e-04 5.13337001e-04 1.00000000e+00]]


