bootstarp入门二(基本控件的使用)
bootstrap为我们定义了简洁易用的样式,我们只需要很少的样式指定,就可以完成简约优雅的页面展示。
本篇主要介绍以下几个基本控件的而已。
1. table
2. form
3. button
1. 表格(table)依旧使用<table><thead><tbody><tr><th><td>来表现表格。有如下的类来控制table的属性, table样式默认会占满父容器
| Class | 作用 |
| .table | 占满父容器,只有行间分隔线 |
| .table-bordered | 为表格加边框 |
| .table-striped | 斑马线式的背景色 |
| .table-condensed | table横向紧缩,padding值会减半 |
| .table-hover | 设置悬浮时的反馈效果 |
<div class="container">
<div class="row">
<div class="col-md-8 col-md-offset-2">
<table class="table table-bordered table-striped table-hover">
<tr>
<th>标题一</th>
<th>标题二</th>
<th>标题三</th>
</tr>
<tr>
<td>1</td>
<td>2</td>
<td>3</td>
</tr>
<tr>
<td>4</td>
<td>5</td>
<td>6</td>
</tr>
</table>
</div>
</div>
</div>
将任何.table包裹在.table-responsive中即可创建响应式表格,其会在小屏幕设备上(小于768px)水平滚动。当屏幕大于768px宽度时,水平滚动条消失。
2. 表单form, 有如个几种样式定义
| Class | 作用 |
| .form-vertical(default) | 标签从上到下各占一行,左对齐 |
| .form-horizontal | 水平排列,将label和控件组水平并排布局 |
| .form-inline | 简约的内联表单 |
lable与控件要用 form-group类型的div包起来,默认表单如下
<div class="container">
<form>
<div class="form-group">
<label for="exampleInputEmail1">Email address</label>
<input type="email" class="form-control" id="exampleInputEmail1"
placeholder="Enter email">
</div>
<div class="form-group">
<label for="exampleInputPassword1">Password</label>
<input type="password" class="form-control"
id="exampleInputPassword1" placeholder="Password">
</div>
<div class="checkbox">
<label> <input type="checkbox"> Check me out
</label>
</div>
<button type="submit" class="btn btn-default">Submit</button>
</form>
</div>
内联表单, 为label指定sr-only类别,可隐藏掉标签,但必须 不可省略lable.
<div class="container">
<form class="form-inline">
<div class="form-group">
<label for="exampleInputEmail1" class="sr-only">Email address</label>
<input type="email" class="form-control" id="exampleInputEmail1"
placeholder="Enter email">
</div>
<div class="form-group">
<label for="exampleInputPassword1">Password</label>
<input type="password" class="form-control"
id="exampleInputPassword1" placeholder="Password">
</div>
<div class="checkbox">
<label> <input type="checkbox"> Check me out
</label>
</div>
<button type="submit" class="btn btn-default">Submit</button>
</form>
</div>
水平类型的表单, 要为lable与标签组指定长度, 采用栅格系统的布局方式。 label右对齐,标签组左对齐。
<div class="container">
<form class="form-horizontal">
<div class="form-group">
<label for="exampleInputEmail1" class="col-md-2 control-label">Email
address</label>
<div class="col-md-8">
<input type="email" class="form-control" id="exampleInputEmail1"
placeholder="Enter email">
</div>
</div>
<div class="form-group" >
<label for="exampleInputPassword1" class="col-md-2 control-label">Password</label>
<div class="col-md-8">
<input type="password" class="form-control"
id="exampleInputPassword1" placeholder="Password">
</div>
</div>
<div class="checkbox col-md-offset-2">
<label> <input type="checkbox"> Check me out
</label>
</div>
<button type="submit" class="btn btn-default col-md-offset-2">Submit</button>
</form>
</div>
form表单验证,bootstrap3支持表单的自定义验证。 加入req uired表示表单必填,node.setCustomValidity可以设置表单的自定义验证
<div class="container">
<form class="form-horizontal">
<div class="form-group">
<label for="exampleInputEmail1" class="col-md-2 control-label">Email
address</label>
<div class="col-md-8">
<input type="email" class="form-control" id="exampleInputEmail1"
placeholder="Enter email" required>
</div>
</div>
<div class="form-group">
<label for="password1" class="col-md-2 control-label">Password</label>
<div class="col-md-8">
<input type="password" class="form-control"
id="password1" placeholder="Password" required onchange="checkPassword()">
</div>
</div>
<div class="form-group">
<label for="password2" class="col-md-2 control-label" onchange="checkPassword()"> Password2</label>
<div class="col-md-8">
<input type="password" class="form-control"
id="password2" placeholder="Password2" required>
</div>
</div>
<div class="checkbox col-md-offset-2">
<label> <input type="checkbox"> Check me out
</label>
</div>
<button type="submit" class="btn btn-default col-md-offset-2">Submit</button>
</form>
</div>
<script>
function checkPassword() {
var pwd1 = $("#password1").val();
var pwd2 = $("#password2").val();
if (pwd1 != pwd2) {
document.getElementById("password1").setCustomValidity("两次输入的密码不一致");
} else {
document.getElementById("password1").setCustomValidity("");
}
}
</script>
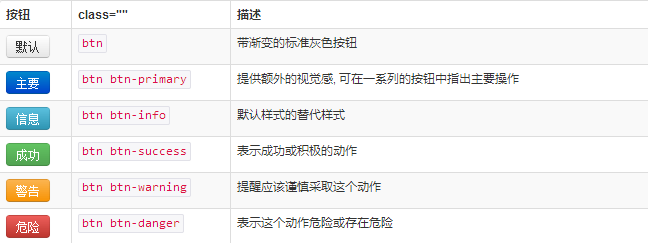
3. button的样式,
使用.btn-lg、.btn-sm、.btn-xs可以获得不同尺寸的按钮, 给按钮添加.btn-block可以使其充满父节点100%的宽度,而且按钮也变为了块级(block)元素,
<a>、<button>或<input>元素添加按钮class。
<div class="container">
<button type="button" class="btn btn-default btn-block">Default</button>
<button type="button" class="btn btn-primary btn-block">Primary</button>
<button type="button" class="btn btn-success">Success</button>
<button type="button" class="btn btn-info">Info</button>
<button type="button" class="btn btn-warning">Warning</button>
<button type="button" class="btn btn-danger">Danger</button>
<button type="button" class="btn btn-link">链接</button>
<a class="btn btn-default" href="#" role="button">Link</a>
<button class="btn btn-default" type="submit">Button</button>
<input class="btn btn-default" type="button" value="Input">
<input class="btn btn-default" type="submit" value="Submit">
</div>
