cacti安装记录 第一阶段 LAMP源码环境配置 复盘
本博客之内所有文章保证全由本人亲手调试。
首先要和说明一下,复盘实验是在我十分不情愿的情况下进行的。
在对之前企鹅服务器调整OPENSSL的时候。突然出了undefined symbol: FIPS_mode错误。SSH无法连接,在我想办法修复的时候,断电了。这下只有重装系统,复盘重来了。
OK旧照。
hostname
[root@VM_196_175_redhat tool]# vi /etc/sysconfig/network
[root@VM_196_175_redhat ~]# hostname Only-test.org
[root@Only-test ~]# export PS1='[\u@\h \W]\>'
最后这成这样了,纪念好久不见的DOS。
Selinux状态的查询:
[root@Only-test ~]\>sestatus
先配好yum,有些不打算动的直接装了。
Yum的配置
RADHAT的升级是增值服务。但好在包和centos通用。只需要把yum源修改即可
此部分来自网络http://hxl2009.blog.51cto.com/779549/197359/
[root@Only-test ~]\>mv /etc/yum.conf /etc/yum.conf.old yum的配置文件
[root@Only-test ~]\>mv /etc/yum.repos.d/ /etc/yum.repos.d.old yum源的记录信息
[root@Only-test ~]\>vim /etc/yum.conf
[main]
cachedir=/var/cache/yum
keepcache=1
debuglevel=2
logfile=/var/log/yum.log
pkgpolicy=newest
distroverpkg=redhat-release
tolerant=1
exactarch=1
obsoletes=1
gpgcheck=1
plugins=1
metadata_expire=1800
# PUT YOUR REPOS HERE OR IN separate files named file.repo
# in /etc/yum.repos.d
[base]
name=centos-5 - Base
baseurl=http://centos.ustc.edu.cn/centos/5/os/i386/
# the other site: http://centos.candishosting.com.cn/centos/5/os/i386/
# you can find more site in: http://www.centos.org/modules/tinycontent/index.php?id=13
enabled=1
gpgcheck=1
gpgkey=http://centos.ustc.edu.cn/centos/5/os/i386/RPM-GPG-KEY-CentOS-5
#released updates
[update]
name=CentOS-5 - Updates
baseurl=http://mirror.centos.org/centos/5/updates/i386/
gpgcheck=1
gpgkey=http://centos.ustc.edu.cn/centos/5/os/i386/RPM-GPG-KEY-CentOS-5
#packages used/produced in the build but not released
[addons]
name=CentOS-5 - Addons
baseurl=http://mirror.centos.org/centos/5/addons/$basearch/
gpgcheck=1
gpgkey=http://centos.ustc.edu.cn/centos/5/os/i386/RPM-GPG-KEY-CentOS-5
#additional packages that may be useful
[extras]
name=CentOS-5 - Extras
baseurl=http://mirror.centos.org/centos/5/extras/$basearch/
gpgcheck=1
gpgkey=http://mirror.centos.org/centos/RPM-GPG-KEY-centos4
#additional packages that extend functionality of existing packages
[centosplus]
name=CentOS-5 - Plus
baseurl=http://mirror.centos.org/centos/5/centosplus/$basearch/
gpgcheck=1
enabled=0
gpgkey=http://centos.ustc.edu.cn/centos/5/os/i386/RPM-GPG-KEY-CentOS-5
#contrib - packages by Centos Users
[contrib]
name=CentOS-5 - Contrib
baseurl=http://mirror.centos.org/centos/5/contrib/$basearch/
gpgcheck=1
enabled=0
gpgkey=http://centos.ustc.edu.cn/centos/5/os/i386/RPM-GPG-KEY-CentOS-5
#packages in testing
[testing]
name=CentOS-5 - Testing
baseurl=http://mirror.centos.org/centos/5/testing/$basearch/
gpgcheck=1
enabled=0
gpgkey=http://centos.ustc.edu.cn/centos/5/os/i386/RPM-GPG-KEY-CentOS-5
LAMP环境
一、OpenSSL
[root@AS5 tool]# rpm -aq | grep openssl
这次打算不动。而且本身也比我准备的0.9.8a版本要高
[root@Only-test ~]\>rpm -ql openssl-0.9.8e-33.el5_11
反正动态链接文件和执行文件都有了。暂时不装devel
二、Apahce
[root@Only-test ~]\>rpm -qa | grep httpd
好吧。系统盘是被格空了。这次装在自己买的数据盘里。
从体积上来说,系统盘是够用的。不过还是建议可能的话买几个G的数据盘1G一个月才3毛钱。重装系统之后最多再做一个链接。
[root@Only-test Ddisk]\> mkdir program 恩,为了纪念windows,以后就全装这里面了。
[root@Only-test tool]\> tar zxvf httpd-2.2.24.tar.gz
[root@Only-test tool]\> cd httpd-2.2.24
[root@Only-test httpd-2.2.24]\> ./configure --prefix=/Ddisk/program/apache
--enable-modules=so --enable-rewrite
--enable-ssl=static --with-ssl
--with-mpm=prefork --enable-status
好吧。还是要指定位置。好像是要头文件。这下要装openssl-devel了
[root@Only-test httpd-2.2.24]\>./configure --help | grep ssl
[root@Only-test httpd-2.2.24]\> yum list openssl-devel
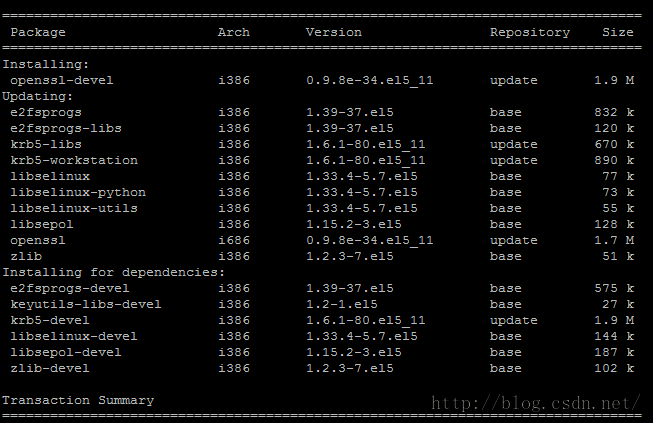
为了一个openssl-devel,这下吓死人。
[root@Only-test httpd-2.2.24]\> ./configure --prefix=/Ddisk/program/apache
--enable-modules=so
--enable-rewrite
--enable-ssl=static
--with-ssl=/usr/include/openssl/
--with-mpm=prefork
--enable-status
此步骤把
--prefix=/Ddisk/program/apache apache安装到/Ddisk/program/apache
--with-mpm=prefork 主要是为了适应新的Zend 版本把线程模式改成了这个。
--enable-status 为了CACTI能监控apche
--enable-ssl=static 用于将mod_ssl静态的编译到httpd服务中。
--with-ssl 后面指定的是OpenSSL的头文件路径。
--enable-rewrite 打开重定向
--enable-modules=so 允许动态模块的加载
[root@Only-test httpd-2.2.24]\> make
[root@Only-test httpd-2.2.24]\> make install
[root@Only-test httpd-2.2.24]\> vim /Ddisk/program/apache/conf/httpd.conf
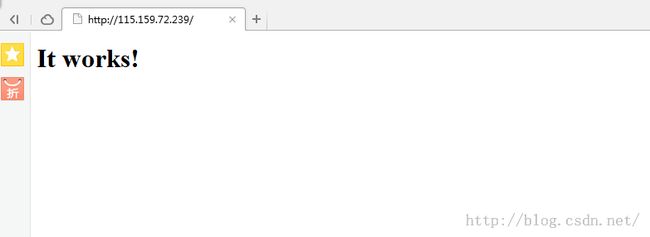
[root@Only-test httpd-2.2.24]\> /Ddisk/program/apache/bin/apachectl start
查看一下是否已经加载 status模块
[root@Only-test httpd-2.2.24]\> /Ddisk/program/apache/bin/httpd -M
OK用httpd -M可以很清楚看到。ssl 和 status 已经加载。
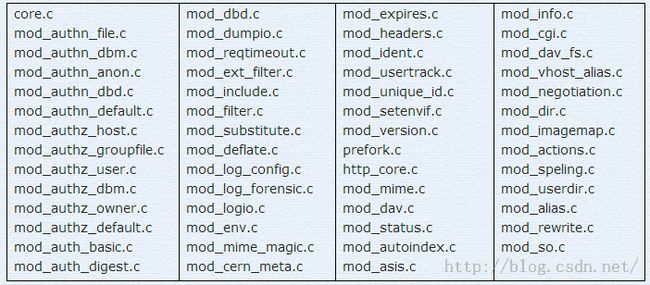
Apache一共有55个静态模块。自动加载的除了上面的两个,如图可视。全部模块如下:
如果要加载。现在在编译的时候。用 --enable-[module]=static。不过我这里后面没有加static好像也被静态加载了。
APACHE暂时结束
三、MySQL
这个可以确定没有多余包。我就直接安装了。
[root@Only-test tar]\> rpm -ivh MySQL-devel-community-5.0.45-0.rhel4.i386.rpm
[root@Only-test tar]\> rpm -ivh MySQL-shared-community-5.0.45-0.rhel4.i386.rpm
[root@Only-test tar]\> rpm -ihv MySQL-client-community-5.0.45-0.rhel4.i386.rpm
还是老问题。
[root@Only-test tar]\> yum install perl-DBI
[root@Only-test tar]\> rpm -ivh MySQL-client-community-5.0.45-0.rhel4.i386.rpm
[root@Only-test tar]\> rpm -ivh MySQL-server-community-5.0.45-0.rhel4.i386.rpm
[root@Only-test tar]\> service mysql start
[root@Only-test tar]\> mysql
OK.完成。
Mysql改密码
[root@Only-test tar]\> mysql
mysql> use mysql
mysql> update user set password=password('123456789') where user='root';
mysql> flush privileges;
//这步不打,密码不会即时生效
四、PHP
GD库(让PHP支持GIF,PNG,JPEG)
这次应该会不需要装两次了。
a. 安装 jpeg7
[root@Only-test jpeg-7]\> rpm -qa | grep jpeg
很好什么都没有
[root@Only-test jpeg-7]\> ./configure --prefix=/Ddisk/program/jpeg7
[root@Only-test jpeg-7]\> make && make install
[root@Only-test jpeg-7]\> ln -s /Ddisk/program/jpeg7/bin/* /usr/bin/
[root@Only-test jpeg-7]\> ln -s /Ddisk/program/jpeg7/include/* /usr/include/
[root@Only-test jpeg-7]\> ln -s /Ddisk/program/jpeg7/include/* /usr/include/jpeg7
[root@Only-test jpeg-7]\> ln -s /Ddisk/program/jpeg7/lib/* /usr/lib/
[root@Only-test jpeg-7]\> ln -s /Ddisk/program/jpeg7/share/man/man1/* /usr/share/man/man1/
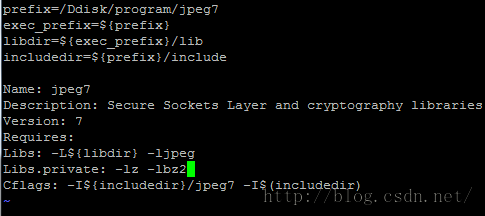
要注意一下。这里是没有pc文件的。所以采取自己生成
[root@Only-test jpeg-7]\> cp /usr/lib/pkgconfig/libssl.pc /Ddisk/program/jpeg7/lib/jpeg7.pc
vi jpeg7.pc
最后大体修改成这样
[root@Only-test jpeg-7]\> ln -s /Ddisk/program/jpeg7/lib/jpeg7.pc /usr/lib/pkgconfig/
[root@Only-test jpeg-7]\> yum install pkgconfig
[root@Only-test jpeg-7]\> pkg-config --modversion jpeg7
![]()
OK成功
b. 安装libpng
[root@Only-test libpng-1.4.3]\> rpm -aq | grep png
![]()
[root@Only-test libpng-1.4.3]\> ./configure --prefix=/Ddisk/program/libpng/
[root@Only-test libpng-1.4.3]\> make && make install
[root@Only-test libpng-1.4.3]\> ln -s /Ddisk/program/libpng/bin/* /usr/bin/
[root@Only-test libpng-1.4.3]\> ln -s /Ddisk/program/libpng/include/* /usr/include/
[root@Only-test libpng-1.4.3]\> ln -s /Ddisk/program/libpng/lib/pkgconfig/libpng
[root@Only-test libpng-1.4.3]\> ln -s /Ddisk/program/libpng/lib/pkgconfig/* /usr/lib/pkgconfig/
[root@Only-test libpng-1.4.3]\> ln -s /Ddisk/program/libpng/share/man/man3/* /usr/share/man/man3/
[root@Only-test libpng-1.4.3]\> ln -s /Ddisk/program/libpng/share/man/man5/* /usr/share/man/man5/
[root@Only-test libpng-1.4.3]\> pkg-config --modversion libpng
完事
c. 安装 freetype
[root@Only-test freetype-2.4.8]\> rpm -aq | grep freetype
[root@Only-test freetype-2.4.8]\> ./configure --prefix=/Ddisk/program/freetype
[root@Only-test freetype-2.4.8]\> make && make install
[root@Only-test freetype-2.4.8]\> ln -s /Ddisk/program/freetype/bin/* /usr/bin/
[root@Only-test freetype-2.4.8]\> ln -s /Ddisk/program/freetype/include/* /usr/include/
[root@Only-test freetype-2.4.8]\> ln -s /Ddisk/program/freetype/lib/*so* /usr/lib
[root@Only-test freetype-2.4.8]\> ln -s /Ddisk/program/freetype/lib/pkgconfig/freetype2.pc /usr/lib/pkgconfig/
[root@Only-test freetype-2.4.8]\> ln -s /Ddisk/program/freetype/share/aclocal/freetype2.m4 /usr/share/aclocal/
[root@Only-test freetype-2.4.8]\> pkg-config --modversion freetype2
OK
PS:这里直接查freetype还没结果。估计等下会有问题,不过CP一下应该也没问题。
d. 安装 libXpm
[root@Only-test libXpm-3.5.5]\> rpm -aq | grep Xpm
[root@Only-test libXpm-3.5.5]\> ./configure --prefix=/Ddisk/program/libXpm
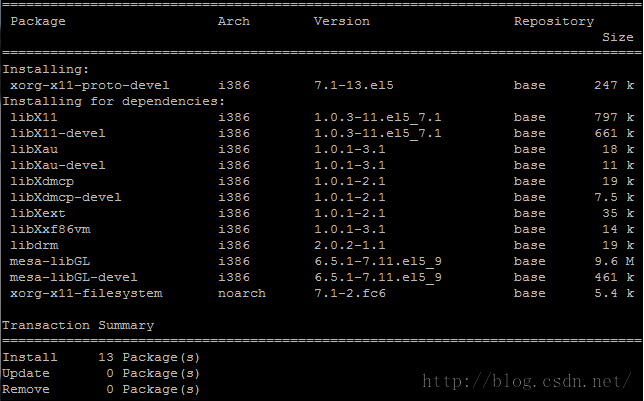
果然还是这两个包。
[root@Only-test libXpm-3.5.5]\> yum install Xorg-x11-proto-devel
[root@Only-test libXpm-3.5.5]\> ./configure --prefix=/Ddisk/program/libXpm
[root@Only-test libXpm-3.5.5]\> make && make install
[root@Only-test libXpm-3.5.5]\> ln -s /Ddisk/program/libXpm/bin/* /usr/bin/
[root@Only-test libXpm-3.5.5]\> ln -s /Ddisk/program/libXpm/include/X11/xpm.h /usr/include/X11/
[root@Only-test libXpm-3.5.5]\> ln -s /Ddisk/program/libXpm/lib/*so* /usr/lib
[root@Only-test libXpm-3.5.5]\> ln -s /Ddisk/program/libXpm/lib/pkgconfig/xpm.pc /usr/lib/pkgconfig/
[root@Only-test libXpm-3.5.5]\> ln -s /Ddisk/program/libXpm/man/man1/cxpm.1x /usr/share/man/man1/
[root@Only-test libXpm-3.5.5]\> pkg-config --modversion xpm
完成
现在本来应该是选编译GD库有关组件的,但是fontconfig需要freetype和libxml2的支持。先编译libxml2
e. libxml2
[root@Only-test libxml2-2.6.32]\> rpm -aq | grep libxml2
[root@Only-test libxml2-2.6.32]\> rpm -e --nodeps libxml2-2.6.26-2.1.2.7
[root@Only-test libxml2-2.6.32]\> ./configure --prefix=/Ddisk/program/libxml2 --with-zlib
[root@Only-test libxml2-2.6.32]\> vim Makefile
找到CFLAGS参数,在它后面添加 -fPIC 参数
[root@Only-test libxml2-2.6.32]\> make && make install
[root@Only-test libxml2-2.6.32]\> ln -s /Ddisk/program/libxml2/bin/* /usr/bin/
[root@Only-test libxml2-2.6.32]\> ln -s /Ddisk/program/libxml2/include/libxml2/ /usr/include/
[root@Only-test libxml2-2.6.32]\> ln -s /Ddisk/program/libxml2/lib/*so* /usr/lib
[root@Only-test libxml2-2.6.32]\> ln -s /Ddisk/program/libxml2/lib/pkgconfig/libxml-2.0.pc /usr/lib/pkgconfig/
[root@Only-test libxml2-2.6.32]\> ln -s /Ddisk/program/libxml2/share/aclocal/* /usr/share/aclocal/
[root@Only-test libxml2-2.6.32]\> ln -s /Ddisk/program/libxml2/share/doc/libxml2-2.6.32/ /usr/share/doc/
[root@Only-test libxml2-2.6.32]\> ln -s /Ddisk/program/libxml2/share/gtk-doc/ /usr/share/
[root@Only-test libxml2-2.6.32]\> ln -s /Ddisk/program/libxml2/share/man/man1/* /usr/share/man/man1
[root@Only-test libxml2-2.6.32]\> ln -s /Ddisk/program/libxml2/share/man/man3/libxml.3 /usr/share/man/man3/
[root@Only-test libxml2-2.6.32]\> pkg-config --modversion libxml-2.0
这个名字太操蛋了,实在不行,等下CP
f. fontconfig
[root@Only-test fontconfig-2.4.2]\> rpm -aq | grep fontconfig
[root@Only-test fontconfig-2.4.2]\> ./configure --prefix=/Ddisk/program/fontconfig
OK 一次过
[root@Only-test fontconfig-2.4.2]\> make && make install
[root@Only-test fontconfig-2.4.2]\> ln -s /Ddisk/program/fontconfig/bin/* /usr/bin/
[root@Only-test fontconfig-2.4.2]\> ln -s /Ddisk/program/fontconfig/include/fontconfig/* /usr/include/
[root@Only-test fontconfig-2.4.2]\> ln -s /Ddisk/program/fontconfig/include/fontconfig/ /usr/include/
[root@Only-test fontconfig-2.4.2]\> ln -s /Ddisk/program/fontconfig/lib/*so* /usr/lib
[root@Only-test fontconfig-2.4.2]\> ln -s /Ddisk/program/fontconfig/lib/pkgconfig/fontconfig.pc /usr/lib/pkgconfig/
[root@Only-test fontconfig-2.4.2]\> ln -s /Ddisk/program/fontconfig/share/man/man3/* /usr/share/man/man3/
[root@Only-test fontconfig-2.4.2]\> ln -s /Ddisk/program/fontconfig/share/man/man5/fonts-conf.5 /usr/share/man/man5/
[root@Only-test fontconfig-2.4.2]\> ln -s /Ddisk/program/fontconfig/var/cache/fontconfig/ /var/cache/
[root@Only-test fontconfig-2.4.2]\> ln -s /Ddisk/program/fontconfig/etc/fonts/ /etc/
[root@Only-test fontconfig-2.4.2]\> pkg-config --modversion fontconfig
完成
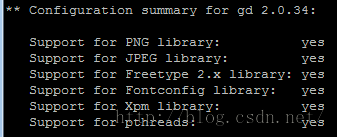
g. 安装 GD
[root@Only-test gd-2.0.34]\> rpm -qa | grep gd
[root@Only-test gd-2.0.34]\> ./configure --prefix=/Ddisk/program/gd2
--with-jpeg=/Ddisk/program/jpeg7/
--with-png=/Ddisk/program/libpng/
--with-freetype=/Ddisk/program/freetype/
OK
[root@Only-test gd-2.0.34]\> vim gd_png.c
![]()
改为
[root@Only-test gd-2.0.34]\> include "/usr/local/libpng/include/png.h"
![]()
两个""不能有空格
这里必须要改,否则会提示找不到png.h
make && make install
[root@Only-test gd-2.0.34]\> ln -s /Ddisk/program/gd2/bin/* /usr/bin/
[root@Only-test gd-2.0.34]\> ln -s /Ddisk/program/gd2/include/* /usr/include/
[root@Only-test gd-2.0.34]\> ln -s /Ddisk/program/gd2/lib/libgd.so* /usr/lib
这里没有.pc文件。如前面jpeg一样如法炮制
[root@Only-test gd-2.0.34]\> cp /Ddisk/program/freetype/lib/pkgconfig/freetype2.pc /Ddisk/program/gd2/lib/gd2.pc
[root@Only-test gd-2.0.34]\> vim /Ddisk/program/gd2/lib/gd2.pc
大体改成如下
[root@Only-test gd-2.0.34]\> ln -s /Ddisk/program/gd2/lib/gd2.pc /usr/lib/pkgconfig/
[root@Only-test gd-2.0.34]\> pkg-config --modversion gd2
完成
h. 安装 curl
[root@Only-test curl-7.24.0]\> rpm -qa | grep curl
[root@Only-test curl-7.24.0]\> rpm -e --nodeps curl-7.15.5-2.el5
[root@Only-test curl-7.24.0]\> ./configure --prefix=/Ddisk/program/curl
[root@Only-test curl-7.24.0]\> make && make install
[root@Only-test curl-7.24.0]\> ln -s /Ddisk/program/curl/bin/* /usr/bin/
[root@Only-test curl-7.24.0]\> ln -s /Ddisk/program/curl/include/curl/ /usr/include/
[root@Only-test curl-7.24.0]\> ln -s /Ddisk/program/curl/include/curl/* /usr/include/
[root@Only-test curl-7.24.0]\> ln -s /Ddisk/program/curl/lib/*so* /usr/lib
[root@Only-test curl-7.24.0]\> ln -s /Ddisk/program/curl/lib/pkgconfig/libcurl.pc /usr/lib/pkgconfig/
[root@Only-test curl-7.24.0]\> ln -s /Ddisk/program/curl/share/man/man1/* /usr/share/man/man1/
[root@Only-test curl-7.24.0]\> ln -s /Ddisk/program/curl/share/man/man3/* /usr/share/man/man3/
[root@Only-test curl-7.24.0]\> pkg-config --modversion libcurl
完成
i. 安装 libxslt
[root@Only-test libxslt-1.1.24]\> rpm -aq | grep libxslt
![]()
[root@Only-test libxslt-1.1.24]\> ./configure --prefix=/Ddisk/program/libxslt
--with-libxml-prefix=/Ddisk/program/libxml2/
[root@Only-test libxslt-1.1.24]\> make && make install
[root@Only-test libxslt-1.1.24]\> ln -s /Ddisk/program/libxslt/bin/* /usr/bin/
[root@Only-test libxslt-1.1.24]\> ln -s /Ddisk/program/libxslt/include/libexslt/ /usr/include/
[root@Only-test libxslt-1.1.24]\> ln -s /Ddisk/program/libxslt/include/libxslt/ /usr/include/
[root@Only-test libxslt-1.1.24]\> ln -s /Ddisk/program/libxslt/lib/*so* /usr/lib/
[root@Only-test libxslt-1.1.24]\> ln -s /Ddisk/program/libxslt/lib/libxslt-plugins/ /usr/lib/
[root@Only-test libxslt-1.1.24]\> ln -s /Ddisk/program/libxslt/lib/pkgconfig/* /usr/lib/pkgconfig/
[root@Only-test libxslt-1.1.24]\> pkg-config --modversion libxslt
[root@Only-test libxslt-1.1.24]\> pkg-config --modversion libexslt
完成
j. Sockets函数支持
涉及到三个包。一个个装过来。
安装libmcrypt
[root@Only-test libmcrypt]\> ./configure --prefix=/Ddisk/program/mcrypt
还是 gcc-c++的老错误
[root@Only-test libmcrypt]\> yum install gcc-c++
[root@Only-test libmcrypt]\> ./configure --prefix=/Ddisk/program/mcrypt
[root@Only-test libmcrypt]\> make && make install
安装mhash
[root@Only-test mhash]\> ./configure --prefix=/Ddisk/program/mcrypt
[root@Only-test mhash]\> make && make install
安装mcrypt
在安装mcrypt前,需先导入环境变量,不然在安装的时候会提示找不到libmcrypt和mhash
export LD_LIBRARY_PATH=/usr/local/mcrypt/lib:$LD_LIBRARY_PATH
export LDFLAGS="-L/usr/local/mcrypt/lib/ -I/usr/local/mcrypt/include/"
export CFLAGS="-I/usr/local/mcrypt/include/"
原本是这样做。我换个方式
[root@Only-test mcrypt]\> ln -s /Ddisk/program/mcrypt/bin/libmcrypt-config /usr/bin/
[root@Only-test mcrypt]\> ln -s /Ddisk/program/mcrypt/include/* /usr/include/
[root@Only-test mcrypt]\> ln -s /Ddisk/program/mcrypt/lib/*so* /usr/lib
[root@Only-test mcrypt]\> ln -s /Ddisk/program/mcrypt/lib/libmcrypt/ /usr/lib
[root@Only-test mcrypt]\> ln -s /Ddisk/program/mcrypt/man/man3/mcrypt.3 /usr/share/man/man3/
[root@Only-test mcrypt]\> ln -s /Ddisk/program/mcrypt/share/aclocal/libmcrypt.m4 /usr/share/aclocal/
[root@Only-test mcrypt]\> ln -s /Ddisk/program/mcrypt/share/man/man3/mhash.3 /usr/share/man/man3/
好了。试试看
[root@Only-test mcrypt]\> ./configure --prefix=/Ddisk/program/mcrypt --with-libmcrypt-prefix=/Ddisk/program/mcrypt/
过了。果然如此
[root@Only-test mcrypt]\> make && make install
[root@Only-test mcrypt]\> ln -s /Ddisk/program/mcrypt/bin/libmcrypt-config /usr/bin/
[root@Only-test mcrypt]\> ln -s /Ddisk/program/mcrypt/include/* /usr/include/
[root@Only-test mcrypt]\> ln -s /Ddisk/program/mcrypt/lib/*so* /usr/lib
还有一个 /Ddisk/program/mcrypt/share/locale/ 太过麻烦没有链接
不过依旧没有pc文件
[root@Only-test mcrypt]\> cp /Ddisk/program/freetype/lib/pkgconfig/freetype2.pc /Ddisk/program/mcrypt/lib/mcrypt.pc
大体如此
[root@Only-test mcrypt]\> ln -s /Ddisk/program/mcrypt/lib/mcrypt.pc /usr/lib/pkgconfig/
[root@Only-test mcrypt]\> pkg-config --modversion mcrypt
完成
k. 安装php5
[root@Only-test php-5.3.24]\> rpm -aq | grep php
[root@Only-test php-5.3.24]\> ./configure --prefix=/Ddisk/program/php
--with-apxs2=/Ddisk//program/apache/bin/apxs
--with-mysql --with-mysqli=/usr/bin/mysql_config
--with-curl=/Ddisk/program/curl --enable-ftp
--with-libxml-dir=/Ddisk/program/libxml2 --enable-soap
--with-xsl=/Ddisk/program/libxslt
--with-gd=/Ddisk/program/gd2/
--with-jpeg-dir=/Ddisk/program/jpeg7/ --with-zlib
--with-png-dir=/Ddisk/program/libpng/
--with-freetype-dir=/Ddisk/program/freetype/
--with-xpm-dir=/Ddisk/program/libXpm/
--with-mcrypt=/Ddisk/program/mcrypt
--enable-mbstring --enable-sockets
--with-openssl
[root@Only-test php-5.3.24]\> make && make install
[root@Only-test php-5.3.24]\> cp php.ini-development /Ddisk/program/php/lib/php.ini
配置 httpd.conf 让apache支持PHP
[root@Only-test php-5.3.24]\> vim /Ddisk/program/apache/conf/httpd.conf
找到 AddType application/x-gzip .gz .tgz 在其下添加如下内容
AddType application/x-httpd-php .php
AddType application/x-httpd-php-source .phps
重启apache
[root@Only-test php-5.3.24]\> /Ddisk/program/apache/bin/apachectl restart
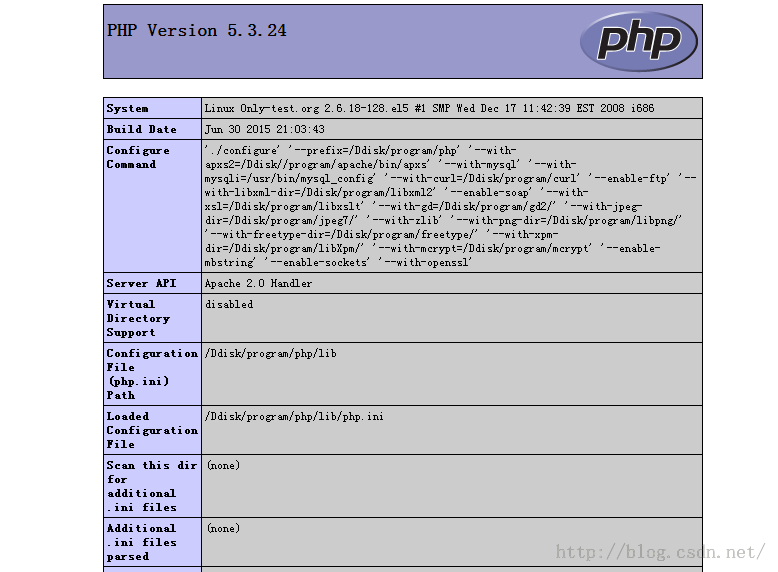
在htdocs目录里建一内容为 <?php phpinfo(); ?> PHP文件, 输入URL地址查看PHP配置是否正确。
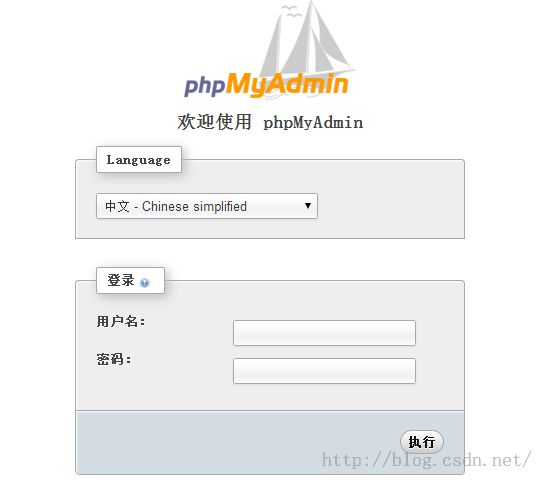
Phpmyadmin
[root@Only-test tool]\> unzip phpMyAdmin-3.4.10.2-all-languages.zip
[root@Only-test tool]\> mv phpMyAdmin-3.4.10.2-all-languages /Ddisk/program/apache/htdocs/phpmyadmin


