ios 实现谷歌地图
Google地图实现之一
在iphone中可以用core location功能来实现地理定位,并可用mapkit 框架加载google地图。
一、 Core Location 实现定位
Core Location主要应用了GPS, 蜂窝基站三角网以及Wi_Fi(WPS)三种技术。一代iphone之后,有的把这称之为Assistant GPS(A_GPS),第一代iphone不具备GPS功能。想得到定点的信息,其实不难,只需要涉及到几个类,CLLocationManager, CLLocation, CLLocationManagerdelegate协议,CLLocationCoodinate2D, CLLocationDegrees。
<一>先实例化一个CLLocationManager,同时设置委托及精确度等。
CCLocationManager *manager = [[CLLocationManager alloc] init];
[manager setDelegate: self];
[manager setDesiredAccuracy: kCLLocationAccuracyBest];
其中desiredAccuracy属性表示精确度,有利5种选择如下:
| desiredAccuracy属性 |
描述 |
| kCLLocationAccuracyBest |
精确度最佳 |
| kCLLocationAccuracynearestTenMeters |
精确度10m以内 |
| kCLLocationAccuracyHundredMeters |
精确度100m以内 |
| kCLLocationAccuracyKilometer |
精确度1000m以内 |
| kCLLocationAccuracyThreeKilometers |
精确度3000m以内 |
NOTE:精确度越高,用点越多,就要根据实际情况而定。
manager.distanceFilter = 250;这个表示在地图上每隔250m才更新一次定位信息。
[manager startUpdateLocation]; 启动定位器,如果不用的时候就必须调用stopUpdateLocation以关闭定位功能。
<二>CCLocation对像中包含着定点的相关信息数据。其属性主要包括coordinate, altitude,horizontalAccuracy,verticalAccuracy, timestamp等,分别如下:
coordinate 用来存储地理位置的latitude和longitude,分别表示纬度和经度,都是float类型.如可这样: float latitude = location.coordinat.latitude; location是CCLocation的实例。这里也把上面提到的CLLocationDegrees,它其实是一个double类型,在core Location框架中是用来储存 CLLocationCoordinate2D实例coordinate的latitude 和longitude,
typedef double CLLocationDegrees;
typedef struct
{CLLocationDegrees latitude;
CLLocationDegrees longitude} CLLocationCoordinate2D;
altitude 表示位置的海拔高度,这个值是极不准确的。
horizontalAccuracy 表示水平准确度,这么理解,它是以coordinate为圆心的半径,返回的值越小,证明准确度越好,如果是负数,则表示core location定位失败。
verticalAccuracy表示垂直准确度,它的返回值与altitude相关,所以不准确。
Timestamp 返回的是定位时的时间,是NSDate类型。
<三>CLLocationMangerDelegate协议
我们只需实现两个方法就可以了,如下:
- (void)locationManager:(CLLocationManager *)manager
didUpdateToLocation:(CLLocation *)newLocation
fromLocation:(CLLocation *)oldLocation ;
- (void)locationManager:(CLLocationManager *)manager
didFailWithError:(NSError *)error;
上面第一个是定位时候回访调,后者定位出错时被调。
<四>现在可以去实现定位了:
新建一个view-based application模板的工程,假设项目名称为coreLocation.我们在contronller的头文件和源文件中的代码大概有如下:
.h
#import <UIKit/UIKit.h>
#import <CoreLocation/CoreLocation.h>
@interface CoreLocationViewController : UIViewController
<CLLocationManagerDelegate>{
CLLocationManager *locManager;
}
@property (nonatomic, retain) CLLocationManager *locManager;
@end
.m
#import "CoreLocationViewController.h"
@implementation CoreLocationViewController
@synthesize locManager;
// Implement viewDidLoad to do additional setup after loading the view, typically from a nib.
- (void)viewDidLoad {
locManager = [[CLLocationManager alloc] init];
locManager.delegate = self;
locManager.desiredAccuracy = kCLLocationAccuracyBest;
[locManager startUpdatingLocation];
[super viewDidLoad];
}
- (void)didReceiveMemoryWarning {
// Releases the view if it doesn't have a superview.
[super didReceiveMemoryWarning];
// Release any cached data, images, etc that aren't in use.
}
- (void)viewDidUnload {
// Release any retained subviews of the main view.
// e.g. self.myOutlet = nil;
}
- (void)dealloc {
[locManager stopUpdatingLocation];
[locManager release];
[textView release];
[super dealloc];
}
#pragma mark -
#pragma mark CoreLocation Delegate Methods
- (void)locationManager:(CLLocationManager *)manager
didUpdateToLocation:(CLLocation *)newLocation
fromLocation:(CLLocation *)oldLocation {
CLLocationCoordinate2D locat = [newLocation coordinate];
float lattitude = locat.latitude;
float longitude = locat.longitude;
float horizon = newLocation.horizontalAccuracy;
float vertical = newLocation.verticalAccuracy;
NSString *strShow = [[NSString alloc] initWithFormat:
@"currentpos: 经度=%f 维度=%f 水平准确读=%f 垂直准确度=%f ",
lattitude, longitude, horizon, vertical];
UIAlertView *show = [[UIAlertView alloc] initWithTitle:@"coreLoacation"
message:strShow delegate:nil cancelButtonTitle:@"i got it"
otherButtonTitles:nil];
[show show];
[show release];
}
- (void)locationManager:(CLLocationManager *)manager
didFailWithError:(NSError *)error{
NSString *errorMessage;
if ([error code] == kCLErrorDenied){
errorMessage = @"你的访问被拒绝";}
if ([error code] == kCLErrorLocationUnknown) {
errorMessage = @"无法定位到你的位置!";}
UIAlertView *alert = [[UIAlertView alloc]
initWithTitle:nil message:errorMessage
delegate:self cancelButtonTitle:@"确定" otherButtonTitles:nil];
[alert show];
[alert release];
}
@end
运行的效果如下:
Google地图实现之二
这一节我将用看到那个google的地图,在实现上也相当简便。嵌入地图时需要MKMapView这个类,
它有很多方法和属性,不过如果只是想得到基本的定位功能的话,只需实例化一个对像然后加到当前的
view上就可以了。
<一>先介绍一下,它的几个常用的属性。
region 用来设置地图的那一部份被显示,它是一个结构体,定义如下:
typedef struct{
CLLocationCoordinate2D center;//表示显示的中心
MKCoordinateSpan span; //表示比例
}MKCoordinateRegion;
对于MKCoordinateSpan其定义如下:
typedef struct{
CLLocationDegrees latitudeDelta;//这类型在前一节中讲过了,是double型的
CLLocationDegrees longitudeDlta;
}MKCoordinateSpan;
再看一下maptype属性,它用于设置地图的类型,如下所示:
MapType属性值 描述
MKMapTypeStandard 表示标准的街道级地图
MKMapTypeSatellite 表示卫星图
MKMapTypeHybird 表示上面两者的混合
其余的就不再一一介绍了,去看看相关的文档即可,在这里已经可以把地图弄出来了。
<二>下面我们把上一节中的代码改一下:
.h头文件
#import <UIKit/UIKit.h>
#import <CoreLocation/CoreLocation.h>
#import <MapKit/MapKit.h>
@interface CoreLocationViewController : UIViewController
<CLLocationManagerDelegate,MKMapViewDelegate>{
MKMapView *map;
CLLocationManager *locManager;
CLLocationCoordinate2D loc;
}
@property (nonatomic, retain) MKMapView *map;
@property (nonatomic, retain) CLLocationManager *locManager;
- (void)setCurrentLocation:(CLLocation *)location;
@end
.m源文件
#import "CoreLocationViewController.h"
@implementation CoreLocationViewController
@synthesize map;
@synthesize locManager;
- (void)viewDidLoad {
map = [[MKMapView alloc]initWithFrame:CGRectMake(0.0f, 0.0f, 320.0f, 411.0f)];
map.showsUserLocation = YES;
[self.view addSubview:map];
locManager = [[CLLocationManager alloc] init];
locManager.delegate = self;
locManager.desiredAccuracy = kCLLocationAccuracyBest;
locManager.distanceFilter = 100;
[locManager startUpdatingLocation];
[super viewDidLoad];
}
- (void)dealloc {
[map release];
[locManager release];
[super dealloc];
}
#pragma mark -
#pragma mark Core Location Delegate Methods
- (void)locationManager:(CLLocationManager *)manager
didUpdateToLocation:(CLLocation *)newLocation
fromLocation:(CLLocation *)oldLocation {
NSLog(@"---------------");
loc = [newLocation coordinate];
MKCoordinateRegion region;
MKCoordinateSpan span;
span.latitudeDelta=0.1; //zoom level
span.longitudeDelta=0.1; //zoom level
NSLog(@"%f",loc.latitude);
NSLog(@"%f",loc.longitude);
region.span=span;
region.center=loc;
// map.showsUserLocation=NO;
map.mapType = MKMapTypeStandard;
[map setRegion:region animated:YES];
[map regionThatFits:region];
}
- (void)locationManager:(CLLocationManager *)manager
didFailWithError:(NSError *)error{
NSString *errorMessage;
if ([error code] == kCLErrorDenied){
errorMessage = @"被拒绝访问";
}
if ([error code] == kCLErrorLocationUnknown) {
errorMessage = @"";
}
UIAlertView *alert = [[UIAlertView alloc]
initWithTitle:nil
message:errorMessage
delegate:self
cancelButtonTitle:@"纭畾"
otherButtonTitles:nil];
[alert show];
[alert release];
}
- (void)setCurrentLocation:(CLLocation *)location {
MKCoordinateRegion region ;
region.center = location.coordinate;
region.span.longitudeDelta = 0.15f;
region.span.latitudeDelta = 0.15f;
[map setRegion:region animated:YES];
}
@end
效果如下图所示
Google地图实现之三添加注解
2010-09-20 17:34:42| 分类:iphone/ipad开发|字号 订阅
这一节将会讲到添加地图注解,这个需要用到MKAnnotation这个协议,主要有两个UILabel类型的属性,title和subtitle,当用户点击小别针时候就会把相关信息显示出来,如下图:
大概的操作是这样的,先定义一个继承了MKAnnotation的类,第当需要加上注解的时候,就根据当前的region等信息,实例化出一个对像,然后把它addAnnotation到googleMap上去就可了。
为了实现MKAnnotation我们重新定义一个类来操作。新建objectiv-c的NSObject类
.h头文件
#import <Foundation/Foundation.h>
#import <CoreLocation/CoreLocation.h>
#import <MapKit/MapKit.h>
@interface MapAnnotations : NSObject <MKAnnotation>{
CLLocationCoordinate2D coordinate;//这个表示一点,在map中就是中心点。
NSString *subtitle;
NSString *title;
}
-(id)initWithCoordinate:(CLLocationCoordinate2D) coordinate;
@property (nonatomic, readonly) CLLocationCoordinate2D coordinate;
@property (nonatomic, retain) NSString *subtitle;
@property (nonatomic, retain) NSString *title;
@end
.m源文件
#import "MapAnnotations.h"
@implementation MapAnnotations
@synthesize coordinate;
@synthesize title;
@synthesize subtitle;
-(id)initWithCoordinate:(CLLocationCoordinate2D) c{
coordinate=c;
NSLog(@"%f,%f",c.latitude,c.longitude);
return self;
}
- (void) dealloc
{
[title release];
[subtitle release];
[super dealloc];
}
@end
好了,有了这个类,我们就可以在数据更新的地方,实例化它的对像,然后加在MKMapview的实例上,就可以了,如下:
mapAnnotations=[[MapAnnotations alloc] initWithCoordinate:loc];
mapAnnotations.title=@"TEST";
mapAnnotations.subtitle=@"havea try";
[map addAnnotation:mapAnnotations];
[mapAnnotations release];
ios利用MKMapView显示自己当前位置的地图
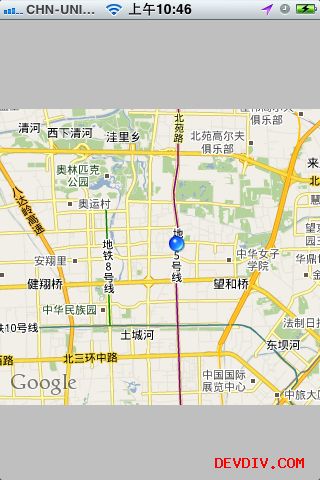
在 ios利用MKMapView实现简单的地图一文中只是介绍了使用最简单的地图,这篇文章主要是介绍怎么把地图显示到自己的当前位置和是地图扩大。下面是我们实现的界面: 位置相当准确,
在ios利用MKMapView实现简单的地图一文中只是介绍了使用最简单的地图,这篇文章主要是介绍怎么把地图显示到自己的当前位置和是地图扩大。下面是我们实现的界面:
位置相当准确,和我用google map或得的信息一样。
下面介绍一下实现的过程,是在 ios利用MKMapView实现简单的地图例子的基础上实现的。DEVDIV博客
首先要获取自己的经纬度,要使用CLLocationManager,CLLocationManager在CoreLocation.framework中,所以先在工程中添加CoreLocation.framework。

然后添加相关代码:
添加CLLocationManagerDelegate协议
@interface iphone_MapViewController : UIViewController
<CLLocationManagerDelegate>{
IBOutlet MKMapView *mapView;
}
实现代码:
- (void)viewDidLoad {
[super viewDidLoad];
mapView.showsUserLocation=YES;
CLLocationManager *locationManager = [[CLLocationManager alloc] init];//创建位置管理器
locationManager.delegate=self;//设置代理
locationManager.desiredAccuracy=kCLLocationAccuracyBest;//指定需要的精度级别
locationManager.distanceFilter=1000.0f;//设置距离筛选器
[locationManager startUpdatingLocation];//启动位置管理器
MKCoordinateSpan theSpan;
//地图的范围 越小越精确
theSpan.latitudeDelta=0.05;
theSpan.longitudeDelta=0.05;
MKCoordinateRegion theRegion;
theRegion.center=[[locationManager location] coordinate];
theRegion.span=theSpan;
[mapView setRegion:theRegion];
[locationManager release];
}
运行就可以得到如图所示的效果了。
[精华]iPhone入门学习——MKMapView学习笔记
目前主流的智能手机大部分都支持GoogleMap地图程序,而手机上的地图程序确实能给我们的出行带来很大的方便。在iPhone中利用MapKit框架可以很方便的显示Google地图,并且可以在地图上添加标注。
二.具体介绍
1.MKMapView的显示
(1)创建MKMapView
CGRect rect = CGRectMake(0, 20, 320, 460);
MKMapView *mapView = [[MKMapView alloc] initWithFrame:rect];
(2)设定经纬度
CLLocationCoordinate2D theCoordinate;
theCoordinate.latitude=24.148926;
theCoordinate.longitude=120.715542;
(3)设定显示范围
MKCoordinateSpan theSpan;
theSpan.latitudeDelta=0.1;
theSpan.longitudeDelta=0.1;
(4)设置地图显示的中心及范围
MKCoordinateRegion theRegion;
theRegion.center=theCoordinate;
theRegion.span=theSpan;
(5)设置地图显示的类型及根据范围进行显示[mapView setMapType:MKMapTypeStandard];
[mapView setRegion:theRegion];
完成这些步骤,再把mapView添加到当前view中就可以显示了。
2.在MKMapView上添加标注
(1)和标注相关的类及协议
(a)MKAnnotation Protocol
标注必须实现这个协议,有三个属性,coordinate,title和subtitle,其中coordinate属性必须设置。
@property (nonatomic, readonly) CLLocationCoordinate2D coordinate
(b)MKAnnotationView
设置好Annotation后就可以用这个把标注在地图上显示出来,
- (id)initWithAnnotation:(id <MKAnnotation>)annotation reuseIdentifier:(NSString *)reuseIdentifier
其比较重要的属性有
@property (nonatomic, retain) UIImage *image
自定义在地图上标注的图片
@property (nonatomic) BOOL canShowCallout
设置点击后能否弹出标注
@property (retain, nonatomic) UIView *rightCalloutAccessoryView
property (retain, nonatomic) UIView *leftCalloutAccessoryView
设置在标注的左右边点击后进一步弹出附属的View
(c)MKPinAnnotationView
这是以大头针的方式显示标注,继承自MKAnnotationView,同时添加了两个属性
@property (nonatomic) MKPinAnnotationColor pinColor
设置大头针的颜色,有红绿紫三种颜色可选择
@property (nonatomic) BOOL animatesDrop
设置大头针是否以掉下来的动画方式显示
(2)在地图上添加Annotation的步骤
(a)创建一个实现MKAnnotation协议的类,在该类的初始化函数中给其coordinate属性设置
(b)用上述方法创建Annotation
(c)把创建的Annotation用addAnnotation的方法添加到MapView中
(d)实现MKMapViewDelegate代理,在代理函数
- (MKAnnotationView *)mapView:(MKMapView *)mView viewForAnnotation:(id <MKAnnotation>)annotation中把Annotation以MKPinAnnotationView或 MKAnnotationView的方式标注在地图上上显示。
[文档教程]使用MKMapView时,点击iPhone屏幕,大头针落在触点的代码
- - (MKAnnotationView *)mapView:(MKMapView *)mV viewForAnnotation:(id <MKAnnotation>)annotation
- {
- MKPinAnnotationView *pinView = nil;
- if(annotation != mapView.userLocation)
- {
- static NSString *defaultPinID = @”目的地”;
- pinView = (MKPinAnnotationView *)[mapView dequeueReusableAnnotationViewWithIdentifier:defaultPinID];
- if ( pinView == nil )
- pinView = [[[MKPinAnnotationView alloc] initWithAnnotation:annotation reuseIdentifier:defaultPinID] autorelease];
- pinView.pinColor = MKPinAnnotationColorPurple;
- pinView.canShowCallout = YES;
- pinView.animatesDrop = YES;
- pinView.draggable=YES;
- pinView.selected=YES;
- }
- else
- {
- [mapView.userLocation setTitle:@"I am here"];
- }
- return pinView;
- }
google地图http参数
无论是在android下还是通过浏览器,访问google地图是相同的参数。具体参数含义可以参见:
http://mapki.com/wiki/Google_Map_Parameters
对我目前比较有用的参数是:
- q,查询语句,我使用的是经纬度坐标;
- dirflg,路线类型,比如r表示乘车(公交),t表示避开收费站,h避开高速公路,w步行,什么都不选则是驾车(不避开收费站和高速公路);
- t,地图类型,m地图,k卫星,h地图和卫星混合,p地形
- 和方向相关的:saddr … 从哪里开始,终点在哪里。
dirflg默认情况,驾车,无限制:
避开高速公路:
公交:
步行:
混合模式:
卫星模式:
地形模式:
Google Places API
https://developers.google.com/maps/documentation/places/?hl=zh-CN#PlaceSearchRequests
