IOS SDK详解之CALayer(一)
原创Blog,转载请注明出处
http://blog.csdn.net/hello_hwc?viewmode=contents
前言:这个系列要更新Core Animation的内容,但是CALayer是Core Animation的基础。
一 CALayer是什么?
摘自官网的一句话-Layers Provide the Basis for Drawing and Animations(Layers是绘图和动画的基础)
Layer是在3D空间中的2D平面。Layer管理的几何(例如rotate,transfrom),内容(image等),和可视属性(backgroundColor,alpha)等信息。Layer主要通过管理bitmap来维护自己的状态信息,从这一点上来说,Layer可以看作对象模型,因为他们主要用来管理数据。
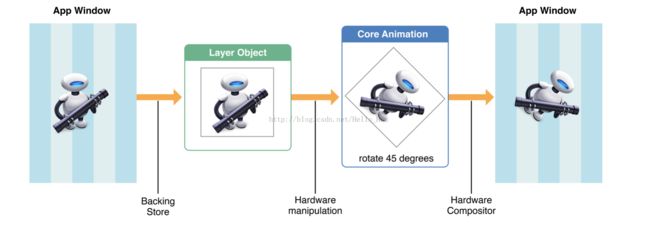
Layer是基于bitmap的,它会捕获View要呈现的内容,然后cache在一个bitmap中,这个bitmap可以看作一个对象。这样每次进行操作,例如平移旋转等,只是bitmap的矩阵运算。基于Layer的动画过程如图
由于基于Layer的绘制是处理静态的Bitmap的,而bitmap的处理又是GPU所擅长的,所以它的效率要比基于View绘制的高很多,因为基于View绘制的每次都要进行drawRect的调用重新绘制。
二 Layer支持继承,支持添加Sublayer,支持对sublayer进行层次调整
常用的Layer子类
| CAEmitterLayer |
发射器层,用来控制粒子效果 |
| CAGradientLayer |
梯度层,颜色渐变 |
| CAEAGLayer |
用OpenGL ES绘制的层 |
| CAReplicationLayer |
用来自动复制sublayer |
| CAScrollLayer |
用来管理可滑动的区域 |
| CAShapeLayer |
绘制立体的贝塞尔曲线 |
| CATextLayer |
可以绘制AttributeString |
| CATiledLayer |
用来管理一副可以被分割的大图 |
| CATransformLayer |
用来渲染3D layer的层次结构 |
管理Layer内容的几个函数
addSublayer:
insertSublayer:above:
insertSublayer:atIndex:
insertSublayer:below:
replaceSublayer:with:
三 直接设置UIView的Layer
先看一个示例,然后我会列出常用的属性,最后就某几个比较不容易理解的属性单独分析。
先在Stroyboard上拖拽一个UIView,然后control+drag出一个IBOutlet,命名为containView
@property (weak, nonatomic) IBOutlet UIView *containView;然后,在ViewDidLoad中,键入如下代码
   containView.layer.backgroundColor = [UIColor lightGrayColor].CGColor;//背景色
    containView.layer.cornerRadius = 20.0;//圆角
    containView.layer.shadowColor = [UIColor blueColor].CGColor;//阴影颜色
    containView.layer.shadowOpacity = 0.8;//阴影透明度
    containView.layer.shadowOffset = CGSizeMake(3.0, 3.0);//阴影的偏移量
    containView.layer.borderColor = [UIColor redColor].CGColor;//边界颜色
    containView.layer.borderWidth = 2;//边界宽度
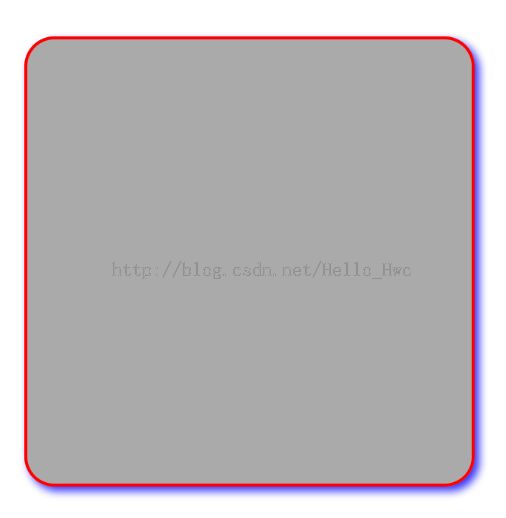
这样,运行后的效果如图
四 添加Sublayer
   containView.layer.backgroundColor = [UIColor lightGrayColor].CGColor;
    containView.layer.cornerRadius = 20.0;
    containView.layer.shadowColor = [UIColor blueColor].CGColor;
    containView.layer.shadowOpacity = 0.8;
    containView.layer.shadowOffset = CGSizeMake(3.0, 3.0);
    containView.layer.borderColor = [UIColor redColor].CGColor;
    containView.layer.borderWidth = 2;

    CALayer * sublayer1 = [CALayer layer];
    sublayer1.backgroundColor = [UIColor blueColor].CGColor;
    sublayer1.frame = CGRectMake(0, 0,80,80);
    sublayer1.anchorPoint = CGPointMake(0.5, 0.5);
    sublayer1.position = CGPointMake(100,100);
    [containView.layer addSublayer:sublayer1];
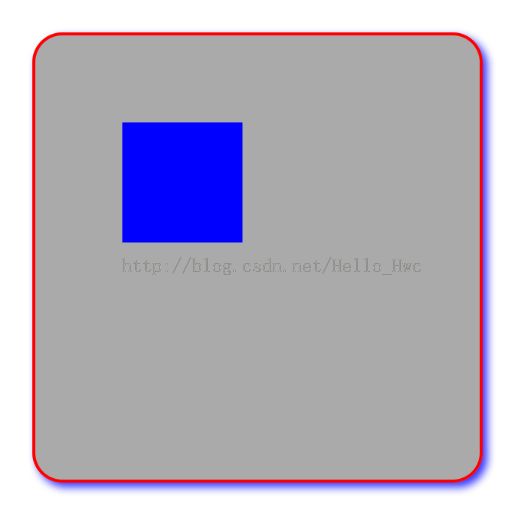
效果图如图
有可能添加Sublayer的时候,sublayer的frame范围已经超过了super Layer的frame,那么会怎么样呢?
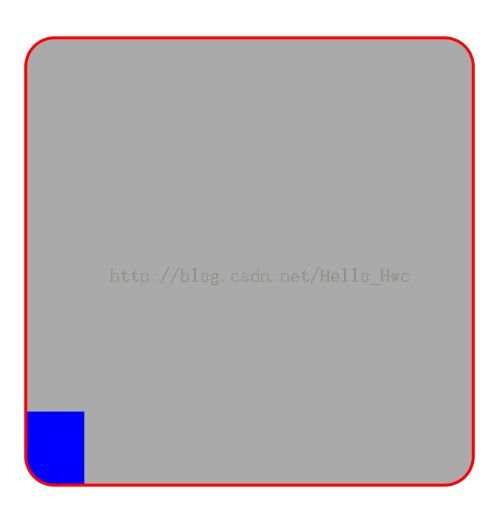
sublayer1.position = CGPointMake(0,CGRectGetMaxY(containView.bounds)-10);修改sublayer1的位置,然后效果如图
但是,很多时候我们并不想sublayer的范围超出 super layer,这时候可以设置这个属性
containView.layer.masksToBounds = YES;效果如图
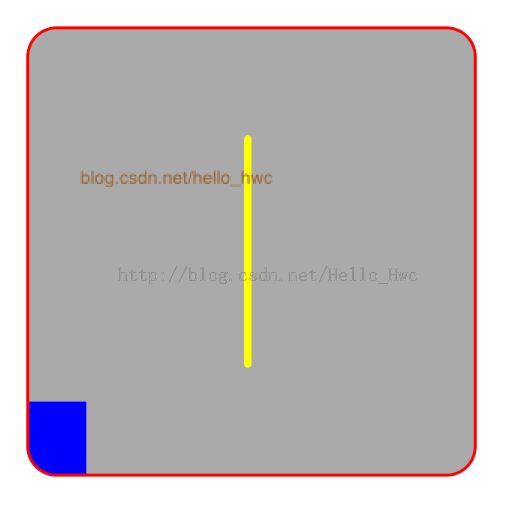
这里再听过两个常用的CALayer的子类UIShapeLayer和UITextLayer的示例
    CAShapeLayer * shapeLayer = [CAShapeLayer layer];
    CGMutablePathRef path = CGPathCreateMutable();
    CGPathMoveToPoint(path,nil,0.0,0);
    CGPathAddLineToPoint(path,nil,0.0,CGRectGetHeight(containView.bounds)/2);
    shapeLayer.path = path;
    shapeLayer.bounds = CGRectMake(0,0,5.0,CGRectGetHeight(containView.bounds)/2);
    shapeLayer.anchorPoint = CGPointMake(0.5, 0.5);
    shapeLayer.position = CGPointMake(CGRectGetMidX(containView.bounds),CGRectGetMidY(containView.bounds));
    shapeLayer.lineWidth = 5.0;
    shapeLayer.lineCap = kCALineCapRound;
    shapeLayer.strokeColor = [UIColor yellowColor].CGColor;
    [containView.layer addSublayer:shapeLayer];

    CATextLayer * textLayer = [CATextLayer layer];
    NSString * text = @"blog.csdn.net/hello_hwc";
    NSAttributedString * attributeString = [[NSAttributedString alloc] initWithString:text];
    textLayer.string = text;
    textLayer.alignmentMode = @"center";
    textLayer.fontSize = 12;
    textLayer.foregroundColor = [UIColor brownColor].CGColor;
    CGRect bounds;
    bounds.origin = CGPointMake(0, 0);
    bounds.size = attributeString.size;
    textLayer.bounds = bounds;
    textLayer.position = CGPointMake(100,100);
    [containView.layer addSublayer:textLayer];
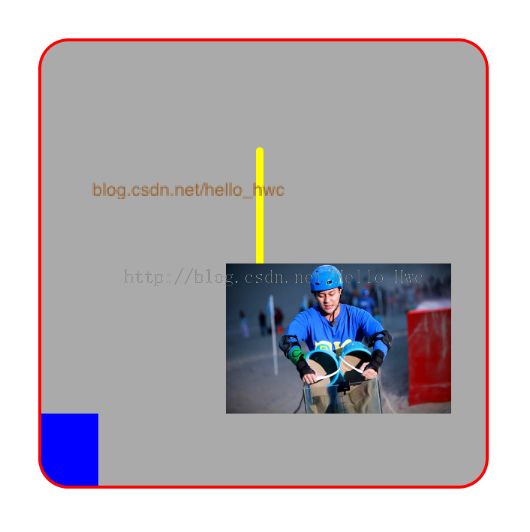
效果图如图
五 anchorPoint和position
和UIView不同,Layer主要由三个属性来设置位置(极少用Frame):
bounds - 设置大小
anchorPoint -设置锚点(锚点对后续的layer动画有很大影响)
position - 锚点在superLayer中的位置
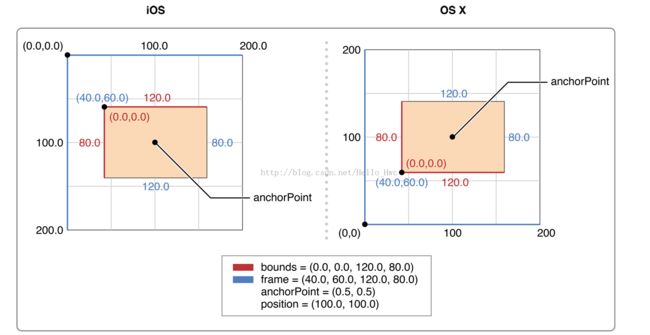
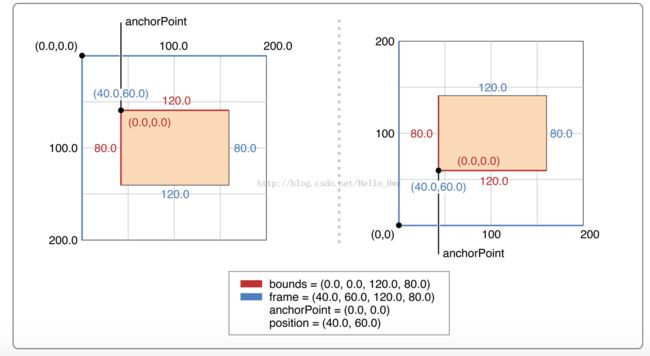
这样说有点抽象,我们看看以下的图就了解了
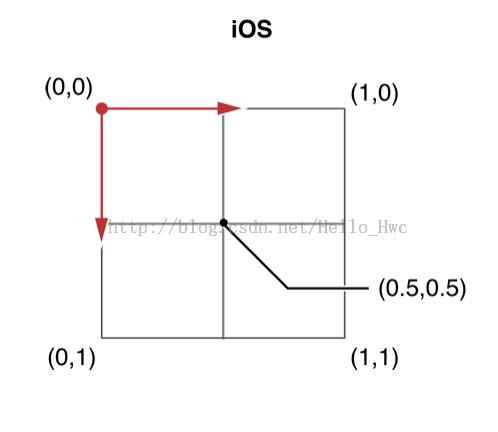
对于IOS来说,坐标系如图,archPoint(x,y)的两个值通常取0.0-1.0,默认值是(0.5,0.5)这里的值可以看作所占用x的比例,比如默认的0.5,0.5就是在x的中间和y的中间。
而position则是AnchorPoint在super layer中的位置
如下图
五 Layer显示图片
    CALayer * imageLayer = [CALayer layer];
    imageLayer.bounds = CGRectMake(0,0,200,100);
    imageLayer.position = CGPointMake(200,200);
    imageLayer.contents = (id)[UIImage imageNamed:@"lichen.jpg"].CGImage;
    imageLayer.contentsGravity = kCAGravityResizeAspect;
    [containView.layer addSublayer:imageLayer];
效果图
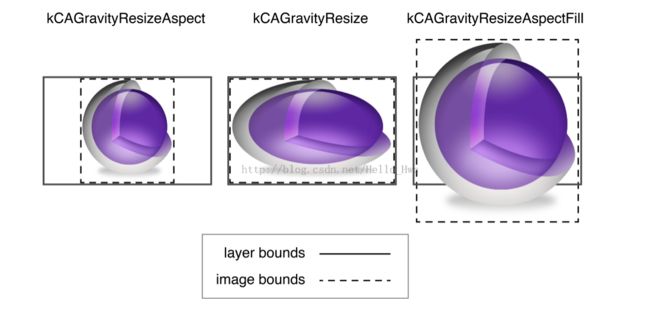
这里,要详细讲解以下contentGravity这个属性。这个属性决定了contents如何填充。
具体分为两个方面,
方面一,位置方面
具体如图
方面二,比例变换方面
如图
六 Layer于UIView的区别
摘自官方文档
Layers are not a replacement for your app’s views—that is, you cannot create a visual interface based solely on layer objects. Layers provide infrastructure for your views. Specifically, layers make it easier and more efficient to draw and animate the contents of views and maintain high frame rates while doing so. However, there are many things that layers do not do. Layers do not handle events, draw content, participate in the responder chain, or do many other things. For this reason, every app must still have one or more views to handle those kinds of interactions.In iOS, every view is backed by a corresponding layer object but in OS X you must decide which views should have layers. In OS X v10.8 and later, it probably makes sense to add layers to all of your views. However, you are not required to do so and can still disable layers in cases where the overhead is unwarranted and unneeded. Layers do increase your app’s memory overhead somewhat but their benefits often outweigh the disadvantage, so it is always best to test the performance of your app before disabling layer support.
简单来说,View和Layer最大的区别就是View可以接受用户输入(例如触摸)而Layer不可以,Layer单独并不能呈现出任何可视的内容,必须依托于View。Layer只是几何上呈现给用户的东西,它较为轻量,通常采用Cache技术,对资源消耗也较小。
七 接下来的计划
下一篇会继续更新CALayer,更新一些不常用的属性和方法,然后更新Core Animation的内容
