每当Service Server注册服务时,Context Manager都会把服务的名称与Binder节点编号注册到自身的服务目录中,该服务目录通过根文件系统下的/system/service程序即可查看。 下图即为在华为某型号手机上使用service list命令查看到的服务列表:
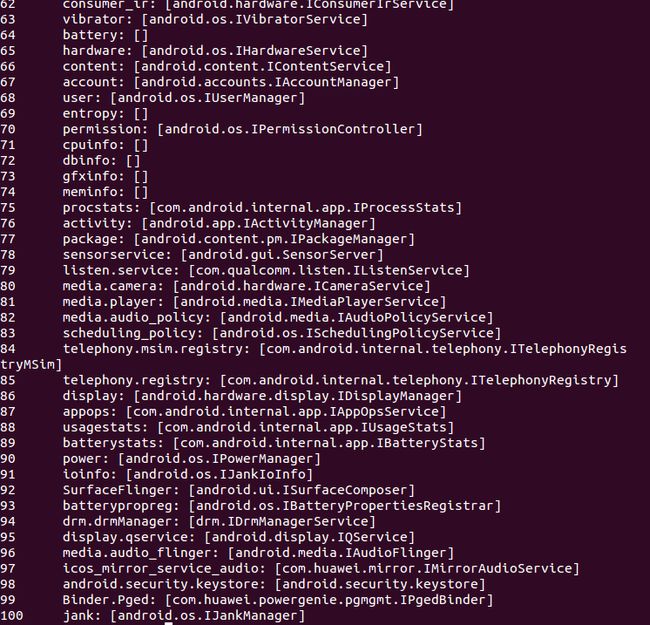
可以看到MediaPlayer Service以及Camera Service等。
1.启动运行Context Manager的main()函数
Context Manager与其他Android服务不同,它采用C语言编写,以便使其与Binder Driver紧密衔接。Context Manager的源码在/frameworks/base/cmds/servicemanager目录下的service_manager.c中。main()函数如下所示:
service_manager.c
<span class="line-number" style="margin: 0px; padding: 0px; border: 0px; font-style: inherit; font-variant: inherit; font-weight: inherit; line-height: inherit; font-family: inherit; vertical-align: baseline; color: rgb(88, 110, 117) !important;">1</span>
<span class="line-number" style="margin: 0px; padding: 0px; border: 0px; font-style: inherit; font-variant: inherit; font-weight: inherit; line-height: inherit; font-family: inherit; vertical-align: baseline; color: rgb(88, 110, 117) !important;">2</span>
<span class="line-number" style="margin: 0px; padding: 0px; border: 0px; font-style: inherit; font-variant: inherit; font-weight: inherit; line-height: inherit; font-family: inherit; vertical-align: baseline; color: rgb(88, 110, 117) !important;">3</span>
<span class="line-number" style="margin: 0px; padding: 0px; border: 0px; font-style: inherit; font-variant: inherit; font-weight: inherit; line-height: inherit; font-family: inherit; vertical-align: baseline; color: rgb(88, 110, 117) !important;">4</span>
<span class="line-number" style="margin: 0px; padding: 0px; border: 0px; font-style: inherit; font-variant: inherit; font-weight: inherit; line-height: inherit; font-family: inherit; vertical-align: baseline; color: rgb(88, 110, 117) !important;">5</span>
<span class="line-number" style="margin: 0px; padding: 0px; border: 0px; font-style: inherit; font-variant: inherit; font-weight: inherit; line-height: inherit; font-family: inherit; vertical-align: baseline; color: rgb(88, 110, 117) !important;">6</span>
<span class="line-number" style="margin: 0px; padding: 0px; border: 0px; font-style: inherit; font-variant: inherit; font-weight: inherit; line-height: inherit; font-family: inherit; vertical-align: baseline; color: rgb(88, 110, 117) !important;">7</span>
<span class="line-number" style="margin: 0px; padding: 0px; border: 0px; font-style: inherit; font-variant: inherit; font-weight: inherit; line-height: inherit; font-family: inherit; vertical-align: baseline; color: rgb(88, 110, 117) !important;">8</span>
<span class="line-number" style="margin: 0px; padding: 0px; border: 0px; font-style: inherit; font-variant: inherit; font-weight: inherit; line-height: inherit; font-family: inherit; vertical-align: baseline; color: rgb(88, 110, 117) !important;">9</span>
<span class="line-number" style="margin: 0px; padding: 0px; border: 0px; font-style: inherit; font-variant: inherit; font-weight: inherit; line-height: inherit; font-family: inherit; vertical-align: baseline; color: rgb(88, 110, 117) !important;">10</span>
<span class="line-number" style="margin: 0px; padding: 0px; border: 0px; font-style: inherit; font-variant: inherit; font-weight: inherit; line-height: inherit; font-family: inherit; vertical-align: baseline; color: rgb(88, 110, 117) !important;">11</span>
<span class="line-number" style="margin: 0px; padding: 0px; border: 0px; font-style: inherit; font-variant: inherit; font-weight: inherit; line-height: inherit; font-family: inherit; vertical-align: baseline; color: rgb(88, 110, 117) !important;">12</span>
<span class="line-number" style="margin: 0px; padding: 0px; border: 0px; font-style: inherit; font-variant: inherit; font-weight: inherit; line-height: inherit; font-family: inherit; vertical-align: baseline; color: rgb(88, 110, 117) !important;">13</span>
<span class="line-number" style="margin: 0px; padding: 0px; border: 0px; font-style: inherit; font-variant: inherit; font-weight: inherit; line-height: inherit; font-family: inherit; vertical-align: baseline; color: rgb(88, 110, 117) !important;">14</span>
<span class="line-number" style="margin: 0px; padding: 0px; border: 0px; font-style: inherit; font-variant: inherit; font-weight: inherit; line-height: inherit; font-family: inherit; vertical-align: baseline; color: rgb(88, 110, 117) !important;">15</span>
<span class="line-number" style="margin: 0px; padding: 0px; border: 0px; font-style: inherit; font-variant: inherit; font-weight: inherit; line-height: inherit; font-family: inherit; vertical-align: baseline; color: rgb(88, 110, 117) !important;">16</span>
|
int main(int argc, char**argv) { struct binder_state *bs; void *svcmgr=BINDER_SERVICE_MANAGER; bs=binder_open(128*1024); if(binder_become_context_manager(bs)){ LOGE("cannot become context manager (%s)\n",strerror(errno)); return -1; } svcmgr_handle=svcmgr; binder_loop(bs,svcmgr_handler); return 0; }
|
上面的代码按功能可以分为以下3部分:
-
调用binder_open()函数,将引起open()与mmap()函数调用,调用open()函数打开Binder Driver,而调用mmap()函数则生成接收IPC数据的Buffer. Context Manager使用大小为128KB的Buffer来接收IPC数据;
-
与Service Server和服务客户端不同,这是Context Manager特有的语句,用于访问Binder Driver,并将自身的Binder节点设置为0号节点。在binder_become_context_manager()中,仅有一条调用ioctl()函数的语句,如下所示:
binder_become_context_manager()
1
2
3
4
|
int binder_become_context_manager(struct binder_state*bs) { return ioctl(bs->fd,BINDER_SET_CONTEXT_MGR,0); }
|
- Context Manager将自身的Binder节点设置好后,就进入循环,不断等待接收IPC数据,那就是binder_loop()的作用。
下面将详细讲解这3个部分。
2.binder_open()函数分析
2.1 驱动函数注册
在分析binder_open()方法之前,我们先了解一下驱动函数是如何被调用的,我们先看一下下面的代码:
binder.c
1
2
3
4
5
6
7
8
9
10
11
12
13
14
15
16
17
18
19
20
21
22
23
24
|
static const struct file_operations binder_fops={ .owner=THIS_MODULE, .poll=binder_poll, .unlocked_ioctl=binder_ioctl, .mmap=binder_mmap, .open=binder_open, .flush=binder_flush, .release=binder_release, }; static struct miscdevice binder_miscdev={ .minor=MISC_DYNAMIC_MINOR, .name="binder", .fops=&binder_fops, } static int __init binder_init(void) { ... ret=misc_register(&binder_miscdev); ... } device_initcall(binder_init);
|
上面的代码在drivers/staging/android/binder.c中。我们知道,Android是基于Linux 2.6内核开发的,所以驱动的注册和Linux中也一样。
-
device_initcall(binder_init)的作用是将binder_init()函数注册到kernel的初始化函数列表中。当kernel启动后,会按照一定的次序调用初始化函数列表,也就会执行binder_init()函数,执行binder_init()时便会加载Binder驱动;
-
binder_init()函数中会通过misc_register(&binder_miscdev)将Binder驱动注册到文件节点/dev/binder上。在Linux中,一切都是文件。将Binder驱动注册到文件节点上之后,就可以通过操作文件节点进而对Binder驱动进行操作。而该文件节点/dev/binder的设备信息是binder_miscdev这个结构体对象。
-
binder_miscdev变量是struct miscdevice类型。minor是次设备号,这个我们不关心;name是Binder驱动对应在/dev虚拟文件系统下的设备节点名称,也就是/dev/binder中的"binder";fops是该设备节点的文件操作对象,它是我们需要重点关注的.
-
binder_fops变量是struct file_operations类型。其中owner标明了该文件操作变量的拥有者,就是该驱动;poll则指定了poll函数指针,当我们对/dev/binder文件节点执行poll操作时,实际上调用的就是binder_poll()函数;同理,mmap()对应binder_mmap(),open()对应binder_open(),ioctl()对应binder_ioctl
2.2 binder_open()
binder_open()方法的主要代码如下:
binder_open()
1
2
3
4
5
6
7
8
9
10
11
12
13
14
15
16
17
18
19
|
struct binder_state *binder_open(unsigned mapsize) { struct binder_state *bs; bs = malloc(sizeof(*bs)); ... bs->fd = open("/dev/binder", O_RDWR); ... bs->mapsize = mapsize; bs->mapped = mmap(NULL, mapsize, PROT_READ, MAP_PRIVATE, bs->fd, 0); ... return bs; }
|
该代码在/frameworks/base/cmds/servicemanager/binder.c中.
2.2.1 驱动中的binder_oepn()
通过2.1的分析,我们知道open(“/dev/binder”,O_RDWR);其实就是调用Binder驱动中的binder_open(),其代码如下:
binder_open()
1
2
3
4
5
6
7
8
9
10
11
12
13
14
15
16
17
18
19
20
21
22
23
24
25
26
27
28
29
30
31
32
33
34
35
36
|
static int binder_open(struct inode *nodp, struct file *filp) { struct binder_proc *proc; binder_debug(BINDER_DEBUG_OPEN_CLOSE, "binder_open: %d:%d\n", current->group_leader->pid, current->pid); //为proc分配内存 proc = kzalloc(sizeof(*proc), GFP_KERNEL); if (proc == NULL) return -ENOMEM; get_task_struct(current); //将proc->tsk指向当前线程 proc->tsk = current; //初始化proc的待处理事务列表 INIT_LIST_HEAD(&proc->todo); //初始化proc的待处理事务列表 init_waitqueue_head(&proc->wait); //设置proc的进程优先级设置为当前线程的优先级 proc->default_priority = task_nice(current); mutex_lock(&binder_lock); binder_stats_created(BINDER_STAT_PROC); //将该进程上下文信息proc保存到binder_procs中 hlist_add_head(&proc->proc_node, &binder_procs); //设置进程id proc->pid = current->group_leader->pid; INIT_LIST_HEAD(&proc->delivered_death); //将proc设置为flip的私有数据中,从而 使mmap(),ioctl()等函数都可以通过私有数据获取到proc,即该进程的context信息 filp->private_data = proc; mutex_unlock(&binder_lock); if (binder_debugfs_dir_entry_proc) { char strbuf[11]; snprintf(strbuf, sizeof(strbuf), "%u", proc->pid); proc->debugfs_entry = debugfs_create_file(strbuf, S_IRUGO, binder_debugfs_dir_entry_proc, proc, &binder_proc_fops); } return 0; }
|
tips: 结构体binder_proc用于记录进程上下文信息。它的详细介绍可参考博客Android Binder机制中的数据结构分析.
结合注释,很容易发现该函数的主要伤脑筋其实就是新建了一个binder_proc指针,并为其分配内存,再设置其属性(如tsk,todo,default_priority等),最后将其赋值给flip的private_data属性,这样以后就可以通过flip->private_data访问到进程上下方信息了。