Andoroid中引用控件和自定义布局
1引用控件:
在安卓的控件中,有些组件是经常用到的比如说界面上的一条线,这种线没有任何功能,可重复使用,可以把他定义出来不断引用
定义一条线
<?xml version="1.0" encoding="utf-8"?>
<LinearLayout xmlns:android="http://schemas.android.com/apk/res/android"
android:layout_width="match_parent"
android:layout_height="match_parent"
android:orientation="vertical" >
<TextView
android:layout_width="fill_parent"
android:layout_height="2dp"
android:layout_marginTop="10dp"
android:background="@color/background_huangse" />
</LinearLayout>
//在别的布局中引用这条线
<?xml version="1.0" encoding="utf-8"?>
<LinearLayout xmlns:android="http://schemas.android.com/apk/res/android"
android:layout_width="match_parent"
android:layout_height="match_parent"
android:orientation="vertical" >
<include layout="@layout/custom_line" />
</LinearLayout>
2自定义布局:
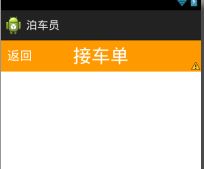
这样的标题每个界面都是完全一样而且多了一个相同的返回功能,这时候仅仅引用就不行了,就需要自定义布局
自定义布局的界面
<?xml version="1.0" encoding="utf-8"?>
<LinearLayout xmlns:android="http://schemas.android.com/apk/res/android"
android:layout_width="match_parent"
android:layout_height="match_parent"
android:orientation="vertical" >
<RelativeLayout
android:layout_width="match_parent"
android:layout_height="50dp"
android:background="@color/background_huangse" >
<TextView
android:id="@+id/custom_title"
android:layout_width="wrap_content"
android:layout_height="wrap_content"
android:layout_centerInParent="true"
android:text="@string/custom_jiechedan"
android:textColor="@color/textcolor_baise"
android:textSize="@dimen/biaoti30" />
<TextView
android:id="@+id/custom_back"
android:layout_width="wrap_content"
android:layout_height="wrap_content"
android:layout_alignParentLeft="true"
android:layout_centerVertical="true"
android:text="@string/custom_fanhui"
android:textSize="@dimen/fanhui20"
android:textColor="@color/textcolor_baise"
android:layout_marginLeft="10dp"
android:background="@drawable/selector_login_denglu"
/>
</RelativeLayout>
</LinearLayout>
自定义布局的代码
package com.boyouhui.www.base;
import com.boyouhui.www.R;
import com.boyouhui.www.R.id;
import com.boyouhui.www.R.layout;
import android.app.Activity;
import android.content.Context;
import android.util.AttributeSet;
import android.view.LayoutInflater;
import android.view.View;
import android.widget.Button;
import android.widget.LinearLayout;
import android.widget.TextView;
/**
* 自定义布局,为了相同的地方,多次被使用
*
*/
public class MyTitleLayout extends LinearLayout {
public MyTitleLayout(Context context, AttributeSet attrs) {
super(context, attrs);
LayoutInflater.from(context).inflate(R.layout.custom_layout, this);
//写的时候把textView的等号左边错写成了Button,但是没有报错
//在运行的时候,报的是xml报错,要认真看错误,要记着在写控件时可以先把控件
//定义出来,不要因为习惯了而犯错误
TextView custom_title = (TextView) findViewById(R.id.custom_title);
TextView custom_back=(TextView) findViewById(R.id.custom_back);
custom_back.setOnClickListener(new OnClickListener() {
@Override
public void onClick(View v) {
((Activity)getContext()).finish();
}
});
}
}
别的界面引用自定义布局
<?xml version="1.0" encoding="utf-8"?>
<LinearLayout xmlns:android="http://schemas.android.com/apk/res/android"
android:layout_width="match_parent"
android:layout_height="match_parent"
android:orientation="vertical" >
<!-- 引用自定义布局 内容是上面一行题目 -->
<com.boyouhui.www.base.MyTitleLayout
android:layout_width="fill_parent"
android:layout_height="wrap_content" >
</com.boyouhui.www.base.MyTitleLayout>
</LinearLayout>

