【第十章】集成其它Web框架 之 10.1 概述 集成Struts1.x ——跟我学spring3
10.1 概述
10.1.1 Spring和Web框架
Spring框架不仅提供了一套自己的Web框架实现,还支持集成第三方Web框架(如Struts1x、Struts2x)。
Spring实现的SpringMVC Web框架将在第十八章详细介绍。
由于现在有很大部分公司在使用第三方Web框架,对于并不熟悉SpringMVC Web框架的公司,为了充分利用开发人员已掌握的技术并相使用Spring的功能,想集成所使用的Web框架;由于Spring框架的高度可配置和可选择性,因此集成这些第三方Web框架是非常简单的。
之所以想把这些第三方Web框架集成到Spring中,最核心的价值是享受Spring的某些强大功能,如一致的数据访问,事务管理,IOC,AOP等等。
Spring为所有Web框架提供一致的通用配置,从而不管使用什么Web框架都使用该通用配置。
10.1.2 通用配置
Spring对所有Web框架抽象出通用配置,以减少重复配置,其中主要有以下配置:
1、Web环境准备:
1.1、在spring项目下创建如图10-1目录结构:

图10-1 web目录结构
1.2、右击spring项目选择【Propeties】,然后选择【Java Build Path】中的【Source】选项卡,将类输出路径修改为“spring/webapp/WEB-INF/classes”,如图10-2所示:

图10-2 修改类输出路径
1.3、web.xml初始内容如下:
- <?xml version="1.0" encoding="UTF-8"?>
- <web-app version="2.4" xmlns="http://java.sun.com/xml/ns/j2ee"
- xmlns:xsi="http://www.w3.org/2001/XMLSchema-instance"
- xsi:schemaLocation="http://java.sun.com/xml/ns/j2ee
- http://java.sun.com/xml/ns/j2ee/web-app_2_4.xsd">
- </web-app>
<?xml version="1.0" encoding="UTF-8"?>
<web-app version="2.4" xmlns="http://java.sun.com/xml/ns/j2ee"
       xmlns:xsi="http://www.w3.org/2001/XMLSchema-instance"
       xsi:schemaLocation="http://java.sun.com/xml/ns/j2ee
       http://java.sun.com/xml/ns/j2ee/web-app_2_4.xsd">
</web-app>
<web-app version="2.4">表示采用Servlet 2.4规范的Web程序部署描述格式
2、 指定Web应用上下文实现:在Web环境中,Spring提供WebApplicationContext(继承ApplicationContext)接口用于配置Web应用,该接口应该被实现为在Web应用程序运行时只读,即在初始化完毕后不能修改Spring Web容器(WebApplicationContext),但可能支持重载。
Spring提供XmlWebApplicationContext实现,并在Web应用程序中默认使用该实现,可以通过在web.xml配置文件中使用如下方式指定:
- <context-param>
- <param-name>contextClass</param-name>
- <param-value>
- org.springframework.web.context.support.XmlWebApplicationContext
- </param-value>
- </context-param>
<context-param>
    <param-name>contextClass</param-name>
    <param-value>
        org.springframework.web.context.support.XmlWebApplicationContext
    </param-value>
</context-param>
如上指定是可选的,只有当使用其他实现时才需要显示指定。
3、 指定加载文件位置:
前边已经指定了Spring Web容器实现,那从什么地方加载配置文件呢?
默认情况下将加载/WEB-INF/applicationContext.xml配置文件,当然也可以使用如下形式在web.xml中定义要加载自定义的配置文件,多个配置文件用“,”分割:
- <context-param>
- <param-name>contextConfigLocation</param-name>
- <param-value>
- classpath:chapter10/applicationContext-message.xml
- </param-value>
- </context-param>
<context-param>
    <param-name>contextConfigLocation</param-name>
    <param-value>
        classpath:chapter10/applicationContext-message.xml
    </param-value>
</context-param>
通用Spring配置文件(resources/chapter10/applicationContext-message.xml)内容如下所示:
- <bean id="message" class="java.lang.String">
- <constructor-arg index="0" value="Hello Spring"/>
- </bean>
<bean id="message" class="java.lang.String">
    <constructor-arg index="0" value="Hello Spring"/>
</bean>
4、 加载和关闭Spring Web容器:
我们已经指定了Spring Web容器实现和配置文件,那如何才能让Spring使用相应的Spring Web容器实现加载配置文件呢?
Spring使用ContextLoaderListener监听器来加载和关闭Spring Web容器,即使用如下方式在web.xml中指定:
- <listener>
- <listener-class>
- org.springframework.web.context.ContextLoaderListener
- </listener-class>
- </listener>
<listener>
    <listener-class>
       org.springframework.web.context.ContextLoaderListener
    </listener-class>
</listener>
ContextLoaderListener监听器将在Web应用启动时使用指定的配置文件初始化Spring Web容器,在Web应用关闭时销毁Spring Web容器。
注:监听器是从Servlet 2.3才开始支持的,因此如果Web应用所运行的环境是Servlet 2.2版本则可以使用ContextLoaderServlet来完成,但从Spring3.x版本之后ContextLoaderServlet被移除了。
5、 在Web环境中获取Spring Web容器:
既然已经定义了Spring Web容器,那如何在Web中访问呢?Spring提供如下方式来支持获取Spring Web容器(WebApplicationContext):
- WebApplicationContextUtils.getWebApplicationContext(servletContext);
- 或
- WebApplicationContextUtils.getRequiredWebApplicationContext(servletContext);
WebApplicationContextUtils.getWebApplicationContext(servletContext);
或
WebApplicationContextUtils.getRequiredWebApplicationContext(servletContext);
如果当前Web应用中的ServletContext 中没有相应的Spring Web容器,对于getWebApplicationContext()方法将返回null,而getRequiredWebApplicationContext()方法将抛出异常,建议使用第二种方式,因为缺失Spring Web容器而又想获取它,很明显是错误的,应该抛出异常。
6、 通用jar包,从下载的spring-framework-3.0.5.RELEASE-with-docs.zip中dist目录查找如下jar包:
| org.springframework.web-3.0.5.RELEASE.jar |
此jar包为所有Web框架所共有,提供WebApplicationContext及实现等。
7、Web服务器选择及测试:
目前比较流行的支持Servlet规范的开源Web服务器包括Tomcat、Resin、Jetty等,Web服务器有独立运行和嵌入式运行之分,嵌入式Web服务器可以在测试用例中运行不依赖于外部环境,因此我们使用嵌入式Web服务器。
Jetty是一个非常轻量级的Web服务器,并且提供嵌入式运行支持,在此我们选用Jetty作为测试使用的Web服务器。
7.1、准备Jetty嵌入式Web服务器运行需要的jar包:
到http://dist.codehaus.org/jetty/网站下载jetty-6.1.24,在下载的jetty-6.1.24.zip包中拷贝如下jar包到项目的lib/jetty目录下,并添加到类路径中:

7.2、在单元测试中启动Web服务器:
- package cn.javass.spring.chapter10;
- import org.junit.Test;
- import org.mortbay.jetty.Server;
- import org.mortbay.jetty.webapp.WebAppContext;
- public class WebFrameWorkIntegrateTest {
- @Test
- public void testWebFrameWork() throws Exception {
- Server server = new Server(8080);
- WebAppContext webapp = new WebAppContext();
- webapp.setResourceBase("webapp");
- //webapp.setDescriptor("webapp/WEB-INF/web.xml");
- webapp.setContextPath("/");
- webapp.setClassLoader(Thread.currentThread().getContextClassLoader());
- server.setHandler(webapp);
- server.start();
- server.join();
- //server.stop();
- }
- }
package cn.javass.spring.chapter10;
import org.junit.Test;
import org.mortbay.jetty.Server;
import org.mortbay.jetty.webapp.WebAppContext;
public class WebFrameWorkIntegrateTest {
    @Test
    public void testWebFrameWork() throws Exception {
        Server server = new Server(8080);
        WebAppContext webapp = new WebAppContext();
        webapp.setResourceBase("webapp");
        //webapp.setDescriptor("webapp/WEB-INF/web.xml");
        webapp.setContextPath("/");
        webapp.setClassLoader(Thread.currentThread().getContextClassLoader());
        server.setHandler(webapp);
        server.start();
        server.join();
       //server.stop();
    }
}
- 创建内嵌式Web服务器:使用new Server(8080)新建一个Jetty服务器,监听端口为8080;
- 创建一个Web应用:使用new WebAppContext()新建一个Web应用对象,一个Web应用可以认为就是一个WebAppContext对象;
- 指定Web应用的目录:使用webapp.setResourceBase("webapp")指定Web应用位于项目根目录下的“webapp”目录下;
- 指定部署描述符:使用webapp.setDescriptor("webapp/WEB-INF/web.xml");此处指定部署描述符为项目根目录下的“webapp/WEB-INF/web.xml”,该步骤是可选的,如果web.xml位于Web应用的WEB-INF下。
- 指定Web应用请求上下文:使用webapp.setContextPath("/")指定请求上下文为“/”,从而访问该Web应用可以使用如“http://localhost:8080/hello.do”形式访问;
- 指定类装载器:因为Jetty自带的ClassLoader在内嵌环境中对中文路径处理有问题,因此我们使用Eclispe的ClassLoader,即通过“webapp.setClassLoader(Thread.currentThread().getContextClassLoader()) ”指定;
- 启动Web服务器:使用“server.start()”启动并使用“server.join()”保证Web服务器一直运行;
- 关闭Web服务器:可以通过某种方式执行“server.stop()”来关闭Web服务器;另一种方式是通过【Console】控制台面板的【Terminate】终止按钮关闭,如图10-3所示:

图10-3 点击红色按钮关闭Web服务器
原创内容,转载请注明出处【http://sishuok.com/forum/blogPost/list/0/2510.html】
先进行通用配置, 【第十章】集成其它Web框架 之 10.1 概述
10.2 集成Struts1.x
10.2.1 概述
Struts1.x是最早实现MVC(模型-视图-控制器)模式的Web框架之一,其使用非常广泛,虽然目前已经有Struts2.x等其他Web框架,但仍有很多公司使用Struts1.x框架。
集成Struts1.x也非常简单,除了通用配置外,有两种方式可以将Struts1.x集成到Spring中:
- 最简单集成:使用Spring提供的WebApplicationContextUtils工具类中的获取Spring Web容器,然后通过Spring Web容器获取Spring管理的Bean;
- Struts1.x插件集成:利用Struts1.x中的插件ContextLoaderPlugin来将Struts1.x集成到Spring中。
接下来让我们首先让我们准备Struts1x所需要的jar包:
1.1、从下载的spring-framework-3.0.5.RELEASE-with-docs.zip中dist目录查找如下jar包,该jar包用于提供集成struts1.x所需要的插件实现等:
| org.springframework.web.struts-3.0.5.RELEASE.jar |
1.2、从下载的spring-framework-3.0.5.RELEASE-dependencies.zip中查找如下依赖jar包,该组jar是struts1.x需要的jar包:
|
com.springsource.org.apache.struts-1.2.9.jar //struts1.2.9实现包 com.springsource.org.apache.commons.digester-1.8.1.jar //用于解析struts配置文件 com.springsource.org.apache.commons.beanutils-1.8.0.jar //用于请求参数绑定 com.springsource.javax.servlet-2.5.0.jar //Servlet 2.5 API antlr.jar //语法分析包(已有) commons-logging.jar //日志记录组件包(已有) servlet-api.jar //Servlet API包(已有) jsp-api.jar //JSP API包(已有,可选) commons-validator.jar //验证包(可选) commons-fileupload.jar //文件上传包(可选)
|
10.2.2 最简单集成
只使用通用配置,利用WebApplicationContextUtils提供的获取Spring Web容器方法获取Spring Web容器,然后从Spring Web容器获取Spring管理的Bean。
1、 第一个Action实现:
- package cn.javass.spring.chapter10.struts1x.action;
- import org.apache.struts.action.Action;
- //省略部分import
- public class HelloWorldAction1 extends Action {
- public ActionForward execute(ActionMapping mapping, ActionForm form, HttpServletRequest request, HttpServletResponse response) throws Exception {
- WebApplicationContext ctx = WebApplicationContextUtils.
- getRequiredWebApplicationContext(getServlet().getServletContext());
- String message = ctx.getBean("message", String.class);
- request.setAttribute("message", message);
- return mapping.findForward("hello");
- }
- }
package cn.javass.spring.chapter10.struts1x.action;
import org.apache.struts.action.Action;
//省略部分import
public class HelloWorldAction1 extends Action {
    public ActionForward execute(ActionMapping mapping, ActionForm form, HttpServletRequest request, HttpServletResponse response) throws Exception {

        WebApplicationContext ctx = WebApplicationContextUtils.
            getRequiredWebApplicationContext(getServlet().getServletContext());
        String message = ctx.getBean("message", String.class);
        request.setAttribute("message",  message);
        return mapping.findForward("hello");
    }
}
此Action实现非常简单,首先通过WebApplicationContextUtils获取Spring Web容器,然后从Spring Web容器中获取“message”Bean并将其放到request里,最后转到“hello”所代表的jsp页面。
2、JSP页面定义(webapp/WEB-INF/jsp/hello.jsp):
- <%@ page language="java" pageEncoding="UTF-8"
- contentType="text/html; charset=UTF-8" %>
- <!DOCTYPE html PUBLIC "-//W3C//DTD HTML 4.01 Transitional//EN"
- "http://www.w3.org/TR/html4/loose.dtd">
- <html>
- <head>
- <title>Hello World</title>
- </head>
- <body>
- ${message}
- </body>
- </html>
<%@ page language="java" pageEncoding="UTF-8"
contentType="text/html; charset=UTF-8" %>
<!DOCTYPE html PUBLIC "-//W3C//DTD HTML 4.01 Transitional//EN"
"http://www.w3.org/TR/html4/loose.dtd">
<html>
<head>
    <title>Hello World</title>
</head>
<body>
    ${message}
</body>
</html>
3、配置文件定义:
3.1、Spring配置文件定义(resources/chapter10/applicationContext-message.xml):
在此配置文件中定义我们使用的“message”Bean;
- <bean id="message" class="java.lang.String">
- <constructor-arg index="0" value="Hello Spring"/>
- </bean>
<bean id="message" class="java.lang.String">
    <constructor-arg index="0" value="Hello Spring"/>
</bean>
3.2、struts配置文件定义(resources/chapter10/struts1x/struts-config.xml):
- <?xml version="1.0" encoding="UTF-8"?>
- <!DOCTYPE struts-config PUBLIC
- "-//Apache Software Foundation//DTD Struts Configuration 1.1//EN"
- "http://jakarta.apache.org/struts/dtds/struts-config_1_1.dtd">
- <struts-config>
- <action-mappings>
- <action path="/hello" type="cn.javass.spring.chapter10.struts1x.action.HelloWorldAction1">
- <forward name="hello" path="/WEB-INF/jsp/hello.jsp"/>
- </action>
- </action-mappings>
- </struts-config>
<?xml version="1.0" encoding="UTF-8"?>
<!DOCTYPE struts-config PUBLIC
          "-//Apache Software Foundation//DTD Struts Configuration 1.1//EN"
          "http://jakarta.apache.org/struts/dtds/struts-config_1_1.dtd">
<struts-config>
  <action-mappings>
    <action path="/hello" type="cn.javass.spring.chapter10.struts1x.action.HelloWorldAction1">
       <forward name="hello" path="/WEB-INF/jsp/hello.jsp"/>
    </action>
  </action-mappings>
</struts-config>
3.3、web.xml部署描述符文件定义(webapp/WEB-INF/web.xml)添加如下内容:
- <!-- Struts1.x前端控制器配置开始 -->
- <servlet>
- <servlet-name>hello</servlet-name>
- <servlet-class>org.apache.struts.action.ActionServlet</servlet-class>
- <init-param>
- <param-name>config</param-name>
- <param-value>
- /WEB-INF/classes/chapter10/struts1x/struts-config.xml
- </param-value>
- </init-param>
- <load-on-startup>1</load-on-startup>
- </servlet>
- <servlet-mapping>
- <servlet-name>hello</servlet-name>
- <url-pattern>*.do</url-pattern>
- </servlet-mapping>
- <!-- Struts1.x前端控制器配置结束 -->
<!-- Struts1.x前端控制器配置开始   -->
       <servlet>
        <servlet-name>hello</servlet-name>
        <servlet-class>org.apache.struts.action.ActionServlet</servlet-class>

        <init-param>
            <param-name>config</param-name>
            <param-value>
                      /WEB-INF/classes/chapter10/struts1x/struts-config.xml
             </param-value>
        </init-param>
        <load-on-startup>1</load-on-startup>
       </servlet>
       <servlet-mapping>
        <servlet-name>hello</servlet-name>
        <url-pattern>*.do</url-pattern>
      </servlet-mapping>
<!-- Struts1.x前端控制器配置结束   -->
Struts1.x前端控制器配置了ActionServlet前端控制器,其拦截以.do开头的请求,Strut配置文件通过初始化参数“config”来指定,如果不知道“config”参数则默认加载的配置文件为“/WEB-INF/ struts-config.xml”。
4、执行测试:在Web浏览器中输入http://localhost:8080/hello.do可以看到“Hello Spring”信息说明测试正常。
有朋友想问,我不想使用这种方式,我想在独立环境内测试,没关系,您只需将spring/lib目录拷贝到spring/webapp/WEB-INF/下,然后将webapp拷贝到如tomcat中即可运行,尝试一下吧。
Spring还提供ActionSupport类来简化获取WebApplicationContext,Spring为所有标准Action类及子类提供如下支持类,即在相应Action类后边加上Support后缀:
- ActionSupport
- DispatchActionSupport
- LookupDispatchActionSupport
- MappingDispatchActionSupport
具体使用方式如下:
1、Action定义
- package cn.javass.spring.chapter10.struts1x.action;
- //省略import
- public class HelloWorldAction2 extends ActionSupport {
- public ActionForward execute(ActionMapping mapping, ActionForm form, HttpServletRequest request, HttpServletResponse response) throws Exception {
- WebApplicationContext ctx = getWebApplicationContext();
- String message = ctx.getBean("message", String.class);
- request.setAttribute("message", message);
- return mapping.findForward("hello");
- }
- }
package cn.javass.spring.chapter10.struts1x.action;
//省略import
public class HelloWorldAction2 extends ActionSupport {
public ActionForward execute(ActionMapping mapping, ActionForm form, HttpServletRequest request, HttpServletResponse response) throws Exception {
        WebApplicationContext ctx = getWebApplicationContext();
        String message = ctx.getBean("message", String.class);
        request.setAttribute("message", message);
        return mapping.findForward("hello");
    }
}
和第一个示例唯一不同的是直接调用getWebApplicationContext()即可获得Spring Web容器。
2、修改Struts配置文件(resources/chapter10/struts1x/struts-config.xml)添加如下Action定义:
- <action path="/hello2" type="cn.javass.spring.chapter10.struts1x.action.HelloWorldAction2">
- <forward name="hello" path="/WEB-INF/jsp/hello.jsp"/>
- </action>
<action path="/hello2" type="cn.javass.spring.chapter10.struts1x.action.HelloWorldAction2">
    <forward name="hello" path="/WEB-INF/jsp/hello.jsp"/>
</action>
3、启动嵌入式Web服务器并在Web浏览器中输入http://localhost:8080/hello2.do可以看到“Hello Spring”信息说明Struts1集成成功。
这种集成方式好吗?而且这种方式算是集成吗?直接获取Spring Web容器然后从该Spring Web容器中获取Bean,暂且看作是集成吧,这种集成对于简单操作可以接受,但更复杂的注入呢?接下来让我们学习使用Struts插件进行集成。
10.2.2 Struts1.x插件集成
Struts插件集成使用ContextLoaderPlugin类,该类用于为ActionServlet加载Spring配置文件。
1、在Struts配置文件(resources/chapter10/struts1x/struts-config.xml)中配置插件:
- <plug-in className="org.springframework.web.struts.ContextLoaderPlugIn">
- <set-property property="contextClass" value="org.springframework.web.context.support.XmlWebApplicationContext"/>
- <set-property property="contextConfigLocation" value="/WEB-INF/hello-servlet.xml"/>
- <set-property property="namespace" value="hello"/>
- </plug-in>
<plug-in className="org.springframework.web.struts.ContextLoaderPlugIn">
    <set-property property="contextClass" value="org.springframework.web.context.support.XmlWebApplicationContext"/>
    <set-property property="contextConfigLocation" value="/WEB-INF/hello-servlet.xml"/>
    <set-property property="namespace" value="hello"/>
</plug-in>
- contextClass:可选,用于指定WebApplicationContext实现类,默认是XmlWebApplicationContext;
- contextConfigLocation:指定Spring配置文件位置,如果我们的ActionServlet 在 web.xml 里面通过 <servlet-name>hello</servlet-name>指定名字为“hello”,且没有指定contextConfigLocation,则默认Spring配置文件是/WEB-INF/hello-servlet.xml;
- namespace:因为默认使用ActionServlet在web.xml定义中的Servlet的名字,因此如果想要使用其他名字可以使用该变量指定,如指定“hello”,将加载的Spring配置文件为/WEB-INF/hello-servlet.xml;
由于我们的ActionServlet在web.xml中的名字为hello,而我们的配置文件在/WEB-INF/hello-servlet.xml,因此contextConfigLocation和namespace可以不指定,因此最简单配置如下:
- <plug-in className="org.springframework.web.struts.ContextLoaderPlugIn"/>
<plug-in className="org.springframework.web.struts.ContextLoaderPlugIn"/>
通用配置的Spring Web容器将作为ContextLoaderPlugin中创建的Spring Web容器的父容器存在,然而可以省略通用配置而直接在struts配置文件中通过ContextLoaderPlugin插件指定所有配置文件。
插件已经配置了,那如何定义Action、配置Action、配置Spring管理Bean呢,即如何真正集成Spring+Struts1x呢?使用插件方式时Action将在Spring中配置而不是在Struts中配置了,Spring目前提供以下两种方式:
- 将Struts配置文件中的<action>的type属性指定为DelegatingActionProxy,然后在Spring中配置同名的Spring管理的Action Bean;
- 使用Spring提供的DelegatingRequestProcessor重载 Struts 默认的 RequestProcessor来从Spring容器中查找同名的Spring管理的Action Bean。
看懂了吗?好像没怎么看懂,那就直接上代码,有代码有真相。
2、定义Action实现,由于Action将在Spring中配置,因此message可以使用依赖注入方式了:
- package cn.javass.spring.chapter10.struts1x.action;
- //省略
- public class HelloWorldAction3 extends Action {
- private String message;
- public ActionForward execute(ActionMapping mapping, ActionForm form, HttpServletRequest request, HttpServletResponse response) throws Exception {
- request.setAttribute("message", message);
- return mapping.findForward("hello");
- }
- public void setMessage(String message) {//有setter方法,大家是否想到setter注入
- this.message = message;
- }
- }
package cn.javass.spring.chapter10.struts1x.action;
//省略
public class HelloWorldAction3 extends Action {
    private String message;
    public ActionForward execute(ActionMapping mapping, ActionForm form, HttpServletRequest request, HttpServletResponse response) throws Exception {

        request.setAttribute("message", message);
        return mapping.findForward("hello");
    }
    public void setMessage(String message) {//有setter方法,大家是否想到setter注入
        this.message = message;
    }
}
3、DelegatingActionProxy方式与Spring集成配置:
3.1、在Struts配置文件(resources/chapter10/struts1x/struts-config.xml)中进行Action定义:
- <action path="/hello3" type="org.springframework.web.struts.DelegatingActionProxy">
- <forward name="hello" path="/WEB-INF/jsp/hello.jsp"/>
- </action>
<action path="/hello3" type="org.springframework.web.struts.DelegatingActionProxy">
    <forward name="hello" path="/WEB-INF/jsp/hello.jsp"/>
</action>
3.2、在Spring配置文件(webapp/WEB-INF/hello-servlet.xml)中定义Action对应的Bean:
- <bean name="/hello3" class="cn.javass.spring.chapter10.struts1x.action.HelloWorldAction3">
- <property name="message" ref="message"/>
- </bean>
<bean name="/hello3" class="cn.javass.spring.chapter10.struts1x.action.HelloWorldAction3">
    <property name="message" ref="message"/>
</bean>
3.3、启动嵌入式Web服务器并在Web浏览器中输入http://localhost:8080/hello3.do可以看到“Hello Spring”信息说明测试正常。
从以上配置中可以看出:
- Struts配置文件中<action>标签的path属性和Spring配置文件的name属性应该完全一样,否则错误;
- Struts通过DelegatingActionProxy去到Spring Web容器中查找同名的Action Bean;
很简单吧,DelegatingActionProxy是个代理Action,其实现了Action类,其内部帮我们查找相应的Spring管理Action Bean并把请求转发给这个真实的Action。
4、DelegatingRequestProcessor方式与Spring集成:
4.1、首先要替换掉Struts默认的RequestProcessor,在Struts配置文件(resources/chapter10/struts1x/struts-config.xml)中添加如下配置:
- <controller>
- <set-property property="processorClass"
- value="org.springframework.web.struts.DelegatingRequestProcessor"/>
- </controller>
<controller>
    <set-property property="processorClass"
         value="org.springframework.web.struts.DelegatingRequestProcessor"/>
</controller>
4.2、在Struts配置文件(resources/chapter10/struts1x/struts-config.xml)中进行Action定义:
- <action path="/hello4" type=" cn.javass.spring.chapter10.struts1x.action.HelloWorldAction3">
- <forward name="hello" path="/WEB-INF/jsp/hello.jsp"/>
- </action>
<action path="/hello4" type=" cn.javass.spring.chapter10.struts1x.action.HelloWorldAction3">
    <forward name="hello" path="/WEB-INF/jsp/hello.jsp"/>
</action>
或更简单形式:
- <action path="/hello4">
- <forward name="hello" path="/WEB-INF/jsp/hello.jsp"/>
- </action>
<action path="/hello4">
    <forward name="hello" path="/WEB-INF/jsp/hello.jsp"/>
</action>
4.3、在Spring配置文件(webapp/WEB-INF/hello-servlet.xml)中定义Action对应的Bean:
- <bean name="/hello4" class="cn.javass.spring.chapter10.struts1x.action.HelloWorldAction3">
- <property name="message" ref="message"/>
- </bean>
<bean name="/hello4" class="cn.javass.spring.chapter10.struts1x.action.HelloWorldAction3">
    <property name="message" ref="message"/>
</bean>
4.4、启动嵌入式Web服务器并在Web浏览器中输入http://localhost:8080/hello4.do可以看到“Hello Spring”信息说明Struts1集成成功。
从以上配置中可以看出:
- Struts配置文件中<action>标签的path属性和Spring配置文件的name属性应该完全一样,否则错误;
- Struts通过DelegatingRequestProcessor去到Spring Web容器中查找同名的Action Bean;
很简单吧,只是由DelegatingRequestProcessor去帮我们查找相应的Action Bean,但没有代理Action了,所以推荐使用该方式。
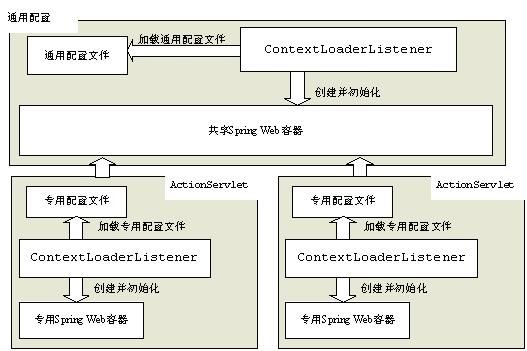
图10-4 共享及专用Spring Web容器
Struts1x与Spring集成到此就完成了,在集成时需要注意一下几点:
- 推荐使用ContextLoaderPlugin+DelegatingRequestProcessor方式集成;
- 当有多个Struts模块时建议在通用配置部分配置通用部分,因为通用配置在正在Web容器中是可共享的,而在各个Struts模块配置文件中配置是不可共享的,因此不推荐直接使用ContextLoaderPlugin中为每个模块都指定所有配置,因为ContextLoaderPlugin加载的Spring容器只对当前的ActionServlet有效对其他ActionServlet无效,如图10-4所示。