【DirectX11-Tutorial】编写第一个窗口程序creating a window
接下来开始第一个窗口程序,上一个程序中使用WinMain()函数开始整个程序,这一次将结合另一个函数WinProc(),这个函数将处理程序每一个系统运行中的传来的信息。
第一个窗口程序
下面就是运行一个窗口的全部代码:
// include the basic windows header file

#include <windows.h>

#include <windowsx.h>

// the WindowProc function prototype

LRESULT CALLBACK WindowProc(HWND hWnd,

                         UINT message,

                         WPARAM wParam,

                         LPARAM lParam);

// the entry point for any Windows program

int WINAPI WinMain(HINSTANCE hInstance,

                   HINSTANCE hPrevInstance,

                   LPSTR lpCmdLine,

                   int nCmdShow)

{

    // the handle for the window, filled by a function

    HWND hWnd;

    // this struct holds information for the window class

    WNDCLASSEX wc;

    // clear out the window class for use

    ZeroMemory(&wc, sizeof(WNDCLASSEX));

    // fill in the struct with the needed information

    wc.cbSize = sizeof(WNDCLASSEX);

    wc.style = CS_HREDRAW | CS_VREDRAW;

    wc.lpfnWndProc = WindowProc;

    wc.hInstance = hInstance;

    wc.hCursor = LoadCursor(NULL, IDC_ARROW);

    wc.hbrBackground = (HBRUSH)COLOR_WINDOW;

    wc.lpszClassName = L"WindowClass1";

    // register the window class

    RegisterClassEx(&wc);

    // create the window and use the result as the handle

    hWnd = CreateWindowEx(NULL,

                          L"WindowClass1",    // name of the window class

                          L"Our First Windowed Program",   // title of the window

                          WS_OVERLAPPEDWINDOW,    // window style

                          300,    // x-position of the window

                          300,    // y-position of the window

                          500,    // width of the window

                          400,    // height of the window

                          NULL,    // we have no parent window, NULL

                          NULL,    // we aren't using menus, NULL

                          hInstance,    // application handle

                          NULL);    // used with multiple windows, NULL

    // display the window on the screen

    ShowWindow(hWnd, nCmdShow);

    // enter the main loop:

    // this struct holds Windows event messages

    MSG msg;

    // wait for the next message in the queue, store the result in 'msg'

    while(GetMessage(&msg, NULL, 0, 0))

    {

        // translate keystroke messages into the right format

        TranslateMessage(&msg);

        // send the message to the WindowProc function

        DispatchMessage(&msg);

    }

    // return this part of the WM_QUIT message to Windows

    return msg.wParam;

}

// this is the main message handler for the program

LRESULT CALLBACK WindowProc(HWND hWnd, UINT message, WPARAM wParam, LPARAM lParam)

{

    // sort through and find what code to run for the message given

    switch(message)

    {

        // this message is read when the window is closed

        case WM_DESTROY:

            {

                // close the application entirely

                PostQuitMessage(0);

                return 0;

            } break;

    }

    // Handle any messages the switch statement didn't

    return DefWindowProc (hWnd, message, wParam, lParam);

}
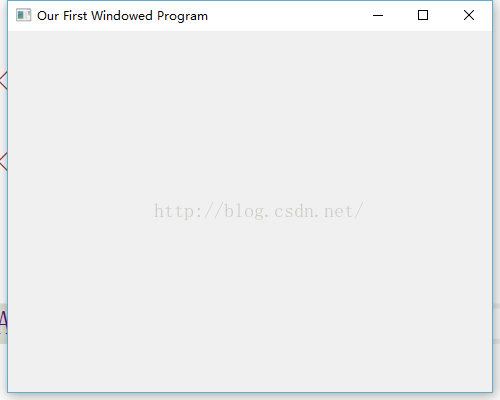
Our First Windowed Program
第一个窗口程序
Building the Window
以上程序中的代码,只有三个步骤用于创建窗口,其余则让程序保持正常运行。三个步骤分别是:
1. Register the window class.
2. Create the window.
3. Show the window.
这些步骤仅仅归结于以下内容:
RegisterClassEx();

CreateWindowEx();

ShowWindow();
下来快速看看,其中包含的细节:
1. Registering the Window Class
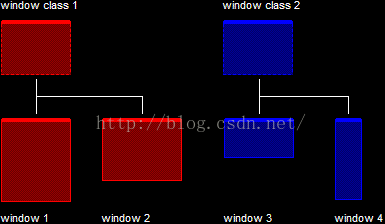
简单地说,窗口类是系统处理各种参数变量的结构基础。不需要了解其中的细节,只需要知道从定义上讲它并不是一个C++类。而是一种特定属性窗口的模板。
The Window Class
窗口类
在上图中,"window 1" 和"window 2"用"window class 1"定义基本属性,而 "window class 2"同样"window 3" 和"window 4"作为基本属性的定义。每一个窗口都有其自己单独的属性,例如窗口大小、位置、内容等。但是基本属性仍然是窗口类。在此步骤中,将注册窗口类,这意味着让系统创建一个窗口类,为了实现这一环节有如下代码:
// this struct holds information for the window class

WNDCLASSEX wc;

// clear out the window class for use

ZeroMemory(&wc, sizeof(WNDCLASSEX));

// fill in the struct with the needed information

wc.cbSize = sizeof(WNDCLASSEX);

wc.style = CS_HREDRAW | CS_VREDRAW;

wc.lpfnWndProc = WindowProc;

wc.hInstance = hInstance;

wc.hCursor = LoadCursor(NULL, IDC_ARROW);

wc.hbrBackground = (HBRUSH)COLOR_WINDOW;

wc.lpszClassName = L"WindowClass1";

// register the window class

RegisterClassEx(&wc);
了解每一个类,但是不需要花费太多时间在这些不必要的细节上面。
WNDCLASSEX wc;
这是包含窗口类的信息的结构。我们不涉及其所有内容,如一些不需要在游戏编程中涉及的内容。如果你想要结构完整的概括,可以在 WNDCLASSEX 下 MSDN 库中找到它。
顺便说一句, 'EX' 是表明这是加长版结构的 WNDCLASS,基本上是相同的除了不会涉及到的一些其他地方。CreateWindowEx() 和 RegisterClassEx() 的功能也是一样的。
ZeroMemory(&wc, sizeof(WNDCLASSEX));
这个函数可以初始化数组内存为NULL,第一个参数指向数值的初始位置,第二个参数标识数组的长度。使用这两个参数可以很快的初始化。
wc.cbSize = sizeof(WNDCLASSEX);
用于指定内容计算结构的大小,使用sizeof()运算符来实现。
wc.style = CS_HREDRAW | CS_VREDRAW;
使用这个语句我们可以存储窗口的样式,虽然可以自行插入一下参数但是在游戏编程中几乎用不到。其可以插入的值能在WNDCLASSEX 下 MSDN 库中找到。现在,使用 CS_HREDRAW 和CS_VREDRAW的OR逻辑。这两个参数告诉 Windows,如果它移动垂直或水平则重绘窗口。这是适用于窗口的语句,而不是游戏。稍后将重置此值,当我们进入全屏游戏。
wc.lpfnWndProc = WindowProc;
这个值告诉窗口类当从系统受到指令时该使用什么语句。在程序中,这个函数语句是WindowProc(),但是它也可以是其他适合的语句,例如WndProc()、WinProc()或者ASDF()。
wc.hInstance = hInstance;
上一篇文章提到过这个语句,用来处理应用的副本,只是将值传递到WinMain()。
wc.hCursor = LoadCursor(NULL, IDC_ARROW);
此语句存储窗口类的默认鼠标图像。这是通过使用具有两个参数的函数的返回值 LoadCursor()函数。第一个参数是 hInstance,存储应用程序的指针图形。不设置这一点,所以它设置为 NULL。第二个是包含默认的鼠标指针值。在 LoadCursor() 下 MSDN 库中还有其他。
wc.hbrBackground = (HBRUSH)COLOR_WINDOW;
此语句包含的'brush' 将用于窗口的背景颜色。画笔在这里用于指示背景的颜色。COLOR_WINDOW 指示绘制画笔的窗口颜色,在示例中为白色 。
wc.lpszClassName = L"WindowClass1";
这是正在建设的窗口类的名称。当生成一个类的时候,命名它为"WindowClass1"。用于使窗口名字显示正确。
'L' 出现在字符串,只需告诉编译器这个字符串应由 16 位 Unicode 字符,而不是通常的 8 位 ANSI 字符。
RegisterClassEx(&wc);
此函数最后注册窗口类。唯一的参数是结构和系统休息是存放的地址。
2. Create the Window
接下来就是创建一个窗口,现在有了自己创建的窗口类,可以创建基于这个类的窗口。
// create the window and use the result as the handle

hWnd = CreateWindowEx(NULL,

                      L"WindowClass1",    // name of the window class

                      L"Our First Windowed Program",   // title of the window

                      WS_OVERLAPPEDWINDOW,    // window style

                      300,    // x-position of the window

                      300,    // y-position of the window

                      500,    // width of the window

                      400,    // height of the window

                      NULL,    // we have no parent window, NULL

                      NULL,    // we aren't using menus, NULL

                      hInstance,    // application handle

                      NULL);    // used with multiple windows, NULL
以上只是一个函数来创建一个窗口。此函数具有大量的参数,以下是函数原型:
HWND CreateWindowEx(DWORD dwExStyle,

                    LPCTSTR lpClassName,

                    LPCTSTR lpWindowName,

                    DWORD dwStyle,

                    int x,

                    int y,

                    int nWidth,

                    int nHeight,

                    HWND hWndParent,

                    HMENU hMenu,

                    HINSTANCE hInstance,

                    LPVOID lpParam);
DWORD dwExStyle,
第一个参数在RegisterClass() 更新为RegisterClassEx()的时候进行添加,第四个参数dwStyle,用来添加更多选项的窗口样式。不会涉及其他几个参数,但可以在 CreateWindowEx() 下 MSDN 库中找到它们。
LPCTSTR lpClassName,
This is the name of the class our window will use. Because we only have one class, we will use what we have, L"WindowClass1". This string also uses 16-bit Unicode characters, thus we put an 'L' in front of it.
这个语句是使用窗口的类名称。因为只有一个类,将使用现有的类 L"WindowClass1"。这个字符串也使用 16 位 Unicode 字符,因此把 'L' 在它的前面。
LPCTSTR lpWindowName,
这是窗口的名称,它显示在窗口的标题栏中,使用 Unicode编码。
DWORD dwStyle,
可以在其中定义各种窗口的选项,比如删除最小化和最大化按钮,不可被调整,使其具有滚动条和各种很酷的事情。这些可以在 MSDN 中CreateWindowEx()下的库中找到。
将使用单个值 WS_OVERLAPPEDWINDOW,包括一个带有标准功能的基本窗口的其他值的快捷方式。
int x,
这一决定沿 x 轴的屏幕窗口的位置。.
int y,
这一决定沿 y 轴的屏幕窗口的位置。
int nWidth,
在这里我们设置窗口的初始宽度。
int nHeight,
在这里我们设置窗口的初始高度。
HWND hWndParent,
这个参数告诉 Windows 正在创建的父窗口。父窗口是一种包含其他窗口的窗口。举个例子,Microsoft Word 中,可以在同一窗口中打开多个文档,就是包括多个 '子' 窗口的父窗口。因为没有做任何与这个参数相关的内容,将此参数设置为 NULL。
HMENU hMenu,
这个语句用来处理菜单栏。没有任何菜单栏,所以这一个也是 NULL。
HINSTANCE hInstance,
此语句处理该实例,设置为 hInstance。
LPVOID lpParam
如果创建多个窗口,将使用一个参数。但是现在不需要创建,所以将其设为空值。
Return Value
这个是处理新窗口函数的返回值。将直接存储到 hWnd 变量,像这样 ︰
hWnd = CreateWindowEx(NULL,

                      ...
显示窗口是比创建一个消息框容易。它需要一个具有两个参数的函数。原型 ︰
BOOL ShowWindow(HWND hWnd,

                int nCmdShow);
HWND hWnd,
这是只是处理刚刚创建的窗口,所以将系统返回值放置在这里 。
int nCmdShow
记得最后一个参数的 WinMain() 吗?这个语句就是去哪里使用它。由于游戏运行的时候需要全屏,不必要知道系统返回哪些指令,但是不管是否需要,可以知道nCmdShow返回的值在哪里总是
接下来进行支持创建窗口程序运行的其他操作,WinProc() 函数和消息循环。
Handling Windows Events and Messages
一旦创建窗口,需要保持这个窗口能够进行交互操作。当然,如果结束我们程序,像现在,它不会编译这么多。但是假定进行编译,我们依然只能在窗口被创建时看到一道闪光,并随着我们执行到Winmain()函数底端时闪光消失。
如果不退出,需要在完成创建窗口之后进入主循环。事件是系统程序的基础,这意味着我们的程序需要在系统退出之前做些事情。
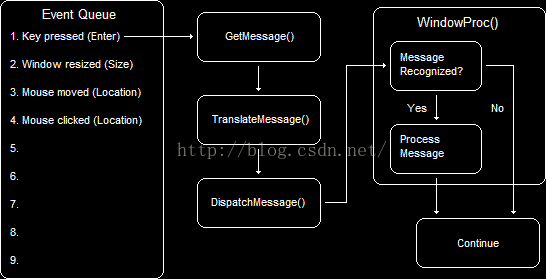
当系统传递命令的时候,事件立即发生。指令被放置在事件队列之中。使用 GetMessage() 函数从队列中检索语句,使用TranslateMessage() 处理指定的语句格式,同时在选择运行代码之后使用DispatchMessage() 函数传递运行结果到WindowProc() 函数。
下图解释发生的顺序:
The Process of an Event Message
处理事件的过程分为两个部分:
1. The Main Loop
2. The WindowProc() Function
主循环包括GetMessage(), TranslateMessage() 和 DispatchMessage() 函数.而WindowProc() 函数中只包含某些消息发送时运行的代码。
1. The Main Loop
从上图中看出,这一节包括只有三个功能。每个函数是实际上很简单,不需要了解太多的细节,以下是所需的主循环的代码:
    // this struct holds Windows event messages

    MSG msg;

    // wait for the next message in the queue, store the result in 'msg'

    while(GetMessage(&msg, NULL, 0, 0))

    {

        // translate keystroke messages into the right format

        TranslateMessage(&msg);

        // send the message to the WindowProc function

        DispatchMessage(&msg);

    }
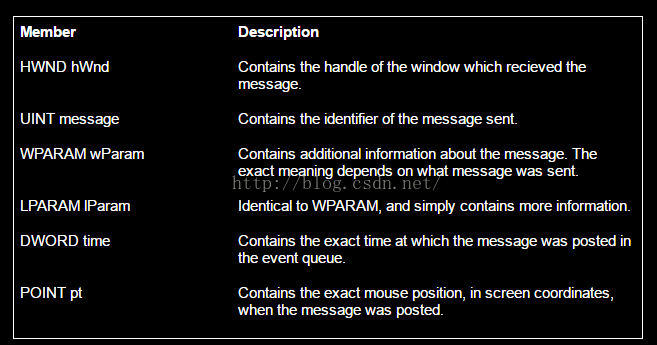
MSG msg;
MSG是一个结构,其中包含一个事件消息的资料。不会经常访问内容这个结构,下图是它所包含的内容 ︰
while(GetMessage(&msg, NULL, 0, 0))
Getmessage () 获取消息队列中指定信息的函数,同时将获取的信息存储到 msg 结构。通常返回 TRUE,除了程序即将退出的情况,返回 FALSE这样一来。此时while() 循环被打破。
Getmessage () 函数具有四个参数,以下是它的原型 ︰
BOOL GetMessage(LPMSG lpMsg,

                HWND hWnd,

                UINT wMsgFilterMin,

                UINT wMsgFilterMax);
LPMSG lpMsg,
这是一个指针,指向一个消息结构,传递结构的地址。
HWND hWnd,
这处理来自于窗口的消息。然而,你可能会注意到 这是空值。在此参数中,NULL 意味着获取任何窗口的下一条消息。与在这里使用hWnd值没有区别,但是如果我们有多个窗口就有所区别了。
UINT wMsgFilterMin, UINT wMsgFilterMax
这些参数可以用于限制要从消息队列检索消息的类型。示例,在 wMsgFilterMin 中使用 WM_KEYFIRST 和 WM_KEYLAST 的使用限制到键盘消息的消息类型。WM_KEYFIRST 和 WM_KEYLAST 是第一个和最后一个键盘消息的整数值的代名词。同样,WM_MOUSEFIRST 和 WM_MOUSELAST 限制鼠标消息的消息类型。
这些参数还有一个特殊情况。假定你想要收集任何消息,如果赋值每个参数为 '0',然后 getmessage () 进行搜索,你可能会在程序中注意到这点。
TranslateMessage(&msg);
TranslateMessage() 是一个函数,可以让某些按键转化为正确的格式。不会到这在太多的细节,因为它自动完成。其参数是 msg 结构的地址。
DispatchMessage(&msg);
DispatchMessage() basically does what it says. It dispatches the message. It dispatches it to our WindowProc() function, which we will cover next. This function also has a single parameter filled with the address of our msg struct.
DispatchMessage() 基本上是用于消息调度。它分派给我们的 WindowProc() 函数,将在下一篇文章中介绍。此函数的参数也是 msg 结构的地址。
2. The WindowProc() Function
这里简要介绍一下流程:Getmessage () 获取消息,翻译,使用 DispatchMessage() 函数派遣它。
DispatchMessage() 函数调用适当的 WindowProc() 函数。幸运的是,我们只有一个 WindowProc() 函数,不用担心,所以东西会留相对简单。
当调用 WindowProc() 函数时,四条从MSG结构信息得到通过。以下是 WindowProc()的原型:
LRESULT CALLBACK WindowProc(HWND hWnd,

                            UINT message,

                            WPARAM wParam,

                            LPARAM lParam);
当消息进入 WindowProc 时,可以使用 uMsg 参数来确定它是什么消息。很多程序员使用 switch() 语句确定消息。下面是一个示例解释如何执行:
 // sort through and find what code to run for the message given

    switch(message)

    {

        // this message is read when the window is closed

        case WM_DESTROY:

            {

                // ...

                // ...

            } break;

    }
在这里,switch 语句查找要运行的代码。当然,只提供 WM_DESTROY语句,意味着如果任何其他消息发送,只是忽略它。关闭窗口时,将发送 WM_DESTROY 语句。所以当窗口关闭时,需要清理应用程序。
所包含的内容告诉应用程序我们执行完毕并返回"0",表明一切被清理干净。我们用如下代码进行操作:
 case WM_DESTROY:

            {

                // close the application entirely

                PostQuitMessage(0);

                return 0;

            } break;
PostQuitMessage() 函数发送消息 WM_QUIT,它有一个整数值为 '0'。整数值 '0' 发送时,getmessage () 返回 FALSE。所以这个函数基本上做的是告诉我们程序完成了 WinMain() 功能正常。
接下来返回 '0'。这是相当重要,因为它告诉 Windows 需要处理该消息。如果返回别的值,Windows 可能会混淆不清。
你也许会发现还有最后一个函数DefWindowProc()。这个函数的功能是处理没有执行过的消息。总之,它将为处理不返回 '0' 的消息。因此将其放置在结 WindowProc() 函数结束的为位置,用来捕获任何错过的语句。


