Material Design -- TextInputLayout
导入Support Library
想要使用TextInputLayout 控件,必须先在自己的项目中导入 Support Liarbry,如果没有下载这个支持库,可以打开 SDK Manager 去下载
在 build.gradle 加入以下语句
compile 'com.android.support:design:23.2.0'当然这个代码取决于你的Support Library 的版本。
接下来我们就可以使用 TextInputLayout 控件了。
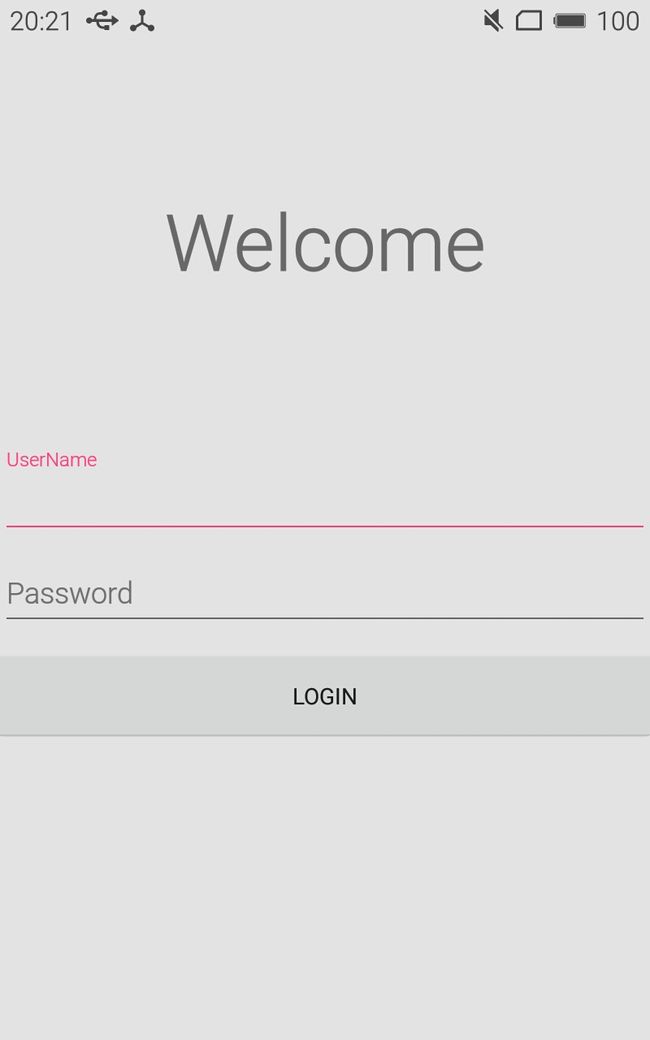
2.使用TextInputLayout 创建一个简单的登录界面
效果图
首先介绍一下经常用到几个方法
setHint(CharSequence hint); //用于设置提示文字
setError(CharSequence error);//用于设置错误提示信息
setErrorEnabled(boolean enabled);//用于设置是否将错误信息显示出来
接下来介绍如何在 XML 文件中定义 TextInputLayout,它的简单使用方法如下:
<android.support.design.widget.TextInputLayout
        android:id="@+id/textInputLayout"
        android:layout_width="match_parent"
        android:layout_height="wrap_content"
        android:layout_marginTop="5dp">

        <EditText
            android:id="@+id/edittext"
            android:layout_width="match_parent"
            android:layout_height="wrap_content"/>

    </android.support.design.widget.TextInputLayout>
之后在Activity 中获取到这个TextInputLayout,然后使用上面介绍的几个函数,对其进行相应设置即可。
TextInputLayout mTextInputLayout = (TextInputLayout) findViewById(R.id.textInputLayout);
mTextInputLayout.setHint("UserName ");
好了,介绍完它的简单使用方法,下面就来实现LOGIN 界面,实际上是很容易实现的。
<?xml version="1.0" encoding="utf-8"?>
<LinearLayout  xmlns:android="http://schemas.android.com/apk/res/android" xmlns:app="http://schemas.android.com/apk/res-auto" android:layout_width="match_parent" android:layout_height="match_parent" android:background="#e3e3e3" android:orientation="vertical">
    <RelativeLayout  android:layout_width="match_parent" android:layout_height="0dp" android:layout_weight="0.4" android:id="@+id/relative">
        <TextView  android:layout_width="match_parent" android:layout_height="wrap_content" android:textSize="48sp" android:text="Welcome" android:gravity="center" android:layout_centerInParent="true"/>
    </RelativeLayout>
    <LinearLayout  android:layout_width="match_parent" android:layout_height="0dp" android:layout_weight="0.6" android:orientation="vertical">
        <android.support.design.widget.TextInputLayout  android:id="@+id/textInputLayout" android:layout_width="match_parent" android:layout_height="wrap_content" android:layout_marginTop="5dp">
                <EditText  android:layout_width="match_parent" android:layout_height="wrap_content"/>
        </android.support.design.widget.TextInputLayout>

        <android.support.design.widget.TextInputLayout  android:layout_width="match_parent" android:layout_height="wrap_content" android:id="@+id/textInputLayout2">

            <EditText  android:layout_width="match_parent" android:layout_height="wrap_content"/>
        </android.support.design.widget.TextInputLayout>

        <Button  android:layout_width="match_parent" android:layout_height="wrap_content" android:layout_marginTop="15dp" android:text="LOGIN"/>
     </LinearLayout>
</LinearLayout>
之后在主函数中进行如下操作
public class MainActivity extends AppCompatActivity {

    private TextInputLayout mTextInputLayout,mTextInputLayout2;
    @Override
    protected void onCreate(Bundle savedInstanceState) {
        super.onCreate(savedInstanceState);
        setContentView(R.layout.activity_main);
         mTextInputLayout = (TextInputLayout) findViewById(R.id.textInputLayout);
        mTextInputLayout2 = (TextInputLayout) findViewById(R.id.textInputLayout2);
        mTextInputLayout.setHint("UserName ");
        mTextInputLayout2.setHint("Password");

        EditText editText = mTextInputLayout.getEditText();
        editText.addTextChangedListener(new TextWatcher() {
            @Override
            public void beforeTextChanged(CharSequence charSequence, int i, int i1, int i2) {

            }

            @Override
            public void onTextChanged(CharSequence charSequence, int i, int i1, int i2) {
                if (charSequence.length() > 10){
                    mTextInputLayout.setError("The length more than 10");
                    mTextInputLayout.setErrorEnabled(true);
                } else {
                    mTextInputLayout.setErrorEnabled(false);
                }
            }

            @Override
            public void afterTextChanged(Editable editable) {

            }
        });
    }
如以上代码示,在Username 输入框内添加了 监听事件,当输入字符长度 10 时,便将错误显示出来,Password 输入框我并没有去实现,因为是相同的实现方法。在真正的登录系统中,我们还需要去检验输入的合法性,相应检验函数可以在LOGIN 按钮的监听事件内去执行。
3.ActionBar 问题
为了美观,在登陆界面一般都是将 ActionBar 进行隐藏的,这里有两种方法去隐藏。
第一种方法十分简单,直接设置一个不含ActionBar 的主题,比如我使用的是 Theme.AppCompat.DayNight.NoActionBar 主题,所以自然不含有ActionBar。
第二种方法,
<style name="AppTheme" parent="Theme.AppCompat.DayNight.NoActionBar">
        <!-- Customize your theme here. -->
        <item name="colorPrimary">@color/colorPrimary</item>
        <item name="colorPrimaryDark">@color/colorPrimaryDark</item>
        <item name="colorAccent">@color/colorAccent</item>

        // 隐藏ActionBar
        <item name="android:windowActionBar">false</item>
        <item name="windowActionBar">false</item>
        <item name="android:windowNoTitle">true</item>
        <item name="windowNoTitle">true</item>
    </style>
好了,通过以上两种方法都可以隐藏ActionBar。
4.隐藏 KeyBoard
以上登录界面,当我们输入完密码之后,会有一个非常恼人的问题,就是除非我们按后退键,否则输入键盘不会消失。或许在某些机型上,只许轻轻点击一下Home 键就可以实现返回的功能,但是在另一些机型上,比如说我的调试机 魅族MX2,必须上划 Home 键,才可以实现返回功能,又由于,点击Home键是返回主菜单,经常出现按错的问题,现在我们来实现一个功能,让我们点击屏幕上的其他控件,以隐藏输入键盘。
在以上登陆界面内,输入键盘弹出时,屏幕的绝大部分空间都被RelativeLayout 控件占据,所以我为这个控件设置了一个监听事件,当用户输入完点击这个控件,便去隐藏KeyBoard,主要添加代码如下
RelativeLayout mRelativeLayout = (RelativeLayout) findViewById(R.id.relative);
        mRelativeLayout.setOnClickListener(new View.OnClickListener() {
            @Override
            public void onClick(View view) {
                hideKeyboard();
            }
        });


 private void hideKeyboard() {
            ((InputMethodManager) getSystemService(Context.INPUT_METHOD_SERVICE)).
                    hideSoftInputFromWindow(mRelativeLayout.getWindowToken(), InputMethodManager.HIDE_NOT_ALWAYS);
    }
好了,通过以上设置有解决了 KeyBoard 的问题,这个时候,我们发现 TextInputLayout 的hint 文字颜色为深红色,那么我们能不能改变这个颜色呢?
5.改变 Hint 样式
打开 values\styles.xml ,找到以下代码
<item name="colorAccent">@color/colorAccent</item>就算找不到这行代码也没关系,我们可以手动添加进去,只要改变这个 colorAccent 的值,就可以将 整个 样式改变为我们想要的颜色了。

