- Kafka 消息丢失如何处理?
架构文摘JGWZ
学习
今天给大家分享一个在面试中经常遇到的问题:Kafka消息丢失该如何处理?这个问题啊,看似简单,其实里面藏着很多“套路”。来,咱们先讲一个面试的“真实”案例。面试官问:“Kafka消息丢失如何处理?”小明一听,反问:“你是怎么发现消息丢失了?”面试官顿时一愣,沉默了片刻后,可能有点不耐烦,说道:“这个你不用管,反正现在发现消息丢失了,你就说如何处理。”小明一头雾水:“问题是都不知道怎么丢的,处理起来
- nosql数据库技术与应用知识点
皆过客,揽星河
NoSQLnosql数据库大数据数据分析数据结构非关系型数据库
Nosql知识回顾大数据处理流程数据采集(flume、爬虫、传感器)数据存储(本门课程NoSQL所处的阶段)Hdfs、MongoDB、HBase等数据清洗(入仓)Hive等数据处理、分析(Spark、Flink等)数据可视化数据挖掘、机器学习应用(Python、SparkMLlib等)大数据时代存储的挑战(三高)高并发(同一时间很多人访问)高扩展(要求随时根据需求扩展存储)高效率(要求读写速度快)
- 【六】阿伟开始搭建Kafka学习环境
能源恒观
中间件学习kafkaspring
阿伟开始搭建Kafka学习环境概述上一篇文章阿伟学习了Kafka的核心概念,并且把市面上流行的消息中间件特性进行了梳理和对比,方便大家在学习过程中进行对比学习,最后梳理了一些Kafka使用中经常遇到的Kafka难题以及解决思路,经过上一篇的学习我相信大家对Kafka有了初步的认识,本篇将继续学习Kafka。一、安装和配置学习一项技术首先要搭建一套服务,而Kafka的运行主要需要部署jdk、zook
- Java面试题精选:消息队列(二)
芒果不是芒
Java面试题精选javakafka
一、Kafka的特性1.消息持久化:消息存储在磁盘,所以消息不会丢失2.高吞吐量:可以轻松实现单机百万级别的并发3.扩展性:扩展性强,还是动态扩展4.多客户端支持:支持多种语言(Java、C、C++、GO、)5.KafkaStreams(一个天生的流处理):在双十一或者销售大屏就会用到这种流处理。使用KafkaStreams可以快速的把销售额统计出来6.安全机制:Kafka进行生产或者消费的时候会
- Kafka是如何保证数据的安全性、可靠性和分区的
喜欢猪猪
kafka分布式
Kafka作为一个高性能、可扩展的分布式流处理平台,通过多种机制来确保数据的安全性、可靠性和分区的有效管理。以下是关于Kafka如何保证数据安全性、可靠性和分区的详细解析:一、数据安全性SSL/TLS加密:Kafka支持SSL/TLS协议,通过配置SSL证书和密钥来加密数据传输,确保数据在传输过程中不会被窃取或篡改。这一机制有效防止了中间人攻击,保护了数据的安全性。SASL认证:Kafka支持多种
- Kafka详细解析与应用分析
芊言芊语
kafka分布式
Kafka是一个开源的分布式事件流平台(EventStreamingPlatform),由LinkedIn公司最初采用Scala语言开发,并基于ZooKeeper协调管理。如今,Kafka已经被Apache基金会纳入其项目体系,广泛应用于大数据实时处理领域。Kafka凭借其高吞吐量、持久化、分布式和可靠性的特点,成为构建实时流数据管道和流处理应用程序的重要工具。Kafka架构Kafka的架构主要由
- Kafka 基础与架构理解
StaticKing
KAFKAkafka
目录前言Kafka基础概念消息队列简介:Kafka与传统消息队列(如RabbitMQ、ActiveMQ)的对比Kafka的组件Kafka的工作原理:消息的生产、分发、消费流程Kafka系统架构Kafka的分布式架构设计Leader-Follower机制与数据复制Log-basedStorage和持久化Broker间通信协议Zookeeper在Kafka中的角色总结前言Kafka是一个分布式的消息系
- Flume:大规模日志收集与数据传输的利器
傲雪凌霜,松柏长青
后端大数据flume大数据
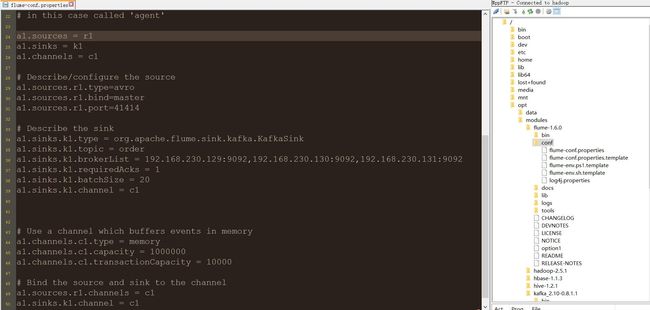
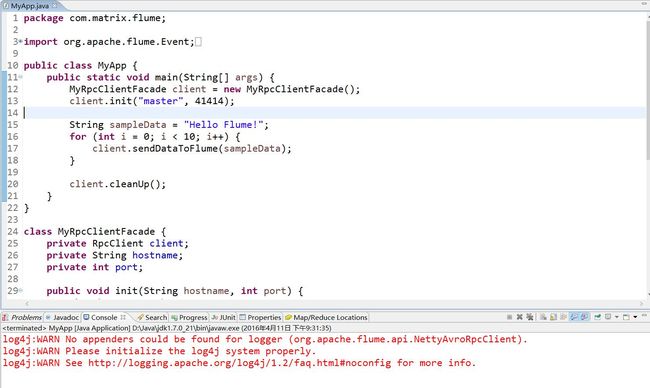
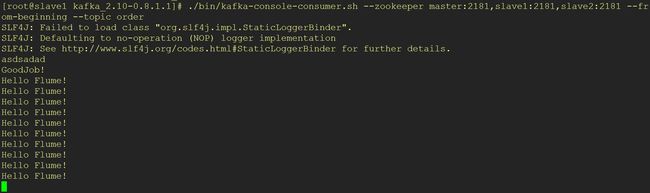
Flume:大规模日志收集与数据传输的利器在大数据时代,随着各类应用的不断增长,产生了海量的日志和数据。这些数据不仅对业务的健康监控至关重要,还可以通过深入分析,帮助企业做出更好的决策。那么,如何高效地收集、传输和存储这些海量数据,成为了一项重要的挑战。今天我们将深入探讨ApacheFlume,它是如何帮助我们应对这些挑战的。一、Flume概述ApacheFlume是一个分布式、可靠、可扩展的日志
- 全面指南:用户行为从前端数据采集到实时处理的最佳实践
数字沉思
营销流量运营系统架构前端内容运营大数据
引言在当今的数据驱动世界,实时数据采集和处理已经成为企业做出及时决策的重要手段。本文将详细介绍如何通过前端JavaScript代码采集用户行为数据、利用API和Kafka进行数据传输、通过Flink实时处理数据的完整流程。无论你是想提升产品体验还是做用户行为分析,这篇文章都将为你提供全面的解决方案。设计一个通用的ClickHouse表来存储用户事件时,需要考虑多种因素,包括事件类型、时间戳、用户信
- Docker安装Kafka和Kafka-Manager
阿靖哦
本文介绍如何通过Docker安装kafka与kafka界面管理界面一、拉取zookeeper由于kafka需要依赖于zookeeper,因此这里先运行zookeeper1、拉取镜像dockerpullwurstmeister/zookeeper2、启动dockerrun-d--namezookeeper-p2181:2181-eTZ="Asia/Shanghai"--restartalwayswu
- 主流行架构
rainbowcheng
架构架构
nexus,gitlab,svn,jenkins,sonar,docker,apollo,catteambition,axure,蓝湖,禅道,WCP;redis,kafka,es,zookeeper,dubbo,shardingjdbc,mysql,InfluxDB,Telegraf,Grafana,Nginx,xxl-job,Neo4j,NebulaGraph是一个高性能的,NOSQL图形数据库
- 月度总结 | 2022年03月 | 考研与就业的抉择 | 确定未来走大数据开发路线
「已注销」
个人总结hadoop
一、时间线梳理3月3日,寻找到同专业的就业伙伴3月5日,着手准备Java八股文,决定先走Java后端路线3月8月,申请到了校图书馆的考研专座,决定暂时放弃就业,先准备考研,买了数学和408的资料书3月9日-3月13日,因疫情原因,宿舍区暂封,这段时间在准备考研,发现内容特别多3月13日-3月19日,大部分时间在刷Hadoop、Zookeeper、Kafka的视频,同时在准备实习的项目3月20日,退
- 分布式消息队列Kafka
叶域
大数据分布式kafkascalaspark
分布式消息队列Kafka简介:Kafka是一个分布式消息队列系统,用于处理实时数据流。消息按照主题(Topic)进行分类存储,发送消息的实体称为Producer,接收消息的实体称为Consumer。Kafka集群由多个Kafka实例(Server)组成,每个实例称为Broker。主要用途:广泛应用于构建实时数据管道和流应用程序,适用于需要高吞吐量和低延迟的数据处理场景依赖:Kafka集群和消费者依
- K8S学习之PV&&PVC
david161
部署mysql之前我们需要先了解一个概念有状态服务。这是一种特殊的服务,简单的归纳下就是会产生需要持久化的数据,并且有很强的I/O需求,且重启需要依赖上次存储到磁盘的数据。如典型的mysql,kafka,zookeeper等等。在我们有比较优秀的商业存储的前提下,非常推荐使用有状态服务进行部署,计算和存储分离那是相当的爽的。在实际生产中如果没有这种存储,localPV也是不错的选择,当然local
- Kafka系列之:kafka命令详细总结
快乐骑行^_^
日常分享专栏KafkaKafka系列kafka命令详细总结
Kafka系列之:kafka命令详细总结一、添加和删除topic二、修改topic三、平衡领导者四、检查消费者位置五、管理消费者群体一、添加和删除topicbin/kafka-topics.sh--bootstrap-serverbroker_host:port--create--topicmy_topic_name\--partitions20--replication-factor3--con
- 搭建Kafka+zookeeper集群调度
krb___
kafka分布式
前言硬件环境172.18.0.5kafkazk1Kafka+zookeeperKafkaBroker集群172.18.0.6kafkazk2Kafka+zookeeperKafkaBroker集群172.18.0.7kafkazk3Kafka+zookeeperKafkaBroker集群软件环境zookeeper3.5.9资源调度、写作Kafka2.8.0消息通信中间件安装JDK1.8安装搭建zo
- Kafka和Pulsar深入解析
jasen91
大数据开发kafka分布式
Kafka多租户:单租户系统数据迁移:依赖MirrorMaker,需要额外维护。市场上也有ConfluentReplicator等供应商工具。分层存储:由供应商提供商业使用。组件依赖:KafkaRaft(KRaft)从Kafka2.8开始处于早期访问模式,允许Kafka在没有ZooKeeper的情况下工作。这对Kafka来说是一个显著的优势,因为它简化了Kafka的体系结构并降低了学习成本。云原生
- Linux系统部署Kafka教学
情书学长
linux学习笔记kafka
第一步:Zookeeper安装(准备工作)1、解压安装将安装包上传到/opt/software目录下,解压并修改名称tar-zxvfapache-zookeeper-3.5.7-bin.tar.gz-C/opt/module/mvapache-zookeeper-3.5.7-bin/zookeeper2、配置服务器编号1)在/opt/module/zookeeper-3.5.7/这个目录下创建zk
- 数仓开发之DWD层完整使用 (第五章)
小坏讲微服务
数据仓库hadoopscalakafka
数仓开发之DWD层完整使用一、流量域未精加工的事务事实表1、主要任务1)数据清洗(ETL)2)新老访客状态标记修复3)分流2、思路1)数据清洗(ETL)2)新老访客状态标记修复(1)前端埋点新老访客状态标记设置规则(2)新老访客状态标记修复思路3)利用侧输出流实现数据拆分(1)埋点日志结构分析(2)分流日志分类(3)分流思路3、图解4、代码1)在KafkaUtil工具类中补充getKafkaPro
- Kafka 应用场景
zinuxer
kafka分布式
数据流处理:Kafka支持实时数据流处理,能够在数据流动时进行处理和分析,确保应用程序与最新信息保持同步!日志聚合:可以将来自不同来源的日志集中和聚合,简化应用程序的调试和监控!消息队列:Kafka充当高性能的消息队列,确保不同系统组件之间可靠且可扩展的通信!网络活动追踪:Kafka可以追踪网络活动,改进用户体验和推动业务增长!数据复制:Kafka允许在多个集群之间实现无缝数据复制,确保高可用性和
- Kafka的ack机制
香山上的麻雀
ack=0/1/-1的不同情况:0:producer不等待broker的ack,broker一接收到还没有写入磁盘就已经返回,当broker故障时有可能丢失数据;1:producer等待broker的ack,partition的leader落盘成功后返回ack,如果在follower同步成功之前leader故障,那么将会丢失数据;-1:producer等待broker的ack,partition的
- Kafka 实战 - Kafka分区和副本机制理解
用心去追梦
kafka分布式
ApacheKafka的分区(Partition)和副本(Replica)机制是其核心架构和可靠性保证的关键组成部分。以下是对其理解的详细解释:分区(Partition)分区概念:在Kafka中,每个主题(Topic)可以被划分为多个分区。分区是一个有序的、不可变的消息序列。这意味着消息在分区中按生成顺序存储,每个消息都有一个唯一的偏移量(Offset)。目的:分区的主要目的是为了水平扩展和并行处
- 编程常用命令总结
Yellow0523
LinuxBigData大数据
编程命令大全1.软件环境变量的配置JavaScalaSparkHadoopHive2.大数据软件常用命令Spark基本命令Spark-SQL命令Hive命令HDFS命令YARN命令Zookeeper命令kafka命令Hibench命令MySQL命令3.Linux常用命令Git命令conda命令pip命令查看Linux系统的详细信息查看Linux系统架构(X86还是ARM,两种方法都可)端口号命令L
- zookeeper+kafka消息队列部署
TBF610218
zookeeperkafka分布式
消息队列的概念什么是消息队列消息是指在应用间传送的数据消息队列是一种应用间的通信方式解决方法,确保消息的可靠传递专门为消息做缓存的消息队列的特征存储将消息存储在某个类型的缓冲区中,指导目标进读取这些消息或者将其从消息队列中显示移除为止异步消息队列通过缓冲消息可以在应用程序当中公开一定程度的异步性,允许源进程发送消息并在队列当中累积消息,而且目标进程可以挑选消息并进行处理为什么需要消息队列解耦冗余扩
- 分布式中间件-几个常用的消息中间件
问道飞鱼
分布式技术分布式中间件
文章目录常见消息中间件1.RabbitMQ2.ApacheKafka3.RedisPub/Sub4.ActiveMQ5.AmazonSimpleNotificationService(SNS)和SimpleQueueService(SQS)6.RocketMQ差异总结消息协议1.AMQP(AdvancedMessageQueuingProtocol)2.STOMP(SimpleTextOrient
- kafka php 教程,php 使用kafka
weixin_39713841
kafkaphp教程
准备工作gitclonehttps://github.com/edenhill/librdkafka.git./configuremakesudomakeinstall$gitclonehttps://github.com/arnaud-lb/php-rdkafka.git#生成configure文件$/Users/shiyibo/LNMP/php/bin/phpize#编译安装$./config
- Kafka快速入门
G丶AEOM
速成学习区kafkalinq分布式
讲一下什么是Kafka首先引入这样一个场景:A服务可以发送200qps(QueriesPerSecond,是指每秒查询率),而B服务可以处理100qps。很显然,B服务很可能会被A服务压垮掉。怎么为了保证B不被压垮的同时还能处理A消息,没有什么是不能通过一层中间件解决的,如果有,那就再加一层。开始很容易想到,可以在B服务中增加一个队列,其实就是个链表,B服务根据自己的消费能力,消费链表中的消息。每
- 【Python系列】异步任务的终止
Kwan的解忧杂货铺@新空间代码工作室
s2Pythonpython开发语言
欢迎来到我的博客,很高兴能够在这里和您见面!希望您在这里可以感受到一份轻松愉快的氛围,不仅可以获得有趣的内容和知识,也可以畅所欲言、分享您的想法和见解。推荐:kwan的首页,持续学习,不断总结,共同进步,活到老学到老导航檀越剑指大厂系列:全面总结java核心技术,jvm,并发编程redis,kafka,Spring,微服务等常用开发工具系列:常用的开发工具,IDEA,Mac,Alfred,Git,
- 老版本kafka查询topic消费情况(python查询)
代码是谁
kafkapython分布式
由于老版本的kafka缺少shell,导致无法通过命令直接进行查询,所以通过python代码,实现消费情况查询安装必须的包#pyhon2.5pipinstallkafka-python==1.4.7python脚本#!/usr/bin/envpythonimportsysfromkafkaimportKafkaConsumer,TopicPartitioniflen(sys.argv)!=2:pr
- 【Python系列】使用切片移动元素位置
Kwan的解忧杂货铺@新空间代码工作室
s2Pythonpython开发语言
欢迎来到我的博客,很高兴能够在这里和您见面!希望您在这里可以感受到一份轻松愉快的氛围,不仅可以获得有趣的内容和知识,也可以畅所欲言、分享您的想法和见解。推荐:kwan的首页,持续学习,不断总结,共同进步,活到老学到老导航檀越剑指大厂系列:全面总结java核心技术,jvm,并发编程redis,kafka,Spring,微服务等常用开发工具系列:常用的开发工具,IDEA,Mac,Alfred,Git,
- 集合框架
天子之骄
java数据结构集合框架
集合框架
集合框架可以理解为一个容器,该容器主要指映射(map)、集合(set)、数组(array)和列表(list)等抽象数据结构。
从本质上来说,Java集合框架的主要组成是用来操作对象的接口。不同接口描述不同的数据类型。
简单介绍:
Collection接口是最基本的接口,它定义了List和Set,List又定义了LinkLi
- Table Driven(表驱动)方法实例
bijian1013
javaenumTable Driven表驱动
实例一:
/**
* 驾驶人年龄段
* 保险行业,会对驾驶人的年龄做年龄段的区分判断
* 驾驶人年龄段:01-[18,25);02-[25,30);03-[30-35);04-[35,40);05-[40,45);06-[45,50);07-[50-55);08-[55,+∞)
*/
public class AgePeriodTest {
//if...el
- Jquery 总结
cuishikuan
javajqueryAjaxWebjquery方法
1.$.trim方法用于移除字符串头部和尾部多余的空格。如:$.trim(' Hello ') // Hello2.$.contains方法返回一个布尔值,表示某个DOM元素(第二个参数)是否为另一个DOM元素(第一个参数)的下级元素。如:$.contains(document.documentElement, document.body); 3.$
- 面向对象概念的提出
麦田的设计者
java面向对象面向过程
面向对象中,一切都是由对象展开的,组织代码,封装数据。
在台湾面向对象被翻译为了面向物件编程,这充分说明了,这种编程强调实体。
下面就结合编程语言的发展史,聊一聊面向过程和面向对象。
c语言由贝尔实
- linux网口绑定
被触发
linux
刚在一台IBM Xserver服务器上装了RedHat Linux Enterprise AS 4,为了提高网络的可靠性配置双网卡绑定。
一、环境描述
我的RedHat Linux Enterprise AS 4安装双口的Intel千兆网卡,通过ifconfig -a命令看到eth0和eth1两张网卡。
二、双网卡绑定步骤:
2.1 修改/etc/sysconfig/network
- XML基础语法
肆无忌惮_
xml
一、什么是XML?
XML全称是Extensible Markup Language,可扩展标记语言。很类似HTML。XML的目的是传输数据而非显示数据。XML的标签没有被预定义,你需要自行定义标签。XML被设计为具有自我描述性。是W3C的推荐标准。
二、为什么学习XML?
用来解决程序间数据传输的格式问题
做配置文件
充当小型数据库
三、XML与HTM
- 为网页添加自己喜欢的字体
知了ing
字体 秒表 css
@font-face {
font-family: miaobiao;//定义字体名字
font-style: normal;
font-weight: 400;
src: url('font/DS-DIGI-e.eot');//字体文件
}
使用:
<label style="font-size:18px;font-famil
- redis范围查询应用-查找IP所在城市
矮蛋蛋
redis
原文地址:
http://www.tuicool.com/articles/BrURbqV
需求
根据IP找到对应的城市
原来的解决方案
oracle表(ip_country):
查询IP对应的城市:
1.把a.b.c.d这样格式的IP转为一个数字,例如为把210.21.224.34转为3524648994
2. select city from ip_
- 输入两个整数, 计算百分比
alleni123
java
public static String getPercent(int x, int total){
double result=(x*1.0)/(total*1.0);
System.out.println(result);
DecimalFormat df1=new DecimalFormat("0.0000%");
- 百合——————>怎么学习计算机语言
百合不是茶
java 移动开发
对于一个从没有接触过计算机语言的人来说,一上来就学面向对象,就算是心里上面接受的了,灵魂我觉得也应该是跟不上的,学不好是很正常的现象,计算机语言老师讲的再多,你在课堂上面跟着老师听的再多,我觉得你应该还是学不会的,最主要的原因是你根本没有想过该怎么来学习计算机编程语言,记得大一的时候金山网络公司在湖大招聘我们学校一个才来大学几天的被金山网络录取,一个刚到大学的就能够去和
- linux下tomcat开机自启动
bijian1013
tomcat
方法一:
修改Tomcat/bin/startup.sh 为:
export JAVA_HOME=/home/java1.6.0_27
export CLASSPATH=$CLASSPATH:$JAVA_HOME/lib/tools.jar:$JAVA_HOME/lib/dt.jar:.
export PATH=$JAVA_HOME/bin:$PATH
export CATALINA_H
- spring aop实例
bijian1013
javaspringAOP
1.AdviceMethods.java
package com.bijian.study.spring.aop.schema;
public class AdviceMethods {
public void preGreeting() {
System.out.println("--how are you!--");
}
}
2.beans.x
- [Gson八]GsonBuilder序列化和反序列化选项enableComplexMapKeySerialization
bit1129
serialization
enableComplexMapKeySerialization配置项的含义
Gson在序列化Map时,默认情况下,是调用Key的toString方法得到它的JSON字符串的Key,对于简单类型和字符串类型,这没有问题,但是对于复杂数据对象,如果对象没有覆写toString方法,那么默认的toString方法将得到这个对象的Hash地址。
GsonBuilder用于
- 【Spark九十一】Spark Streaming整合Kafka一些值得关注的问题
bit1129
Stream
包括Spark Streaming在内的实时计算数据可靠性指的是三种级别:
1. At most once,数据最多只能接受一次,有可能接收不到
2. At least once, 数据至少接受一次,有可能重复接收
3. Exactly once 数据保证被处理并且只被处理一次,
具体的多读几遍http://spark.apache.org/docs/lates
- shell脚本批量检测端口是否被占用脚本
ronin47
#!/bin/bash
cat ports |while read line
do#nc -z -w 10 $line
nc -z -w 2 $line 58422>/dev/null2>&1if[ $?-eq 0]then
echo $line:ok
else
echo $line:fail
fi
done
这里的ports 既可以是文件
- java-2.设计包含min函数的栈
bylijinnan
java
具体思路参见:http://zhedahht.blog.163.com/blog/static/25411174200712895228171/
import java.util.ArrayList;
import java.util.List;
public class MinStack {
//maybe we can use origin array rathe
- Netty源码学习-ChannelHandler
bylijinnan
javanetty
一般来说,“有状态”的ChannelHandler不应该是“共享”的,“无状态”的ChannelHandler则可“共享”
例如ObjectEncoder是“共享”的, 但 ObjectDecoder 不是
因为每一次调用decode方法时,可能数据未接收完全(incomplete),
它与上一次decode时接收到的数据“累计”起来才有可能是完整的数据,是“有状态”的
p
- java生成随机数
cngolon
java
方法一:
/**
* 生成随机数
* @author
[email protected]
* @return
*/
public synchronized static String getChargeSequenceNum(String pre){
StringBuffer sequenceNum = new StringBuffer();
Date dateTime = new D
- POI读写海量数据
ctrain
海量数据
import java.io.FileOutputStream;
import java.io.OutputStream;
import org.apache.poi.xssf.streaming.SXSSFRow;
import org.apache.poi.xssf.streaming.SXSSFSheet;
import org.apache.poi.xssf.streaming
- mysql 日期格式化date_format详细使用
daizj
mysqldate_format日期格式转换日期格式化
日期转换函数的详细使用说明
DATE_FORMAT(date,format) Formats the date value according to the format string. The following specifiers may be used in the format string. The&n
- 一个程序员分享8年的开发经验
dcj3sjt126com
程序员
在中国有很多人都认为IT行为是吃青春饭的,如果过了30岁就很难有机会再发展下去!其实现实并不是这样子的,在下从事.NET及JAVA方面的开发的也有8年的时间了,在这里在下想凭借自己的亲身经历,与大家一起探讨一下。
明确入行的目的
很多人干IT这一行都冲着“收入高”这一点的,因为只要学会一点HTML, DIV+CSS,要做一个页面开发人员并不是一件难事,而且做一个页面开发人员更容
- android欢迎界面淡入淡出效果
dcj3sjt126com
android
很多Android应用一开始都会有一个欢迎界面,淡入淡出效果也是用得非常多的,下面来实现一下。
主要代码如下:
package com.myaibang.activity;
import android.app.Activity;import android.content.Intent;import android.os.Bundle;import android.os.CountDown
- linux 复习笔记之常见压缩命令
eksliang
tar解压linux系统常见压缩命令linux压缩命令tar压缩
转载请出自出处:http://eksliang.iteye.com/blog/2109693
linux中常见压缩文件的拓展名
*.gz gzip程序压缩的文件
*.bz2 bzip程序压缩的文件
*.tar tar程序打包的数据,没有经过压缩
*.tar.gz tar程序打包后,并经过gzip程序压缩
*.tar.bz2 tar程序打包后,并经过bzip程序压缩
*.zi
- Android 应用程序发送shell命令
gqdy365
android
项目中需要直接在APP中通过发送shell指令来控制lcd灯,其实按理说应该是方案公司在调好lcd灯驱动之后直接通过service送接口上来给APP,APP调用就可以控制了,这是正规流程,但我们项目的方案商用的mtk方案,方案公司又没人会改,只调好了驱动,让应用程序自己实现灯的控制,这不蛋疼嘛!!!!
发就发吧!
一、关于shell指令:
我们知道,shell指令是Linux里面带的
- java 无损读取文本文件
hw1287789687
读取文件无损读取读取文本文件charset
java 如何无损读取文本文件呢?
以下是有损的
@Deprecated
public static String getFullContent(File file, String charset) {
BufferedReader reader = null;
if (!file.exists()) {
System.out.println("getFull
- Firebase 相关文章索引
justjavac
firebase
Awesome Firebase
最近谷歌收购Firebase的新闻又将Firebase拉入了人们的视野,于是我做了这个 github 项目。
Firebase 是一个数据同步的云服务,不同于 Dropbox 的「文件」,Firebase 同步的是「数据」,服务对象是网站开发者,帮助他们开发具有「实时」(Real-Time)特性的应用。
开发者只需引用一个 API 库文件就可以使用标准 RE
- C++学习重点
lx.asymmetric
C++笔记
1.c++面向对象的三个特性:封装性,继承性以及多态性。
2.标识符的命名规则:由字母和下划线开头,同时由字母、数字或下划线组成;不能与系统关键字重名。
3.c++语言常量包括整型常量、浮点型常量、布尔常量、字符型常量和字符串性常量。
4.运算符按其功能开以分为六类:算术运算符、位运算符、关系运算符、逻辑运算符、赋值运算符和条件运算符。
&n
- java bean和xml相互转换
q821424508
javabeanxmlxml和bean转换java bean和xml转换
这几天在做微信公众号
做的过程中想找个java bean转xml的工具,找了几个用着不知道是配置不好还是怎么回事,都会有一些问题,
然后脑子一热谢了一个javabean和xml的转换的工具里,自己用着还行,虽然有一些约束吧 ,
还是贴出来记录一下
顺便你提一下下,这个转换工具支持属性为集合、数组和非基本属性的对象。
packag
- C 语言初级 位运算
1140566087
位运算c
第十章 位运算 1、位运算对象只能是整形或字符型数据,在VC6.0中int型数据占4个字节 2、位运算符: 运算符 作用 ~ 按位求反 << 左移 >> 右移 & 按位与 ^ 按位异或 | 按位或 他们的优先级从高到低; 3、位运算符的运算功能: a、按位取反: ~01001101 = 101
- 14点睛Spring4.1-脚本编程
wiselyman
spring4
14.1 Scripting脚本编程
脚本语言和java这类静态的语言的主要区别是:脚本语言无需编译,源码直接可运行;
如果我们经常需要修改的某些代码,每一次我们至少要进行编译,打包,重新部署的操作,步骤相当麻烦;
如果我们的应用不允许重启,这在现实的情况中也是很常见的;
在spring中使用脚本编程给上述的应用场景提供了解决方案,即动态加载bean;
spring支持脚本