栏式按钮项(UIBarButtonItem类)
UIBarButtonItem类继承自UIBarItem类,而UIBarItem类是一个可以放置在Bar之上的所有小控件类的抽象类。继承了该基类所有子类在外观上类似于一个Button,它们都有一个标题,图片,动作以及目标,这点可以从其子类的初始化方法处看到。
对于子类UIBarButtonItem而言,它是专门放置在UIToolbar或UINavigationBar之上的Button,它从其基类处继承了Button的基本行为。通常,我们会使用Interface Builder来创建和配置UIBarButtonItem对象,这种方式更直观,更方便,也更易理解。
接下来,我们创建一个简单工程以展示UIBarButtonItem在工具栏和导航栏上的应用,其中,UIBarButtonItem对象通过Interface Builder来创建。
备注:该工程使用Xcode 4.6.2 (4H1003)版本创建,目标iOS SDK版本为6.1,并使用了自动引用计数。同时,该实例并没有考虑实际应用的需要,仅作学习参考使用。
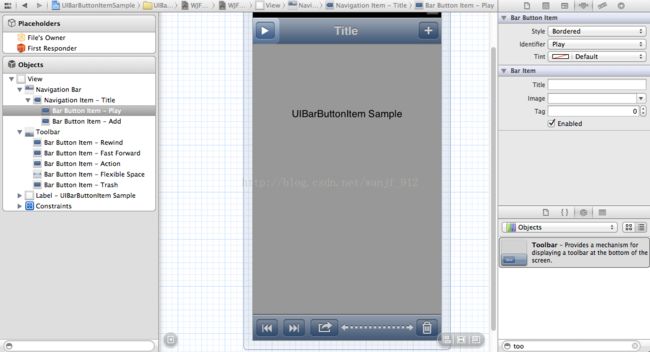
首先,通过向导创建一个Single View Application工程,命名为UIBarButtonItemSample, 设Project Prefix为WJF。创建完成后,修改WJFViewController.xib,首先从对象库中分别拖出一个Navigation Bar和一个Toolbar放置在视图View的上方和下方,然后再从对象库中拖出几个Bar Button Item分别放置在Navigation Bar和Toolbar上,最后,分别点中这几个Bar Button Item后,在右侧的属性检查器(Attributes Inspector)中设置它们的标示(Identifier)。修改后的WJFViewController.xib在Interface Builder中的显示如下:
最终,在模拟器上的运行结果如下:

之前,我们通过Interface Builder来创建UIBarButtonItem,现在我们尝试用代码的方式来创建它们。
首先,我们删除xib内文件所有者的view输出口关联,然后在右面的对象库里重新拖出一个view,并让其与文件所有者的view输出口建立关联。接下来修改WJFViewController.h文件和WJFViewController.m文件,修改后如下:
WJFViewController.h文件
//
//  WJFViewController.h
//  UIBarButtonItemSample
//
//  Created by jiafu wan on 6/25/13.
//  Copyright (c) 2013 jiafu wan. All rights reserved.
//

#import <UIKit/UIKit.h>
#define NAVIGATIONBAR_HEIGHT    44
#define TOOLBAR_HEIGHT          44
@interface WJFViewController : UIViewController
@property (weak, nonatomic)UINavigationItem *navigationItem;
@end
WJFViewController.m文件
//
//  WJFViewController.m
//  UIBarButtonItemSample
//
//  Created by jiafu wan on 6/25/13.
//  Copyright (c) 2013 jiafu wan. All rights reserved.
//

#import "WJFViewController.h"

@interface WJFViewController ()
{
    UINavigationBar *navigationBar;
    UIToolbar       *toolbar;
}
@end

@implementation WJFViewController

@synthesize navigationItem;

- (void)viewDidLoad
{
    [super viewDidLoad];
	// Do any additional setup after loading the view, typically from a nib.
    //1.创建NavigationBar及button
    UIBarButtonItem  *leftItemButton, *rightItemButton;
    navigationBar = [[UINavigationBar alloc] init];
    navigationItem = [[UINavigationItem alloc] initWithTitle:@"Title" ];
    leftItemButton = [[UIBarButtonItem alloc] initWithBarButtonSystemItem:UIBarButtonSystemItemPlay target:self action:nil];
    rightItemButton = [[UIBarButtonItem alloc] initWithBarButtonSystemItem:UIBarButtonSystemItemAdd target:self action:nil];
    if (leftItemButton != nil && self.navigationItem != nil) {
        self.navigationItem.leftBarButtonItem = leftItemButton;
    }
    if (rightItemButton != nil && self.navigationItem != nil) {
        self.navigationItem.rightBarButtonItem = rightItemButton;
    }
    if (navigationBar != nil) {
        navigationBar.frame = CGRectMake(0, 0, [UIScreen mainScreen].bounds.size.width, NAVIGATIONBAR_HEIGHT);
        [navigationBar pushNavigationItem:self.navigationItem animated:FALSE];
        [self.view addSubview:navigationBar];
    }
    //2.创建Toobar及button
    NSArray *itemButtons;
    UIBarButtonItem  *rewindItemButton, *fastForwardItemButton, *actionItemButton, *trashItemButton,*flexibleSpaceItem;
    toolbar = [[UIToolbar alloc] initWithFrame:CGRectMake(0, [UIScreen mainScreen].bounds.size.height -  [[UIApplication sharedApplication] statusBarFrame].size.height -  TOOLBAR_HEIGHT, [UIScreen mainScreen].bounds.size.width, TOOLBAR_HEIGHT)];
    rewindItemButton = [[UIBarButtonItem alloc] initWithBarButtonSystemItem:UIBarButtonSystemItemRewind  target:self action:nil];
    rewindItemButton.style = UIBarButtonItemStyleBordered;
    fastForwardItemButton = [[UIBarButtonItem alloc] initWithBarButtonSystemItem:UIBarButtonSystemItemFastForward target:self action:nil];
    fastForwardItemButton.style = UIBarButtonItemStyleBordered;
    actionItemButton = [[UIBarButtonItem alloc] initWithBarButtonSystemItem:UIBarButtonSystemItemAction target:self action:nil];
    actionItemButton.style = UIBarButtonItemStyleBordered;
    trashItemButton = [[UIBarButtonItem alloc] initWithBarButtonSystemItem:UIBarButtonSystemItemTrash target:self action:nil];
    trashItemButton.style = UIBarButtonItemStyleBordered;
    flexibleSpaceItem = [[UIBarButtonItem alloc] initWithBarButtonSystemItem:UIBarButtonSystemItemFlexibleSpace target:self action:nil];
    //注意顺序
    itemButtons = [[NSArray alloc ] initWithObjects:rewindItemButton, fastForwardItemButton, actionItemButton, flexibleSpaceItem, trashItemButton, nil];
    if (toolbar != nil) {
        toolbar.items = itemButtons;
        [self.view addSubview:toolbar];
    }
}

- (BOOL)shouldAutorotate
{
    return TRUE;
}
- (NSUInteger)supportedInterfaceOrientations
{
    return UIInterfaceOrientationMaskLandscapeLeft|UIInterfaceOrientationMaskLandscapeRight|UIInterfaceOrientationMaskPortrait;
}
- (void)willAnimateRotationToInterfaceOrientation:(UIInterfaceOrientation)interfaceOrientation duration:(NSTimeInterval)duration
{
    if (interfaceOrientation == UIInterfaceOrientationPortrait) {
        navigationBar.frame = CGRectMake(0, 0, [UIScreen mainScreen].bounds.size.width, NAVIGATIONBAR_HEIGHT);
        toolbar.frame = CGRectMake(0, [UIScreen mainScreen].bounds.size.height -  [[UIApplication sharedApplication] statusBarFrame].size.height -  TOOLBAR_HEIGHT, [UIScreen mainScreen].bounds.size.width, TOOLBAR_HEIGHT);
    }
    else if(interfaceOrientation == UIInterfaceOrientationLandscapeLeft | interfaceOrientation == UIInterfaceOrientationLandscapeRight){
        navigationBar.frame = CGRectMake(0, 0, [UIScreen mainScreen].bounds.size.height, NAVIGATIONBAR_HEIGHT);
        toolbar.frame = CGRectMake(0, [UIScreen mainScreen].bounds.size.width -  [[UIApplication sharedApplication] statusBarFrame].size.width -  TOOLBAR_HEIGHT, [UIScreen mainScreen].bounds.size.height, TOOLBAR_HEIGHT);
    }
}
- (void)didReceiveMemoryWarning
{
    [super didReceiveMemoryWarning];
    // Dispose of any resources that can be recreated.
}

@end
最后,运行的结果同先前是一样的。
不难看出,UIBarButtonItem只是一种Button,但它需要同NavigationBar和Toolbar结合使用时才能体现它的特别。我们在介绍NavigationBar和Toolbar时再大概地对这些特别支持进行介绍。