bootloader_v2 以及改进PatchDSE!
bootloader_v1
//Disable PatchGuard - the easy/lazy way.
//for Vista SP2 & Windows 7 (X64)//
//by Fyyre (thank you Roxaz for helping me to test)
//http://fyyre.l2-fashion.de/
//http://twitter.com/Fyyre
last update: 19/03/2011
This txt file provides a general overview/outline for bypassing signature validation of critical system files (ntoskrnl, mainly) during
the Vista/Win 7 boot phase. It is documentation of the steps taken from start to finish, to reach the desired goal of removing
kernel patch protection "PatchGuard" without use of a driver. We will call this the 'lazy/easy' way to kill PatchGuard.
We cannot modify ntoskrnl without winload taking up issue...
winload.exe is the Windows loader for Vista & Windows 7. Along with this, he makes some verification of digital signatures and
checking to make sure the files have not been modified. If modification of ntoskrnl is detected, the result is winload *refusing*
to boot Windows and launching a WinPE looking "Recovery Mode".
//PART I { additional }: new way for patch of winload.exe
//
//Function ImgpValidateImageHash - signature we locate: 8B C3 49 8B 5B 20 49 8B 73 28 49 8B 7B 30 4D 8B -- you may play with this one to make him smaller. as for this
//patching, use of dUP2... size of not a concern. First bytes replaced with xor eax, eax (STATUS_SUCCESS) .. all validations successful.
PART I: disassembly and modification of winload.exe
Starting from OslpMain, after loading the System registry hives(registry)... occurs a call to OslInitializeCodeIntegrity:
.text:00000000004016C3 call OslpLoadSystemHive
.text:00000000004016C3
.text:00000000004016C8 cmp eax, ebx
.text:00000000004016CA mov edi, eax
.text:00000000004016CC jl loc_401A08
.text:00000000004016CC
.text:00000000004016D2 mov ecx, ebp
.text:00000000004016D4 call OslInitializeCodeIntegrity <<-- =(
.text:00000000004057E8 OslInitializeCodeIntegrity proc near
original code -->>
We will replace four bytes here:
48 8B C4 53
.text:00000000004057E8 mov rax, rsp
.text:00000000004057EB push rbx
.text:00000000004057EC push rbp
with: 0B0h, 01h, 0C3h, 090h ... which produce:
mov al, 1
ret
nop
Save as winload.exe as osloader.exe (or whatever..) & correct PE checksum (LordPE and/or CFF_Explorer will do).
Copy osloader.exe to \Windows\System32
PART II - new BCD entry:
bcdedit /copy {current} /d "PatchGuard Disabled"
"The entry was successfully copied to {01234567-89ab-cdef-00ff-fff000ffffff}" <<-- GUID of new entry. each is different!
bcdedit /timeout 10 <<-- number of seconds to show boot menu.
bcdedit /set {01234567-89ab-cdef-00ff-fff000ffffff} nointegritychecks 1 <<-- no validation of winload
bcdedit /set {01234567-89ab-cdef-00ff-fff000ffffff} recoveryenabled 0 <<-- optional... i dislike this feature, therefore disable.
bcdedit /set {01234567-89ab-cdef-00ff-fff000ffffff} path \Windows\system32\osloader.exe
bcdedit /set {01234567-89ab-cdef-00ff-fff000ffffff} kernel ntkrnlmp.exe (name of modified ntos... =))
Part III: Skip Initialization of PatchGuard - - (driver not required)
As for this .txt, and PatchGuard... we are concerned with one function KiInitializePatchGuard(*1) which is called by KiFilterFiberContext.
KiInitializePatchGuard is a very large function located in the INIT section of ntoskrnl, you can easily locate him via two calls from
KiFilterFiberContext, by examination xrefs to exported dword InitSafeBootMode, searching for db 20h dup(90h) + db 044h ... or 48 81 EC 58 0F 00 00 to name a few...
PatchGuard does not initialize if we boot into safe mode. So to disable we just patch one conditional jxx
KiInitializePatchGuard:
original code -->>
INIT:000000014055D359 sub rsp, 0F58h
INIT:000000014055D360 xor edi, edi
INIT:000000014055D362 cmp cs:InitSafeBootMode, edi
INIT:000000014055D368 jz short loc_14055D371
INIT:000000014055D368
INIT:000000014055D36A mov al, 1
INIT:000000014055D36C jmp loc_1405600D9
modified code -->>
INIT:000000014055D359 sub rsp, 0F58h
INIT:000000014055D360 xor edi, edi
INIT:000000014055D362 cmp cs:InitSafeBootMode, edi
INIT:000000014055D368 nop
INIT:000000014055D369 nop
INIT:000000014055D36A mov al, 1
INIT:000000014055D36C jmp loc_1405600D9 <<-- to end of KiInitializePatchGuard
and back to KiFilterFiberContext... and important detail:
The first jxx in KiInitializePatchGuard must not be taken & al == 1. When we return to KiFilterFiberContext, the jxx must be taken,
and EBX must not be xor'd ... (unless enjoy BSOD).
INIT:0000000140567110 loc_140567110:
INIT:0000000140567110 test al, al
INIT:0000000140567112 jnz short loc_140567116
INIT:0000000140567112
INIT:0000000140567114
INIT:0000000140567114 loc_140567114:
INIT:0000000140567114 xor ebx, ebx <<-- bad
INIT:0000000140567114
Anyways... nop the first jxx in KiInitializePatchGuard... save modified ntoskrnl.exe with a different name (i.e. ntkrnlmp.exe) ... fix checksum (PE header).
Then copy your modified kernel to \Windows\system32 -- with bcdedit -->>
bcdedit /set {guid-of-new-entry} kernel ntkrnlmp.exe
When you reboot the system, loading your modified kernel should be a success... He will load without PatchGuard initializing, which will allow you to once again play in kernel mode without receiving BSOD as result...
This could be worked into mbr bootkit code as well... this is beyond the scope of our intention.
-Fyyre
references:
*1: Bypassing PatchGuard on Windows x64, by Skywing 12/1/2005
bootloader_v2:
/*
Fyyre
http://fyyre.l2-fashion.de/
http://twitter.com/Fyyre/
*/
Change Log:
// zzz ...
// Win 8 RC0: // 06/09/2012, small update
// Windows 10 // 08/18/2015, small update
// this file is a jumble of notes, sorry!
This txt file provides a general overview/outline for the reader to disable "Kernel Patch Protection" ( Patch Guard ) ..
on Windows 7, 8 and 10.
Windows 8:
Looking in the INIT section, it appear nothing change since RC0. Meaning we still can use byte signature of:
8B FA FA 33 C0, which next instruction is mov edi, edx near start of PgInitialize inside ntoskrnl INIT section. Subtract
0x2B from this agan yields function start .. which our mov al, 1 overwrites mov rax, rsp ^^
Windows 10:
48 8B C4 4C 89 48 20 44 89 40 18 89 50 10 89 48 // ntoskrnl.exe 10.0.10240.16430 x64 -- PgInitialize signature, only some slight changes!
Probably safe to assume my 'three byte patch' from forever ago, still works fine.
Seems the SepInitializeCodeIntegrity stuff is still present. Nothing new to see, I guess.
// end 08/2015 update
INIT:00000001406C5A04 PgInitialize
8B FA FA 33 C0 // binary signature
address of first byte in signature - 0x2B == PgInitialize function start.
replace with 0xb0 0x01 0xc3 (add nops, if needed).
didn't verify this, but at first blush i see no real difference here.
INIT:00000001406744C0
INIT:00000001406744C0 ; <"PREFETCHWLIST", "\ObjectTypes\">
INIT:00000001406744C0
INIT:00000001406744C0 KiInitializePatchGuard proc near ; CODE XREF: KiFilterFiberContext+1E2
INIT:00000001406744C0 ; KiFilterFiberContext+29E
or using the signature: "\x48\x8B\xC4\x44\x89\x48\x20\x44\x89\x40\x18\x89\x50\x10\x89\x48" or "\x48\x81\xEC\xD0\x17\x00\x00" - 0x1C we again find within
the .INIT section of ntoskrnl the start of PG initialization function.
Brief look over it, we can tell that it is a good bit different than Windows 7 -- the details, save for rainy days. to disable,
again we simply make it return true, by overwrite starting bytes with "\xB0\x01\xC3"
Moving on, as I not fully fix SeInitializeCodeIntegrity (EP_X0FF did, see his dsefix at kernelmode.info)
I did little change to SeValidateImageHeader... searching for "\x74\x27\x48\x8B\x84\x24\x80\x00" changing 0x74 to 0x84. Also, we fix the return in this function
mov eax, 0C0000428h <<-- I replace 0x28 0x04 with 0x00 0x00 -- mov eax, STATUS_SUCCESS;
Save changes, be certain to fix pe checksum on ntoskrnl.exe -- and rename to what you wish..
Next, winload.exe -- again.
ImgpValidateImageHash... find him using debugging symbols, and change start of function to return STATUS_SUCCESS -->> 0x33 0xC0 0xC3 --
again, save file and update pe checksum.
I rename winload.exe -->> osloader.exe and ntoskrnl.exe -->> ntkrnlmp.exe
Next... bcd entry.. create .bat file now add...
ECHO.
ECHO Creating BCD Entry...
ECHO.
set ENTRY_GUID={46595952-454E-4F50-4747-554944FEEEEE}
bcdedit -create %ENTRY_GUID% -d "PatchGuard Disabled" -application OSLOADER
bcdedit -set %ENTRY_GUID% device partition=%SYSTEMDRIVE%
bcdedit -set %ENTRY_GUID% osdevice partition=%SYSTEMDRIVE%
bcdedit -set %ENTRY_GUID% systemroot \Windows
bcdedit -set %ENTRY_GUID% path \Windows\system32\osloader.exe
bcdedit -set %ENTRY_GUID% kernel ntkrnlmp.exe
bcdedit -set %ENTRY_GUID% recoveryenabled 0 ; optional, i just dislike the recovery ...
bcdedit -set %ENTRY_GUID% nx OptIn
bcdedit -set %ENTRY_GUID% nointegritychecks 1
bcdedit -set %ENTRY_GUID% inherit {bootloadersettings}
bcdedit -set %ENTRY_GUID% testsigning 1
bcdedit -displayorder %ENTRY_GUID% -addlast
bcdedit -timeout 10
ECHO.
ECHO Setting PEAUTH service to manual... (avoid BSOD at login screen)
ECHO.
sc config peauth start= demand
ECHO.
ECHO Step One Complete!
also -- now, there is some registry settings that may be modified...
\Registry\MACHINE\System\CurrentControlSet\Control\CI
AllowTestCode REG_DWORD <<-- 0 or 1
IntegrityLevelPolicy REG_DWORD <<-- not sure :)
Driver requires test signing, atm -- but PG is now gone (again).
If you receive BSOD (often after Windows Update) .. simply start system not selecting "Disable PatchGuard" from boot loader menu...
Have fun =)
-Fyyre
翻译v2:(v1差不多的)
/*
Fyyre
http://fyyre.l2-fashion.de/
http://twitter.com/Fyyre/
*/
修改日志:
// zzz ...
// Win 8 RC0: // 06/09/2012,小更新
// Windows 10 // 08/18/2015,小更新
// 该文件是一个混乱的笔记,抱歉!
本文档的目的是:
为读者提供一个 “内核补丁保护”(PG) 在 Windows 7,8,10 环境下的总体概貌。
Windows 8:
在 INIT 部分(section),RC0它似乎一直以来就没有什么改变。
这意味着我们仍然可以使用字节的签名:
/*
8B FA FA 33 C0, which next instruction is mov edi, edx near start of PgInitialize inside ntoskrnl INIT section.
*/
这一句不是很好翻译,于是意译了
8BFA          mov     edi,edx
FA            cli
33C0          xor     eax,eax
在 ntoskrnl 的 INIT 区段(section) 里面的 PgInitialize 函数 的开始部分的附近能找到特征码,
8B FA FA 33 C0,它的起始指令是 mov edi,edx。
从这个函数 (agan yields function,不知道怎么译) 开始位置减去 0x2B,就能得到需要我们覆写的地址,使用 mov al, 1 覆盖掉 mov rax, rsp。
译者附注:
B0 01         mov     al,1
------------------------------
89E0          mov     eax,esp   < mov rax,rsp>
Windows 10:
48 8B C4 4C 89 48 20 44 89 40 18 89 50 10 89 48
// ntoskrnl.exe 10.0.10240.16430 x64
-- PgInitialize signature, only some slight changes! (不太好译)
-- PgInitialize 签名(特征码),只有一些轻微的变化!
可以假设 我的 “3字节补丁” 一直安全且仍然工作稳定。
SepInitializeCodeIntegrity(代码完整性效验) 看来是依旧存在,并没有什么新的发现。
// 最后更新于 08/2015
INIT:00000001406C5A04 PgInitialize
8B FA FA 33 C0 // 二进制签名(特征码标识)
特征码的开始地址 - 0x2B == PgInitialize 函数开始地址
替换为 0xb0 0x01 0xc3 (如果需要的话 加上一些 nop).
笔者说他并没有验证这些,只是通过观察得出的结论。
INIT:00000001406744C0
INIT:00000001406744C0 ; <"PREFETCHWLIST", "\ObjectTypes\">
INIT:00000001406744C0
INIT:00000001406744C0 KiInitializePatchGuard proc near        ; CODE XREF: KiFilterFiberContext+1E2
INIT:00000001406744C0                                         ; KiFilterFiberContext+29E
其他的特征码:
"\x48\x8B\xC4\x44\x89\x48\x20\x44\x89\x40\x18\x89\x50\x10\x89\x48"
或者
"\x48\x81\xEC\xD0\x17\x00\x00" - 0x1C
我们同样可以找到 .
位于内核的 INIT 区段的 PG 初始化函数的起始地址。
浅显的看,我们可以看出这种方式在细节上比 Win7的方式稍好一些,留以备用。
去禁用它,我们可以通过覆盖起始字节“\ xB0 \ x01 \ xC3” 让它只返回true。
继续,我没有完全修复 SeInitializeCodeIntegrity(EP_X0FF did, see his dsefix at kernelmode.info 简译为:看看 EP_X0FF 他是如何实现的)
我并没有改变SeValidateImageHeader…
搜索 "\x74\x27\x48\x8B\x84\x24\x80\x00" ,将 0x74 改为 0x84。
同样的,我们修复这个函数返回。
mov eax, 0C0000428h <<-- I replace 0x28 0x04 with 0x00 0x00 -- mov eax, STATUS_SUCCESS; // 替换 0x28 0x04 为 0x00 0x00
保存修改。当然还需要 修复 ntoskrnl.exe 文件的 效验和信息(checksum),并且重命名它。
接下来就轮到 winload.exe
ImgpValidateImageHash……使用调试符号找到他,并改变函数开头使其直接返回STATUS_SUCCESS - - > > 0x33 0xC0 0xC3
同样,保存文件和更新PE文件校验和。
自己 重命名winload.exe - - > > osloader.exe和ntoskrnl.exe - - > > ntkrnlmp.exe
接着使用批处理来 创建添加 bcd entry(不好翻译这个:简译为 引导项)
ECHO.
ECHO Creating BCD Entry...
ECHO.

set ENTRY_GUID={46595952-454E-4F50-4747-554944FEEEEE}
bcdedit -create %ENTRY_GUID% -d "PatchGuard Disabled" -application OSLOADER
bcdedit -set %ENTRY_GUID% device partition=%SYSTEMDRIVE%
bcdedit -set %ENTRY_GUID% osdevice partition=%SYSTEMDRIVE%
bcdedit -set %ENTRY_GUID% systemroot \Windows
bcdedit -set %ENTRY_GUID% path \Windows\system32\osloader.exe
bcdedit -set %ENTRY_GUID% kernel ntkrnlmp.exe
bcdedit -set %ENTRY_GUID% recoveryenabled 0 ; optional, i just dislike the recovery ...
bcdedit -set %ENTRY_GUID% nx OptIn
bcdedit -set %ENTRY_GUID% nointegritychecks 1
bcdedit -set %ENTRY_GUID% inherit {bootloadersettings}
bcdedit -set %ENTRY_GUID% testsigning 1
bcdedit -displayorder %ENTRY_GUID% -addlast
bcdedit -timeout 10

ECHO.
ECHO Setting PEAUTH service to manual... (avoid BSOD at login screen)
ECHO.
sc config peauth start= demand

ECHO.
ECHO Step One Complete!
——现在,有一些注册表设置可能是需要修改的…
\Registry\MACHINE\System\CurrentControlSet\Control\CI
AllowTestCode REG_DWORD <<-- 0 or 1
IntegrityLevelPolicy REG_DWORD <<-- 不确定 :) <<-- 这个卖萌的笑脸是笔者的与我无关 :)
Driver requires test signing, atm -- but PG is now gone (again).
驱动依旧需要签名 和 atm(啥?) -- 但是 PG 已经滚蛋了~~~
If you receive BSOD (often after Windows Update) .. simply start
system not selecting "Disable PatchGuard" from boot loader menu...
Have fun =)
如果你收到了蓝脸(BSOD) (通常在 Wiondos 更新之后)... 在系统引导时选择 不禁止 "PatchGurad" 一般是可以解决这个问题的
祝你好运
-Fyyre
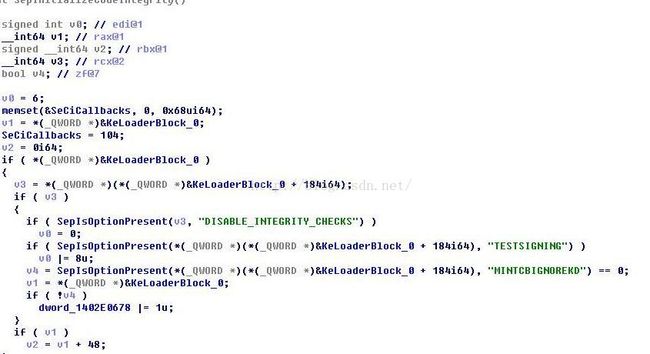
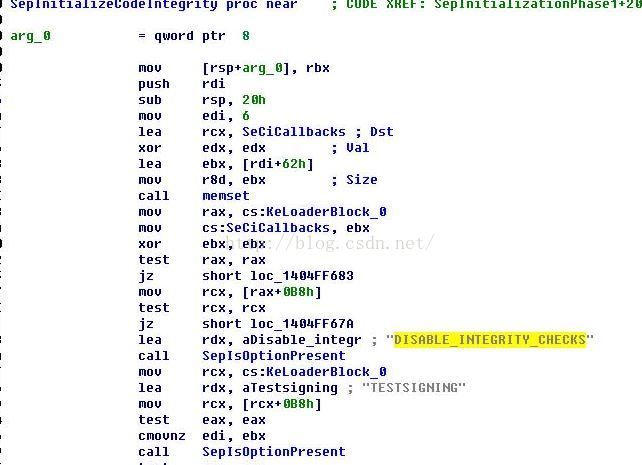
v2并没有给提供win8.1 patch dse
我自己研究后成功破解
方法是:
将SeInitializeCodeIntegrity下的两个字符串交换,然后在创建引导的时候使用bcdedit -set %ENTRY_GUID% testsigning 1 ,这里不是测试模式了,
只需要改2个字节哦
其它的一些patch点
OslInitializeCodeIntegrity mov al,1 retn
89 54 24 ->b0 1 c3
ImgpValidateImageHash xor eax,eax retn
48 89 5c ->33 c0 c3
ImgpValidateImageHashWithCatalog xor eax,eax retn
48 89 5c ->33 c0 c3
计算校验和
9600.16384
Org Checksum:17 2d
Patch Checksum:81 c9


9600.16384
ntoskrnl.exe
Org Checksum:13 63
Patch Checksum:79 d9
KiInitializePatchGuar 通过FsRtlUninitializeSmallMcb定位到一个sub函数 这个sub就是KiInitializePatchGuar
mov rax,rsp ->mov al,1 retn
48 8b c4 -> b0 1 c3
感谢 fyyre女神!
未破解前:
破解后:

