iOS逆向工程-工具篇
对于初开始学习iOS逆向工程的人来说,实现一个tweak可以算是入门逆向工程了。当然了,可能你现在还不知道tweak是什么。简单来说,你可以把一个tweak当作某一个app的一个插件(类似于浏览器广告屏蔽插件)。在app运行的时候,tweak会hook住某个函数,然后在hook的函数里面,你可以插入你的代码。比如用户在登陆微信账号的时候,tweak可以hook住登录函数,dump出用户的账号密码。那问题来了,我们要如何知道哪个函数是账号登录函数咧?这就涉及到我们如何去分析一个iOS app
要进行iOS逆向工程,建议掌握iOS应用的开发相关知识,相信看本文的读者应该都具备。 进行iOS逆向工程的一个关键就是工具的使用,工欲善其事,必先利其器。用好工具可以事半功倍。甚至可以做之前可能根本没想到能够做的事情。
这里介绍的工具可以分为如下几类:
- UI分析工具
- 文件系统查看工具
- 数据库查看工具
- 网络分析工具
- 逆向程序开发工具
- 反汇编工具
- 调试器
- 性能监控工具
- crash分析工具
UI分析工具
UI分析工具是对iOS应用的UI进行分析的工具,有Reveal和PonyDebugger等。
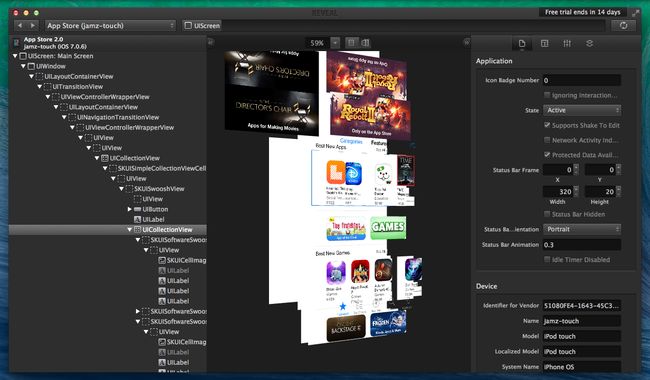
Reveal能够在运行时调试和修改iOS应用程序。它能连接到应用程序,并允许开发者编辑各种用户界面参数,这反过来会立即反应在程序的UI上。就像用FireBug调试HTML页面一样,在不需要重写代码、重新构建和重新部署应用程序的情况下就能够调试和修改iOS用户界面。 --InfoQ
使用Reveal的效果如图:
使用PonyDebugger的效果如图:
文件系统查看工具
在iOS设备上可以安装iExplorer, iFunbox, iTool等工具,可以查看iOS应用的文件系统结构。
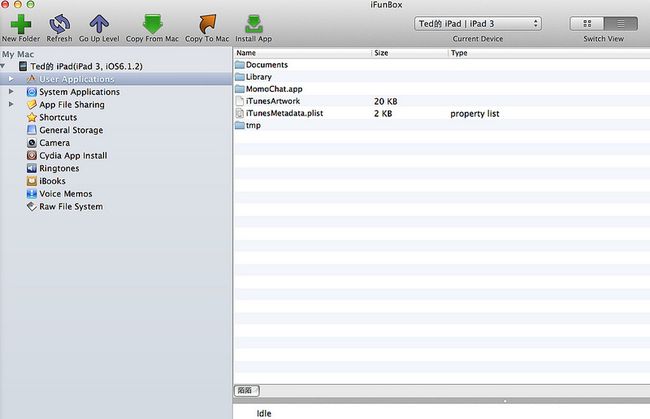
使用iFunbox打开陌陌的文件目录,如下图所示:
网络分析工具
使用Tcpdump, WireShark, Charles、httpscope等工具可以对应用的网络数据进行分析。
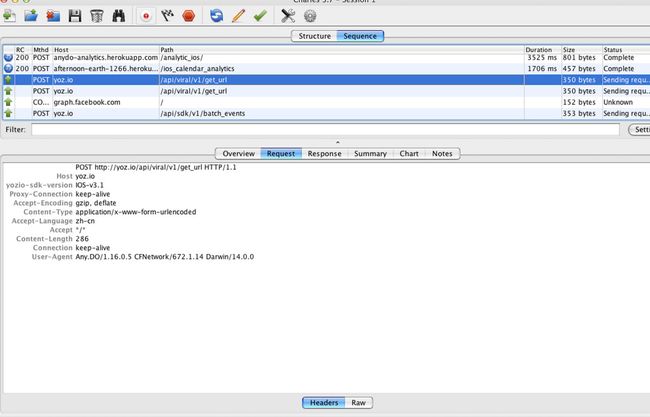
使用Charles对网络数据包进行分析的示意图:
逆向程序开发工具
开发越狱程序和日常开发的iOS程序很相似,不过,越狱程序能做更强大的事情。你的设备越狱之后,你就能够hook进Apple提供的几乎所有的class,来控制iPhone/iPad的功能。
Theos大幅简化了编写越狱程序的流程,后面会对该工具进行详细的介绍。
反汇编工具
-
可执行代码分析
- dumpdecrpted
- class_dump,class_dump_z,classdump_dyld
- Disassemblers
- IDA
- Hopper
- otool
- strings
- nm
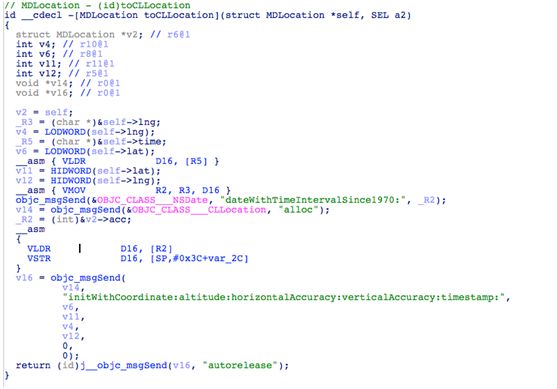
IDA Pro是一款非常强大的反汇编工具,甚至能够将汇编代码转换成近似于源码的伪代码。
如下图所示[1]:
可以看到,基本上相当于源码。
调试器
-
运行时分析
- GDB/LLDB
- Cycript
- Logify
- weak_classdump
- InspectiveC
本文简要介绍了iOS逆向工程要用到的工具,后面的文章会对用到的工具做进一步的介绍。
性能监控工具
手把手教time profiler
一、启动time profiler
二、基本介绍
主面板
详情面板(detail pane)介绍
一些简单技巧
三、简单的过滤
过滤时间段
函数名或类名过滤
Call Tree过滤
Call Tree Constraints过滤
打用户标记
Specific Data mining
四、高级的功能
两种模式的介绍
instrument4.0之后的新特性
其他视图
五、参考文档
鉴于网上没有较完善的time profile教程,官网上的介绍也很简略,look在此写一篇time profile的小教程,此篇文档囊括了谷歌前两页的搜索结果,look浓缩翻译了部分精华并加入了些个人理解,有不对的地方或需要补充的地方,欢迎大家斧正和指导。
在此感谢carmelosui关于self的指正。
一、启动time profiler
已使用过time profiler的同志请直接跳到二、基本介绍
首先您的手机得有证书,能确保能run过,笔者用的是xcode5.0.2 instrument5.0.1,以下的图示均以xcode5.0.2 instrument5.0.1为准,有同学反馈证书都OK了,用time profiler时app会闪退、手机接着重启,可能是手机越狱的原因,请用非越狱手机试试。
启动time profile两种方式
1. 长按Xcode左上角的run键几秒,将会出现一个下拉列表,然后选择profile
2. 通过xcode菜单栏,Product -> Profile 启动instrument
instrument里选取time profiler,然后点Profile:
Time Profile就启动了,操作一段时间后,点击stop,停止分析:
回到目录
二、基本介绍
如果您对time profiler每个面板,大部分字段了如指掌,请跳到三、简单的过滤
主面板
首先点击下图view中三个选择器,确保所有的视图均有打开
主界面如下:
图1
1、 可以通过range设置您需要关注的时间段,在图1标识5 跟踪(track)面板中
通过时间轴线,设置您的起止时间:
2. run timer and run navigator,记录您run的次数,通过左右三角箭可以查看上/下一次运行:
3. Liabrary,选取这个后,右边会出现instrument工具的库,您可以选取其他工具,然后拖到左上角的instrument视图中,由于look这里只介绍time profile,其他工具请查阅其他文档。
4. 过滤器,如果您需要查找具体的类或函数,在此输入类名或函数名,图1标识8详情面板中将会展示您过滤后的结果
5. 跟踪面板(track pane)
6. 扩展详情面板(extended detail pane)
7. 选项面板(options pane)
8. 详情面板(detail pane)用于展示主要信息
详情面板(detail pane)介绍
下面介绍最重要的详情面板(detail pane)和扩展详情列表(Extended Detail),time profiler下我们主要看两种视图Call Tree和Sample List
调用树(Call Tree)视图
| Column heading |
DefinDefinition |
翻译 |
| Running Time |
The amount of time the symbol ran. |
该符号(函数)运行时间,注意是累积时间,time profiler不会顺着程序流程去统计时间 |
| Self |
The number of times the symbol calls itself. |
并非调用次数,look有发现很多self为0也有耗时的情况,经carmelosui指出后,此为在栈顶次数,look有待考证 |
| Symbol Name |
The name of the symbol being called. |
被调用的符号信息 |
详情面板call tree视图与扩展详情面板对应关系如图:
经carmelosui指导,调用树视图下还可以开启一些官网上没有提到的信息,如图所示:
关于self #self self%,可以参考carmelosui 在stackoverflow上的提问和carmelo对本文的评论:
http://stackoverflow.com/questions/12262695/what-do-self-and-self-mean-in-the-time-profiler-instrument
Self in the Time Profiler refers to the amount of time spent in the given function itself, excluding time spent in other methods that it calls.
Self % is the same thing but expressed as a percentage of the total running time.
# Self is the number of actual profiler samples that hit this function or method. The Time Profiler samples every 1 ms by default, so this number will often be the same as the Self value.
如上仅供参考,具体有待考证,look有空再demo验证
样本列表(sample list)
| Column heading |
Definition |
| Timestamp |
该采样开始时间 |
| Depth |
堆栈深度 |
| CPU |
线程运行在哪块cpu上 |
| Thread |
The thread identifier. |
| Hot Frame |
该采样中调用最频繁的函数 |
| Responsible Library |
调用该函数的库 |
| Responsible Caller |
调用该函数的函数 |
sample list视图下,详情面板与扩展详情面板对应关系如图:
一些简单技巧
如果您想一级级打开调用栈,点击符号信息前的展开/收起即可,如果您想一下全部打开调用栈,按住option,再点展开/收起
您也可以按耗时,调用次数的升序/降序进行排列,如图所示:
放大(shift) /缩小(control)+拖动时间轴线:调整跟踪面板的单位时间长度,
也可以View ->snap Track to fit自动匹配合适的时间间隔显示
比较两次run的差异:
instrument->Compare Call Trees
回到目录
三、简单的过滤
如果您对基本的过滤方法信手拈来,四、高级的功能或许能满足您
过滤时间段
通过前面的inspection range可以设置起止时间,关注您设定时间内的耗时,设定后的效果如下图:
instrument4.0之后,我还可以教您更快的方法,按住option,然后直接在跟踪面板上拖动就可以限定时间范围
函数名或类名过滤
通过主面板图1标识4,输入名称可以直接过滤
也可以通过Edit ->find( 快捷键Command+F)来查找,还可以设置查找类型:
Call Tree过滤
通过选项面板中一些选项,进行一些简单的过滤,选项面板如下:
Call Tree下面有些很有用的选项
Separate by Thread(建议开启):通过线程分类,能看到哪些线程占用cpu最多,该选项一般选上
invert Call Tree(不建议开启):反转调用树,正常的详情面板中的调用树是从线程的根向下一级级显示,选上该选项,则从最底层的调用向上一级级显示,在您需要看哪个方法调用最深时有用,一般不建议开启此选项,
Hide Missing Symbols(建议): 隐藏丢失的符号,如果应用程序或系统framework的dSYM文件找不到,详情面板中将看不到方法名(符号),看到的是十六进制值,对应的是指令在二进制代码中的地址值.如果开启这个选项,这些数值将会隐藏,只显示能被解析的函数(符号)信息,帮助简化显示的信息。
Hide System Libraries(建议): 当开启这个选项,只展示和您应用程序相关的符号信息,该选项通常很有用,因为您只关心自己代码的耗时, 而不是过多关心系统库的cpu耗时。
Show Obj-C Only(依场景): 开启该选项仅Objective-C methods 展示,C和C++函数不展示,如果您的程序用到了OpenGL ,会包含一些C++的方法。
Flatten Recursion(有递归时建议开启): 这个选项会将调用栈里递归函数作为一个入口,而不是多个
Top Functions:开启这个选项,会将最耗时的函数降序排列,这种耗时统计是累加的,例如A调用B,A的耗时统计里包含B的耗时,如果A B函数依次是第一、二耗时的函数,在此选项下,A B会降序依次显示。
通过一些过滤后,笔者的demo程序最终如图所示:
从上图可以看出,RootViewController类中的tableView:cellForRowAtIndexPath:方法最耗时,
双击该行,可以跳到代码处:
发现tableView:cellForRowAtIndexPath:方法中一行代码耗了该方法50.4%的耗时,这行代码就应该是我们应该优化的重点。
您也可以打开反汇编视图,有助于您排查问题
也可以打开源文件进行处理,而不用在Xcode里去查找该文件
Call Tree Constraints过滤
如果您想看调用次数超过10 或者只关心耗时超过10ms以上的函数,或者指定一个范围,这个可以派上用场了
count 若子级调用里有超过该设定值的,父级调用也不会被过滤掉
打用户标记
在跟踪面板上,同时按
command+方向下键,可以添加用户标记,也可以通过Edit->Add Flag添加
command+方向上键,可以删除用户标记,也可以通过Edit->Remove Flag删除
command+方向左右键,移动到上/下个标记
打用户标记可以缩小具体场景,具体怎么用,笔者还不太清楚,求指导。
Specific Data mining
暂留空,笔者还不太会用,将收集的一些说明暂且放这,求指导。
charge prune flatten
Charge symbols or Library to caller: Time Profiler will tally the time spent for a system symbol or even a complete library, to the method that calls it.
Prune Symbol and subtree: So you are pretty sure that there is nothing in the world that can shave a millisecond from a given portion of your app? Then you can instruct Time Profiler not to display it. In this case, Time Profiler will remove the the symbol and the subtree associate with it (all the code called from the marked symbol) from the tally.
Flatten Library to Boundaries: Let’s say that you call a Core Audio function, that itself spawn a lively arrange of calls to the stack. Again, you cannot do much about how Core Audio works internally, but you might find useful to instruct Time Profiler to show you just the boundaries between your code and Core Audio.
回到目录
四、高级的功能
如果作为初级用户,前面的介绍想必已够您大展拳脚了,下面介绍一下比较少用的高级功能,有一定帮助的功能,不完全针对time profile。
两种录制模式的介绍
录制主要有两种模式:立即模式(默认)和延时模式,下面简单介绍下两种模式的区别:
立即模式:默认方式,用profile探视用户时间耗时是非常有用的,但是因为instrument和我们探视的程序用同一块cpu,instrument也要耗掉部分那些能被程序所利用的时间,苹果称之为观察者效应。
延时模式:iOS4之后的新特性,该模式会最小化instrument对cpu的观察者效应,当你录制时,这种模式会禁用instrument的实时动态刷新过程,直到录制结束,这些数据才会显示出来,所以称为延时模式,如果您要开启这个选项:
当开启延时模式录制时,您看不到instrument的实时数据,界面如下:
look并没有对两种模式的性能数据做过详尽的对比,暂不清楚两种模式的数据差别有多大
instrument4.0之后的新特性
Specific Data mining
在某行信息上,按住controle+左键或在某行上直接右键,可以进行一些过滤
You select one of five focus options to focus on specific parts of the call tree:
Focus on subtree
只显示选中符号的子树,上面的调用均不显示
Focus on calls made by <symbol name>
只展示该符号发起的子树调用,上面的调用除了根调用均不显示
Focus on callers of <symbol name>
Displays only the subtrees with callers of the selected symbol.
Focus on calls made by <library name>
Displays only the subtrees with calls made by symbols in the selected symbol’s library.
Focus on callers of <library name>
Displays only the subtrees with callers of symbols in the selected symbol’s library.
支持直接将详情面板中的信息拷贝到文本中,
按住command键,可以同时选择不连续的多行,然后按command+C,可以直接拷贝到文本中
支持看源代码时,扩展详情面板有汇总信息,并可以选择升序/降序排列,选中汇总信息表中某行,源代码会对应显示
其他视图
下面主要介绍其他两种视图:cpu视图和线程视图
cpu视图(cpu strategy)
苹果官网上提到,多核的情况下,如果每个核利用率过高,而其他核利用率过低,意味着程序需要优化,上图中,笔者的demo程序两个核运行较均衡。
苹果官网上提供的不均衡的场景:
如果在4核机器上,能把程序写成如上图所示,笔者认为那也不是一般滴程序员。
线程视图
如上图所示,笔者demo程序中共有4个线程,第一个是主线程,用鼠标任意点一个采样点,将会出现和扩展详情面板里一样的调用栈信息
回到目录
五、参考文档
Time Profiler Instrument官方文档:
https://developer.apple.com/library/ios/documentation/AnalysisTools/Reference/Instruments_User_Reference/TimeProfilerInstrument/TimeProfilerInstrument.html
Analyzing CPU Usage in Your App官方文档
https://developer.apple.com/library/ios/documentation/DeveloperTools/Conceptual/InstrumentsUserGuide/AnalysingCPUUsageinYourOSXApp/AnalysingCPUUsageinYourOSXApp.html#//apple_ref/doc/uid/TP40004652-CH16-SW8
How to Use Instruments in Xcode
http://www.raywenderlich.com/23037/how-to-use-instruments-in-xcode
time profile详细面板和其他工具的介绍
KISS Time Profiling
http://www.digital-wave.com/blog/2013/02/08/profiling-macro/
设定用户标记
Tuning performance with Instruments:
http://volonbolon.net/post/897931352/tuning-performance-with-instruments
两种录制模式的介绍反汇编 charge prune flatten
self self % # self carmelosui的提问:
http://stackoverflow.com/questions/12262695/what-do-self-and-self-mean-in-the-time-profiler-instrument
命令行启动instrument:
http://diogogmt.wordpress.com/2012/09/17/using-instruments-time-profiler/
Time profiler instruments not showing objective c functions
http://stackoverflow.com/questions/12818149/time-profiler-instruments-not-showing-objective-c-functions
iOS 5 Tech Talk: Michael Jurewitz on Performance Measurement
http://oleb.net/blog/2011/11/ios5-tech-talk-michael-jurewitz-on-performance-measurement/
launch timePay special attention to the Self column.
iOS SDK: Time Profiling with Instruments
http://mobile.tutsplus.com/tutorials/iphone/ios-sdk-time-profiling-with-instruments/
讲了一个重点,设置用户标记和设定时间范围
此文对应较差劲的中文翻译:
http://blog.163.com/zhuhongwei_2012/blog/static/19541097720130933430461
斯坦福ios开发教程- Time Profiler (November 4, 2011)
http://v.youku.com/v_show/id_XNDUyMjIwNTY4.html
New Features in Instruments 4.0
https://developer.apple.com/library/ios/documentation/AnalysisTools/Conceptual/WhatsNewInstruments/NewFeatures40/NewFeatures40.html
crash分析工具
Cycript
Cycript最重要的特性是,它可以hook住 iOS/macosx 上面正在运行的进程,并通过终端使用objective_c或javascript语法去打印和修改该应用的运行时信息。我们可以把它当作一个可以debug没有源代码程序的工具。
以下是 Cycript 的用途:
- 能够hook正在运行的进程,并打印相关信息,如 appdelegate,rootViewController
- 对程序中的类,可以获取到它用过的方法名称
- 可以获取到类的实例变量名称,以及打印出实例变量的值,当然也可以修改实例变量的值
- 能够执行 method swizzling, 替换某个指定的函数
- 可以在运行时调用其他方法
安装 cycript
首先利用 Cydia 下载 mobilesubstrate adv-mds;从官网上面下载最新的包,并通过 scp 把文件拷贝到 iOS 设备上去,利用 dpkg 进行安装:
dpkg -i cycript cycript_0.9.102-1_iphoneos-arm.deb
安装完成之后,执行 cycript 看是否工作:
用Cycript进行实时修改
本文将使用支付宝来进行测试。
- 让支付宝钱包在前台运行,并找出它的进程id,然后用 cycript -p hook 进程
    chengpeide-iPhone:~ root# ps aux | grep AlipayWallet
    mobile     629   0.0  9.3   815836  47792   ??  Ss    9:45PM   0:34.79 /var/mobile/Containers/Bundle/Application/FB2E1466-0D87-4FF9-9616-BD4269D61BCF/AlipayWallet.app/AlipayWallet
    root       678   0.0  0.1   536256    412 s000  U+    9:49PM   0:00.01 grep AlipayWallet

    -rwxr-xr-x 1 root admin 906 Jan 12  2015 cycript
    chengpeide-iPhone:/cp/Cycript_0.9.502 root# cycript -p 629

    cy# var app = [UIApplication sharedApplication]
    #"<DFApplication: 0x14df44d0>"
    cy# app.delegate
    #"<DFClientDelegate: 0x14ed2d40>"
    cy# app.keyWindow.rootViewController
    #"<DFNavigationController: 0x15ac9a00>"
    cy# var nav = new Instance(0x15ac9a00)
    #"<DFNavigationController: 0x15ac9a00>"
    cy# nav.topViewController.childViewControllers
    @[#"<HPHomeWidgetGroup: 0x160a03d0>",#"<O2OIndexViewController: 0x15ad6600>",#"<APContactRecentViewController: 0x15afb600>",#"<WWAssetsViewController: 0x160a9da0>"]
    cy# var assetsViewController = new Instance(0x160a9da0)
    #"<WWAssetsViewController: 0x160a9da0>"
    cy# [assetsViewController.view subviews]
    @[#"<UIView: 0x162d8000; frame = (0 0; 0 0); layer = <CALayer: 0x162c85d0>>",#"<UITableView: 0x15433800; frame = (0 0; 320 519); clipsToBounds = YES; gestureRecognizers = <NSArray: 0x1623d1f0>; layer = <CALayer: 0x162c3b10>; contentOffset: {0, -64}; contentSize: {320, 800}>"]
    cy# var tableView = new Instance (0x15433800)
    #"<UITableView: 0x15433800; frame = (0 0; 320 519); clipsToBounds = YES; gestureRecognizers = <NSArray: 0x1623d1f0>; layer = <CALayer: 0x162c3b10>; contentOffset: {0, -42}; contentSize: {320, 800}>"
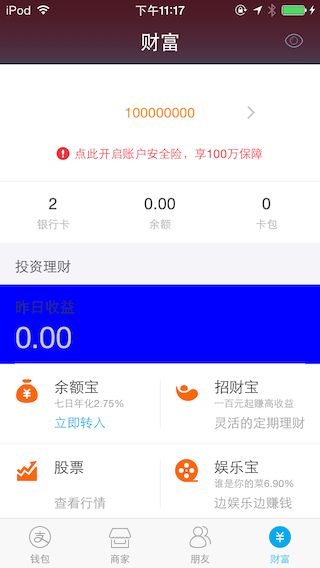
    cy# tableView.backgroundColor = [UIColor redColor]
    #"UIDeviceRGBColorSpace 1 0 0 1"

    [tableView visibleCells]
    @[#"<HeadInfoCell: 0x16160a40; baseClass = UITableViewCell; frame = (0 220; 320 80); autoresize = W; layer = <CALayer: 0x16160e80>>",#"<DoubleInfoCell: 0x1569e800; baseClass = UITableViewCell; frame = (0 300; 320 80); autoresize = W; layer = <CALayer: 0x16486e80>>",#"<DoubleInfoCell: 0x15452e00; baseClass = UITableViewCell; frame = (0 380; 320 80); autoresize = W; layer = <CALayer: 0x16491a50>>"]
    cy# var headCell = new Instance (0x16160a40)
    #"<HeadInfoCell: 0x16160a40; baseClass = UITableViewCell; frame = (0 220; 320 80); autoresize = W; layer = <CALayer: 0x16160e80>>"
    cy# headCell.backgroundColor = [UIColor redColor]
    #"UIDeviceRGBColorSpace 1 0 0 1"
    cy# headCell.contentView.backgroundColor = [UIColor redColor]
    #"UIDeviceRGBColorSpace 1 0 0 1"
我们可以看到,界面上 tableViewCell 的背景颜色变成了红色。
以上操作的思路大致就是, appdelegate => keyWindow => rootViewController => viewControllers => view
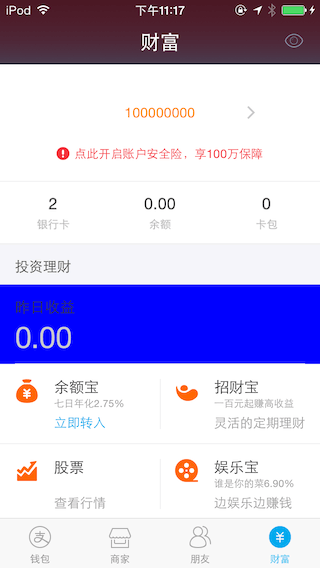
当然你也可以骗骗自己,把余额这个label的text改成巨款,过过眼瘾
    cy# [tableView subviews]
    @[#"<UIRefreshControl: 0x16482c90; frame = (0 0; 320 60); hidden = YES; autoresize = W; layer = <CALayer: 0x16256370>>",#"<UITableViewWrapperView: 0x1624cce0; frame = (0 0; 320 519); gestureRecognizers = <NSArray: 0x16098960>; layer = <CALayer: 0x14e12cf0>; contentOffset: {0, 0}; contentSize: {320, 519}>",#"<UIView: 0x16216d10; frame = (0 780; 320 20); layer = <CALayer: 0x162562c0>>",#"<WHAccountHeaderView: 0x16217c10; frame = (0 0; 320 180); layer = <CALayer: 0x1637edd0>>",#"<UIView: 0x17635b80; frame = (0 180; 320 40); autoresize = W; layer = <CALayer: 0x1620d670>>",#"<UIImageView: 0x161f4740; frame = (0 452.5; 320 2.5); alpha = 0; opaque = NO; autoresize = TM; userInteractionEnabled = NO; layer = <CALayer: 0x161f47c0>>"]
    cy# var header = new Instance(0x16217c10)
    #"<WHAccountHeaderView: 0x16217c10; frame = (0 0; 320 180); layer = <CALayer: 0x1637edd0>>"
    cy# [header subviews]
    @[#"<UIView: 0x161c6530; frame = (0 0; 320 117); layer = <CALayer: 0x1638a780>>",#"<UIView: 0x16142d70; frame = (0 117.5; 106.667 62.5); layer = <CALayer: 0x161f6350>>",#"<UIView: 0x16142de0; frame = (106.667 117.5; 106.667 62.5); layer = <CALayer: 0x16109ed0>>",#"<UIView: 0x1610a4b0; frame = (213.333 117.5; 106.667 62.5); layer = <CALayer: 0x163771b0>>",#"<UILabel: 0x161082c0; frame = (122 28; 76 41); text = '0.00'; userInteractionEnabled = NO; layer = <_UILabelLayer: 0x14f73520>>",#"<UIImageView: 0x1610a520; frame = (246 42; 9 13); opaque = NO; userInteractionEnabled = NO; layer = <CALayer: 0x161025c0>>",#"<UIImageView: 0x161692b0; frame = (56.5 83; 13 13); opaque = NO; userInteractionEnabled = NO; layer = <CALayer: 0x16169330>>",#"<UILabel: 0x16169380; frame = (74.5 83; 189 13); text = '\xe7\x82\xb9\xe6\xad\xa4\xe5\xbc\x80\xe5\x90\xaf\xe8\xb4\xa6\xe6\x88\xb7\xe5\xae\x89\xe5\x85\xa8\xe9\x99\xa9\xef\xbc\x8c\xe4\xba\xab100\xe4\xb8\x87\xe4\xbf\x9d\xe9\x9a\x9c'; userInteractionEnabled = NO; layer = <_UILabelLayer: 0x16169230>>",#"<UILabel: 0x16169570; frame = (36.8333 154.25; 33 12); text = '\xe9\x93\xb6\xe8\xa1\x8c\xe5\x8d\xa1'; userInteractionEnabled = NO; layer = <_UILabelLayer: 0x16169630>>",#"<UILabel: 0x16169810; frame = (48.3333 131.25; 10 17); text = '2'; userInteractionEnabled = NO; layer = <_UILabelLayer: 0x161698d0>>",#"<UIImageView: 0x16169ab0; frame = (42.3333 127.25; 22 22); hidden = YES; opaque = NO; userInteractionEnabled = NO; layer = <CALayer: 0x16169b30>>",#"<UILabel: 0x16381200; frame = (149 154.25; 22 12); text = '\xe4\xbd\x99\xe9\xa2\x9d'; userInteractionEnabled = NO; layer = <_UILabelLayer: 0x16381160>>",#"<UILabel: 0x16380280; frame = (144 131.25; 32 17); text = '0.00'; userInteractionEnabled = NO; layer = <_UILabelLayer: 0x16380340>>",#"<UILabel: 0x16380520; frame = (255.667 154.25; 22 12); text = '\xe5\x8d\xa1\xe5\x8c\x85'; userInteractionEnabled = NO; layer = <_UILabelLayer: 0x163805e0>>",#"<UILabel: 0x1638d640; frame = (261.667 131.25; 10 17); text = '0'; userInteractionEnabled = NO; layer = <_UILabelLayer: 0x1638d700>>",#"<UIView: 0x16151570; frame = (0 117; 320 0.5); layer = <CALayer: 0x161515e0>>",#"<UIView: 0x16151670; frame = (0 179.5; 320 0.5); layer = <CALayer: 0x161516e0>>"]
    cy# var label2= new Instance(0x161082c0)
    #"<UILabel: 0x161082c0; frame = (122 28; 76 41); text = '0.00'; userInteractionEnabled = NO; layer = <_UILabelLayer: 0x14f73520>>"
    cy# label2.text=@"10000000000000"
    @"10000000000000"
很好玩,也很有用的工具,cycript。当然cycript还有一些高级用法,后面会介绍。
